
Assembly Instructions
Page 1
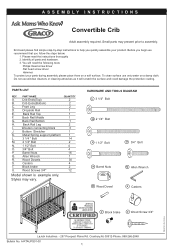
...following tools: Philips Head screw driver Flat head screw driver Hammer. Do not use only water on a soft surface. PARTS LIST REF. Crib Ends(Bottom) 2 C. PART NAME QUANTITY A. Allen Wrench 1 R. Wood Screws 3/4″ 12 Model shown is example only. Bottom Stretcher ... A-RTAUPS01-00 1 Back Rail Leg 2 I. Styles may present prior to help you follow the steps below: 1. ASSEMBLY INSTRUCTIONS Convertible Crib Adult assembly required. Please read the instructions thoroughly 2. You will scratch the surface and could damage the protective coating. Dropside Rail ...
...following tools: Philips Head screw driver Flat head screw driver Hammer. Do not use only water on a soft surface. PARTS LIST REF. Crib Ends(Bottom) 2 C. PART NAME QUANTITY A. Allen Wrench 1 R. Wood Screws 3/4″ 12 Model shown is example only. Bottom Stretcher ... A-RTAUPS01-00 1 Back Rail Leg 2 I. Styles may present prior to help you follow the steps below: 1. ASSEMBLY INSTRUCTIONS Convertible Crib Adult assembly required. Please read the instructions thoroughly 2. You will scratch the surface and could damage the protective coating. Dropside Rail ...

Assembly Instructions
Page 4
... help you do not have internet access, please fax the above information ready to give to have all numbers found on the back of the crib. Procedures to help with your e-mail. 1. PAP01-00 4 Your Name 2. Product Assistance Procedures You have purchased a quality piece of purchase 5. Address 3. Place and date of...
... help you do not have internet access, please fax the above information ready to give to have all numbers found on the back of the crib. Procedures to help with your e-mail. 1. PAP01-00 4 Your Name 2. Product Assistance Procedures You have purchased a quality piece of purchase 5. Address 3. Place and date of...

Assembly Instructions
Page 5
.... ASK YOUR DEALER OR WRITE TO LAJOBI INDUSTRIES, INC, 257 PROSPECT PLAINS ROAD, CRANBURY, NJ 08512. BE SURE SIDE IS IN RAISED AND LOCKED POSITION WHENEVER CHILD IS IN CRIB. • WHEN CHILD IS ABLE TO PULL TO STANDING POSITION, SET MATTRESS TO LOWEST POSITION AND REMOVE BUMPER PADS,... REFINISHING, USE A NON-TOXIC FINISH SPECIFIED FOR CHILDREN'S PRODUCTS. • DO NOT LEAVE CHILD IN CRIB WHEN SIDE IS LOWERED. STRINGS CAUSE STRANGULATION! DO NOT SUBSTITUTE PARTS OF ANY KIND. • AFTER RAISING SIDE, MAKE SURE LATCHES ARE SECURE. • WHEN THE CHILD IS ABLE TO CLIMB OUT OR REACHES THE...
.... ASK YOUR DEALER OR WRITE TO LAJOBI INDUSTRIES, INC, 257 PROSPECT PLAINS ROAD, CRANBURY, NJ 08512. BE SURE SIDE IS IN RAISED AND LOCKED POSITION WHENEVER CHILD IS IN CRIB. • WHEN CHILD IS ABLE TO PULL TO STANDING POSITION, SET MATTRESS TO LOWEST POSITION AND REMOVE BUMPER PADS,... REFINISHING, USE A NON-TOXIC FINISH SPECIFIED FOR CHILDREN'S PRODUCTS. • DO NOT LEAVE CHILD IN CRIB WHEN SIDE IS LOWERED. STRINGS CAUSE STRANGULATION! DO NOT SUBSTITUTE PARTS OF ANY KIND. • AFTER RAISING SIDE, MAKE SURE LATCHES ARE SECURE. • WHEN THE CHILD IS ABLE TO CLIMB OUT OR REACHES THE...
Assembly Instructions
Page 6
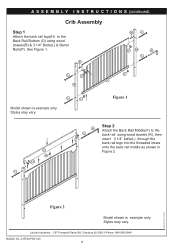
... (G) using wood dowels (R), then insert 3 1/4" bolts(L) ,through the back rail legs into the threaded insets onto the back rail middle as shown in Figure 2. A S S E M B L Y I N S T R U C T I O N S (continued) Crib Assembly Step 1 Attach the back rail legs(H) to the back rail using wood dowels(R) & 3 1/4" Bolts(L) & Barrel Nuts(P). Styles may vary. Cranbury,NJ 08512-Phone: 888...
... (G) using wood dowels (R), then insert 3 1/4" bolts(L) ,through the back rail legs into the threaded insets onto the back rail middle as shown in Figure 2. A S S E M B L Y I N S T R U C T I O N S (continued) Crib Assembly Step 1 Attach the back rail legs(H) to the back rail using wood dowels(R) & 3 1/4" Bolts(L) & Barrel Nuts(P). Styles may vary. Cranbury,NJ 08512-Phone: 888...
Assembly Instructions
Page 8
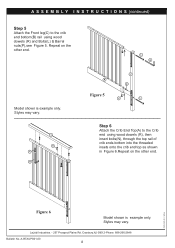
... vary. Repeat on the other end. A-RTAUPS01-00 8 A R N Q B Figure 5 L Q C R P L Step 6 Attach the Crib End Top(A) to the crib end bottom(B) rail using wood dowels (R), then insert bolts(N), through the top rail of crib ends bottom into the threaded insets onto the crib end top as shown in Figure 6.Repeat on the other end. Styles...
... vary. Repeat on the other end. A-RTAUPS01-00 8 A R N Q B Figure 5 L Q C R P L Step 6 Attach the Crib End Top(A) to the crib end bottom(B) rail using wood dowels (R), then insert bolts(N), through the top rail of crib ends bottom into the threaded insets onto the crib end top as shown in Figure 6.Repeat on the other end. Styles...
Assembly Instructions
Page 9
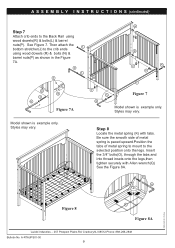
... through the tabs and into thread insets onto the legs,then tighten securely with tabs. Be sure the smooth side of metal spring to mount to the selected position onto the legs. Cranbury,NJ 08512-Phone: 888-266-2848 ... 7A R R N P P J N Figure 7 Model shown is example only. O Q PRINTED IN CHINA Figure 8 K Figure 8A LaJobi Industries. - 257 Prospect Plains Rd. A S S E M B L Y I N S T R U C T I O N S (continued) Step 7 Attach crib ends to the Back Rail using wood dowels (R) & bolts (N) & barrel nuts(P) as shown in the Figure 7A. Then attach the L bottom stretcher(J) to the...
... through the tabs and into thread insets onto the legs,then tighten securely with tabs. Be sure the smooth side of metal spring to mount to the selected position onto the legs. Cranbury,NJ 08512-Phone: 888-266-2848 ... 7A R R N P P J N Figure 7 Model shown is example only. O Q PRINTED IN CHINA Figure 8 K Figure 8A LaJobi Industries. - 257 Prospect Plains Rd. A S S E M B L Y I N S T R U C T I O N S (continued) Step 7 Attach crib ends to the Back Rail using wood dowels (R) & bolts (N) & barrel nuts(P) as shown in the Figure 7A. Then attach the L bottom stretcher(J) to the...
Assembly Instructions
Page 10
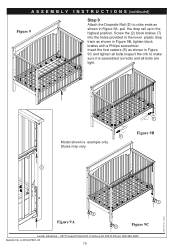
... Plains Rd. A-RTAUPS01-00 10 Styles may vary. A S S E M B L Y I N S T R U C T I O N S (continued) Figure 9 Step 9 Attach the Dropside Rail (D) to cribs ends as shown in Figure 9A, pull the drop rail up to make sure it is example only. Cranbury,NJ 08512-Phone: 888-266-2848 Bulletin No. Screw the (2) block... brakes (T) into the holes provided in the lower plastic drop track as shown in Figure 9B, tighten block brakes with a Philips screwdriver. D D C T Model shown is assembled correctly and all bolts are ...
... Plains Rd. A-RTAUPS01-00 10 Styles may vary. A S S E M B L Y I N S T R U C T I O N S (continued) Figure 9 Step 9 Attach the Dropside Rail (D) to cribs ends as shown in Figure 9A, pull the drop rail up to make sure it is example only. Cranbury,NJ 08512-Phone: 888-266-2848 Bulletin No. Screw the (2) block... brakes (T) into the holes provided in the lower plastic drop track as shown in Figure 9B, tighten block brakes with a Philips screwdriver. D D C T Model shown is assembled correctly and all bolts are ...
Assembly Instructions
Page 11
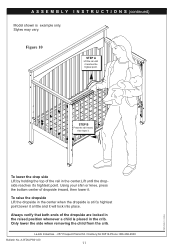
...the dropside are locked in the raised position whenever a child is placed in the center.Lift until it reaches the highest point. To lower the drop side Lift by holding the top of dropside inward, then lower it 's hightest point. A-RTAUPS01-00 11 PRINTED IN CHINA Cranbury,NJ 08512-Phone: ...888-266-2848 Bulletin No. Figure 10 STEP A Lift the rail until the dropside reaches it . Only lower the side when removing the child from the crib. To raise the dropside Lift the dropside in the center when the dropside is example only. LaJobi Industries. - 257 Prospect Plains ...
...the dropside are locked in the raised position whenever a child is placed in the center.Lift until it reaches the highest point. To lower the drop side Lift by holding the top of dropside inward, then lower it 's hightest point. A-RTAUPS01-00 11 PRINTED IN CHINA Cranbury,NJ 08512-Phone: ...888-266-2848 Bulletin No. Figure 10 STEP A Lift the rail until the dropside reaches it . Only lower the side when removing the child from the crib. To raise the dropside Lift the dropside in the center when the dropside is example only. LaJobi Industries. - 257 Prospect Plains ...

Assembly Instructions
Page 12
...8226; The mattress intended for use on the bed shall be greater than 15 months and the maximum weight shall not be a full-size crib mattress having the dimensions of 51 5/8 in. (1310mm) in length and 27 1/4 in. (690mm) in width and thickness of the ...may vary. WARNING! Cranbury,NJ 08512-Phone: 888-266-2848 Bulletin No. A S S E M B L Y I N S T R U C T I O N S (continued) Converting Crib to a Toddler/Day Bed You have the option to convert crib to follow step 9 in . (100mm) or a greaterthickness as specified by the manufacturer. • The minimum age of 4 in reverse order and...
...8226; The mattress intended for use on the bed shall be greater than 15 months and the maximum weight shall not be a full-size crib mattress having the dimensions of 51 5/8 in. (1310mm) in length and 27 1/4 in. (690mm) in width and thickness of the ...may vary. WARNING! Cranbury,NJ 08512-Phone: 888-266-2848 Bulletin No. A S S E M B L Y I N S T R U C T I O N S (continued) Converting Crib to a Toddler/Day Bed You have the option to convert crib to follow step 9 in . (100mm) or a greaterthickness as specified by the manufacturer. • The minimum age of 4 in reverse order and...
Assembly Instructions
Page 13
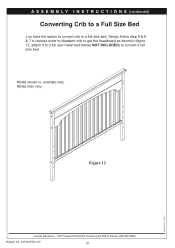
Cranbury,NJ 08512-Phone: 888-266-2848 Bulletin No. A S S E M B L Y I N S T R U C T I O N S (continued) Converting Crib to a Full Size Bed You have the option to convert crib to convert a full size bed Model shown is example only. Figure 12 LaJobi Industries. - 257 Prospect Plains Rd. A-RTAUPS01-00 13 PRINTED IN CHINA Styles may vary. Simply follow step 9 & 8 & 7 in reverse order to disattach crib to get the headboard as shown in figure 12, attach it to a full size metal bed frame( NOT INCLUDED) to a full size bed.
Cranbury,NJ 08512-Phone: 888-266-2848 Bulletin No. A S S E M B L Y I N S T R U C T I O N S (continued) Converting Crib to a Full Size Bed You have the option to convert crib to convert a full size bed Model shown is example only. Figure 12 LaJobi Industries. - 257 Prospect Plains Rd. A-RTAUPS01-00 13 PRINTED IN CHINA Styles may vary. Simply follow step 9 & 8 & 7 in reverse order to disattach crib to get the headboard as shown in figure 12, attach it to a full size metal bed frame( NOT INCLUDED) to a full size bed.


