
Manual
Page 3
GV-RX13P256D-RH Radeon X1300 Pro Graphics Accelerator User's Manual Rev. 101 12MD-RX13P2DR-101R * The WEEE marking on VGA card, this may appear in this document nor ... any from without the expressed, written permission of their respective owners. Trademarks Third-party brands and names are the property of GBT. Copyright © 2005 GIGABYTE TECHNOLOGY CO., LTD Copyright by GIGA-BYTE TECHNOLOGY CO., LTD. ("GBT").
GV-RX13P256D-RH Radeon X1300 Pro Graphics Accelerator User's Manual Rev. 101 12MD-RX13P2DR-101R * The WEEE marking on VGA card, this may appear in this document nor ... any from without the expressed, written permission of their respective owners. Trademarks Third-party brands and names are the property of GBT. Copyright © 2005 GIGABYTE TECHNOLOGY CO., LTD Copyright by GIGA-BYTE TECHNOLOGY CO., LTD. ("GBT").

Manual
Page 4
... 34 5.1.1. Utilities on Driver CD 12 3.1.5. Introduction 3 1.1. Windows® 2000 Driver Installation 32 4. Hardware Installation 4 2.1. Resolutions and Color Depth Table (In Windows® XP 35 GV-RX13P256D-RH Graphics Accelerator - 2 - Software Installation 8 3.1.
... 34 5.1.1. Utilities on Driver CD 12 3.1.5. Introduction 3 1.1. Windows® 2000 Driver Installation 32 4. Hardware Installation 4 2.1. Resolutions and Color Depth Table (In Windows® XP 35 GV-RX13P256D-RH Graphics Accelerator - 2 - Software Installation 8 3.1.
Manual
Page 5
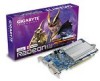
Introduction Features • Powered by ATI Radeon X1300 Pro Visual Processing Unit (VPU) • Supports the newest PCI Express x 16 • Integrated with Pentium® III 650MHz or AMD Athlon 650MHz class processor or higher • One PCI Express x 16 slot • Operating Systems Windows® 2000 / Windows® XP • 64MB system memory • 50MB of available disk space for full installation • CD-ROM or DVD-ROM drive - 3 - Minimum System Requirement • IBM® or 100% PC compatible with 256MB GDDR2 memory • Supports DirectX 9.0C • ...
Introduction Features • Powered by ATI Radeon X1300 Pro Visual Processing Unit (VPU) • Supports the newest PCI Express x 16 • Integrated with Pentium® III 650MHz or AMD Athlon 650MHz class processor or higher • One PCI Express x 16 slot • Operating Systems Windows® 2000 / Windows® XP • 64MB system memory • 50MB of available disk space for full installation • CD-ROM or DVD-ROM drive - 3 - Minimum System Requirement • IBM® or 100% PC compatible with 256MB GDDR2 memory • Supports DirectX 9.0C • ...

Manual
Page 6
Hardware Installation 2.1. Board Layout VGA Monitor Connector (15-pin) TV_Out DVI-I Connector OR Analog LCD Monitor Analog Monitor VGA Output HDTV NTSC / PAL TV Projector Digital LCD Monitor Y Pr Pb/AV Output S-Video Output DVI Output Analog LCD Monitor VGA Output DVI-I Connector English 2. VGA Monitor Connector (15-pin) TV-Out DVI-I to D-Sub Connector GV-RX13P256D-RH Graphics Accelerator - 4 -
Hardware Installation 2.1. Board Layout VGA Monitor Connector (15-pin) TV_Out DVI-I Connector OR Analog LCD Monitor Analog Monitor VGA Output HDTV NTSC / PAL TV Projector Digital LCD Monitor Y Pr Pb/AV Output S-Video Output DVI Output Analog LCD Monitor VGA Output DVI-I Connector English 2. VGA Monitor Connector (15-pin) TV-Out DVI-I to D-Sub Connector GV-RX13P256D-RH Graphics Accelerator - 4 -

Manual
Page 7
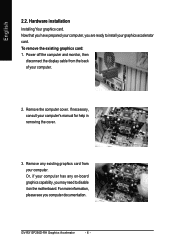
... graphics card. - 5 - Shipping and handling may cause damage to a metal object, such as the antistatic mat. Use none official Gigabyte BIOS might cause problem on the card before handling computer components. DO NOT APPLY POWER TO YOUR SYSTEM IF IT HAS BEEN DAMAGED ON... Hardware Installation English Expansion cards contain very delicate Integrated Circuit (IC) chips. Turn off your graphics card working correctly, please use official Gigabyte BIOS only. The operator should follow some precautions whenever you do not have one, touch both of your hands to a safely grounded object...
... graphics card. - 5 - Shipping and handling may cause damage to a metal object, such as the antistatic mat. Use none official Gigabyte BIOS might cause problem on the card before handling computer components. DO NOT APPLY POWER TO YOUR SYSTEM IF IT HAS BEEN DAMAGED ON... Hardware Installation English Expansion cards contain very delicate Integrated Circuit (IC) chips. Turn off your graphics card working correctly, please use official Gigabyte BIOS only. The operator should follow some precautions whenever you do not have one, touch both of your hands to a safely grounded object...
Manual
Page 8
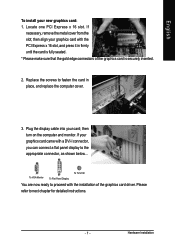
... card from the back of your computer. If necessary, consult your computer, you are ready to disable it on -board graphics capability, you computer documentation. GV-RX13P256D-RH Graphics Accelerator - 6 - Now that you have prepared your computer's manual for help in removing the cover. 3. To remove the existing graphics card: 1. Remove the computer...
... card from the back of your computer. If necessary, consult your computer, you are ready to disable it on -board graphics capability, you computer documentation. GV-RX13P256D-RH Graphics Accelerator - 6 - Now that you have prepared your computer's manual for help in removing the cover. 3. To remove the existing graphics card: 1. Remove the computer...
Manual
Page 9
English To install your card; If necessary, remove the metal cover from the slot; Plug the display cable into your new graphics card: 1. Replace the screws to fasten the card in firmly until the card is securely inserted. 2. then align your graphics card came with the installation of the graphics card is fully seated. * Please make sure that the gold edge connectors of the graphics card driver. To VGA Monitor To Flat Panel Display To TV/VCR You are now ready to proceed with a DVI-I connector, you can connect a flat panel display to next chapter for detailed ...
English To install your card; If necessary, remove the metal cover from the slot; Plug the display cable into your new graphics card: 1. Replace the screws to fasten the card in firmly until the card is securely inserted. 2. then align your graphics card came with the installation of the graphics card is fully seated. * Please make sure that the gold edge connectors of the graphics card driver. To VGA Monitor To Flat Panel Display To TV/VCR You are now ready to proceed with a DVI-I connector, you can connect a flat panel display to next chapter for detailed ...

Manual
Page 10
... graphics card drivers for the motherboard, which consist of Windows® 2000 / Windows® XP drivers is very simple. Or please contact your graphics accelerator.) 3.1. GV-RX13P256D-RH Graphics Accelerator - 8 - Then you can see the AUTORUN window (if it does not show up, run "D:\setup.exe"). English 3. Software Installation In this manual, we...
... graphics card drivers for the motherboard, which consist of Windows® 2000 / Windows® XP drivers is very simple. Or please contact your graphics accelerator.) 3.1. GV-RX13P256D-RH Graphics Accelerator - 8 - Then you can see the AUTORUN window (if it does not show up, run "D:\setup.exe"). English 3. Software Installation In this manual, we...

Manual
Page 11
Click the Install DirectX 9 item. Step 4. Click the Next button. Then the DirectX 9 installation is completed. - 9 - Step 1. Choose I accept the agreement and click the Next button. English 3.1.2. Note: For software MPEG support in Windows® 2000 or Windows® XP, you must install DirectX first. Installing the components. DirectX Installation Install Microsoft DirectX to enable 3D hardware acceleration support for Windows® 2000 or Windows® XP to install DirectX separately. Users who run Windows XP with Service Pack 2 or above do not need to ...
Click the Install DirectX 9 item. Step 4. Click the Next button. Then the DirectX 9 installation is completed. - 9 - Step 1. Choose I accept the agreement and click the Next button. English 3.1.2. Note: For software MPEG support in Windows® 2000 or Windows® XP, you must install DirectX first. Installing the components. DirectX Installation Install Microsoft DirectX to enable 3D hardware acceleration support for Windows® 2000 or Windows® XP to install DirectX separately. Users who run Windows XP with Service Pack 2 or above do not need to ...
Manual
Page 12
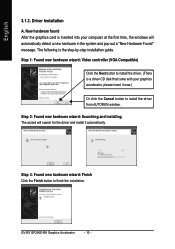
... click the Cancel button to install the driver from AUTORUN window. New hardware found After the graphics card is the step-by-step installation guide. GV-RX13P256D-RH Graphics Accelerator - 10 - English 3.1.3. Step 1: Found new hardware wizard: Video controller (VGA Compatible) Click the Next button to finish the installation...
... click the Cancel button to install the driver from AUTORUN window. New hardware found After the graphics card is the step-by-step installation guide. GV-RX13P256D-RH Graphics Accelerator - 10 - English 3.1.3. Step 1: Found new hardware wizard: Video controller (VGA Compatible) Click the Next button to finish the installation...
Manual
Page 13
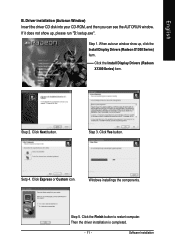
Click the Install Display Drivers (Radeon X1300 Series) item. Click the Finish button to restart computer. If it does not show up , please run "D:\setup.exe". When autorun window show up , click the Install Display Drivers (Radeon X1300 Series) item. Click Next button. Setp 4. English B. Step 2. Step 5. Windows installings the components. Step 1. Then the driver installation is completed. - 11 - Driver installation (Autorun Window) Insert the driver CD disk into your CD-ROM, and then you can see the AUTORUN window. Step 3. Click Yes button. Click ...
Click the Install Display Drivers (Radeon X1300 Series) item. Click the Finish button to restart computer. If it does not show up , please run "D:\setup.exe". When autorun window show up , click the Install Display Drivers (Radeon X1300 Series) item. Click Next button. Setp 4. English B. Step 2. Step 5. Windows installings the components. Step 1. Then the driver installation is completed. - 11 - Driver installation (Autorun Window) Insert the driver CD disk into your CD-ROM, and then you can see the AUTORUN window. Step 3. Click Yes button. Click ...

Manual
Page 14
Click the Next button. Step 3. Click the Finish button to restart computer. Then the V-Tuner2 installation is completed. If it does not show up, please run "D:\setup.exe". Install GIGABYTE Utility (V-Tuner2): Click the GIGABYTE Utility item. GV-RX13P256D-RH Graphics Accelerator - 12 - English 3.1.4. Step 2. Step 4. Utilities on Driver CD Insert the driver CD disk into your name and company. Enter your CD-ROM, and then you can see the AUTORUN window.
Click the Next button. Step 3. Click the Finish button to restart computer. Then the V-Tuner2 installation is completed. If it does not show up, please run "D:\setup.exe". Install GIGABYTE Utility (V-Tuner2): Click the GIGABYTE Utility item. GV-RX13P256D-RH Graphics Accelerator - 12 - English 3.1.4. Step 2. Step 4. Utilities on Driver CD Insert the driver CD disk into your name and company. Enter your CD-ROM, and then you can see the AUTORUN window.
Manual
Page 15
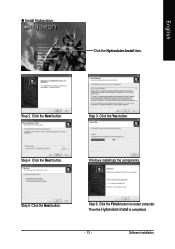
English Install Hydravision : Click the Hydravision Install item. Step 3. Click the Next button. Then the Hydravision Install is completed. - 13 - Click the Next button. Software Installation Click the Yes button. Step 6. Click the Next button. Step 2. Step 4. Windows installings the components. Step 5. Click the Finish button to restart computer.
English Install Hydravision : Click the Hydravision Install item. Step 3. Click the Next button. Then the Hydravision Install is completed. - 13 - Click the Next button. Software Installation Click the Yes button. Step 6. Click the Next button. Step 2. Step 4. Windows installings the components. Step 5. Click the Finish button to restart computer.

Manual
Page 16
English V-Tuner 2 V-Tuner 2 lets you adjust the working frequency of skin GV-RX13P256D-RH Graphics Accelerator - 14 - Displays core clock status Displays memory clock status Adjust core speed Adjust memory speed Opens Help page Select choice of the graphic engine and video memory (Core Clock and Memory Clock).
English V-Tuner 2 V-Tuner 2 lets you adjust the working frequency of skin GV-RX13P256D-RH Graphics Accelerator - 14 - Displays core clock status Displays memory clock status Adjust core speed Adjust memory speed Opens Help page Select choice of the graphic engine and video memory (Core Clock and Memory Clock).
Manual
Page 17
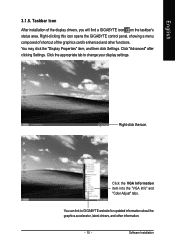
... graphics card's enhanced and other information. - 15 - Right-clicking this icon opens the GIGABYTE control panel, showing a menu composed of shortcut of the display drivers, you will find a GIGABYTE icon on the taskbar's status area. Click "Advanced" after clicking Settings. English 3.1.5. Software... Installation Click the appropriate tab to GIGABYTE website for updated information about the graphics accelerator, latest drivers, and other functions. Click the VGA Information item ...
... graphics card's enhanced and other information. - 15 - Right-clicking this icon opens the GIGABYTE control panel, showing a menu composed of shortcut of the display drivers, you will find a GIGABYTE icon on the taskbar's status area. Click "Advanced" after clicking Settings. English 3.1.5. Software... Installation Click the appropriate tab to GIGABYTE website for updated information about the graphics accelerator, latest drivers, and other functions. Click the VGA Information item ...

Manual
Page 18
English VGA Information VGA Info lists the relevant information about your card. GV-RX13P256D-RH Graphics Accelerator - 16 - Color Adjust Color Adjust allows you to make color adjustments, such as brightness, contrast and gamma values for each or all of RGB colors.
English VGA Information VGA Info lists the relevant information about your card. GV-RX13P256D-RH Graphics Accelerator - 16 - Color Adjust Color Adjust allows you to make color adjustments, such as brightness, contrast and gamma values for each or all of RGB colors.
Manual
Page 19
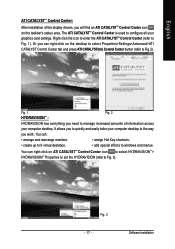
English ATI CATALYSTTM Control Center: After installation of information across your computer desktop. Fig. 1 Fig. 2 HYDRAVISIONTM : HYDRAVISION has everything you need to manage increased amounts of the display drivers, you will find an ATI CATALYSTTM Control Center icon on the taskbar's status area. Or you can right-click on the desktop to select Properties>Settings>Advanced>ATI CATALYST Control Center tab and press ATI CATALYST(tm) Control Center button (refer to the way you to Fig. 3). Fig. 3 - 17 - Software Installation It allows you work. Right-click the icon to ...
English ATI CATALYSTTM Control Center: After installation of information across your computer desktop. Fig. 1 Fig. 2 HYDRAVISIONTM : HYDRAVISION has everything you need to manage increased amounts of the display drivers, you will find an ATI CATALYSTTM Control Center icon on the taskbar's status area. Or you can right-click on the desktop to select Properties>Settings>Advanced>ATI CATALYST Control Center tab and press ATI CATALYST(tm) Control Center button (refer to the way you to Fig. 3). Fig. 3 - 17 - Software Installation It allows you work. Right-click the icon to ...
Manual
Page 20
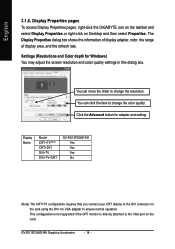
...the CRT monitor is directly attached to change the color quality. GV-RX13P256D-RH Graphics Accelerator - 18 - You can click the item to ensure normal operation. Display Properties pages To access Display Properties pages, right-click the GIGABYTE icon on the taskbar and select Display Properties or right-click ...on the card. Display Matrix Model CRT+TV(Note) CRT+DVI DVI+TV DVI+TV+CRT GV-RX13P256D-RH Yes Yes Yes No (Note) The CRT+TV configuration...
...the CRT monitor is directly attached to change the color quality. GV-RX13P256D-RH Graphics Accelerator - 18 - You can click the item to ensure normal operation. Display Properties pages To access Display Properties pages, right-click the GIGABYTE icon on the taskbar and select Display Properties or right-click ...on the card. Display Matrix Model CRT+TV(Note) CRT+DVI DVI+TV DVI+TV+CRT GV-RX13P256D-RH Yes Yes Yes No (Note) The CRT+TV configuration...

Manual
Page 21
Standard View The Standard view is the default view when CATALYST Control Center is recommended for experienced users. The Advanced view is launched for each page. Hotkeys Properties: The Hotkeys Manager allows you to create shortcut key combinations to display only the features you to quickly perform tasks such as Ctrl, Alt, or Shift, and any letter from the alphabet. - 19 - The left navigation pane. Custom View The Custom view allows you choose in the left navigation pane for the first time. The Custom view is recommended for experienced users who want to ...
Standard View The Standard view is the default view when CATALYST Control Center is recommended for experienced users. The Advanced view is launched for each page. Hotkeys Properties: The Hotkeys Manager allows you to create shortcut key combinations to display only the features you to quickly perform tasks such as Ctrl, Alt, or Shift, and any letter from the alphabet. - 19 - The left navigation pane. Custom View The Custom view allows you choose in the left navigation pane for the first time. The Custom view is recommended for experienced users who want to ...

Manual
Page 22
... a Profile. Restore Factory Defaults ... Preferences Properties: The Preferences page helps to create customized environments for your computer, you need to a specific graphics card. Select a Skin ... GV-RX13P256D-RH Graphics Accelerator - 20 - English Profiles Properties: You can be quickly activated manually, through a Hotkey, or by file association. The CATALYST Control Center Preferences page contains...
... a Profile. Restore Factory Defaults ... Preferences Properties: The Preferences page helps to create customized environments for your computer, you need to a specific graphics card. Select a Skin ... GV-RX13P256D-RH Graphics Accelerator - 20 - English Profiles Properties: You can be quickly activated manually, through a Hotkey, or by file association. The CATALYST Control Center Preferences page contains...