Manual
Page 4
... resulting in DVD playback capability. 1.2. KEY FEATURES n Powered by the ATi RADEON™ 7000 graphics processor and 32 / 64 MB DDR memory; GV-R7032T/GV-R7064T has industry leading, built-in improved 3D performance n Incredible 3D graphics performance with... systems) n Support TV-OUT (S and AV connector) Function GV-R7032T/GV-R7064T Graphics Accelerator - 4 - English 1.INTRODUCTION 1.1. PREFACE GV-R7032T/GV-R7064T deliversenhanced 3D and 2D graphics performance fortoday's demanding applications. GV-R7032T/GV-R7064T features HYPER Z™ technology to 2048x1536 n AGP universal bus...
... resulting in DVD playback capability. 1.2. KEY FEATURES n Powered by the ATi RADEON™ 7000 graphics processor and 32 / 64 MB DDR memory; GV-R7032T/GV-R7064T has industry leading, built-in improved 3D performance n Incredible 3D graphics performance with... systems) n Support TV-OUT (S and AV connector) Function GV-R7032T/GV-R7064T Graphics Accelerator - 4 - English 1.INTRODUCTION 1.1. PREFACE GV-R7032T/GV-R7064T deliversenhanced 3D and 2D graphics performance fortoday's demanding applications. GV-R7032T/GV-R7064T features HYPER Z™ technology to 2048x1536 n AGP universal bus...
Manual
Page 13
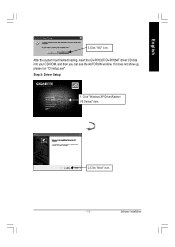
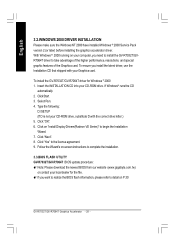
Click "Windows XP Driver(Radeon VE Series)" item. 2.Click "Next" icon. - 13 - Software Installation If it does not show up, please run "D:\setup.exe". Step 5: Driver Setup 1. After the system has finished loading, insert the GV-R7032T/GV-R7064T driver CD disk into your CD-ROM, and then you can see the AUTORUN window. English 3.Click "NO" icon.
Click "Windows XP Driver(Radeon VE Series)" item. 2.Click "Next" icon. - 13 - Software Installation If it does not show up, please run "D:\setup.exe". Step 5: Driver Setup 1. After the system has finished loading, insert the GV-R7032T/GV-R7064T driver CD disk into your CD-ROM, and then you can see the AUTORUN window. English 3.Click "NO" icon.
Manual
Page 19
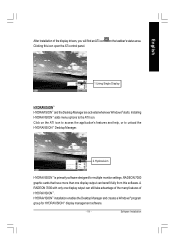
...unload the HYDRAVISION™ Desktop Manager. 2.Hydravision HYDRAVISION™ is primarily software designed for HYDRAVISION™ display management software. - 19 - A RADEON 7000 with only one display output can still take advantage of the many features of the display drivers, you will find anATi icon on the... ATI icon to access the application's features and help, or to the ATI Icon. Software Installation RADEON 7000 graphic cards that have more than one display output can benefit fully from this icon open the ATi control panel. 1.Using ...
...unload the HYDRAVISION™ Desktop Manager. 2.Hydravision HYDRAVISION™ is primarily software designed for HYDRAVISION™ display management software. - 19 - A RADEON 7000 with only one display output can still take advantage of the many features of the display drivers, you will find anATi icon on the... ATI icon to access the application's features and help, or to the ATI Icon. Software Installation RADEON 7000 graphic cards that have more than one display output can benefit fully from this icon open the ATi control panel. 1.Using ...
Manual
Page 28
...Wizard. 7. Follow the Wizard's on "Install Display Drivers(Radeon VE Series)"to complete the installation. 3.3.BIOS FLASH UTILITY GV-R7032T/GV-R7064T BIOS update procedure: MNote: Please download the newest BIOS from our website (www.gigabyte.com.tw) or contact your Graphics card. Type the ... advantage of the higher performance, resolutions, and special graphic features of the Graphics card. With Windows ® 2000 running on P.30 GV-R7032T/GV-R7064T Graphics Accelerator - 28 - If Windows® runs the CD automatically. 2. Select Run. 4. Click "Next". 8. Insert the INSTALLATION...
...Wizard. 7. Follow the Wizard's on "Install Display Drivers(Radeon VE Series)"to complete the installation. 3.3.BIOS FLASH UTILITY GV-R7032T/GV-R7064T BIOS update procedure: MNote: Please download the newest BIOS from our website (www.gigabyte.com.tw) or contact your Graphics card. Type the ... advantage of the higher performance, resolutions, and special graphic features of the Graphics card. With Windows ® 2000 running on P.30 GV-R7032T/GV-R7064T Graphics Accelerator - 28 - If Windows® runs the CD automatically. 2. Select Run. 4. Click "Next". 8. Insert the INSTALLATION...

Manual
Page 31
Appendix English 5.2.Resolutions and Color Depth Table RADEON 7000 2D Display Modes Display Screen Resolution 640x480 800x600 1024x768 Refresh Rate (Hz) 60 72 75 85 90 100 120 160 200 60 70 72 ...
Appendix English 5.2.Resolutions and Color Depth Table RADEON 7000 2D Display Modes Display Screen Resolution 640x480 800x600 1024x768 Refresh Rate (Hz) 60 72 75 85 90 100 120 160 200 60 70 72 ...