Manual
Page 2
... 32 5.1.1. Reflash BIOS in MS-DOS mode 32 5.1.2. Driver installation ...14 3.1.4. Utilities on driver CD ...16 3.1.5. Resolutions and color depth table (In Windows® XP 33 GV-NX66T Series Graphics Accelerator - 2 - Introduction 3 1.1. Appendix 32 5.1. Troubleshooting Tips 31 5. Minimum system requirements 3 2. Hardware Installation 4 2.1. Hardware installation 8 3. Software Installation 11 3.1. Display properties pages 21 3.1.7. nView properties pages 25...
... 32 5.1.1. Reflash BIOS in MS-DOS mode 32 5.1.2. Driver installation ...14 3.1.4. Utilities on driver CD ...16 3.1.5. Resolutions and color depth table (In Windows® XP 33 GV-NX66T Series Graphics Accelerator - 2 - Introduction 3 1.1. Appendix 32 5.1. Troubleshooting Tips 31 5. Minimum system requirements 3 2. Hardware Installation 4 2.1. Hardware installation 8 3. Software Installation 11 3.1. Display properties pages 21 3.1.7. nView properties pages 25...

Manual
Page 3
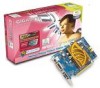
... in an SLI configuration must be with two x16 physical connectors. NX66T128VP-E) • Provides D-Sub (The GV-NX66T256D requires adapter to support this function) and DVI-I connectors 1.2. NX66T128VP/GV-NX66T128VP-E) • Integrated with 128MB DDRIII memory(only for GV-NX66T128VP/GV- Introduction 1.1. GV-NX66T128D) and from the same vendor (i.e. GIGABYTE TECHNOLOGY). - 3 - English 1. Features • Powered by NVIDIA® GeForce™...
... in an SLI configuration must be with two x16 physical connectors. NX66T128VP-E) • Provides D-Sub (The GV-NX66T256D requires adapter to support this function) and DVI-I connectors 1.2. NX66T128VP/GV-NX66T128VP-E) • Integrated with 128MB DDRIII memory(only for GV-NX66T128VP/GV- Introduction 1.1. GV-NX66T128D) and from the same vendor (i.e. GIGABYTE TECHNOLOGY). - 3 - English 1. Features • Powered by NVIDIA® GeForce™...
Manual
Page 4
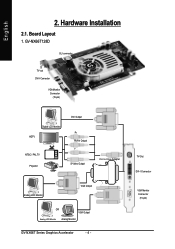
Board Layout 1. TV-Out DVI-I to D-Sub Adapter Analog LCD Monitor VGA Output OR VGA Output Analog LCD Monitor Analog Monitor GV-NX66T Series Graphics Accelerator - 4 - GV-NX66T128D SLI connector TV-out DVI-I Connector VGA Monitor Connector (15-pin) Digital LCD Monitor HDTV NTSC / PAL TV Projector DVI Output Pr Pb/AV Output Y S-Video Output DVI-I Connector VGA Monitor Connector (15-pin) Hardware Installation 2.1. English 2.
Board Layout 1. TV-Out DVI-I to D-Sub Adapter Analog LCD Monitor VGA Output OR VGA Output Analog LCD Monitor Analog Monitor GV-NX66T Series Graphics Accelerator - 4 - GV-NX66T128D SLI connector TV-out DVI-I Connector VGA Monitor Connector (15-pin) Digital LCD Monitor HDTV NTSC / PAL TV Projector DVI Output Pr Pb/AV Output Y S-Video Output DVI-I Connector VGA Monitor Connector (15-pin) Hardware Installation 2.1. English 2.

Manual
Page 7
... electric components, which can be easily damaged by static electricity, so the card should be done on your computer. 1. Use none official Gigabyte BIOS might cause problem on the card before handling computer components. If you work on a grounded anti-static mat. DO NOT APPLY POWER TO...both of your card. Be sure there are separated from static electricity, you should be left in its original packing until it is installed. Shipping and handling may cause damage to ensure your computer and unplug power supply. 2. Turn off your graphics card working correctly, please ...
... electric components, which can be easily damaged by static electricity, so the card should be done on your computer. 1. Use none official Gigabyte BIOS might cause problem on the card before handling computer components. If you work on a grounded anti-static mat. DO NOT APPLY POWER TO...both of your card. Be sure there are separated from static electricity, you should be left in its original packing until it is installed. Shipping and handling may cause damage to ensure your computer and unplug power supply. 2. Turn off your graphics card working correctly, please ...
Manual
Page 8
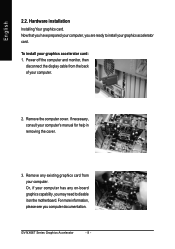
... computer documentation. Remove any existing graphics card from the back of your graphics accelerator card. Remove the computer cover. Or, if your computer. GV-NX66T Series Graphics Accelerator - 8 - To install your computer's manual for help in removing the cover. 3. If necessary, consult your graphics accelerator card: 1. For more information, please see you...
... computer documentation. Remove any existing graphics card from the back of your graphics accelerator card. Remove the computer cover. Or, if your computer. GV-NX66T Series Graphics Accelerator - 8 - To install your computer's manual for help in removing the cover. 3. If necessary, consult your graphics accelerator card: 1. For more information, please see you...

Manual
Page 9
...into your graphics card with the PCI Express x 16 slot, and press it is fully seated. If your graphics card came with the installation of the graphics card driver. English 4. If necessary, remove the metal cover from this slot; then turn on the computer and monitor... now ready to proceed with a DVI-I connector, you can connect a flat panel display to the appropriate connector, as affect the heat dissipation. Hardware Installation then align your card; Warning! Replace the screw to next chapter for detailed instructions. - 9 - Locate the PCI Express x 16 slot. This...
...into your graphics card with the PCI Express x 16 slot, and press it is fully seated. If your graphics card came with the installation of the graphics card driver. English 4. If necessary, remove the metal cover from this slot; then turn on the computer and monitor... now ready to proceed with a DVI-I connector, you can connect a flat panel display to the appropriate connector, as affect the heat dissipation. Hardware Installation then align your card; Warning! Replace the screw to next chapter for detailed instructions. - 9 - Locate the PCI Express x 16 slot. This...

Manual
Page 11
..., we assume that motherboard. Operating system requirement • When loading the graphics card drivers for the system, please make sure you have installed DirectX 9 or later version to your system. • If you can see the AUTORUN window (if it does not show up, ...run "D:\setup.exe"). Then you install the graphics card drivers for the motherboard built on SIS or VIA chipsets, please install the appropriate driver program for motherboard driver. - 11 - Software Installation English 3. Or please contact your graphics accelerator.) 3.1. When you insert...
..., we assume that motherboard. Operating system requirement • When loading the graphics card drivers for the system, please make sure you have installed DirectX 9 or later version to your system. • If you can see the AUTORUN window (if it does not show up, ...run "D:\setup.exe"). Then you install the graphics card drivers for the motherboard built on SIS or VIA chipsets, please install the appropriate driver program for motherboard driver. - 11 - Software Installation English 3. Or please contact your graphics accelerator.) 3.1. When you insert...
Manual
Page 12
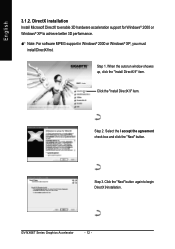
English 3.1.2. Click the "Install DirectX 9" item. GV-NX66T Series Graphics Accelerator - 12 - DirectX installation Install Microsoft DirectX to enable 3D hardware acceleration support for Windows® 2000 or Windows® XP to begin DirectX 9 installation. Step 2. When the autorun window showes up, click the "Install DirectX 9" item. Click the "Next" button again to achieve better 3D performance...
English 3.1.2. Click the "Install DirectX 9" item. GV-NX66T Series Graphics Accelerator - 12 - DirectX installation Install Microsoft DirectX to enable 3D hardware acceleration support for Windows® 2000 or Windows® XP to begin DirectX 9 installation. Step 2. When the autorun window showes up, click the "Install DirectX 9" item. Click the "Next" button again to achieve better 3D performance...

Manual
Page 13
Software Installation Click "Finish" to restart computer. Then the DirectX 9 installation is completed. - 13 - English Installing the components. Step 4.
Software Installation Click "Finish" to restart computer. Then the DirectX 9 installation is completed. - 13 - English Installing the components. Step 4.
Manual
Page 14
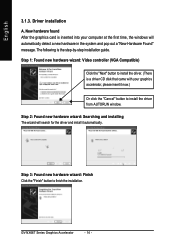
... it automatically. Step 3: Found new hardware wizard: Finish Click the "Finish" button to install the driver from AUTORUN window. GV-NX66T Series Graphics Accelerator - 14 - Step 1: Found new hardware wizard: Video controller (VGA Compatible) Click the "Next" button to install the driver. (There is a driver CD disk that came with your computer at...
... it automatically. Step 3: Found new hardware wizard: Finish Click the "Finish" button to install the driver from AUTORUN window. GV-NX66T Series Graphics Accelerator - 14 - Step 1: Found new hardware wizard: Video controller (VGA Compatible) Click the "Next" button to install the driver. (There is a driver CD disk that came with your computer at...
Manual
Page 15
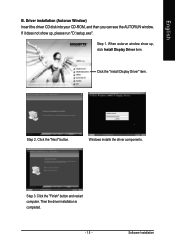
When autorun window show up , click Install Display Driver item. Windows installs the driver components. Then the driver installation is completed. - 15 - Click the "Install Display Driver" item. Click the "Next" button. Software Installation Driver installation (Autorun Window) Insert the driver CD disk into your CD-ROM, and then you can see the AUTORUN window. Click the "Finish" button and restart computer. Step 1. English B. Step 2. Step 3. If it does not show up , please run "D:\setup.exe".
When autorun window show up , click Install Display Driver item. Windows installs the driver components. Then the driver installation is completed. - 15 - Click the "Install Display Driver" item. Click the "Next" button. Software Installation Driver installation (Autorun Window) Insert the driver CD disk into your CD-ROM, and then you can see the AUTORUN window. Click the "Finish" button and restart computer. Step 1. English B. Step 2. Step 3. If it does not show up , please run "D:\setup.exe".

Manual
Page 16
Step 3. Click the "Finish" button and restart computer. Step 2.Click the "GIGABYTE Utility" item. Step 4. Enter your CD-ROM, and then you can see the AUTORUN window. GV-NX66T Series Graphics Accelerator - 16 - Step 5. Then the V-Tuner2 installation is completed. English 3.1.4. Click the "Next" button. Utilities on driver CD Insert the driver CD disk into your name and company. If it does not show up, please run "D:\setup.exe". • Install V-Tuner 2: Step 1.Click the "Utilities" item.
Step 3. Click the "Finish" button and restart computer. Step 2.Click the "GIGABYTE Utility" item. Step 4. Enter your CD-ROM, and then you can see the AUTORUN window. GV-NX66T Series Graphics Accelerator - 16 - Step 5. Then the V-Tuner2 installation is completed. English 3.1.4. Click the "Next" button. Utilities on driver CD Insert the driver CD disk into your name and company. If it does not show up, please run "D:\setup.exe". • Install V-Tuner 2: Step 1.Click the "Utilities" item.
Manual
Page 17
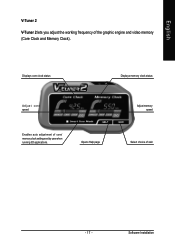
Displays core clock status Displays memory clock status Adjust core speed Enables auto adjustment of skin - 17 - Opens Help page Adjust memory speed Select choice of core/ memory clock settings set by user when running 3D applications. English V-Tuner 2 V-Tuner 2 lets you adjust the working frequency of the graphic engine and video memory (Core Clock and Memory Clock). Software Installation
Displays core clock status Displays memory clock status Adjust core speed Enables auto adjustment of skin - 17 - Opens Help page Adjust memory speed Select choice of core/ memory clock settings set by user when running 3D applications. English V-Tuner 2 V-Tuner 2 lets you adjust the working frequency of the graphic engine and video memory (Core Clock and Memory Clock). Software Installation
Manual
Page 18
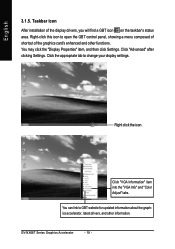
.... Click "Advanced" after clicking Settings. Click "VGA Information" item into the "VGA Info" and "Color Adjust" tabs. GV-NX66T Series Graphics Accelerator - 18 - You can link to change your display settings. Taskbar icon After installation of the graphics card's enhanced and other information. You may click the "Display Properties" item, and then...
.... Click "Advanced" after clicking Settings. Click "VGA Information" item into the "VGA Info" and "Color Adjust" tabs. GV-NX66T Series Graphics Accelerator - 18 - You can link to change your display settings. Taskbar icon After installation of the graphics card's enhanced and other information. You may click the "Display Properties" item, and then...

Manual
Page 19
Color Adjust Color Adjust allows you to make color adjustments, such as brightness, contrast and gamma values for each or all of RGB colors. - 19 - English VGA Information VGA Info lists the relevant information about your card. Software Installation
Color Adjust Color Adjust allows you to make color adjustments, such as brightness, contrast and gamma values for each or all of RGB colors. - 19 - English VGA Information VGA Info lists the relevant information about your card. Software Installation
Manual
Page 20
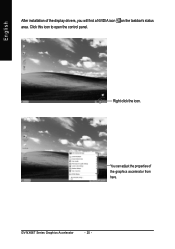
You can adjust the properties of the display drivers, you will find a NVIDIA icon on the taskbar's status area. Click this icon to open the control panel. GV-NX66T Series Graphics Accelerator - 20 - Right click the icon. English After installation of the graphics accelerator from here.
You can adjust the properties of the display drivers, you will find a NVIDIA icon on the taskbar's status area. Click this icon to open the control panel. GV-NX66T Series Graphics Accelerator - 20 - Right click the icon. English After installation of the graphics accelerator from here.

Manual
Page 21
... Properties or right-click on the taskbar and select Nvidia Display to change the resolution. Settings (Resolutions and Color depth for adapter and setting. Software Installation
... Properties or right-click on the taskbar and select Nvidia Display to change the resolution. Settings (Resolutions and Color depth for adapter and setting. Software Installation

Manual
Page 22
...„ To enable SLI mode, select the Enable SLI multi-GPU check box and click Apply after installation of two GVNX66T128D/256D/VP/VP-E graphics cards on an SLI-capable motherboard. GV-NX66T Series Graphics Accelerator - 22 - English nView Display Settings properties * „ nView allows you...single graphics card. • nView modes: select your television and then click "Apply" followed by "Select TV format". Display Model GV-NX66T128D/256D GV-NX66T128VP/VP-E Matrix CRT+TV Yes Yes CRT+DVI Yes Yes DVI+TV Yes Yes "*" This feature will appear in Windows 2000. Options:...
...„ To enable SLI mode, select the Enable SLI multi-GPU check box and click Apply after installation of two GVNX66T128D/256D/VP/VP-E graphics cards on an SLI-capable motherboard. GV-NX66T Series Graphics Accelerator - 22 - English nView Display Settings properties * „ nView allows you...single graphics card. • nView modes: select your television and then click "Apply" followed by "Select TV format". Display Model GV-NX66T128D/256D GV-NX66T128VP/VP-E Matrix CRT+TV Yes Yes CRT+DVI Yes Yes DVI+TV Yes Yes "*" This feature will appear in Windows 2000. Options:...
Manual
Page 23
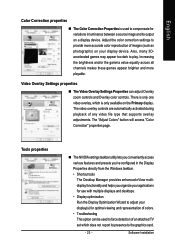
... zoom controls and Overlay color controls. The video overlay controls are automatically activated during playback of any video file type that supports overlay adjustments. Software Installation The "Adjust Colors" button will access "Color Correction" properties page. There is only available on the Primary display. English Color Correction properties „ The Color...
... zoom controls and Overlay color controls. The video overlay controls are automatically activated during playback of any video file type that supports overlay adjustments. Software Installation The "Adjust Colors" button will access "Color Correction" properties page. There is only available on the Primary display. English Color Correction properties „ The Color...
Manual
Page 25
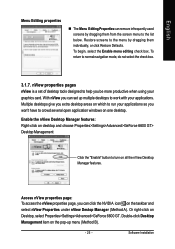
... not select the check box. 3.1.7. To begin, select the Enable menu editing check box. With nView you be more productive when using your applications. Software Installation Or right-click on Desktop, select Properties>Settings>Advanced>GeForce 6600 GT.
... not select the check box. 3.1.7. To begin, select the Enable menu editing check box. With nView you be more productive when using your applications. Software Installation Or right-click on Desktop, select Properties>Settings>Advanced>GeForce 6600 GT.