Manual
Page 1
... booklet. Notice Please do not remove any from without the expressed, written permission of their respective owners. GV-N52128D / GV-N52128T-P GeForce™ FX 5200 Graphics Accelerator User's Manual Rev. 101 12MD-N52128-101 Copyright © 2003 GIGABYTE TECHNOLOGY CO., LTD Copyright by GIGA-BYTE TECHNOLOGY CO., LTD. ("GBT"). Trademarks Third-party brands and...
... booklet. Notice Please do not remove any from without the expressed, written permission of their respective owners. GV-N52128D / GV-N52128T-P GeForce™ FX 5200 Graphics Accelerator User's Manual Rev. 101 12MD-N52128-101 Copyright © 2003 GIGABYTE TECHNOLOGY CO., LTD Copyright by GIGA-BYTE TECHNOLOGY CO., LTD. ("GBT"). Trademarks Third-party brands and...

Manual
Page 2
... the BIOS 30 5.2. Minimum system requirement 3 2. Display properties pages 19 3.1.7. Introduction 3 1.1. Unpacking 4 2.2. Operating system requirement 9 3.1.2. Resolutions and color depth table (In Windows® XP 31 GV-N52128 Series Graphics Accelerator - 2 - English Table of Contents 1. Hardware installation 7 3. DirectX installation ...10 3.1.3. Appendix 30 5.1. BIOS flash utility 28 4. Features ...3 1.2. Taskbar icon ...16 3.1.6. Win®...
... the BIOS 30 5.2. Minimum system requirement 3 2. Display properties pages 19 3.1.7. Introduction 3 1.1. Unpacking 4 2.2. Operating system requirement 9 3.1.2. Resolutions and color depth table (In Windows® XP 31 GV-N52128 Series Graphics Accelerator - 2 - English Table of Contents 1. Hardware installation 7 3. DirectX installation ...10 3.1.3. Appendix 30 5.1. BIOS flash utility 28 4. Features ...3 1.2. Taskbar icon ...16 3.1.6. Win®...
Manual
Page 3
... system requirement • IBM® or 100% PC compatible with 128MB DDR memory • Supports TV-Out and D-Sub connectors • Supports DVI-I connector (For GV-N52128D only) • Supports Direct X 9.0 Spec 1.2. Introduction 1.1.
... system requirement • IBM® or 100% PC compatible with 128MB DDR memory • Supports TV-Out and D-Sub connectors • Supports DVI-I connector (For GV-N52128D only) • Supports Direct X 9.0 Spec 1.2. Introduction 1.1.

Manual
Page 4
... order to D-Sub connector (For GV-N52128D only) Expansion cards contain very delicate Integrated Circuit (IC) chips. Unpacking The GV-N52128 Series package contains the following: The GV-N52128D or GV-N52128T-P graphics accelerator GV-N52128 Series user's manual GV-N52128 Series driver and utility CD Power...with the components whenever the components are no shipping and handling damages on the graphics card. GV-N52128 Series Graphics Accelerator - 4 - Use none official gigabyte BIOS might cause problem on the card before handling computer components. Turn off your graphics card ...
... order to D-Sub connector (For GV-N52128D only) Expansion cards contain very delicate Integrated Circuit (IC) chips. Unpacking The GV-N52128 Series package contains the following: The GV-N52128D or GV-N52128T-P graphics accelerator GV-N52128 Series user's manual GV-N52128 Series driver and utility CD Power...with the components whenever the components are no shipping and handling damages on the graphics card. GV-N52128 Series Graphics Accelerator - 4 - Use none official gigabyte BIOS might cause problem on the card before handling computer components. Turn off your graphics card ...

Manual
Page 5
English 2.2. DVI-I to D-Sub Connector Analog LCD Monitor NTSC / PAL TV Projector VGA Output AV Output S-VideoOutput OR VGA Output Analog LCD Monitor Analog Monitor - 5 - Board layout 1) GV-N52128D DVI-I Connector TV-Out VGA Monitor Connector (15pin) Digital LCD Monitor DVI Output DVI-I Connector TV-out VGA Monitor Connector (15pin) Hardware Installation
English 2.2. DVI-I to D-Sub Connector Analog LCD Monitor NTSC / PAL TV Projector VGA Output AV Output S-VideoOutput OR VGA Output Analog LCD Monitor Analog Monitor - 5 - Board layout 1) GV-N52128D DVI-I Connector TV-Out VGA Monitor Connector (15pin) Digital LCD Monitor DVI Output DVI-I Connector TV-out VGA Monitor Connector (15pin) Hardware Installation

Manual
Page 7
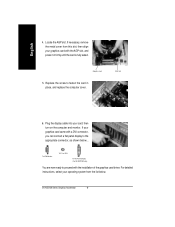
Remove the computer cover. Or, if your computer has any existing graphics card from the back of your computer. Now that you have prepared your graphics accelerator card. Power off the computer and monitor, then disconnect the display cable from your computer. 2. Remove any on the motherboard. Hardware Installation If necessary, consult your graphics accelerator card: 1. To install your computer's manual for help in removing the cover. 3. For more information, see you are ready to disable it on -board graphics capability, you may need to install your computer,...
Remove the computer cover. Or, if your computer has any existing graphics card from the back of your computer. Now that you have prepared your graphics accelerator card. Power off the computer and monitor, then disconnect the display cable from your computer. 2. Remove any on the motherboard. Hardware Installation If necessary, consult your graphics accelerator card: 1. To install your computer's manual for help in removing the cover. 3. For more information, see you are ready to disable it on -board graphics capability, you may need to install your computer,...
Manual
Page 8
...; Locate the AGP slot. If necessary, remove the metal cover from the list below ... AGP slot 6. GV-N52128 Series Graphics Accelerator - 8 - Graphics card 5. To VGA Monitor To TV or VCR To Flat Panel Display (For GV-N52128D only) You are now ready to the appropriate connector, as shown below . English 4. then turn...
...; Locate the AGP slot. If necessary, remove the metal cover from the list below ... AGP slot 6. GV-N52128 Series Graphics Accelerator - 8 - Graphics card 5. To VGA Monitor To TV or VCR To Flat Panel Display (For GV-N52128D only) You are now ready to the appropriate connector, as shown below . English 4. then turn...
Manual
Page 9
Operating system requirement • When loading the graphics card drivers for the system, please make sure your graphics accelerator.) 3.1. Or please contact your CD-ROM drive, you can see the AUTORUN window (if it does not show up, run "D:\setup.exe"). Then you can follow the guides to setup your graphics card driver. (Please follow the subsection 3.1.3 "Driver installation" to be Drive D: The installation of SIS, ALI or VIA chipsets, please install the appropriate driver program for that your CD-ROM Drive letter to install the driver for your system has installed DirectX 8 or ...
Operating system requirement • When loading the graphics card drivers for the system, please make sure your graphics accelerator.) 3.1. Or please contact your CD-ROM drive, you can see the AUTORUN window (if it does not show up, run "D:\setup.exe"). Then you can follow the guides to setup your graphics card driver. (Please follow the subsection 3.1.3 "Driver installation" to be Drive D: The installation of SIS, ALI or VIA chipsets, please install the appropriate driver program for that your CD-ROM Drive letter to install the driver for your system has installed DirectX 8 or ...

Manual
Page 10
... enable 3D hardware acceleration support for Windows® 98/ 98SE / Windows® 2000 / Windows® ME or Windows® XP to achieve better 3D performence. GV-N52128 Series Graphics Accelerator - 10 - English 3.1.2.
... enable 3D hardware acceleration support for Windows® 98/ 98SE / Windows® 2000 / Windows® ME or Windows® XP to achieve better 3D performence. GV-N52128 Series Graphics Accelerator - 10 - English 3.1.2.

Manual
Page 11
Software Installation Click "Finish" to restart computer. Then the DirectX 9 installation is completed. - 11 - Step 4. English Installing the components.
Software Installation Click "Finish" to restart computer. Then the DirectX 9 installation is completed. - 11 - Step 4. English Installing the components.

Manual
Page 12
... computer at the first time, the windows will search for the driver and install it now.) Or click the "Cancel" button to finish the installation. GV-N52128 Series Graphics Accelerator - 12 - The following is the step-by-step installation guide. Step 3: Found new hardware wizard: Finish Click the "Finish" button to...
... computer at the first time, the windows will search for the driver and install it now.) Or click the "Cancel" button to finish the installation. GV-N52128 Series Graphics Accelerator - 12 - The following is the step-by-step installation guide. Step 3: Found new hardware wizard: Finish Click the "Finish" button to...
Manual
Page 13
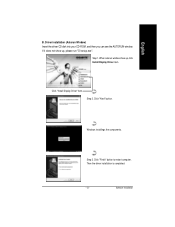
Step 1. Windows installings the components. Click "Finish" button to restart computer. If it does not show up , please run "D:\setup.exe". Step 3. Click "Next" button. Then the driver installation is completed. - 13 - When autorun window show up , click Install Display Driver item. English B. Click "Install Display Driver" item. Software Installation Step 2. Driver installation (Autorun Window) Insert the driver CD disk into your CD-ROM, and then you can see the AUTORUN window.
Step 1. Windows installings the components. Click "Finish" button to restart computer. If it does not show up , please run "D:\setup.exe". Step 3. Click "Next" button. Then the driver installation is completed. - 13 - When autorun window show up , click Install Display Driver item. English B. Click "Install Display Driver" item. Software Installation Step 2. Driver installation (Autorun Window) Insert the driver CD disk into your CD-ROM, and then you can see the AUTORUN window.
Manual
Page 14
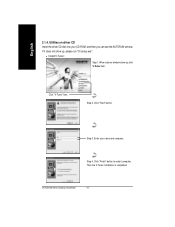
Step 2. Click "Next" button. Enter your CD-ROM, and then you can see the AUTORUN window. Step 4. Utilities on driver CD Insert the driver CD disk into your name and company. Click "V-Tuner" item. GV-N52128 Series Graphics Accelerator - 14 - When autorun window show up , click V-Tuner item. Click "Finish" button to restart computer. If it does not show up , please run "D:\setup.exe". • Install V-Tuner: Step 1. Step 3. Then the V-Tuner installation is completed. English 3.1.4.
Step 2. Click "Next" button. Enter your CD-ROM, and then you can see the AUTORUN window. Step 4. Utilities on driver CD Insert the driver CD disk into your name and company. Click "V-Tuner" item. GV-N52128 Series Graphics Accelerator - 14 - When autorun window show up , click V-Tuner item. Click "Finish" button to restart computer. If it does not show up , please run "D:\setup.exe". • Install V-Tuner: Step 1. Step 3. Then the V-Tuner installation is completed. English 3.1.4.

Manual
Page 15
Display & Adjust Min V-Tuner Core Clock Display Core Clock Close V-Tuner Display Memory Clock Link to the Websit of the graphic engine and video memory (Core Clock and Memory Clock). English V-Tuner (Overclock Utility) V-Tuner lets you adjust the working frequency of Gigabyte Display & Adjust Memory Clock Help Description Close V-Tuner To system Tray - 15 - Software Installation
Display & Adjust Min V-Tuner Core Clock Display Core Clock Close V-Tuner Display Memory Clock Link to the Websit of the graphic engine and video memory (Core Clock and Memory Clock). English V-Tuner (Overclock Utility) V-Tuner lets you adjust the working frequency of Gigabyte Display & Adjust Memory Clock Help Description Close V-Tuner To system Tray - 15 - Software Installation
Manual
Page 16
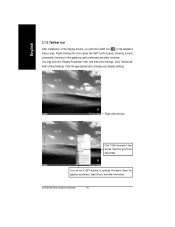
Taskbar icon After installation of the graphics card's enhanced and other information. Click "Advanced" after clickng Settings. GV-N52128 Series Graphics Accelerator - 16 - You can link to change your display settings. English 3.1.5. You may click the "Display Properties" item, and then click Settings. ...
Taskbar icon After installation of the graphics card's enhanced and other information. Click "Advanced" after clickng Settings. GV-N52128 Series Graphics Accelerator - 16 - You can link to change your display settings. English 3.1.5. You may click the "Display Properties" item, and then click Settings. ...

Manual
Page 17
English VGA Information VGA Info lists the relevant information about your card. Software Installation Color Adjust Color Adjust allows you to make color adjustments, such as brightness, contrast and gamma values for each or all of RGB colors. - 17 -
English VGA Information VGA Info lists the relevant information about your card. Software Installation Color Adjust Color Adjust allows you to make color adjustments, such as brightness, contrast and gamma values for each or all of RGB colors. - 17 -

Manual
Page 18
Right click the icon. You can adjust the properties of the display drivers, you will find a NVIDIA icon on the taskbar's status area. English After installation of the graphics accelertaor from here. You can enable the nView function. GV-N52128 Series Graphics Accelerator - 18 - Clicking this icon open the control panel.
Right click the icon. You can adjust the properties of the display drivers, you will find a NVIDIA icon on the taskbar's status area. English After installation of the graphics accelertaor from here. You can enable the nView function. GV-N52128 Series Graphics Accelerator - 18 - Clicking this icon open the control panel.
Manual
Page 19
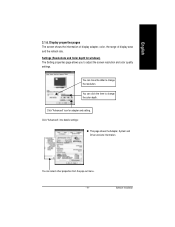
You can click the item to change the resolution. Click "Advanced", into details settings: n This page shows the Adapter, System and Driver versions information. Settings (Resolutions and Color depth for adapter and setting. Display properties pages The screen shows the information of display adapter, color, the range of display area and the refresh rate. You can move the slider to adjust the screen resolution and color quality settings. You can select other properties from the pop-out menu. - 19 - Software Installation Click "Advanced" icon for windows) The Setting ...
You can click the item to change the resolution. Click "Advanced", into details settings: n This page shows the Adapter, System and Driver versions information. Settings (Resolutions and Color depth for adapter and setting. Display properties pages The screen shows the information of display adapter, color, the range of display area and the refresh rate. You can move the slider to adjust the screen resolution and color quality settings. You can select other properties from the pop-out menu. - 19 - Software Installation Click "Advanced" icon for windows) The Setting ...

Manual
Page 20
... display devices mapped to the desired position. English Screen Adjustment properties n Click the icons on the desktop image to adjust the screen to the view. GV-N52128 Series Graphics Accelerator - 20 - It also allows gamma control for your display. • Auto-Detect (Windows determines the proper mode.) • General Timing Formula...
... display devices mapped to the desired position. English Screen Adjustment properties n Click the icons on the desktop image to adjust the screen to the view. GV-N52128 Series Graphics Accelerator - 20 - It also allows gamma control for your display. • Auto-Detect (Windows determines the proper mode.) • General Timing Formula...

Manual
Page 21
Software Installation Direct3D Settings properties n Performance and Compatibility options. • Enable fog table emulation. • Display logo when running Direct3D applications. • Mipmap Detail Level • PCI Texture Memory Size • Custom Direct3D settings - 21 - It will provide excellent 3D image quality. • Antialiasing: Improves image quality by removing jagged edges from 3D images. • Anisotropic Filtering: Use a texture filtering technique that blends multiple texture samples together. English Performance and Quality Settings properties n The ...
Software Installation Direct3D Settings properties n Performance and Compatibility options. • Enable fog table emulation. • Display logo when running Direct3D applications. • Mipmap Detail Level • PCI Texture Memory Size • Custom Direct3D settings - 21 - It will provide excellent 3D image quality. • Antialiasing: Improves image quality by removing jagged edges from 3D images. • Anisotropic Filtering: Use a texture filtering technique that blends multiple texture samples together. English Performance and Quality Settings properties n The ...