Manual
Page 12
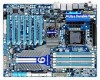
... detection CPU overheating warning CPU fan fail warning CPU fan speed control (Note 4) 2 x 16 Mbit flash Use of physical memory is installed, the actual memory size displayed will depend on the CPU cooler you install them in the PCIEX16_1 and PCIEX16_3 slots. (Note 3) Each PCIEX8 slot shares bandwidth with the corresponding...
... detection CPU overheating warning CPU fan fail warning CPU fan speed control (Note 4) 2 x 16 Mbit flash Use of physical memory is installed, the actual memory size displayed will depend on the CPU cooler you install them in the PCIEX16_1 and PCIEX16_3 slots. (Note 3) Each PCIEX8 slot shares bandwidth with the corresponding...

Manual
Page 43
... Settings [Press Enter] [Press Enter] [Press Enter] [Press Enter] [Press Enter] Item Help Menu Level BIOS Version BCLK CPU Frequency Memory Frequency Total Memory Size CPU Temperature Vcore DRAM Voltage E9 133.27 MHz 3198.64 MHz 1332.71 MHz 1024 MB 45oC 1.280V 1.696V Move Enter: Select F5: Previous...
... Settings [Press Enter] [Press Enter] [Press Enter] [Press Enter] [Press Enter] Item Help Menu Level BIOS Version BCLK CPU Frequency Memory Frequency Total Memory Size CPU Temperature Vcore DRAM Voltage E9 133.27 MHz 3198.64 MHz 1332.71 MHz 1024 MB 45oC 1.280V 1.696V Move Enter: Select F5: Previous...

Manual
Page 52
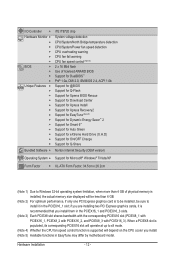
...Enter] [Press Enter] [Press Enter] [Press Enter] Item Help Menu Level BIOS Version BCLK CPU Frequency Memory Frequency Total Memory Size CPU Temperature Vcore DRAM Voltage E9 133.27 MHz 3198.64 MHz 1332.71 MHz 1024 MB 45oC 1.280V 1.696V Move Enter: Select ...F7: Optimized Defaults This section provides information on the BIOS version, CPU base clock, CPU frequency, memory frequency, total memory size , CPU temperature, Chipset temperature, Vcore, and memory voltage. (Note) This item is present only if you install a CPU that supports this...
...Enter] [Press Enter] [Press Enter] [Press Enter] Item Help Menu Level BIOS Version BCLK CPU Frequency Memory Frequency Total Memory Size CPU Temperature Vcore DRAM Voltage E9 133.27 MHz 3198.64 MHz 1332.71 MHz 1024 MB 45oC 1.280V 1.696V Move Enter: Select ...F7: Optimized Defaults This section provides information on the BIOS version, CPU base clock, CPU frequency, memory frequency, total memory size , CPU temperature, Chipset temperature, Vcore, and memory voltage. (Note) This item is present only if you install a CPU that supports this...

Manual
Page 73
actual size requirements vary, depending on the amount of it. For example, a backup file created with SP1 or later, Windows Vista • Xpress Recovery and Xpress Recovery2 ...
actual size requirements vary, depending on the amount of it. For example, a backup file created with SP1 or later, Windows Vista • Xpress Recovery and Xpress Recovery2 ...

Manual
Page 74
... file to start backing up your hard drive data. Step 3: When partitioning your hard drive, make sure to check disk allocation. Accessing Xpress Recovery2 1. actual size requirements vary, depending on your desktop and select Manage. If you wish to check disk allocation. Go to Disk Management to enter Xpress Recovery2 later...
... file to start backing up your hard drive data. Step 3: When partitioning your hard drive, make sure to check disk allocation. Accessing Xpress Recovery2 1. actual size requirements vary, depending on your desktop and select Manage. If you wish to check disk allocation. Go to Disk Management to enter Xpress Recovery2 later...

Manual
Page 77
...A and press . Step 2: The process of Q-Flash, use the key during the POST to Drive Enter : Run hi:Move Total size : 0 ESC:Reset Free size : 0 F10:Power Off 3. ing the BIOS. Insert the floppy disk containing the BIOS file into the floppy disk drive. Select the ...the BIOS When updating the BIOS, choose the location where the BIOS file is displayed on the screen. Q-Flash Utility v2.13 Flash Type/Size MXIC 25L1605/1606 1M Keep0 DfilMe(Is)DfaotuandEnable Floppy A Loa d CMO S Default Enable HDD 1-0 Upda te BIOS from Drive Please SparevsesBaInOySketoy Dtoricvoentinue...
...A and press . Step 2: The process of Q-Flash, use the key during the POST to Drive Enter : Run hi:Move Total size : 0 ESC:Reset Free size : 0 F10:Power Off 3. ing the BIOS. Insert the floppy disk containing the BIOS file into the floppy disk drive. Select the ...the BIOS When updating the BIOS, choose the location where the BIOS file is displayed on the screen. Q-Flash Utility v2.13 Flash Type/Size MXIC 25L1605/1606 1M Keep0 DfilMe(Is)DfaotuandEnable Floppy A Loa d CMO S Default Enable HDD 1-0 Upda te BIOS from Drive Please SparevsesBaInOySketoy Dtoricvoentinue...

Manual
Page 85
... the settings and click Exit to open the Smart Recovery Preference dialog box. If you want to 64 backups (the actual limit depends on the size of changed data files (Note 2) or copy files from a backup: To browse through your backups made at the bottom of these dates. Instructions: In the...
... the settings and click Exit to open the Smart Recovery Preference dialog box. If you want to 64 backups (the actual limit depends on the size of changed data files (Note 2) or copy files from a backup: To browse through your backups made at the bottom of these dates. Instructions: In the...

Manual
Page 93
Physical Disks : Port Drive Model 0 ST3120026AS 1 ST3120026AS Serial # 3JT354CP 3JT329JX Size 111.7GB 111.7GB Type/Status(Vol ID) Non-RAID Disk Non-RAID Disk Press to Non-RAID 4. Create RAID Volume If you press ...Configuration Utility" (Figure 2). Recovery Volume Options RAID Volumes : None defined. [ DISK/VOLUME INFORMATION ] Physical Disks : Port Drive Model 0 ST3120026AS 1 ST3120026AS Serial # 3JT354CP 3JT329JX Size 111.7GB 111.7GB Type/Status(Vol ID) Non-RAID Disk Non-RAID Disk [hi]-Select [ESC]-Exit Figure 3 [ENTER]-Select Menu - 93 -
Physical Disks : Port Drive Model 0 ST3120026AS 1 ST3120026AS Serial # 3JT354CP 3JT329JX Size 111.7GB 111.7GB Type/Status(Vol ID) Non-RAID Disk Non-RAID Disk Press to Non-RAID 4. Create RAID Volume If you press ...Configuration Utility" (Figure 2). Recovery Volume Options RAID Volumes : None defined. [ DISK/VOLUME INFORMATION ] Physical Disks : Port Drive Model 0 ST3120026AS 1 ST3120026AS Serial # 3JT354CP 3JT329JX Size 111.7GB 111.7GB Type/Status(Vol ID) Non-RAID Disk Non-RAID Disk [hi]-Select [ESC]-Exit Figure 3 [ENTER]-Select Menu - 93 -

Manual
Page 94
... stripes the mirror. All Rights Reserved. [ CREATE VOLUME MENU ] Name : Volume0 RAID Level : RAID0(Stripe) Disks : Select Disks Strip Size : 128KB Capacity : 111.7 GB Sync : N/A Create Volume [ HELP ] Choose the RAID level: RAID0: Stripes data (performance). The stripe block...Intel(R) Matrix Storage Manager option ROM v8.9.0.1023 PCH-D wRAID5 Copyright(C) 2003-09 Intel Corporation. RAID1: Mirrors data (redundancy). Set the stripe block size (Figure 5) if necessary. RAID levels supported include RAID 0, RAID 1, Recovery, RAID 10, and RAID 5 (the selections available depend on the ...
... stripes the mirror. All Rights Reserved. [ CREATE VOLUME MENU ] Name : Volume0 RAID Level : RAID0(Stripe) Disks : Select Disks Strip Size : 128KB Capacity : 111.7 GB Sync : N/A Create Volume [ HELP ] Choose the RAID level: RAID0: Stripes data (performance). The stripe block...Intel(R) Matrix Storage Manager option ROM v8.9.0.1023 PCH-D wRAID5 Copyright(C) 2003-09 Intel Corporation. RAID1: Mirrors data (redundancy). Set the stripe block size (Figure 5) if necessary. RAID levels supported include RAID 0, RAID 1, Recovery, RAID 10, and RAID 5 (the selections available depend on the ...

Manual
Page 95
...: ID Name 0 Volume0 [ DISK/VOLUME INFORMATION ] Level RAID0(Stripe) Strip 128KB Size 223.6GB Status Normal Bootable Yes Physical Disks : Port Drive Model 0 ST3120026AS 1 ST3120026AS Serial # 3JT354CP 3JT329JX Size 111.7GB 111.7GB Type/Status(Vol ID) Member Disk(0) Member Disk(0) [hi]-...Reserved. [ MAIN MENU ] 1. All Rights Reserved. [ CREATE VOLUME MENU ] Name : Volume0 RAID Level : RAID0(Stripe) Disks : Select Disks Strip Size : 128 MB Capacity : 111.7 GB Sync : N/A Create Volume WARNING : ALL DATA ON SELECTED DISKS WILL BE LOST. [ HELP ] Are you...
...: ID Name 0 Volume0 [ DISK/VOLUME INFORMATION ] Level RAID0(Stripe) Strip 128KB Size 223.6GB Status Normal Bootable Yes Physical Disks : Port Drive Model 0 ST3120026AS 1 ST3120026AS Serial # 3JT354CP 3JT329JX Size 111.7GB 111.7GB Type/Status(Vol ID) Member Disk(0) Member Disk(0) [hi]-...Reserved. [ MAIN MENU ] 1. All Rights Reserved. [ CREATE VOLUME MENU ] Name : Volume0 RAID Level : RAID0(Stripe) Disks : Select Disks Strip Size : 128 MB Capacity : 111.7 GB Sync : N/A Create Volume WARNING : ALL DATA ON SELECTED DISKS WILL BE LOST. [ HELP ] Are you...

Manual
Page 96
...] 1. Reset Disks to the recovery drive; All Rights Reserved. [ CREATE VOLUME MENU ] Name : Volume0 RAID Level : Recovery Disks : Select Disks Strip Size : N/A Capacity : 0.0 GB Sync : Continuous Create Volume [ HELP ] Choose the RAID level: RAID0: Stripes data (performance). Recovery: Copies data between...Volumes : None defined. [ DISK/VOLUME INFORMATION ] Physical Disks : Port Drive Model 0 ST3120026AS 1 ST3120026AS Serial # 3JT354CP 3JT329JX Size 111.7GB 111.7GB Type/Status(Vol ID) Non-RAID Disk Non-RAID Disk [hi]-Select [ESC]-Exit [ENTER]-Select Menu ...
...] 1. Reset Disks to the recovery drive; All Rights Reserved. [ CREATE VOLUME MENU ] Name : Volume0 RAID Level : Recovery Disks : Select Disks Strip Size : N/A Capacity : 0.0 GB Sync : Continuous Create Volume [ HELP ] Choose the RAID level: RAID0: Stripes data (performance). Recovery: Copies data between...Volumes : None defined. [ DISK/VOLUME INFORMATION ] Physical Disks : Port Drive Model 0 ST3120026AS 1 ST3120026AS Serial # 3JT354CP 3JT329JX Size 111.7GB 111.7GB Type/Status(Vol ID) Non-RAID Disk Non-RAID Disk [hi]-Select [ESC]-Exit [ENTER]-Select Menu ...

Manual
Page 97
...Corporation. Appendix All Rights Reserved. [ CREATE VOLUME MENU ] Name : Volume0 RAID Level : Recovery D[ SisEkLs E: CTSeDleIcStKDSis]ks Strip Size : 128KB Capacity : 223.6 GB Port Drive Model Serial # CreaStiezeVolume M0 ST3120026AS 3JT354CP 111.7GB R1 ST3120026AS 3JT32[ 9HJEXLP ] ...instructions to complete. - 97 - All Rights Reserved. [ CREATE VOLUME MENU ] Name : Volume0 RAID Level : Recovery Disks : Select Disks Strip Size : N/A Capacity : 0.0 GB Sync : Continuous Create Volume [ HELP ] Select a sync option: On Request: volume is updated manually Continuous:...
...Corporation. Appendix All Rights Reserved. [ CREATE VOLUME MENU ] Name : Volume0 RAID Level : Recovery D[ SisEkLs E: CTSeDleIcStKDSis]ks Strip Size : 128KB Capacity : 223.6 GB Port Drive Model Serial # CreaStiezeVolume M0 ST3120026AS 3JT354CP 111.7GB R1 ST3120026AS 3JT32[ 9HJEXLP ] ...instructions to complete. - 97 - All Rights Reserved. [ CREATE VOLUME MENU ] Name : Volume0 RAID Level : Recovery Disks : Select Disks Strip Size : N/A Capacity : 0.0 GB Sync : Continuous Create Volume [ HELP ] Select a sync option: On Request: volume is updated manually Continuous:...

Manual
Page 101
RAID Setup Utility v1.07.06 [ Create New RAID ] Name: Level: Disks: Block: Size: GRAID_ 0-Stripe Select Disk 128 KB 240 GB [ Hard Disk Drive List ] Model Name HDD0: ST3120026AS HDD1: ST3120026AS Available 120 GB 120 GB Type/Status ... RAID Mode: Under the Level item, use up or down arrow key to move onto the next step. [ Create New RAID ] Name: Level: Disks: Block: Size: GRAID 0-Stripe Select Disk 128 KB 240 GB Gigabyte Technology Corp. Gigabyte Technology Corp. Steps: 1. Then press to select RAID 0 (Stripe), RAID 1 (Mirror) or JBOD (Figure 5).
RAID Setup Utility v1.07.06 [ Create New RAID ] Name: Level: Disks: Block: Size: GRAID_ 0-Stripe Select Disk 128 KB 240 GB [ Hard Disk Drive List ] Model Name HDD0: ST3120026AS HDD1: ST3120026AS Available 120 GB 120 GB Type/Status ... RAID Mode: Under the Level item, use up or down arrow key to move onto the next step. [ Create New RAID ] Name: Level: Disks: Block: Size: GRAID 0-Stripe Select Disk 128 KB 240 GB Gigabyte Technology Corp. Gigabyte Technology Corp. Steps: 1. Then press to select RAID 0 (Stripe), RAID 1 (Mirror) or JBOD (Figure 5).

Manual
Page 102
Press . [ Create New RAID ] Name: Level: Disks: Block: Size: GRAID 0-Stripe Select Disk 128 KB 240 GB Gigabyte Technology Corp. RAID Setup Utility v1.07.06 [ Hard Disk Drive List ] Model Name } HDD0: ST3120026AS } HDD1: ST3120026AS Available 120 GB 120 GB Type.../Status Non-RAID Non-RAID Confirm Creation [ RAID Disk Drive List ] [ Help ] Setting Stripe Block Select a stripe size which will be ...
Press . [ Create New RAID ] Name: Level: Disks: Block: Size: GRAID 0-Stripe Select Disk 128 KB 240 GB Gigabyte Technology Corp. RAID Setup Utility v1.07.06 [ Hard Disk Drive List ] Model Name } HDD0: ST3120026AS } HDD1: ST3120026AS Available 120 GB 120 GB Type.../Status Non-RAID Non-RAID Confirm Creation [ RAID Disk Drive List ] [ Help ] Setting Stripe Block Select a stripe size which will be ...

Manual
Page 107
...in the right block of a replacement drive that is smaller than the failed drive when performing a RAID 1 rebuild. Stripe Size: Select the stripe block size. Gigabyte Rounding: Select whether to create this virtual disk? ENTER: Operation F10: Exit/Save ESC: Return Figure 5 - 107 -... Disk HBA 0 : Marvell 0 Virtual Disks Free Physical Disks * PD 0: WDC WD800JD-22L * PD 8: WDC WD800JD-22L RAID Level : Max Size (MB) : Stripe Size : Gigabyte Rounding : Quick Init : VD Name : Disks ID : Next RAID 0 152378 64KB 1G Yes Default 0 8 Help Virtual disk configurations. When prompted...
...in the right block of a replacement drive that is smaller than the failed drive when performing a RAID 1 rebuild. Stripe Size: Select the stripe block size. Gigabyte Rounding: Select whether to create this virtual disk? ENTER: Operation F10: Exit/Save ESC: Return Figure 5 - 107 -... Disk HBA 0 : Marvell 0 Virtual Disks Free Physical Disks * PD 0: WDC WD800JD-22L * PD 8: WDC WD800JD-22L RAID Level : Max Size (MB) : Stripe Size : Gigabyte Rounding : Quick Init : VD Name : Disks ID : Next RAID 0 152378 64KB 1G Yes Default 0 8 Help Virtual disk configurations. When prompted...

Manual
Page 118
... Disks : Port Drive Model [h i]-Previous/NextSerial # [ENTER]-SelectSize 0 ST3120026AS 3JT354CP 111.7GB 1 WDC WD800JD-22LS WD-WMAM9W736333 111.7GB Size 111.7GB T[yEpSeC/S]t-aEtxuist(Vol ID) Member Disk (0) Non-RAID Disk [hi]-Select [ESC]-Exit [ENTER]-Select Menu Step 2: Select the... Recovery Volume Options RAID Volumes : ID Name 0 Volume0 [ DISK/VOLUME INFORMATION ] Level RAID1(Mirror) Strip Size N/A 111.7GB Status Rebuild Bootable Yes Physical Disks : Port Drive Model 0 ST3120026AS 1 WDC WD800JD-22LS Serial # 3JT354CP WD-WMAM9W736333...
... Disks : Port Drive Model [h i]-Previous/NextSerial # [ENTER]-SelectSize 0 ST3120026AS 3JT354CP 111.7GB 1 WDC WD800JD-22LS WD-WMAM9W736333 111.7GB Size 111.7GB T[yEpSeC/S]t-aEtxuist(Vol ID) Member Disk (0) Non-RAID Disk [hi]-Select [ESC]-Exit [ENTER]-Select Menu Step 2: Select the... Recovery Volume Options RAID Volumes : ID Name 0 Volume0 [ DISK/VOLUME INFORMATION ] Level RAID1(Mirror) Strip Size N/A 111.7GB Status Rebuild Bootable Yes Physical Disks : Port Drive Model 0 ST3120026AS 1 WDC WD800JD-22LS Serial # 3JT354CP WD-WMAM9W736333...

Manual
Page 123
...]2L Free Physical Disks [Rebuild] PD 0: WDC WD800JD-22L Information ID : 0 Name : New_VD Status : Degrade Stripe Size : 64K RAID Mode : RAID1 Size : 75776MB BGA Status : N/A Number of PDs : 1 Do you must enter the GSATA RAID Configuration menu in the array... New_VD PD 8: WDC WD800JD-22L Free Physical Disks * PD 0: WDC WD800JD-22L Rebuild ID : 0 Name : New_VD Status : Degrade Stripe Size : 64K RAID Mode : RAID1 Size : 75776MB BGA Status : N/A Number of PDs : 1 Numbers : 8 Help Rebuilding with a new one. Marvell BIOS Setup (c) 2009 Marvell...
...]2L Free Physical Disks [Rebuild] PD 0: WDC WD800JD-22L Information ID : 0 Name : New_VD Status : Degrade Stripe Size : 64K RAID Mode : RAID1 Size : 75776MB BGA Status : N/A Number of PDs : 1 Do you must enter the GSATA RAID Configuration menu in the array... New_VD PD 8: WDC WD800JD-22L Free Physical Disks * PD 0: WDC WD800JD-22L Rebuild ID : 0 Name : New_VD Status : Degrade Stripe Size : 64K RAID Mode : RAID1 Size : 75776MB BGA Status : N/A Number of PDs : 1 Numbers : 8 Help Rebuilding with a new one. Marvell BIOS Setup (c) 2009 Marvell...

Manual
Page 124
...New_VD PD 0: WDC WD800JD-22L PD 8: WDC WD800JD-22L Free Physical Disks Information ID : 0 Name : New_VD Status : Degrade Stripe Size : 64K RAID Mode : RAID1 Size : 75776MB BGA Status : Running BGA Rebuild : 27% Number of PDs : 2 Numbers : 08 Help Virtual Disk: A set ...[DJDel-e2t2eL] PD 8: WDC WD800[RJDes-u2m2Le] Free Physical Disks Information ID : 0 Name : New_VD Status : Degrade Stripe Size : 64K RAID Mode : RAID1 Size : 75776MB BGA Status : Running BGA Rebuild : 20% Number of PDs : 2 Numbers : 08 Help Virtual Disk: A ...
...New_VD PD 0: WDC WD800JD-22L PD 8: WDC WD800JD-22L Free Physical Disks Information ID : 0 Name : New_VD Status : Degrade Stripe Size : 64K RAID Mode : RAID1 Size : 75776MB BGA Status : Running BGA Rebuild : 27% Number of PDs : 2 Numbers : 08 Help Virtual Disk: A set ...[DJDel-e2t2eL] PD 8: WDC WD800[RJDes-u2m2Le] Free Physical Disks Information ID : 0 Name : New_VD Status : Degrade Stripe Size : 64K RAID Mode : RAID1 Size : 75776MB BGA Status : Running BGA Rebuild : 20% Number of PDs : 2 Numbers : 08 Help Virtual Disk: A ...

Manual
Page 136
... & S/W interrupts to E000 & F000 shadow RAM Expand the Xgroup codes locating in physical address 1000:0 DualBIOS init (optional) Initial Superio_Early_Init switch 1. Check validity of DRAM size, type and ECC Expand compressed BIOS code to DRAM Call chipset hook to copy BIOS back to SPURIOUS_soft_HDLR Initial EARLY_PM_INIT switch 1. Auto detect ports for...
... & S/W interrupts to E000 & F000 shadow RAM Expand the Xgroup codes locating in physical address 1000:0 DualBIOS init (optional) Initial Superio_Early_Init switch 1. Check validity of DRAM size, type and ECC Expand compressed BIOS code to DRAM Call chipset hook to copy BIOS back to SPURIOUS_soft_HDLR Initial EARLY_PM_INIT switch 1. Auto detect ports for...
Manual
Page 138
not until this POST stage can users enter the CMOS setup utility Reset keyboard is Early_Reset_KB is not defined Initialize PS/2 Mouse Prepare memory size information for function call: INT 15h ax=E820h Turn on L2 cache Program chipset registers according to enter Setup utility; If errors occur, report errors & ...
not until this POST stage can users enter the CMOS setup utility Reset keyboard is Early_Reset_KB is not defined Initialize PS/2 Mouse Prepare memory size information for function call: INT 15h ax=E820h Turn on L2 cache Program chipset registers according to enter Setup utility; If errors occur, report errors & ...
