Manual
Page 80
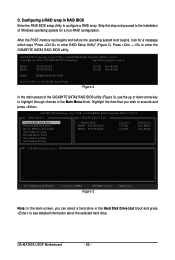
... the item that you can select a hard drive in the Hard Disk Drive List block and press to configure a RAID array. GA-MA790X-UD3P Motherboard - 80 - http://www.gigabyte.com.tw HDD0 : HDD1 : ST3120026AS ST3120026AS 120 GB Non-RAID 120 GB Non-RAID ODD0 : DVDROM GO-D1600B Press to execute...through choices in RAID BIOS Enter the RAID BIOS setup utility to see detailed information about the selected hard drive. GIGABYTE Technology Corp. PCIE-to-SATAII/IDE RAID Controller BIOS v1.06.59 [ Main Menu ] [ Hard Disk Drive List ] Create RAID Disk Drive Delete RAID Disk Drive Revert...
... the item that you can select a hard drive in the Hard Disk Drive List block and press to configure a RAID array. GA-MA790X-UD3P Motherboard - 80 - http://www.gigabyte.com.tw HDD0 : HDD1 : ST3120026AS ST3120026AS 120 GB Non-RAID 120 GB Non-RAID ODD0 : DVDROM GO-D1600B Press to execute...through choices in RAID BIOS Enter the RAID BIOS setup utility to see detailed information about the selected hard drive. GIGABYTE Technology Corp. PCIE-to-SATAII/IDE RAID Controller BIOS v1.06.59 [ Main Menu ] [ Hard Disk Drive List ] Create RAID Disk Drive Delete RAID Disk Drive Revert...

Manual
Page 81
Steps: 1. Select RAID Mode: Under the Level item, use up or down arrow key to -SATAII/IDE RAID Controller BIOS v1.06.59 [ Create New RAID ] [ Hard Disk Drive List ] Name: GRAID Level: 0-Stripe Disks: Select Disk Block: 128 KB Size: 240 GB Model Name ... Select RAID Level RAID 0 RAID 1 JBOD - Data striped for performance Data mirrored for redundancy Data concatenated for creating an array (Figure 5). GIGABYTE Technology Corp. PCIE-to-SATAII/IDE RAID Controller BIOS v1.06.59 [ Create New RAID ] [ Hard Disk Drive List ] Name: GRAID_ Level: 0-Stripe Disks: Select Disk Block: 128 KB ...
Steps: 1. Select RAID Mode: Under the Level item, use up or down arrow key to -SATAII/IDE RAID Controller BIOS v1.06.59 [ Create New RAID ] [ Hard Disk Drive List ] Name: GRAID Level: 0-Stripe Disks: Select Disk Block: 128 KB Size: 240 GB Model Name ... Select RAID Level RAID 0 RAID 1 JBOD - Data striped for performance Data mirrored for redundancy Data concatenated for creating an array (Figure 5). GIGABYTE Technology Corp. PCIE-to-SATAII/IDE RAID Controller BIOS v1.06.59 [ Create New RAID ] [ Hard Disk Drive List ] Name: GRAID_ Level: 0-Stripe Disks: Select Disk Block: 128 KB ...

Manual
Page 82
GIGABYTE Technology Corp. Press . 3. GIGABYTE Technology Corp. Press . PCIE-to the Confirm Creation item. Set Array Size: Under the Size item, enter ... (Figure 7), press to confirm or to 128 KB. The following are configured, the selection bar automatically jumps to -SATAII/IDE RAID Controller BIOS v1.06.59 [ Create New RAID ] [ Hard Disk Drive List ] Name: GRAID Level: 0-Stripe Disks: Select Disk Block: 128 KB Size...LOST WHEN EXIT WITH SAVING []-Switch Unit [DEL,BS]-Delete Number Figure 7 [ENTER]-Next [ESC]-Abort GA-MA790X-UD3P Motherboard - 82 -
GIGABYTE Technology Corp. Press . 3. GIGABYTE Technology Corp. Press . PCIE-to the Confirm Creation item. Set Array Size: Under the Size item, enter ... (Figure 7), press to confirm or to 128 KB. The following are configured, the selection bar automatically jumps to -SATAII/IDE RAID Controller BIOS v1.06.59 [ Create New RAID ] [ Hard Disk Drive List ] Name: GRAID Level: 0-Stripe Disks: Select Disk Block: 128 KB Size...LOST WHEN EXIT WITH SAVING []-Switch Unit [DEL,BS]-Delete Number Figure 7 [ENTER]-Next [ESC]-Abort GA-MA790X-UD3P Motherboard - 82 -

Manual
Page 83
... Normal 240 GB Normal Members(HDDx) 01 [TAB]-Switch Window []-Select RAID [ENTER]-Detail Figure 9 [ESC]-Exit - 83 - GIGABYTE Technology Corp. A small window displaying the array information will be displayed in the center of the screen (Figure 9). Appendix When finished, the new RAID ...array will appear in the RAID Disk Drive List block (Figure 8). PCIE-to-SATAII/IDE RAID Controller BIOS v1.06.59 [ Main Menu ] [ Hard Disk Drive List ] Create RAID Disk Drive Delete RAID Disk Drive Revert HDD to the RAID Disk ...
... Normal 240 GB Normal Members(HDDx) 01 [TAB]-Switch Window []-Select RAID [ENTER]-Detail Figure 9 [ESC]-Exit - 83 - GIGABYTE Technology Corp. A small window displaying the array information will be displayed in the center of the screen (Figure 9). Appendix When finished, the new RAID ...array will appear in the RAID Disk Drive List block (Figure 8). PCIE-to-SATAII/IDE RAID Controller BIOS v1.06.59 [ Main Menu ] [ Hard Disk Drive List ] Create RAID Disk Drive Delete RAID Disk Drive Revert HDD to the RAID Disk ...

Manual
Page 84
... installation of the SATA RAID/AHCI driver and operating system. ARE YOU SURE TO DELETE (Y/N)? 7. PCIE-to-SATAII/IDE RAID Controller BIOS v1.06.78 [ Main Menu ] [ Hard Disk Drive List ] Create RAID Disk Drive Delete RAID Disk Drive Revert HDD to mark the...0-Stripe 240 GB Normal Members(HDDx) 01 []-Select RAID [SPACE]-Mark Delete [DEL]-Confirm Figure 11 GA-MA790X-UD3P Motherboard - 84 - [ESC]-Abort GIGABYTE Technology Corp. GIGABYTE Technology Corp. The selection bar will appear to Non-RAID Solve Mirror Conflict Rebuild Mirror Drive Save And Exit Setup...
... installation of the SATA RAID/AHCI driver and operating system. ARE YOU SURE TO DELETE (Y/N)? 7. PCIE-to-SATAII/IDE RAID Controller BIOS v1.06.78 [ Main Menu ] [ Hard Disk Drive List ] Create RAID Disk Drive Delete RAID Disk Drive Revert HDD to mark the...0-Stripe 240 GB Normal Members(HDDx) 01 []-Select RAID [SPACE]-Mark Delete [DEL]-Confirm Figure 11 GA-MA790X-UD3P Motherboard - 84 - [ESC]-Abort GIGABYTE Technology Corp. GIGABYTE Technology Corp. The selection bar will appear to Non-RAID Solve Mirror Conflict Rebuild Mirror Drive Save And Exit Setup...

Manual
Page 93
... to enter RAID Setup Utility" appears, press + to enter the utility. In the Main Menu block, select Rebuild Mirror Drive and press . GIGABYTE Technology Corp. Rebuilding....35%, please wait.... - 93 - The selection bar will then move to the degraded array. The rebuilding progress is displayed at... status of the screen. Press to perform the rebuild. Use either the GIGABYTE SATA2 RAID BIOS utility or the GIGABYTE RAID CONFIGURER utility in the Hard Disk Drive List block. PCIE-to-SATAII/IDE RAID Controller BIOS v1.06.59 [ Main Menu ] [ Hard Disk Drive List ] Create RAID...
... to enter RAID Setup Utility" appears, press + to enter the utility. In the Main Menu block, select Rebuild Mirror Drive and press . GIGABYTE Technology Corp. Rebuilding....35%, please wait.... - 93 - The selection bar will then move to the degraded array. The rebuilding progress is displayed at... status of the screen. Press to perform the rebuild. Use either the GIGABYTE SATA2 RAID BIOS utility or the GIGABYTE RAID CONFIGURER utility in the Hard Disk Drive List block. PCIE-to-SATAII/IDE RAID Controller BIOS v1.06.59 [ Main Menu ] [ Hard Disk Drive List ] Create RAID...
