Manual
Page 5
...GA-M59SLI-S4. - 5 - Only for GA-M59SLI-S5. Chapter 3 Drivers Installation 61 3-1 Install Chipset Drivers 61 3-2 SoftwareApplications 62 3-3 Driver CD Information 62 3-4 Hardware Information 63 3-5 Contact Us ...63 Chapter 4 Appendix 65 4-1 Unique Software Utilities 65 4-1-1 EasyTune 5 Introduction 65 4-1-2 Xpress Recovery2 Introduction 66 4-1-3 Flash BIOS Method Introduction 68 4-1-4 Configuring SATA Hard Drive(s 79 A. nVIDIA...® nForce 590SLI Southbridge 79 B. Realtek ALC888DD CODEC 104 B. GIGABYTE SATA2 Controller 92 4-1-5 2- / 4- / 6- / 8- ...
...GA-M59SLI-S4. - 5 - Only for GA-M59SLI-S5. Chapter 3 Drivers Installation 61 3-1 Install Chipset Drivers 61 3-2 SoftwareApplications 62 3-3 Driver CD Information 62 3-4 Hardware Information 63 3-5 Contact Us ...63 Chapter 4 Appendix 65 4-1 Unique Software Utilities 65 4-1-1 EasyTune 5 Introduction 65 4-1-2 Xpress Recovery2 Introduction 66 4-1-3 Flash BIOS Method Introduction 68 4-1-4 Configuring SATA Hard Drive(s 79 A. nVIDIA...® nForce 590SLI Southbridge 79 B. Realtek ALC888DD CODEC 104 B. GIGABYTE SATA2 Controller 92 4-1-5 2- / 4- / 6- / 8- ...

Manual
Page 7
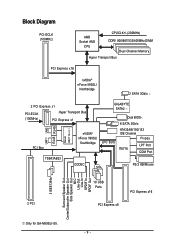
... DDRII3 DDRII4 PWR_FAN CPU_FAN Marvell 88E1116 AUDIO PCIE_1 Marvell 88E1116 nVIDIA® nForce 590SLI Northbridge GA-M59SLI-S5 PCIE_16_1 IDE1 FDD SATAII5 SATAII4 SYS_FAN CODEC PCIE_2 PCIE_8 CD_IN SPDIF_I PCIE_16_2 IT8716 PCI1 PCI2 CI TPM F1_1394 nVIDIA® nForce 590SLI Southbridge SATAII1 SATAII3 TSB43AB23 SATAII0 SATAII2 GIGABYTE SATA2 BAT Backup BIOS CLR_CMOS Main BIOS F2_1394 JSATAII1...
... DDRII3 DDRII4 PWR_FAN CPU_FAN Marvell 88E1116 AUDIO PCIE_1 Marvell 88E1116 nVIDIA® nForce 590SLI Northbridge GA-M59SLI-S5 PCIE_16_1 IDE1 FDD SATAII5 SATAII4 SYS_FAN CODEC PCIE_2 PCIE_8 CD_IN SPDIF_I PCIE_16_2 IT8716 PCI1 PCI2 CI TPM F1_1394 nVIDIA® nForce 590SLI Southbridge SATAII1 SATAII3 TSB43AB23 SATAII0 SATAII2 GIGABYTE SATA2 BAT Backup BIOS CLR_CMOS Main BIOS F2_1394 JSATAII1...

Manual
Page 8
GA-M59SLI-S4 Motherboard Layout KB_MS OPTICAL ATX_12V Socket AM2 R_1394 ATX COMA LPT USB USB IDE1 CPU_FAN DDRII1 DDRII2 DDRII3 DDRII4 PWR_FAN LAN2 F_AUDIO AUDIO PCIE_1 Marvell 88E1116 nVIDIA® nForce 590SLI Northbridge GA-M59SLI-S4 PCIE_16_1 FDD SATAII5 SATAII4 SYS_FAN CODEC PCIE_2 PCIE_8 nVIDIA® nForce 590SLI Southbridge SATAII1 SATAII3 CD_IN SPDIF_I IT8716 PCIE_16_2 SATAII0 SB_FAN SATAII2 PCI1 PCI2 CI TSB43AB23 F1_1394 F2_1394 BAT CLR_CMOS BIOS F_PANEL F_USB3 F_USB2 F_USB1 PCIE_12V PWR_LED - 8 -
GA-M59SLI-S4 Motherboard Layout KB_MS OPTICAL ATX_12V Socket AM2 R_1394 ATX COMA LPT USB USB IDE1 CPU_FAN DDRII1 DDRII2 DDRII3 DDRII4 PWR_FAN LAN2 F_AUDIO AUDIO PCIE_1 Marvell 88E1116 nVIDIA® nForce 590SLI Northbridge GA-M59SLI-S4 PCIE_16_1 FDD SATAII5 SATAII4 SYS_FAN CODEC PCIE_2 PCIE_8 nVIDIA® nForce 590SLI Southbridge SATAII1 SATAII3 CD_IN SPDIF_I IT8716 PCIE_16_2 SATAII0 SB_FAN SATAII2 PCI1 PCI2 CI TSB43AB23 F1_1394 F2_1394 BAT CLR_CMOS BIOS F_PANEL F_USB3 F_USB2 F_USB1 PCIE_12V PWR_LED - 8 -
Manual
Page 9
... AMD Socket AM2 CPU CPUCLK+/-(200MHz) DDRII 800/667/533/400MHz DIMM Dual Channel Memory Hyper Transport Bus PCI Express x16 nVIDIA® nForce 590SLI Northbridge 2 SATA 3Gb/s 2 PCI Express x1 PCI-ECLK (100MHz) Hyper Transport Bus PCI Express x1 ...LAN1 LAN2 RJ45 RJ45 Marvell 88E1116 x 2 PCI Bus TSB43AB23 nVIDIA® nForce 590SLI Southbridge CODEC GIGABYTE SATA2 LPC BUS Dual BIOS 6 SATA 3Gb/s ATA33/66/100/133 IDE Channel Floppy IT8716 LPT Port COM...Speaker Out MIC Line-Out Line-In SPDIF In SPDIF Out Only for GA-M59SLI-S5. - 9 -
... AMD Socket AM2 CPU CPUCLK+/-(200MHz) DDRII 800/667/533/400MHz DIMM Dual Channel Memory Hyper Transport Bus PCI Express x16 nVIDIA® nForce 590SLI Northbridge 2 SATA 3Gb/s 2 PCI Express x1 PCI-ECLK (100MHz) Hyper Transport Bus PCI Express x1 ...LAN1 LAN2 RJ45 RJ45 Marvell 88E1116 x 2 PCI Bus TSB43AB23 nVIDIA® nForce 590SLI Southbridge CODEC GIGABYTE SATA2 LPC BUS Dual BIOS 6 SATA 3Gb/s ATA33/66/100/133 IDE Channel Floppy IT8716 LPT Port COM...Speaker Out MIC Line-Out Line-In SPDIF In SPDIF Out Only for GA-M59SLI-S5. - 9 -
Manual
Page 12
...; Supports SPDIF In / Out connection Š Supports CD In connection Š Onboard T.I. TSB43AB23 chip Š 3 IEEE1394a ports Š nVIDIA® nForce 590SLI Southbridge - 1 FDD connector, allowing connection of 2 FDD device - 1 IDE connectors (IDE1) with UDMA 33/ATA 66...slots Only for Serial ATA Š GIGABYTE SATA2 Controller - 2 SATA 3Gb/s connectors (JSATAII0, JSATAII1), allowing connection of 6 SATA 3Gb/s devices - Supports data striping (RAID 0), mirroring (RAID 1), striping+mirroring (RAID 0+1), RAID 5 and JBOD for GA-M59SLI-S5. GA-M59SLI-S5/GA-M59SLI-S4 Motherboard - 12 -
...; Supports SPDIF In / Out connection Š Supports CD In connection Š Onboard T.I. TSB43AB23 chip Š 3 IEEE1394a ports Š nVIDIA® nForce 590SLI Southbridge - 1 FDD connector, allowing connection of 2 FDD device - 1 IDE connectors (IDE1) with UDMA 33/ATA 66...slots Only for Serial ATA Š GIGABYTE SATA2 Controller - 2 SATA 3Gb/s connectors (JSATAII0, JSATAII1), allowing connection of 6 SATA 3Gb/s devices - Supports data striping (RAID 0), mirroring (RAID 1), striping+mirroring (RAID 0+1), RAID 5 and JBOD for GA-M59SLI-S5. GA-M59SLI-S5/GA-M59SLI-S4 Motherboard - 12 -

Manual
Page 20
... cards to your overall system configurations. GA-M59SLI-S5/GA-M59SLI-S4 Motherboard - 20 - Before you begin-The exact power requirements will depend on the GAM59SLI-S5/GA-M59SLI-S4 motherboard. English 1-6 Setup of SLI (Scalable Link Interface) Configuration nVIDIA® nForce 590SLI offers blistering graphics ... features hardware and software innovations within NVIDIA GPU (graphics processing unit) and the nVIDIA® nForce 590SLI chipset. The SLI design takes advantage of the increased bandwidth of identical brand and chips. For example: GIGABYTE GV-NX76T256D-RH). If you wish ...
... cards to your overall system configurations. GA-M59SLI-S5/GA-M59SLI-S4 Motherboard - 20 - Before you begin-The exact power requirements will depend on the GAM59SLI-S5/GA-M59SLI-S4 motherboard. English 1-6 Setup of SLI (Scalable Link Interface) Configuration nVIDIA® nForce 590SLI offers blistering graphics ... features hardware and software innovations within NVIDIA GPU (graphics processing unit) and the nVIDIA® nForce 590SLI chipset. The SLI design takes advantage of the increased bandwidth of identical brand and chips. For example: GIGABYTE GV-NX76T256D-RH). If you wish ...
Manual
Page 22
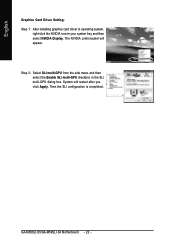
The NVIDIA control panel will restart after you click Apply. GA-M59SLI-S5/GA-M59SLI-S4 Motherboard - 22 - Then the SLI configuration is completed. Step 2: Select SLI multi-GPU from the side menu and then select the Enable SLI multi-GPU checkbox in your system tray and then select NVIDIA Display. System will appear. English Graphics Card Driver Setting: Step 1: After installing graphics card driver in operating system, right-click the NVIDIA icon in the SLI multi-GPU dialog box.
The NVIDIA control panel will restart after you click Apply. GA-M59SLI-S5/GA-M59SLI-S4 Motherboard - 22 - Then the SLI configuration is completed. Step 2: Select SLI multi-GPU from the side menu and then select the Enable SLI multi-GPU checkbox in your system tray and then select NVIDIA Display. System will appear. English Graphics Card Driver Setting: Step 1: After installing graphics card driver in operating system, right-click the NVIDIA icon in the SLI multi-GPU dialog box.
Manual
Page 29
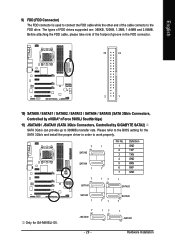
... for GA-M59SLI-S5. 7 JSATAII0 17 1 JSATAII1 - 29 - Please refer to the BIOS setting for the SATA 3Gb/s and install the proper driver in the FDD connector. 34 33 2 1 10) SATAII0 / SATAII1 / SATAII2 / SATAII3 / SATAII4 / SATAII5 (SATA 3Gb/s Connectors, Controlled by nVIDIA® nForce 590SLI Southbridge) 11) JSATAII0 / JSATAII1 (SATA 3Gb/s Connectors, Controlled by GIGABYTE...
... for GA-M59SLI-S5. 7 JSATAII0 17 1 JSATAII1 - 29 - Please refer to the BIOS setting for the SATA 3Gb/s and install the proper driver in the FDD connector. 34 33 2 1 10) SATAII0 / SATAII1 / SATAII2 / SATAII3 / SATAII4 / SATAII5 (SATA 3Gb/s Connectors, Controlled by nVIDIA® nForce 590SLI Southbridge) 11) JSATAII0 / JSATAII1 (SATA 3Gb/s Connectors, Controlled by GIGABYTE...
Manual
Page 67
... Screen of the data to Xpress Recovery. 2. Not compatible to be allocated in advance. (A minimum 4GB is recommended but the actual space is dependent on Nvidia chipsets, BIOS update is no backup file.) 4. Capable of the hard disk, so free space available on the hard disk for Xpress Recovery2 to your...
... Screen of the data to Xpress Recovery. 2. Not compatible to be allocated in advance. (A minimum 4GB is recommended but the actual space is dependent on Nvidia chipsets, BIOS update is no backup file.) 4. Capable of the hard disk, so free space available on the hard disk for Xpress Recovery2 to your...
Manual
Page 79
... drive. A. If there are more than one hard drive. (b) An empty formatted floppy disk. (c) Windows XP/2000 setup disk. (d) Driver CD for the connector. Appendix nVIDIA® nForce 590SLI Southbridge (1) Installing SATA hard drive(s) in RAID BIOS. (4) Make a floppy disk containing the SATA controller driver. (5) Install the SATA controller driver during...
... drive. A. If there are more than one hard drive. (b) An empty formatted floppy disk. (c) Windows XP/2000 setup disk. (d) Driver CD for the connector. Appendix nVIDIA® nForce 590SLI Southbridge (1) Installing SATA hard drive(s) in RAID BIOS. (4) Make a floppy disk containing the SATA controller driver. (5) Install the SATA controller driver during...

Manual
Page 82
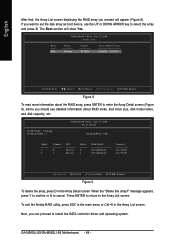
... Disk Model [ ] Add Capacity [ ] Del [ESC] Quit [F6] Back [F7] Finish [TAB] Navigate [ ] Select [ENTER] Popup Figure 5 GA-M59SLI-S5/GA-M59SLI-S4 Motherboard - 82 - Detecting array ... The KB is an example of Striping Block size. Step 1: After the POST memory test begins and before the operating... striping block size. Step 3: In the RAID Mode field, use the UP or DOWN ARROW key to Section 4 if you enter the NVIDIA RAID setup utility. (Figure 5). RAID Mode: Striping MediaShield Utility Mar 22 2006 - You can manually set the Striping Block size. Press...
... Disk Model [ ] Add Capacity [ ] Del [ESC] Quit [F6] Back [F7] Finish [TAB] Navigate [ ] Select [ENTER] Popup Figure 5 GA-M59SLI-S5/GA-M59SLI-S4 Motherboard - 82 - Detecting array ... The KB is an example of Striping Block size. Step 1: After the POST memory test begins and before the operating... striping block size. Step 3: In the RAID Mode field, use the UP or DOWN ARROW key to Section 4 if you enter the NVIDIA RAID setup utility. (Figure 5). RAID Mode: Striping MediaShield Utility Mar 22 2006 - You can manually set the Striping Block size. Press...
Manual
Page 84
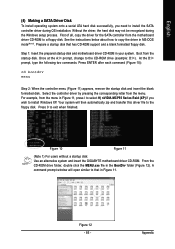
Boot BBS MediaShield Utility Mar 22 2006 - Array List - Status Healthy Vendor NVIDIA Array Model Name STRIPE 223.57G [Ctrl-X] Exit [ ] Select [B] Set Boot [N] New Array [ENTER] Detail Figure ... Delete [C] Clear Disk [ENTER] Return Figure 9 To delete the array, press D in the Array List screen. To exit the Nvidia RAID utility, press ESC in the main menu or Ctrl+X in the Array Detail screen. Press ENTER to return to cancel. The ...select the array and press B. If you created will show Yes. When the "Delete this array?" GA-M59SLI-S5/GA-M59SLI-S4 Motherboard - 84 -
Boot BBS MediaShield Utility Mar 22 2006 - Array List - Status Healthy Vendor NVIDIA Array Model Name STRIPE 223.57G [Ctrl-X] Exit [ ] Select [B] Set Boot [N] New Array [ENTER] Detail Figure ... Delete [C] Clear Disk [ENTER] Return Figure 9 To delete the array, press D in the Array List screen. To exit the Nvidia RAID utility, press ESC in the main menu or Ctrl+X in the Array Detail screen. Press ENTER to return to cancel. The ...select the array and press B. If you created will show Yes. When the "Delete this array?" GA-M59SLI-S5/GA-M59SLI-S4 Motherboard - 84 -
Manual
Page 85
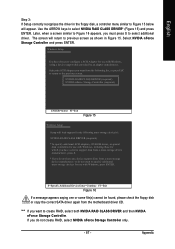
Boot from the menu in Figure 11, press I to select H) nVIDIA MCP55 Series Raid (XP) if you need to install the SATA controller driver during the Windows setup process. At the D:\> prompt, type the following two ... how to copy the driver in Figure 11. Figure 10 Figure 11 (Note 1) For users without a startup disk: Use an alternative system and insert the GIGABYTE motherboard driver CD-ROM.
Boot from the menu in Figure 11, press I to select H) nVIDIA MCP55 Series Raid (XP) if you need to install the SATA controller driver during the Windows setup process. At the D:\> prompt, type the following two ... how to copy the driver in Figure 11. Figure 10 Figure 11 (Note 1) For users without a startup disk: Use an alternative system and insert the GIGABYTE motherboard driver CD-ROM.
Manual
Page 87
... some file(s) cannot be found, please check the floppy disk or copy the correct SATA driver again from the following mass storage device(s): NVIDIA RAID CLASS DRIVER (required) * To specify additional SCSI adapters, CD-ROM drives, or special disk controllers for use with Windows, including ... support disks from a mass storage device manufacturer, press S. * If you must press S to select additional driver. Use the ARROW keys to select NVIDIA RAID CLASS DRIVER* (Figure 15) and press ENTER. The screen will appear. English Step 3: If Setup correctly recognizes the driver in the floppy disk...
... some file(s) cannot be found, please check the floppy disk or copy the correct SATA driver again from the following mass storage device(s): NVIDIA RAID CLASS DRIVER (required) * To specify additional SCSI adapters, CD-ROM drives, or special disk controllers for use with Windows, including ... support disks from a mass storage device manufacturer, press S. * If you must press S to select additional driver. Use the ARROW keys to select NVIDIA RAID CLASS DRIVER* (Figure 15) and press ENTER. The screen will appear. English Step 3: If Setup correctly recognizes the driver in the floppy disk...
Manual
Page 88
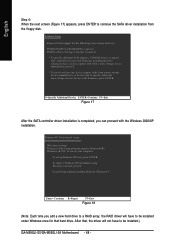
...not have to be installed under Windows once for that , the driver will load support for the following mass storage device(s): NVIDIA RAID CLASS DRIVER (required) NVIDIA nForce Storage Controller (required) * To specify additional SCSI adapters, CD-ROM drives, or special disk controllers for use with ... F3=Exit Figure 18 (Note: Each time you add a new hard drive to a RAID array, the RAID driver will have to be installed.) GA-M59SLI-S5/GA-M59SLI-S4 Motherboard - 88 - English Step 4: When the next screen (Figure 17) appears, press ENTER to continue the SATA driver installation from a mass...
...not have to be installed under Windows once for that , the driver will load support for the following mass storage device(s): NVIDIA RAID CLASS DRIVER (required) NVIDIA nForce Storage Controller (required) * To specify additional SCSI adapters, CD-ROM drives, or special disk controllers for use with ... F3=Exit Figure 18 (Note: Each time you add a new hard drive to a RAID array, the RAID driver will have to be installed.) GA-M59SLI-S5/GA-M59SLI-S4 Motherboard - 88 - English Step 4: When the next screen (Figure 17) appears, press ENTER to continue the SATA driver installation from a mass...

Manual
Page 90
... system restarts, press F10 to Clear Disk Data (Figure 22), press N. When prompted to enter the NVIDIA RAID setup utility. Restart the computer to the Free Disks section with the TAB key. Move to boot...] Finish [TAB] Navigate [ ] Select [ENTER] Popup Figure 21 Step 4: After all the settings, press F7 to exit the NVIDIA RAID BIOS. Then press CTRL+X to complete the configuration. Select the desired disk and use the RIGHT ARROW key to add it to...79G [ ] Del [ESC] Quit [F6] Back [F7] Finish [TAB] Navigate [ ] Select [ENTER] Popup Figure 22 GA-M59SLI-S5/GA-M59SLI-S4 Motherboard - 90 -
... system restarts, press F10 to Clear Disk Data (Figure 22), press N. When prompted to enter the NVIDIA RAID setup utility. Restart the computer to the Free Disks section with the TAB key. Move to boot...] Finish [TAB] Navigate [ ] Select [ENTER] Popup Figure 21 Step 4: After all the settings, press F7 to exit the NVIDIA RAID BIOS. Then press CTRL+X to complete the configuration. Select the desired disk and use the RIGHT ARROW key to add it to...79G [ ] Del [ESC] Quit [F6] Back [F7] Finish [TAB] Navigate [ ] Select [ENTER] Popup Figure 22 GA-M59SLI-S5/GA-M59SLI-S4 Motherboard - 90 -
Manual
Page 91
... System Tasks and select Next following website: http://www.microsoft.com/windows2000/downloads/servicepacks/sp4/HFdeploy.htm Note: If users choose not to START> Programs>Nvidia Corporation and select NVRAID manager. To create the combination installation CD, refer to the following the instructions. Go to install Windows 2000 Service Pack 3 or...
... System Tasks and select Next following website: http://www.microsoft.com/windows2000/downloads/servicepacks/sp4/HFdeploy.htm Note: If users choose not to START> Programs>Nvidia Corporation and select NVRAID manager. To create the combination installation CD, refer to the following the instructions. Go to install Windows 2000 Service Pack 3 or...


