
User Manual
Page 27
... Menu and Option Page Setup Menu Item Help Restore the previous CMOS value from the Internet. Exit current page and return to a new BIOS, either GIGABYTE's Q-Flash or @BIOS utility can enter the BIOS setup screen by pressing "Ctrl + F1". The CMOS SETUP saves the configuration in the event that describes...
... Menu and Option Page Setup Menu Item Help Restore the previous CMOS value from the Internet. Exit current page and return to a new BIOS, either GIGABYTE's Q-Flash or @BIOS utility can enter the BIOS setup screen by pressing "Ctrl + F1". The CMOS SETUP saves the configuration in the event that describes...
User Manual
Page 30
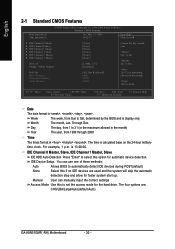
...hard drive. Week The week, from 1 to 2098 KLJI: Move Enter: Select +/-/PU/PD: Value F5: Previous Values F10: Save ESC: Exit F7: Optimized Defaults F1: General Help Date The date format is display only Month The month, Jan. The four options are used and the system will.... Jan. Through Dec. You can manually input the correct settings Access Mode Use this if no IDE devices are : CHS/LBA/Large/Auto(default:Auto) GA-K8N51GMF(-RH) Motherboard - 30 - IDE Channel 0 Master, Slave, IDE Channel 1 Master, Slave IDE HDD Auto-Detection Press "Enter" to set the access ...
...hard drive. Week The week, from 1 to 2098 KLJI: Move Enter: Select +/-/PU/PD: Value F5: Previous Values F10: Save ESC: Exit F7: Optimized Defaults F1: General Help Date The date format is display only Month The month, Jan. The four options are used and the system will.... Jan. Through Dec. You can manually input the correct settings Access Mode Use this if no IDE devices are : CHS/LBA/Large/Auto(default:Auto) GA-K8N51GMF(-RH) Motherboard - 30 - IDE Channel 0 Master, Slave, IDE Channel 1 Master, Slave IDE HDD Auto-Detection Press "Enter" to set the access ...

User Manual
Page 33
... PEG] Item Help Menu Level` Select Hard Disk Boot Device Priority KLJI: Move Enter: Select +/-/PU/PD: Value F5: Previous Values F10: Save ESC: Exit F7: Optimized Defaults F1: General Help Hard Disk Boot Priority Select boot sequence for the type of floppy disk drive by track number. LS120 Select your...
... PEG] Item Help Menu Level` Select Hard Disk Boot Device Priority KLJI: Move Enter: Select +/-/PU/PD: Value F5: Previous Values F10: Save ESC: Exit F7: Optimized Defaults F1: General Help Hard Disk Boot Priority Select boot sequence for the type of floppy disk drive by track number. LS120 Select your...

User Manual
Page 35
...378/IRQ7] [SPP] Item Help Menu Level` KLJI: Move Enter: Select +/-/PU/PD: Value F5: Previous Values F10: Save ESC: Exit F7: Optimized Defaults F1: General Help SATAII RAID Config CMOS Setup Utility-Copyright (C) 1984-2005 Award Software SATAII RAID Config SATA-II RAID function x ...KLJI: Move Enter: Select F5: Previous Values +/-/PU/PD: Value F10: Save F6: Fail-Safe Defaults ESC: Exit F1: General Help F7: Optimized Defaults SATA-II RAID function Enabled Enable SATAII RAID function. Disabled Disable this function. (Default value) SATA-II 1 Secondary RAID Enabled ...
...378/IRQ7] [SPP] Item Help Menu Level` KLJI: Move Enter: Select +/-/PU/PD: Value F5: Previous Values F10: Save ESC: Exit F7: Optimized Defaults F1: General Help SATAII RAID Config CMOS Setup Utility-Copyright (C) 1984-2005 Award Software SATAII RAID Config SATA-II RAID function x ...KLJI: Move Enter: Select F5: Previous Values +/-/PU/PD: Value F10: Save F6: Fail-Safe Defaults ESC: Exit F1: General Help F7: Optimized Defaults SATA-II RAID function Enabled Enable SATAII RAID function. Disabled Disable this function. (Default value) SATA-II 1 Secondary RAID Enabled ...
User Manual
Page 38
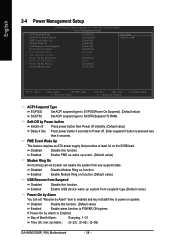
...Disabled] Everyday 0 : 0 : 0 [Disabled] Enter [Disabled] [Soft-Off] Item Help Menu Level` KLJI: Move Enter: Select +/-/PU/PD: Value F5: Previous Values F10: Save ESC: Exit F7: Optimized Defaults F1: General Help ACPI Suspend Type S1(POS) Set ACPI suspend type to S1/POS(Power On Suspend). (Default value) S3(STR) Set...An incoming call via modem can set "Resume by Alarm x Day of Month Alarm : Everyday, 1~31 Time (hh: mm: ss) Alarm : (0~23) : (0~59) : (0~59) GA-K8N51GMF(-RH) Motherboard - 38 - Enter suspend if button is Enabled. Disabled Disable Modem Ring on the 5VSB lead.
...Disabled] Everyday 0 : 0 : 0 [Disabled] Enter [Disabled] [Soft-Off] Item Help Menu Level` KLJI: Move Enter: Select +/-/PU/PD: Value F5: Previous Values F10: Save ESC: Exit F7: Optimized Defaults F1: General Help ACPI Suspend Type S1(POS) Set ACPI suspend type to S1/POS(Power On Suspend). (Default value) S3(STR) Set...An incoming call via modem can set "Resume by Alarm x Day of Month Alarm : Everyday, 1~31 Time (hh: mm: ss) Alarm : (0~23) : (0~59) : (0~59) GA-K8N51GMF(-RH) Motherboard - 38 - Enter suspend if button is Enabled. Disabled Disable Modem Ring on the 5VSB lead.
User Manual
Page 40
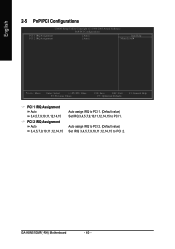
GA-K8N51GMF(-RH) Motherboard - 40 - Auto assign IRQ to PCI 2. (Default value) Set IRQ 3,4,5,7,9,10,11,12,14,15 to PCI 1. English 2-5 PnP/PCI Configurations CMOS Setup ... 1 IRQ Assignment PCI 2 IRQ Assignment [Auto] [Auto] Item Help Menu Level` KLJI: Move Enter: Select +/-/PU/PD: Value F5: Previous Values F10: Save ESC: Exit F7: Optimized Defaults F1: General Help PCI 1 IRQ Assignment Auto 3,4,5,7,9,10,11,12,14,15 PCI 2 IRQ Assignment Auto 3,4,5,7,9,10,11,12,14,15 Auto assign...
GA-K8N51GMF(-RH) Motherboard - 40 - Auto assign IRQ to PCI 2. (Default value) Set IRQ 3,4,5,7,9,10,11,12,14,15 to PCI 1. English 2-5 PnP/PCI Configurations CMOS Setup ... 1 IRQ Assignment PCI 2 IRQ Assignment [Auto] [Auto] Item Help Menu Level` KLJI: Move Enter: Select +/-/PU/PD: Value F5: Previous Values F10: Save ESC: Exit F7: Optimized Defaults F1: General Help PCI 1 IRQ Assignment Auto 3,4,5,7,9,10,11,12,14,15 PCI 2 IRQ Assignment Auto 3,4,5,7,9,10,11,12,14,15 Auto assign...

User Manual
Page 41
.../77oF 39oC/102oF 0 RPM 3183 RPM [Disabled] Item Help Menu Level` KLJI: Move Enter: Select +/-/PU/PD: Value F5: Previous Values F10: Save ESC: Exit F7: Optimized Defaults F1: General Help Reset Case Open Status Disabled Don't reset case open status. (Default value) Enabled Clear case open status at the FAQ...
.../77oF 39oC/102oF 0 RPM 3183 RPM [Disabled] Item Help Menu Level` KLJI: Move Enter: Select +/-/PU/PD: Value F5: Previous Values F10: Save ESC: Exit F7: Optimized Defaults F1: General Help Reset Case Open Status Disabled Don't reset case open status. (Default value) Enabled Clear case open status at the FAQ...

User Manual
Page 42
... F5: Previous Values F10: Save ESC: Exit F7: Optimized Defaults F1: General Help Incorrect using these features may cause your system broken. For power End-User use only! The option will display "Locked" and read only or will automatically assign by overclocking your system broken. GA-K8N51GMF(-RH) Motherboard - 42 - For power end...
... F5: Previous Values F10: Save ESC: Exit F7: Optimized Defaults F1: General Help Incorrect using these features may cause your system broken. For power End-User use only! The option will display "Locked" and read only or will automatically assign by overclocking your system broken. GA-K8N51GMF(-RH) Motherboard - 42 - For power end...

User Manual
Page 65
... [2F8/IRQ3] [378/IRQ7] [SPP] Item Help Menu Level : Move Enter: Select +/-/PU/PD: Value F5: Previous Values F10: Save ESC: Exit F7: Optimized Defaults Figure 1 F1: General Help In the SATAII RAID Config submenu, enable SATA-II RAID function. CMOS Setup Utility-Copyright (C) 1984-2005 Award Software... : Move Enter: Select F5: Previous Values +/-/PU/PD: Value F10: Save F6: Fail-Safe Defaults Figure 2 ESC: Exit F1: General Help F7: Optimized Defaults The BIOS Setup menus described in Figure 2, enable SATA-II 1 Primary/ Secondary RAID). (For example, if you wish to create RAID...
... [2F8/IRQ3] [378/IRQ7] [SPP] Item Help Menu Level : Move Enter: Select +/-/PU/PD: Value F5: Previous Values F10: Save ESC: Exit F7: Optimized Defaults Figure 1 F1: General Help In the SATAII RAID Config submenu, enable SATA-II RAID function. CMOS Setup Utility-Copyright (C) 1984-2005 Award Software... : Move Enter: Select F5: Previous Values +/-/PU/PD: Value F10: Save F6: Fail-Safe Defaults Figure 2 ESC: Exit F1: General Help F7: Optimized Defaults The BIOS Setup menus described in Figure 2, enable SATA-II 1 Primary/ Secondary RAID). (For example, if you wish to create RAID...

User Manual
Page 67
...: Select F5: Previous Values Step 4: Save and exit BIOS Setup. +/-/PU/PD: Value F10: Save F6: Fail-Safe Defaults Figure 5 ESC: Exit F1: General Help F7: Optimized Defaults - 67 - Appendix English Step 3: To boot from Windows installation CD-ROM, set First Boot Device under the Advanced BIOS Features menu to CDROM...
...: Select F5: Previous Values Step 4: Save and exit BIOS Setup. +/-/PU/PD: Value F10: Save F6: Fail-Safe Defaults Figure 5 ESC: Exit F1: General Help F7: Optimized Defaults - 67 - Appendix English Step 3: To boot from Windows installation CD-ROM, set First Boot Device under the Advanced BIOS Features menu to CDROM...

User Manual
Page 68
... Disk Model 2.0.M ST3120026AS 2.1.M ST3120026AS Capacity 111.79GB 111.79GB Array Disks Loc Disk Model [ ] Add Capacity [ ] Del [ESC] Quit [F6] Back [F7] Finish [TAB] Navigate [ ] Select [ENTER] Popup Figure 7 GA-K8N51GMF(-RH) Motherboard - 68 - Step 1: After the POST memory test begins and before the operating system boot begins, look for a message which says...
... Disk Model 2.0.M ST3120026AS 2.1.M ST3120026AS Capacity 111.79GB 111.79GB Array Disks Loc Disk Model [ ] Add Capacity [ ] Del [ESC] Quit [F6] Back [F7] Finish [TAB] Navigate [ ] Select [ENTER] Popup Figure 7 GA-K8N51GMF(-RH) Motherboard - 68 - Step 1: After the POST memory test begins and before the operating system boot begins, look for a message which says...

User Manual
Page 69
...Model [Y[C] Yle]EaArSdddisk[Nd]a11tNa..01O?..MM ST3120026AS ST3120026AS [Y] YES [N] NO [ ] Del Capacity 111.79GB 111.79GB [ESC] Quit [F6] Back [F7] Finish [TAB] Navigate [ ] Select [ENTER] Popup Figure 9 - 69 - The Free Disks section displays the information about the currently installed SATA ...[ ] Add 2.0.M ST3120026AS 2.1.M ST3120026AS Capacity 111.79GB 111.79GB [ ] Del [ESC] Quit [F6] Back [F7] Finish [TAB] Navigate [ ] Select [ENTER] Popup Figure 8 Step 6: Press F7 after selecting the target hard disks. A message which you need to press Y to be included in the disk array...
...Model [Y[C] Yle]EaArSdddisk[Nd]a11tNa..01O?..MM ST3120026AS ST3120026AS [Y] YES [N] NO [ ] Del Capacity 111.79GB 111.79GB [ESC] Quit [F6] Back [F7] Finish [TAB] Navigate [ ] Select [ENTER] Popup Figure 9 - 69 - The Free Disks section displays the information about the currently installed SATA ...[ ] Add 2.0.M ST3120026AS 2.1.M ST3120026AS Capacity 111.79GB 111.79GB [ ] Del [ESC] Quit [F6] Back [F7] Finish [TAB] Navigate [ ] Select [ENTER] Popup Figure 8 Step 6: Press F7 after selecting the target hard disks. A message which you need to press Y to be included in the disk array...

User Manual
Page 70
...Model [ ] Add 2.0.M ST3120026AS 2.1.M ST3120026AS Capacity 111.79GB 111.79GB [ ] Del [ESC] Quit [F6] Back [F7] Finish [TAB] Navigate [ ] Select [ENTER] Popup Figure 8 Step 6: Press F7 after selecting the target hard disks. will appear (Figure 9). Define a New Array - Press the TAB key to move .....01O?..MM ST3120026AS ST3120026AS [Y] YES [N] NO [ ] Del Capacity 111.79GB 111.79GB [ESC] Quit [F6] Back [F7] Finish [TAB] Navigate [ ] Select [ENTER] Popup Figure 9 GA-K8N51GMF(-RH) Motherboard - 70 - MediaShield RAID Utility July 27 2005 - Select the target hard drives using the UP or DOWN ...
...Model [ ] Add 2.0.M ST3120026AS 2.1.M ST3120026AS Capacity 111.79GB 111.79GB [ ] Del [ESC] Quit [F6] Back [F7] Finish [TAB] Navigate [ ] Select [ENTER] Popup Figure 8 Step 6: Press F7 after selecting the target hard disks. will appear (Figure 9). Define a New Array - Press the TAB key to move .....01O?..MM ST3120026AS ST3120026AS [Y] YES [N] NO [ ] Del Capacity 111.79GB 111.79GB [ESC] Quit [F6] Back [F7] Finish [TAB] Navigate [ ] Select [ENTER] Popup Figure 9 GA-K8N51GMF(-RH) Motherboard - 70 - MediaShield RAID Utility July 27 2005 - Select the target hard drives using the UP or DOWN ...

User Manual
Page 76
... port connecting the SATA hard disk (the one containing the Windows 2000) is Enabled (Figure 21/22). ESC: Exit F1: General Help F7: Optimized Defaults Download and install Windows 2000 Service Pack 4 from Microsoft's website. Step 2: After system restarts, press Del to resolve this ...[Disabled] Disabled Disabled Item Help Menu Level : Move Enter: Select F5: Previous Values +/-/PU/PD: Value F10: Save F6: Fail-Safe Defaults GA-K8N51GMF(-RH) Motherboard Figure 22 - 76 - There are the detailed step-by-step instructions: Step 1: Install Windows 2000 onto a selected hard drive. Save...
... port connecting the SATA hard disk (the one containing the Windows 2000) is Enabled (Figure 21/22). ESC: Exit F1: General Help F7: Optimized Defaults Download and install Windows 2000 Service Pack 4 from Microsoft's website. Step 2: After system restarts, press Del to resolve this ...[Disabled] Disabled Disabled Item Help Menu Level : Move Enter: Select F5: Previous Values +/-/PU/PD: Value F10: Save F6: Fail-Safe Defaults GA-K8N51GMF(-RH) Motherboard Figure 22 - 76 - There are the detailed step-by-step instructions: Step 1: Install Windows 2000 onto a selected hard drive. Save...

User Manual
Page 77
... Array Disks Loc Disk Model [ ] Add 2.0.M ST3120026AS 2.1.M ST3120026AS Capacity 111.78G 111.78G [ ] Del [ESC] Quit [F6] Back [F7] Finish [TAB] Navigate [ ] Select [ENTER] Popup Figure 23 Step 4: After all the settings, press F7 to boot into Windows 2000. Restart the computer to complete the configuration. Define a New Array - Define a New Array... Capacity Clear disk daAtarr?ay Disks Loc Disk Model [Y[] Y]EASdd [N] 11N..01O..MM ST3120026AS ST3120026AS Capacity 111.79G 111.79G [ ] Del [ESC] Quit [F6] Back [F7] Finish [TAB] Navigate [ ] Select [ENTER] Popup Figure 24 - 77 -
... Array Disks Loc Disk Model [ ] Add 2.0.M ST3120026AS 2.1.M ST3120026AS Capacity 111.78G 111.78G [ ] Del [ESC] Quit [F6] Back [F7] Finish [TAB] Navigate [ ] Select [ENTER] Popup Figure 23 Step 4: After all the settings, press F7 to boot into Windows 2000. Restart the computer to complete the configuration. Define a New Array - Define a New Array... Capacity Clear disk daAtarr?ay Disks Loc Disk Model [Y[] Y]EASdd [N] 11N..01O..MM ST3120026AS ST3120026AS Capacity 111.79G 111.79G [ ] Del [ESC] Quit [F6] Back [F7] Finish [TAB] Navigate [ ] Select [ENTER] Popup Figure 24 - 77 -