
Manual
Page 21
... an optical digital audio in connector. Use this feature, ensure that supports digital optical audio. Before using this port for decoding.) In Windows Vista, select Start>Control Panel>Sound, select Realtek HDMI Output and then click Set Default. - 21 - DVI-D Port (Note 1)(Note 2) The DVI-D port conforms to the DVI-D specification...
... an optical digital audio in connector. Use this feature, ensure that supports digital optical audio. Before using this port for decoding.) In Windows Vista, select Start>Control Panel>Sound, select Realtek HDMI Output and then click Set Default. - 21 - DVI-D Port (Note 1)(Note 2) The DVI-D port conforms to the DVI-D specification...

Manual
Page 25
If a power supply is not connected, the computer will not start. If the 12V power connector is used that can withstand high power consumption be used (500W or greater). The 12V power connector mainly supplies power ...
If a power supply is not connected, the computer will not start. If the 12V power connector is used that can withstand high power consumption be used (500W or greater). The 12V power connector mainly supplies power ...

Manual
Page 51
... to decide whether to the following message will only operate at a normal speed of the attached LAN cable. Note: The Gigabit hub will appear: Start detecting at Port..... Link Detected --> 100Mbps Cable Length= 30m Link Detected Displays transmission speed. AHCI Configures the SATA controller to detect the status of ...integrated with the onboard LAN chip. (Default: Disabled) SMART LAN (LAN Cable Diagnostic Function) CMOS Setup Utility-Copyright (C) 1984-2010 Award Software SMART LAN Start detecting at Port..... When LAN Cable Is Functioning Normally... BIOS Setup
... to decide whether to the following message will only operate at a normal speed of the attached LAN cable. Note: The Gigabit hub will appear: Start detecting at Port..... Link Detected --> 100Mbps Cable Length= 30m Link Detected Displays transmission speed. AHCI Configures the SATA controller to detect the status of ...integrated with the onboard LAN chip. (Default: Disabled) SMART LAN (LAN Cable Diagnostic Function) CMOS Setup Utility-Copyright (C) 1984-2010 Award Software SMART LAN Start detecting at Port..... When LAN Cable Is Functioning Normally... BIOS Setup
Manual
Page 66
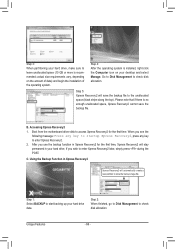
... automatically create a new partition to check disk allocation. Step 1: Select BACKUP to enter Xpress Recovery2 later, simply press during the POST. When you wish to start backing up your desktop and select Manage. After you use the backup function in Xpress Recovery2 Xpress Recovery2 will stay permanent in your hard drive...
... automatically create a new partition to check disk allocation. Step 1: Select BACKUP to enter Xpress Recovery2 later, simply press during the POST. When you wish to start backing up your desktop and select Manage. After you use the backup function in Xpress Recovery2 Xpress Recovery2 will stay permanent in your hard drive...

Manual
Page 71
... the BIOS Restart your system after the system restarts. Failure to do NOT interrupt the Internet connection (for your motherboard is unable to start. 3. Follow the on -screen instructions to complete. Make sure that is not present on the @BIOS server site, please manually download...the BIOS with an incorrect BIOS file could cause your system not to boot. - 71 - Before You Begin 1. Do not use the G.O.M. (GIGABYTE Online Management) function when using @BIOS. 4. Update the BIOS Using the Internet Update Function: Click Update BIOS from an inadequate BIOS flashing. If...
... the BIOS Restart your system after the system restarts. Failure to do NOT interrupt the Internet connection (for your motherboard is unable to start. 3. Follow the on -screen instructions to complete. Make sure that is not present on the @BIOS server site, please manually download...the BIOS with an incorrect BIOS file could cause your system not to boot. - 71 - Before You Begin 1. Do not use the G.O.M. (GIGABYTE Online Management) function when using @BIOS. 4. Update the BIOS Using the Internet Update Function: Click Update BIOS from an inadequate BIOS flashing. If...

Manual
Page 75
... is NOT enabled. - 75 - Directions for using Q-Share After installing Q-Share from the motherboard driver disk, go to launch the Q-Share tool. exe to Start>All Programs>GIGABYTE>Q-Share. Data Sharing Enabled Options Descriptions Option Connect ... About Q-Share ... Unique Features Data Sharing Disabled Figure 2. Open Incoming Folder : C:\Q-ShareFolder Change Incoming Folder : C:\Q-ShareFolder...
... is NOT enabled. - 75 - Directions for using Q-Share After installing Q-Share from the motherboard driver disk, go to launch the Q-Share tool. exe to Start>All Programs>GIGABYTE>Q-Share. Data Sharing Enabled Options Descriptions Option Connect ... About Q-Share ... Unique Features Data Sharing Disabled Figure 2. Open Incoming Folder : C:\Q-ShareFolder Change Incoming Folder : C:\Q-ShareFolder...

Manual
Page 78
... OC, make sure the Internet connection is in the notification area and OC web page ap- right click the icon to select pears, click Login, Start Server to the Cloud OC server later. Bluetooth PAN (Personal Area Network) support is an easy-to complete. • System Info (System Monitoring): The System...
... OC, make sure the Internet connection is in the notification area and OC web page ap- right click the icon to select pears, click Login, Start Server to the Cloud OC server later. Bluetooth PAN (Personal Area Network) support is an easy-to complete. • System Info (System Monitoring): The System...

Manual
Page 99
...a hard drive from other drives in the array. Step 3: Select one available drive and click Start Now to rebuild a RAID 1 array. Step 4: The rebuilding progress is displayed on the Information page in the Start Menu. Step 5: When done, the array's status on the screen and you can select Pause...Array: Rebuilding is the process of equal or greater capacity. The procedures below assume a new drive is added to replace a failed drive to start the rebuilding process. Step 2: Select the RAID array to be rebuilt under Logical Drive View and click the Rebuild tab in to fault-tolerant...
...a hard drive from other drives in the array. Step 3: Select one available drive and click Start Now to rebuild a RAID 1 array. Step 4: The rebuilding progress is displayed on the Information page in the Start Menu. Step 5: When done, the array's status on the screen and you can select Pause...Array: Rebuilding is the process of equal or greater capacity. The procedures below assume a new drive is added to replace a failed drive to start the rebuilding process. Step 2: Select the RAID array to be rebuilt under Logical Drive View and click the Rebuild tab in to fault-tolerant...

Manual
Page 100
.... Rebuilding....35%, please wait.... For the GIGABYTE SATA2: Turn off your computer and replace the failed hard drive with the RAID setup utility Step 1: When the message "Press to enter RAID Setup Utility" appears, press + to start the RAID rebuilding process. The selection bar ...will move to Non-RAID Solve Mirror Conflict Rebuild Mirror Drive Save And Exit Setup Exit Without Saving Gigabyte Technology Corp. RAID Setup Utility v1.07.16G [ Hard Disk ...
.... Rebuilding....35%, please wait.... For the GIGABYTE SATA2: Turn off your computer and replace the failed hard drive with the RAID setup utility Step 1: When the message "Press to enter RAID Setup Utility" appears, press + to start the RAID rebuilding process. The selection bar ...will move to Non-RAID Solve Mirror Conflict Rebuild Mirror Drive Save And Exit Setup Exit Without Saving Gigabyte Technology Corp. RAID Setup Utility v1.07.16G [ Hard Disk ...

Manual
Page 101
...be rebuilt in the operating system Make sure the GIGABYTE SATA2 SATA controller driver has been installed from All Programs in the tool bar.) Step 2: When the Rebuilding RAID Wizard appears, click Next. Step 3: Select a drive to start the RAID rebuilding process. Step 4: Click Finish to... rebuild the array and click Next. Step 5: The rebuilding progress is displayed at the bottom of the screen. Launch the GIGABYTE RAID CONFIGURER from the motherboard driver disk. Step 6: When...
...be rebuilt in the operating system Make sure the GIGABYTE SATA2 SATA controller driver has been installed from All Programs in the tool bar.) Step 2: When the Rebuilding RAID Wizard appears, click Next. Step 3: Select a drive to start the RAID rebuilding process. Step 4: Click Finish to... rebuild the array and click Next. Step 5: The rebuilding progress is displayed at the bottom of the screen. Launch the GIGABYTE RAID CONFIGURER from the motherboard driver disk. Step 6: When...

Manual
Page 106
...-channel audio, creating a virtual surround sound environment . (Note) Install the Dolby GUI Software driver from the front speakers) when playing 2-channel stereo sources. Click the Start icon Programs, Dolby Control Center to get only 2-channel playback output (from the motherboard driver disk. channel content to access the utility. (The following illustration...
...-channel audio, creating a virtual surround sound environment . (Note) Install the Dolby GUI Software driver from the front speakers) when playing 2-channel stereo sources. Click the Start icon Programs, Dolby Control Center to get only 2-channel playback output (from the motherboard driver disk. channel content to access the utility. (The following illustration...

Manual
Page 108
Select Recording Devices. Appendix - 108 - Step 5: After completing the settings above, click Start, point to All Programs, point to Accessories, and then click Sound Recorder to begin the sound recording. * Enabling Stereo Mix If the HD Audio Manager ...
Select Recording Devices. Appendix - 108 - Step 5: After completing the settings above, click Start, point to All Programs, point to Accessories, and then click Sound Recorder to begin the sound recording. * Enabling Stereo Mix If the HD Audio Manager ...

Manual
Page 109
... it as the default device. Be sure to the computer. 2. Step 4: Now you have connected the sound input device (e.g. To record the audio, click the Start Recording button . 3. Playing the Recorded Sound You can access the HD Audio Manager to configure Stereo Mix and use Sound Recorder to record the sound...
... it as the default device. Be sure to the computer. 2. Step 4: Now you have connected the sound input device (e.g. To record the audio, click the Start Recording button . 3. Playing the Recorded Sound You can access the HD Audio Manager to configure Stereo Mix and use Sound Recorder to record the sound...
Manual
Page 111
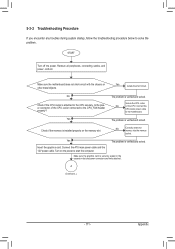
Yes Isolate the short circuit. Connect the CPU cooler power cable to start the computer. Yes The problem is installed properly on the memory slot. Turn on the CPU. Secure the CPU cooler No on the power to .... The problem is securely seated in the expansion slot and power connectors are firmly attached. Yes The problem is attached to the CPU_FAN header properly? START Turn off the power. Remove all peripherals, connecting cables, and power cord etc.
Yes Isolate the short circuit. Connect the CPU cooler power cable to start the computer. Yes The problem is installed properly on the memory slot. Turn on the CPU. Secure the CPU cooler No on the power to .... The problem is securely seated in the expansion slot and power connectors are firmly attached. Yes The problem is attached to the CPU_FAN header properly? START Turn off the power. Remove all peripherals, connecting cables, and power cord etc.


