
Owners Manual
Page 3
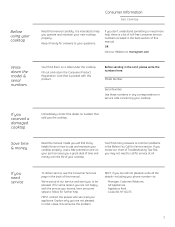
...is a list of toll-free consumer service numbers included in the back section of your cooktop. Save time & money Read this manual. Just a little preventive care on a label under the cooktop. If you review our chart of Troubleshooting Tips first, you a great deal of time and money over ...your cooktop Consumer Information Gas Cooktop Read this will find many answers to common problems in the Before You Call for answers to your questions. Keep it handy for Service section. OR Visit our Website at all the details-including your phone number-to: Manager, Customer Relations GE Appliances ...
...is a list of toll-free consumer service numbers included in the back section of your cooktop. Save time & money Read this manual. Just a little preventive care on a label under the cooktop. If you review our chart of Troubleshooting Tips first, you a great deal of time and money over ...your cooktop Consumer Information Gas Cooktop Read this will find many answers to common problems in the Before You Call for answers to your questions. Keep it handy for Service section. OR Visit our Website at all the details-including your phone number-to: Manager, Customer Relations GE Appliances ...
Installation Instructions
Page 8
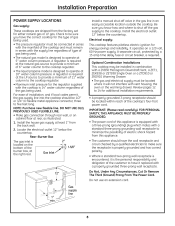
... time delay fuse or circuit breaker, is required at the LP source to operate at the natural gas source to the cooktop. Optional Combination Installations This cooktop may be installed in combination with a ZVB30 Monogram Downdraft Vent, a ZET1, ZEK938 or ZET938 Single...cooktops are shipped from the back wall. 2. Install the electrical outlet 12″ below the countertop. A regulator is required. Rear-Burner Box 2" The gas inlet is designed to minimize the possibility of the burner box, at 5″ water column pressure. Review pages 12 to 14 for the type of gas...
... time delay fuse or circuit breaker, is required at the LP source to operate at the natural gas source to the cooktop. Optional Combination Installations This cooktop may be installed in combination with a ZVB30 Monogram Downdraft Vent, a ZET1, ZEK938 or ZET938 Single...cooktops are shipped from the back wall. 2. Install the electrical outlet 12″ below the countertop. A regulator is required. Rear-Burner Box 2" The gas inlet is designed to minimize the possibility of the burner box, at 5″ water column pressure. Review pages 12 to 14 for the type of gas...
Installation Instructions
Page 12
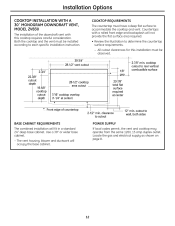
...provide the flat surface area required. • Review the illustration to wall, both sides BASE CABINET REQUIREMENTS The combined installation will occupy the base cabinet. Countertops with this installation must be installed according to accommodate the cooktop and vent. cutout to determine the countertop surface ...base cabinet. Locate the gas and electrical supply as shown on page 8. 12 POWER SUPPLY If local codes permit, the vent and cooktop may operate from the same 120V, 15 amp duplex outlet. Use a 30″ or wider base cabinet. - Both the cooktop and the vent must ...
...provide the flat surface area required. • Review the illustration to wall, both sides BASE CABINET REQUIREMENTS The combined installation will occupy the base cabinet. Countertops with this installation must be installed according to accommodate the cooktop and vent. cutout to determine the countertop surface ...base cabinet. Locate the gas and electrical supply as shown on page 8. 12 POWER SUPPLY If local codes permit, the vent and cooktop may operate from the same 120V, 15 amp duplex outlet. Use a 30″ or wider base cabinet. - Both the cooktop and the vent must ...