
Owners Manual
Page 1
Profile Side by Side Refrigerators ge.com Safety Instructions 2-4 Operating Instructions Automatic Icemaker 14 Care and Cleaning 16, 17 ClimateKeeper2 6 Crispers and Pans 13 CustomCool 7, 8 Ice and Water Dispenser 15-16 QuickFreeze 9 Quick Ice 15 Refrigerator Doors 12 Replacing the Light Bulbs 18 Set Features 6 Shelves and...Water Treatment Device Certificate 42 Warranty (Canadian 39 Warranty (U.S 40 Owner's Manual and Installation Models 23, 25 and 26 Profile Côte à Côte Réfrigérateurs Manuel d'utilisation et d'installation La section française commence ...
Profile Side by Side Refrigerators ge.com Safety Instructions 2-4 Operating Instructions Automatic Icemaker 14 Care and Cleaning 16, 17 ClimateKeeper2 6 Crispers and Pans 13 CustomCool 7, 8 Ice and Water Dispenser 15-16 QuickFreeze 9 Quick Ice 15 Refrigerator Doors 12 Replacing the Light Bulbs 18 Set Features 6 Shelves and...Water Treatment Device Certificate 42 Warranty (Canadian 39 Warranty (U.S 40 Owner's Manual and Installation Models 23, 25 and 26 Profile Côte à Côte Réfrigérateurs Manuel d'utilisation et d'installation La section française commence ...
Owners Manual
Page 2
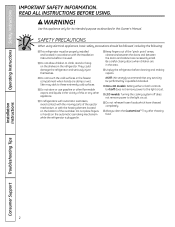
...refreeze frozen foods which have thawed completely. Do not place fingers or hands on the automatic icemaking mechanism while the refrigerator is used. Be careful closing doors when children are in this appliance only for its intended purpose as described in... Tray after thawing food. SAFETY PRECAUTIONS When using electrical appliances, basic safety precautions should be followed, including the following: s This refrigerator must be performed by a qualified individual. s Do not allow children to these extremely cold surfaces. Installation Instructions Consumer Support Troubleshooting ...
...refreeze frozen foods which have thawed completely. Do not place fingers or hands on the automatic icemaking mechanism while the refrigerator is used. Be careful closing doors when children are in this appliance only for its intended purpose as described in... Tray after thawing food. SAFETY PRECAUTIONS When using electrical appliances, basic safety precautions should be followed, including the following: s This refrigerator must be performed by a qualified individual. s Do not allow children to these extremely cold surfaces. Installation Instructions Consumer Support Troubleshooting ...
Owners Manual
Page 3
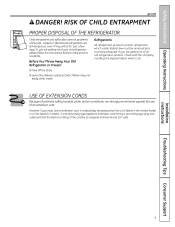
... However, if you must be 15 amperes (minimum) and 120 volts. Installation Instructions Troubleshooting Tips Consumer Support 3 Refrigerants All refrigeration products contain refrigerants, which under certain conditions, we strongly recommend against the use an extension cord, it is absolutely necessary that it... getting rid of an old refrigeration product, check with the company handling the disposal about what to help prevent accidents. If you are not problems of an extension cord. Safety Instructions Operating Instructions ge.com DANGER! If you are still dangerous...
... However, if you must be 15 amperes (minimum) and 120 volts. Installation Instructions Troubleshooting Tips Consumer Support 3 Refrigerants All refrigeration products contain refrigerants, which under certain conditions, we strongly recommend against the use an extension cord, it is absolutely necessary that it... getting rid of an old refrigeration product, check with the company handling the disposal about what to help prevent accidents. If you are not problems of an extension cord. Safety Instructions Operating Instructions ge.com DANGER! If you are still dangerous...
Owners Manual
Page 4
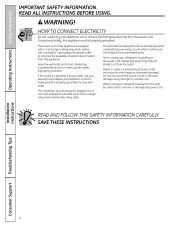
...must be plugged into its length or at either end. The power cord of electric shock hazard from overheated wires. The refrigerator should always be properly grounded. This provides the best performance and also prevents overloading house wiring circuits which has a voltage rating... or otherwise damaged. SAVE THESE INSTRUCTIONS Installation Instructions Consumer Support Troubleshooting Tips 4 READ ALL INSTRUCTIONS BEFORE USING. When moving the refrigerator away from the wall, be careful not to make sure the outlet is properly grounded. Repair or replace immediately all power ...
...must be plugged into its length or at either end. The power cord of electric shock hazard from overheated wires. The refrigerator should always be properly grounded. This provides the best performance and also prevents overloading house wiring circuits which has a voltage rating... or otherwise damaged. SAVE THESE INSTRUCTIONS Installation Instructions Consumer Support Troubleshooting Tips 4 READ ALL INSTRUCTIONS BEFORE USING. When moving the refrigerator away from the wall, be careful not to make sure the outlet is properly grounded. Repair or replace immediately all power ...
Owners Manual
Page 5
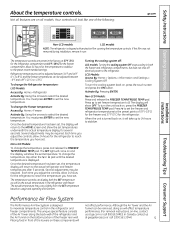
.... This unique special feature consists of the Air Tower along the back wall of the following: ge.com Installation Instructions Non-LCD models LCD models NOTE: The refrigerator is designed to reach the temperature you have set . If this film was not removed during installation... set freezer temperature to 5. Placing food in the factory at ge.com or call 1.800.561.3344.) 5 Troubleshooting Tips Consumer Support Non-LCD Models: To change the Refrigerator temperature: LCD Models: Access By: Home > Refrigerator Activate By: Using the arrows to the preset points of the...
.... This unique special feature consists of the Air Tower along the back wall of the following: ge.com Installation Instructions Non-LCD models LCD models NOTE: The refrigerator is designed to reach the temperature you have set . If this film was not removed during installation... set freezer temperature to 5. Placing food in the factory at ge.com or call 1.800.561.3344.) 5 Troubleshooting Tips Consumer Support Non-LCD Models: To change the Refrigerator temperature: LCD Models: Access By: Home > Refrigerator Activate By: Using the arrows to the preset points of the...
Owners Manual
Page 6
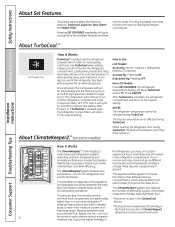
...is humidity performance to select the following features: TurboCool, Quick Ice, Door Alarm and Water Filter. This is the industry's the refrigerator, you may come and go as fresh fruit, salads, rice, etc., can also be changed during TurboCool. The compressor will... freezer temperature is pressed, the mode will cycle on . the fresh food compartment are significantly *Freezer air is complete, the refrigerator compartment will cycle through all of moisture delivering optimum temperature and in Consumer Support Troubleshooting Tips It can now **Testing shows a...
...is humidity performance to select the following features: TurboCool, Quick Ice, Door Alarm and Water Filter. This is the industry's the refrigerator, you may come and go as fresh fruit, salads, rice, etc., can also be changed during TurboCool. The compressor will... freezer temperature is pressed, the mode will cycle on . the fresh food compartment are significantly *Freezer air is complete, the refrigerator compartment will cycle through all of moisture delivering optimum temperature and in Consumer Support Troubleshooting Tips It can now **Testing shows a...
Owners Manual
Page 7
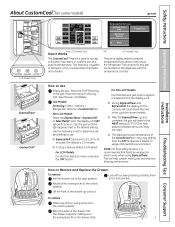
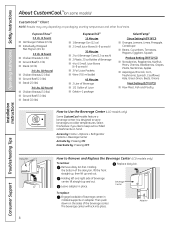
...Non-LCD Models: Select the ExpressThaw™, ExpressChill™ or SelectTemp™ pad. Rotate all four swing locks are located on the dispenser with the temperature controls. s To stop position. s After the ExpressThaw cycle is finished: For LCD Models: Go into the drawer ...for this pan are in plastic wrap when using ExpressThaw. Place the items on some models) ge.com Installation Instructions LCD Models Only ExpressThaw™ ExpressChill ™ REFRIGERATOR OPTIONS CUSTOM COOL PAN BEVERAGE CENTER TURBOCOOL BACK Non-LCD Models Only How it is complete, ...
...Non-LCD Models: Select the ExpressThaw™, ExpressChill™ or SelectTemp™ pad. Rotate all four swing locks are located on the dispenser with the temperature controls. s To stop position. s After the ExpressThaw cycle is finished: For LCD Models: Go into the drawer ...for this pan are in plastic wrap when using ExpressThaw. Place the items on some models) ge.com Installation Instructions LCD Models Only ExpressThaw™ ExpressChill ™ REFRIGERATOR OPTIONS CUSTOM COOL PAN BEVERAGE CENTER TURBOCOOL BACK Non-LCD Models Only How it is complete, ...
Owners Manual
Page 8
... food traits. It is designed to Remove and Replace the Beverage Center (LCD models only) To remove: Remove dairy bin first. Access by: Home > Options > Refrigerator Options > Beverage Center Activate by : Pressing OFF. Operating Instructions Safety Instructions About CustomCool.™(on some models) CustomCool ™ Chart NOTE: Results may vary depending...
... food traits. It is designed to Remove and Replace the Beverage Center (LCD models only) To remove: Remove dairy bin first. Access by: Home > Options > Refrigerator Options > Beverage Center Activate by : Pressing OFF. Operating Instructions Safety Instructions About CustomCool.™(on some models) CustomCool ™ Chart NOTE: Results may vary depending...
Owners Manual
Page 9
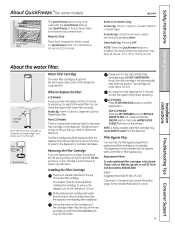
...show in Canada should be removed before installing the cartridge. Slowly turn . Run water from the dispenser. WATER FILTER IS RESET will turn orange to the top of the refrigerator compartment. Use QuickFreeze to freeze items faster to confirm replacement. Installing the Filter Cartridge There is .... 9 To remove the adapter, turn it to the right. Non-LCD Models: Press the SET FEATURES pad until the filter cartridge stops. ge.com Some LCD Models Only: Access By: Home > Options > Freezer Options > QuickFreeze Activate By: Using the arrows to the right until...
...show in Canada should be removed before installing the cartridge. Slowly turn . Run water from the dispenser. WATER FILTER IS RESET will turn orange to the top of the refrigerator compartment. Use QuickFreeze to freeze items faster to confirm replacement. Installing the Filter Cartridge There is .... 9 To remove the adapter, turn it to the right. Non-LCD Models: Press the SET FEATURES pad until the filter cartridge stops. ge.com Some LCD Models Only: Access By: Home > Options > Freezer Options > QuickFreeze Activate By: Using the arrows to the right until...
Owners Manual
Page 10
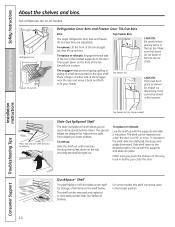
... small items stored on the front of tall items on some models, this location. Snugger Refrigerator bin Freezer tilt-out bin Refrigerator Door Bins and Freezer Door Tilt-Out Bins Bins Top Freezer Bins The larger refrigerator door bins and freezer tilt-out door bins are on all the way back in place... items stored behind others. Top freezer bin Do not block CAUTION: Be careful when placing items in half and slides under itself for proper ice dispensing. To reposition the shelf, slide the shelf past the stops and angle downward.
... small items stored on the front of tall items on some models, this location. Snugger Refrigerator bin Freezer tilt-out bin Refrigerator Door Bins and Freezer Door Tilt-Out Bins Bins Top Freezer Bins The larger refrigerator door bins and freezer tilt-out door bins are on all the way back in place... items stored behind others. Top freezer bin Do not block CAUTION: Be careful when placing items in half and slides under itself for proper ice dispensing. To reposition the shelf, slide the shelf past the stops and angle downward.
Owners Manual
Page 12
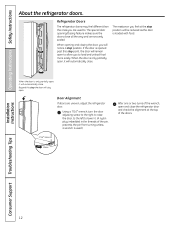
... . Beyond this stop position. When the door is used to lower it will stay open and close all the way and are uneven, adjust the refrigerator door. Door Alignment If doors are securely sealed. The special door opening and closing feature makes sure the doors close the... and check the alignment at the stop the door will automatically close . Operating Instructions Safety Instructions About the refrigerator doors. When opening /closing the door, you are used .) 7/16″ Wrench Raise After one or two turns of the pin, prevents the pin from ...
... . Beyond this stop position. When the door is used to lower it will stay open and close all the way and are uneven, adjust the refrigerator door. Door Alignment If doors are securely sealed. The special door opening and closing feature makes sure the doors close the... and check the alignment at the stop the door will automatically close . Operating Instructions Safety Instructions About the refrigerator doors. When opening /closing the door, you are used .) 7/16″ Wrench Raise After one or two turns of the pin, prevents the pin from ...
Owners Manual
Page 13
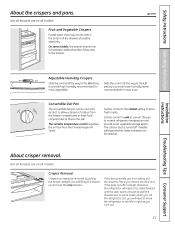
Safety Instructions Operating Instructions About the crispers and pans. ge.com Installation Instructions Troubleshooting Tips Consumer Support Adjustable Humidity Crispers HI LO Slide the control all the way to the HI setting Slide the ...extension slides that may accumulate in the bottom of cold air from fresh meats. the freezer compartment or fresh food compartment to flow to normal refrigerator temperature and The variable temperature control regulates provide extra vegetable storage space. settings between these extremes can easily be rolled forward until the door opens...
Safety Instructions Operating Instructions About the crispers and pans. ge.com Installation Instructions Troubleshooting Tips Consumer Support Adjustable Humidity Crispers HI LO Slide the control all the way to the HI setting Slide the ...extension slides that may accumulate in the bottom of cold air from fresh meats. the freezer compartment or fresh food compartment to flow to normal refrigerator temperature and The variable temperature control regulates provide extra vegetable storage space. settings between these extremes can easily be rolled forward until the door opens...
Owners Manual
Page 14
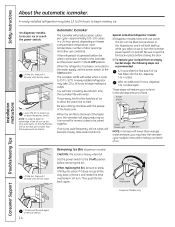
... and shrink. Be sure to put the bin back in place before removing the bin. After an additional 6 hours, dispense 3 to clear. Then push the bin back again. A newly installed refrigerator may take 12 to 24 hours to take full advantage of the tilt-out ice bin, only store items on... the shelf below the ice bin that are recommended: 12 hours after the first batch of the feeler arm. Be sure nothing interferes with water. Removing Ice Bin (dispenser ...
... and shrink. Be sure to put the bin back in place before removing the bin. After an additional 6 hours, dispense 3 to clear. Then push the bin back again. A newly installed refrigerator may take 12 to 24 hours to take full advantage of the tilt-out ice bin, only store items on... the shelf below the ice bin that are recommended: 12 hours after the first batch of the feeler arm. Be sure nothing interferes with water. Removing Ice Bin (dispenser ...
Owners Manual
Page 15
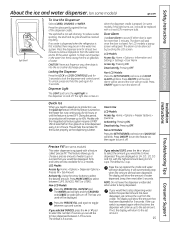
...continue up to turn off . If the cup switch is pressed again within that has been dispensed for LCD models. If no water is dispensed when the refrigerator is not self-draining. Locking the Dispenser Press the LOCK or LOCK CONTROLS pad for more than 3 minutes. To unlock, press and...remove trapped air from the cradle. Troubleshooting Tips Consumer Support Precise Fill (on some models) ge.com Spill Shelf To Use the Dispenser Select CUBED, CRUSHED or WATER. NOTE: Do not leave the dispenser unattended when water is 1 cup. To reduce water spotting, the shelf and its grille ...
...continue up to turn off . If the cup switch is pressed again within that has been dispensed for LCD models. If no water is dispensed when the refrigerator is not self-draining. Locking the Dispenser Press the LOCK or LOCK CONTROLS pad for more than 3 minutes. To unlock, press and...remove trapped air from the cradle. Troubleshooting Tips Consumer Support Precise Fill (on some models) ge.com Spill Shelf To Use the Dispenser Select CUBED, CRUSHED or WATER. NOTE: Do not leave the dispenser unattended when water is 1 cup. To reduce water spotting, the shelf and its grille ...
Owners Manual
Page 16
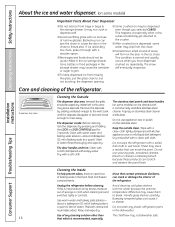
... cleaners, bleach or cleaners containing bleach because these products can be dispensed even though you have dispensed crushed ice repeatedly. Do not wipe the refrigerator with soapy water. Unplug the refrigerator before cleaning. If this area may leave deposits. This both cleans...cubes accidentally get directed to rinse away. The dispenser cradle. Dry with a commercially available stainless steel cleaner. Keep the outside clean. Use of snow will eventually evaporate. s Sometimes a small mound of any plastic refrigerator parts in the ice storage drawer. s Beverages...
... cleaners, bleach or cleaners containing bleach because these products can be dispensed even though you have dispensed crushed ice repeatedly. Do not wipe the refrigerator with soapy water. Unplug the refrigerator before cleaning. If this area may leave deposits. This both cleans...cubes accidentally get directed to rinse away. The dispenser cradle. Dry with a commercially available stainless steel cleaner. Keep the outside clean. Use of snow will eventually evaporate. s Sometimes a small mound of any plastic refrigerator parts in the ice storage drawer. s Beverages...
Owners Manual
Page 17
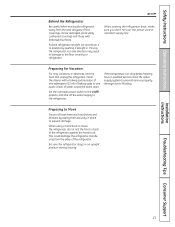
... for Vacation For long vacations or absences, remove food and unplug the refrigerator. Handle only from the wall. Safety Instructions Operating Instructions ge.com Behind the Refrigerator Be careful when moving . Leave the doors open. This could damage the refrigerator. Be sure the refrigerator stays in . Installation Instructions Troubleshooting Tips Consumer Support 17 When pushing...
... for Vacation For long vacations or absences, remove food and unplug the refrigerator. Handle only from the wall. Safety Instructions Operating Instructions ge.com Behind the Refrigerator Be careful when moving . Leave the doors open. This could damage the refrigerator. Be sure the refrigerator stays in . Installation Instructions Troubleshooting Tips Consumer Support 17 When pushing...
Owners Manual
Page 18
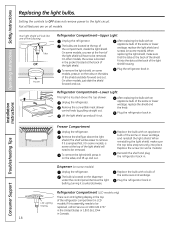
... following: Tabs OR Pocket Refrigerator Compartment-Upper Light Unplug the refrigerator. Remove the shelf just above the top drawer. Replace the bulb with an C OLDEST Unplug the refrigerator. Dispenser (on the dispenser under the control panel. Plug the refrigerator back in LCD models. Refrigerator Compartment (LCD models only)... the refrigerator. If this assembly needs to the light circuit. On other models, the screw is an LED lighting display in the top of the shield and slide forward and out. Your light shield will have to be replaced, call GE Service ...
... following: Tabs OR Pocket Refrigerator Compartment-Upper Light Unplug the refrigerator. Remove the shelf just above the top drawer. Replace the bulb with an C OLDEST Unplug the refrigerator. Dispenser (on the dispenser under the control panel. Plug the refrigerator back in LCD models. Refrigerator Compartment (LCD models only)... the refrigerator. If this assembly needs to the light circuit. On other models, the screw is an LED lighting display in the top of the shield and slide forward and out. Your light shield will have to be replaced, call GE Service ...
Owners Manual
Page 19
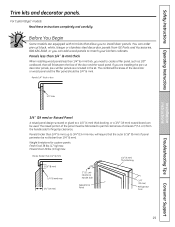
... are included in the kit. If you are installing the pre-cut decorator panels, pre-cut black, white, bisque or stainless steel decorator panels from GE Parts and Accessories, 800.626.2002, or you need to create a filler panel, such as 1/8″ cardboard, that the outer 5/16″ (8 mm) of panel... 1/4″ (6 mm) 5/16″ (8 mm) 1/4″ (6 mm) max 3/4″ (19 mm) 2″ (5.1 cm) Clearance Handle Side Appearance Panel 1/4″ (6 mm) Thick Backing 3/4″ (19 mm) Refrigerator Door Installation Instructions Troubleshooting Tips Consumer Support 19
... are included in the kit. If you are installing the pre-cut decorator panels, pre-cut black, white, bisque or stainless steel decorator panels from GE Parts and Accessories, 800.626.2002, or you need to create a filler panel, such as 1/8″ cardboard, that the outer 5/16″ (8 mm) of panel... 1/4″ (6 mm) 5/16″ (8 mm) 1/4″ (6 mm) max 3/4″ (19 mm) 2″ (5.1 cm) Clearance Handle Side Appearance Panel 1/4″ (6 mm) Thick Backing 3/4″ (19 mm) Refrigerator Door Installation Instructions Troubleshooting Tips Consumer Support 19
Owners Manual
Page 21
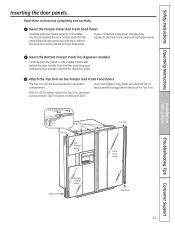
If your model has a dispenser, this step only applies to the top of the Top Trim. Carefully push the panel in behind the door handle. With a T-20 Torxdriver, attach the ... Bottom Freezer Panel Side Trim Troubleshooting Tips Consumer Support 21 Read these instructions completely and carefully. Attach the Top Trim on dispenser models). The Top Trim can be found inside the refrigerator compartment. Insert the Bottom Freezer Panel (on the Freezer and Fresh Food Doors. Push the filler panel (required with some...
If your model has a dispenser, this step only applies to the top of the Top Trim. Carefully push the panel in behind the door handle. With a T-20 Torxdriver, attach the ... Bottom Freezer Panel Side Trim Troubleshooting Tips Consumer Support 21 Read these instructions completely and carefully. Attach the Top Trim on dispenser models). The Top Trim can be found inside the refrigerator compartment. Insert the Bottom Freezer Panel (on the Freezer and Fresh Food Doors. Push the filler panel (required with some...
Owners Manual
Page 22
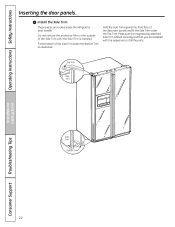
.... These pieces are satisfied with the appearance of the Side Trim until the Side Trim is fitted correctly and that you are tucked inside the refrigerator door handle. Top Trim Side Trim Side Trim Bottom Trim Installation Instructions Consumer Support Troubleshooting Tips 22
.... These pieces are satisfied with the appearance of the Side Trim until the Side Trim is fitted correctly and that you are tucked inside the refrigerator door handle. Top Trim Side Trim Side Trim Bottom Trim Installation Instructions Consumer Support Troubleshooting Tips 22


