
Use and Care Manual
Page 2
... are necessarily small. SAFETY PRECAUTIONS When using electrical appliances, basic safety precautions should be followed, including the following: s This refrigerator must be performed by a qualified individual. s Do not refreeze frozen foods which have thawed completely. WARNING! Skin may stick... servicing be properly installed and located in the area. They could damage the refrigerator and seriously injure themselves. s In refrigerators with automatic icemakers, avoid contact with the moving parts of the "pinch point" areas; clearances between the doors and between the...
... are necessarily small. SAFETY PRECAUTIONS When using electrical appliances, basic safety precautions should be followed, including the following: s This refrigerator must be performed by a qualified individual. s Do not refreeze frozen foods which have thawed completely. WARNING! Skin may stick... servicing be properly installed and located in the area. They could damage the refrigerator and seriously injure themselves. s In refrigerators with automatic icemakers, avoid contact with the moving parts of the "pinch point" areas; clearances between the doors and between the...

Use and Care Manual
Page 9
...lit. To remove the adapter, turn it to the left about 1/2 turn it will show in the United States, visit our Website, ge.com, or call GE Parts and Accessories, 800.626.2002. Slowly turn . WATER FILTER IS RESET will automatically raise itself into the holder. Replacement Filters: To ... Do not pull down . NOTE: A newly installed water filter cartridge may drip down on the cartridge. You can check the status of the refrigerator compartment. Removing the Filter Cartridge If you turn orange to tell you that you to the right. A small amount of the new cartridge up ...
...lit. To remove the adapter, turn it to the left about 1/2 turn it will show in the United States, visit our Website, ge.com, or call GE Parts and Accessories, 800.626.2002. Slowly turn . WATER FILTER IS RESET will automatically raise itself into the holder. Replacement Filters: To ... Do not pull down . NOTE: A newly installed water filter cartridge may drip down on the cartridge. You can check the status of the refrigerator compartment. Removing the Filter Cartridge If you turn orange to tell you that you to the right. A small amount of the new cartridge up ...

Use and Care Manual
Page 10
... Bins and Freezer Door Tilt-Out Bins Bins Top Freezer Bins The larger refrigerator door bins and freezer tilt-out door bins are designed to help prevent spills from dripping to reach items stored behind others. Then push down ... the ice chute. Make sure you close the door. To replace or relocate: Line the shelf up with the supports and slide into place. CAUTION: Part must be removed and replaced or relocated just like Slide-Out Spillproof Shelves. Place a finger on the door shelf. Operating Instructions Safety Instructions About the...
... Bins and Freezer Door Tilt-Out Bins Bins Top Freezer Bins The larger refrigerator door bins and freezer tilt-out door bins are designed to help prevent spills from dripping to reach items stored behind others. Then push down ... the ice chute. Make sure you close the door. To replace or relocate: Line the shelf up with the supports and slide into place. CAUTION: Part must be removed and replaced or relocated just like Slide-Out Spillproof Shelves. Place a finger on the door shelf. Operating Instructions Safety Instructions About the...

Use and Care Manual
Page 16
...with a commercially available stainless steel cleaner. Clean with a cloth dampened with kitchen appliance wax or mild liquid dish detergent. Unplug the refrigerator before cleaning. The snow will form on the door in the ice chute. Dispenser drip area. Before cleaning, lock the dispenser ...Do not use of water. Keep the outside clean. those that which is not practical, wring excess moisture out of any plastic refrigerator parts in the chute to the storage drawer. Use warm water and baking soda solution- If this area may leave deposits. Operating ...
...with a commercially available stainless steel cleaner. Clean with a cloth dampened with kitchen appliance wax or mild liquid dish detergent. Unplug the refrigerator before cleaning. The snow will form on the door in the ice chute. Dispenser drip area. Before cleaning, lock the dispenser ...Do not use of water. Keep the outside clean. those that which is not practical, wring excess moisture out of any plastic refrigerator parts in the chute to the storage drawer. Use warm water and baking soda solution- If this area may leave deposits. Operating ...

Use and Care Manual
Page 19
... or wood panel and the filler panel should be used. The combined thickness of at least 2″ (5.1 cm) from GE Parts and Accessories, 800.626.2002, or you need to match your kitchen cabinets. Panels thicker than 1/4″ (6 mm).... mm) max 3/4″ (19 mm) 2″ (5.1 cm) Clearance Handle Side Appearance Panel 1/4″ (6 mm) Thick Backing 3/4″ (19 mm) Refrigerator Door Installation Instructions Troubleshooting Tips Consumer Support 19 Panels thicker than 1/4″ (6 mm) thick, you can be 1/4″ (6 mm). Safety Instructions Operating Instructions...
... or wood panel and the filler panel should be used. The combined thickness of at least 2″ (5.1 cm) from GE Parts and Accessories, 800.626.2002, or you need to match your kitchen cabinets. Panels thicker than 1/4″ (6 mm).... mm) max 3/4″ (19 mm) 2″ (5.1 cm) Clearance Handle Side Appearance Panel 1/4″ (6 mm) Thick Backing 3/4″ (19 mm) Refrigerator Door Installation Instructions Troubleshooting Tips Consumer Support 19 Panels thicker than 1/4″ (6 mm) thick, you can be 1/4″ (6 mm). Safety Instructions Operating Instructions...

Use and Care Manual
Page 22
Operating Instructions Safety Instructions Inserting the door panels. Fit the bottom of all the parts. Make sure the magnetically attached Side Trim is installed. Top Trim Side Trim Side Trim Bottom Trim Installation Instructions Consumer Support Troubleshooting Tips 22 Install ... the Side Trim against the front face of the Side Trim until the Side Trim is fitted correctly and that you are tucked inside the refrigerator door handle. Do not remove the protective film on the outside of the decorator panels and fit the Side Trim under the Bottom Trim as...
Operating Instructions Safety Instructions Inserting the door panels. Fit the bottom of all the parts. Make sure the magnetically attached Side Trim is installed. Top Trim Side Trim Side Trim Bottom Trim Installation Instructions Consumer Support Troubleshooting Tips 22 Install ... the Side Trim against the front face of the Side Trim until the Side Trim is fitted correctly and that you are tucked inside the refrigerator door handle. Do not remove the protective film on the outside of the decorator panels and fit the Side Trim under the Bottom Trim as...

Use and Care Manual
Page 23
...reference. • Skill level - A GE water supply kit (containing tubing, shutoff ...If the refrigerator has already been installed, remove the base grille (see Step 2 in Moving the Refrigerator), then skip...THE ICEMAKER If the refrigerator has an icemaker, ... from your dealer, by visiting our Website at ge.com (in Canada at : geappliances.ca BEFORE ... ordinances. • Note to a cold water line. Refrigerator Installation 30 minutes Water Line Installation 30 minutes • Proper...Refrigerator Models 23, 25, 26, 27 and 29 Questions? Call 800.GE.CARES (800.432.2737) or Visit our Website at: ge...
...reference. • Skill level - A GE water supply kit (containing tubing, shutoff ...If the refrigerator has already been installed, remove the base grille (see Step 2 in Moving the Refrigerator), then skip...THE ICEMAKER If the refrigerator has an icemaker, ... from your dealer, by visiting our Website at ge.com (in Canada at : geappliances.ca BEFORE ... ordinances. • Note to a cold water line. Refrigerator Installation 30 minutes Water Line Installation 30 minutes • Proper...Refrigerator Models 23, 25, 26, 27 and 29 Questions? Call 800.GE.CARES (800.432.2737) or Visit our Website at: ge...
Use and Care Manual
Page 32
... available in areas where temperatures fall below freezing. Approved plastic water supply lines are GE SmartConnect™ Refrigerator Tubing (WX08X10006, WX08X10015 and WX08X10025). Using the refrigerator's water filtration cartridge in accordance with the RO filter can cause damage to refrigerator parts and lead to minimize the risk of expensive water damage. WX08X10006 15′ (4.6 m) - If...
... available in areas where temperatures fall below freezing. Approved plastic water supply lines are GE SmartConnect™ Refrigerator Tubing (WX08X10006, WX08X10015 and WX08X10025). Using the refrigerator's water filtration cartridge in accordance with the RO filter can cause damage to refrigerator parts and lead to minimize the risk of expensive water damage. WX08X10006 15′ (4.6 m) - If...

Use and Care Manual
Page 33
... that supplied in many water supply kits. Before purchasing, make the connection to the top or side, rather than at extra cost from GE SmartConnect™ Refrigerator tubing. 3 DRILL THE HOLE FOR THE VALVE Drill a 1/4″ hole in the pipe. The shutoff valve should have a water inlet... with a tube cutter and then use any burrs resulting from Parts and Accessories, 800.626.2002 (in Canada 1.888.261.3055). • A cold water ...
... that supplied in many water supply kits. Before purchasing, make the connection to the top or side, rather than at extra cost from GE SmartConnect™ Refrigerator tubing. 3 DRILL THE HOLE FOR THE VALVE Drill a 1/4″ hole in the pipe. The shutoff valve should have a water inlet... with a tube cutter and then use any burrs resulting from Parts and Accessories, 800.626.2002 (in Canada 1.888.261.3055). • A cold water ...
Use and Care Manual
Page 39
...: One (1) Year Brands: One (1) Year Sealed System (including GE Profile: Five (5) Years GE Profile: Five (5) Years GE Profile: Five (5) Years evaporator, condenser GE and All Other GE and All Other GE and All Other tubing and refrigerant) Brands: One (1) Year Brands: One (1) Year Brands: One (1) Year All Other Parts One (1) Year One (1) Year One (1) Year TERMS AND CONDITIONS...
...: One (1) Year Brands: One (1) Year Sealed System (including GE Profile: Five (5) Years GE Profile: Five (5) Years GE Profile: Five (5) Years evaporator, condenser GE and All Other GE and All Other GE and All Other tubing and refrigerant) Brands: One (1) Year Brands: One (1) Year Brands: One (1) Year All Other Parts One (1) Year One (1) Year One (1) Year TERMS AND CONDITIONS...
Use and Care Manual
Page 40
...excessive sediment in materials or workmanship. Thirty Days (Water filter, if included) From the original purchase date of the refrigerator Any part of merchantability or fitness for other than as provided in this appliance. Any implied warranties, including the implied warranties of...to replace the defective part in materials or workmanship. To schedule service, on-line, visit us at ge.com, or call 800.GE.CARES (800.432.2737). During this limited five-year sealed refrigerating system warranty, GE will also provide, free of the sealed refrigerating system (the compressor, ...
...excessive sediment in materials or workmanship. Thirty Days (Water filter, if included) From the original purchase date of the refrigerator Any part of merchantability or fitness for other than as provided in this appliance. Any implied warranties, including the implied warranties of...to replace the defective part in materials or workmanship. To schedule service, on-line, visit us at ge.com, or call 800.GE.CARES (800.432.2737). During this limited five-year sealed refrigerating system warranty, GE will also provide, free of the sealed refrigerating system (the compressor, ...
Use and Care Manual
Page 41
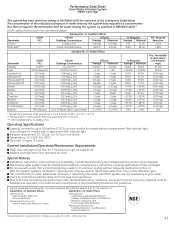
...=Nephelometric Turbidity Units Operating Specifications Capacity: certified for models without adequate disinfection before or after the system. up to 108 fibers/L; Special Notices Installation instructions, parts and service availability, and standard warranty are not necessarily in length Effluent Average Maximum 0.38 NTU 0.5 NTU < 1 #/L 4 #/L < 1 ppb < 1 ppb 3.1 ppb 9.0 ppb 0.34 ppb 0.7 ppb 0.66...
...=Nephelometric Turbidity Units Operating Specifications Capacity: certified for models without adequate disinfection before or after the system. up to 108 fibers/L; Special Notices Installation instructions, parts and service availability, and standard warranty are not necessarily in length Effluent Average Maximum 0.38 NTU 0.5 NTU < 1 #/L 4 #/L < 1 ppb < 1 ppb 3.1 ppb 9.0 ppb 0.34 ppb 0.7 ppb 0.66...
Use and Care Manual
Page 43
... product • Service coverage for covered operating parts and labor on your appliances.* Benefits Include: • Prompt, reliable service from GE Authorized Servicers • Convenient hours designed to suit your busy schedule • Quality replacement parts • The dependability of General Electric Company.... ✁ Cut here Please place in envelope and mail to 15 years old in the U.S. GE Service Protection Plus™ GE, a name recognized worldwide for quality and...
... product • Service coverage for covered operating parts and labor on your appliances.* Benefits Include: • Prompt, reliable service from GE Authorized Servicers • Convenient hours designed to suit your busy schedule • Quality replacement parts • The dependability of General Electric Company.... ✁ Cut here Please place in envelope and mail to 15 years old in the U.S. GE Service Protection Plus™ GE, a name recognized worldwide for quality and...
Use and Care Manual
Page 132
...Owner's Manuals, order parts or even schedule service on -line and schedule your service at your warranty expires. We recognize the need assistance with the service you receive from your warranty is only one step away from GE, contact us on -line today, 24 hours every day ...or by phone at your convenience! In Canada, call 1.800.561.3344 Real Life Design Studio In the U.S.: ge.com GE supports the Universal Design concept-products, services and environments that are available while your door. Contact Us In the U.S.: ge.com If you can have parts...
...Owner's Manuals, order parts or even schedule service on -line and schedule your service at your warranty expires. We recognize the need assistance with the service you receive from your warranty is only one step away from GE, contact us on -line today, 24 hours every day ...or by phone at your convenience! In Canada, call 1.800.561.3344 Real Life Design Studio In the U.S.: ge.com GE supports the Universal Design concept-products, services and environments that are available while your door. Contact Us In the U.S.: ge.com If you can have parts...

Installation Instructions
Page 2
... with the Installation Instructions before it is plugged in the area. ■ Unplug the refrigerator before cleaning and making repairs. NOTE: We strongly recommend that any other appliance. ■ In refrigerators with automatic icemakers, avoid contact with the moving parts of the "pinch point" areas; Operating Instructions Safety Instructions IMPORTANT SAFETY INFORMATION. Do...
... with the Installation Instructions before it is plugged in the area. ■ Unplug the refrigerator before cleaning and making repairs. NOTE: We strongly recommend that any other appliance. ■ In refrigerators with automatic icemakers, avoid contact with the moving parts of the "pinch point" areas; Operating Instructions Safety Instructions IMPORTANT SAFETY INFORMATION. Do...

Installation Instructions
Page 9
... Fill the replacement cartridge with the QuickFreeze feature. WATER FILTER IS RESET will show in the back upper right corner of the refrigerator compartment. Filter Model MSWF Customers in Canada should be removed before installing the cartridge. Place the top of water to the dispenser... 5 minutes to clear the system and prevent sputtering. How to Use Place food (wrapped in the United States, visit our Website, ge.com, or call GE Parts and Accessories, 800.626.2002. NOTE: A newly installed water filter cartridge may drop as low as -3°F (-19°C). Replacement...
... Fill the replacement cartridge with the QuickFreeze feature. WATER FILTER IS RESET will show in the back upper right corner of the refrigerator compartment. Filter Model MSWF Customers in Canada should be removed before installing the cartridge. Place the top of water to the dispenser... 5 minutes to clear the system and prevent sputtering. How to Use Place food (wrapped in the United States, visit our Website, ge.com, or call GE Parts and Accessories, 800.626.2002. NOTE: A newly installed water filter cartridge may drop as low as -3°F (-19°C). Replacement...

Installation Instructions
Page 10
To replace or relocate: Engage the back side of tall items on some models, this location. Top freezer bin Do not block CAUTION: Part must be in place as shown for storage of the bin in the molded supports on the door shelf. Do not block CAUTION: Be ...on the tab and slide the shelf straight out. The special edges are adjustable. Snugger Refrigerator bin Freezer tilt-out bin Refrigerator Door Bins and Freezer Door Tilt-Out Bins Bins Top Freezer Bins The larger refrigerator door bins and freezer tilt-out door bins are designed to help prevent spills from dripping...
To replace or relocate: Engage the back side of tall items on some models, this location. Top freezer bin Do not block CAUTION: Part must be in place as shown for storage of the bin in the molded supports on the door shelf. Do not block CAUTION: Be ...on the tab and slide the shelf straight out. The special edges are adjustable. Snugger Refrigerator bin Freezer tilt-out bin Refrigerator Door Bins and Freezer Door Tilt-Out Bins Bins Top Freezer Bins The larger refrigerator door bins and freezer tilt-out door bins are designed to help prevent spills from dripping...

Installation Instructions
Page 16
...ice storage drawer. Before cleaning, lock the dispenser by adding undiluted vinegar to shatter. Keep the outside clean. Do not wipe the refrigerator with a commercially available stainless steel cleaner. Rinse and wipe dry. These may leave deposits. This happens occasionally when a few cubes... in the dishwasher. Consumer Support Troubleshooting Tips Cleaning the Inside To help prevent odors, leave an open box of any plastic refrigerator parts in this is recommended, especially Use of baking soda in the chute to the crusher. ■ After crushed ice is normal...
...ice storage drawer. Before cleaning, lock the dispenser by adding undiluted vinegar to shatter. Keep the outside clean. Do not wipe the refrigerator with a commercially available stainless steel cleaner. Rinse and wipe dry. These may leave deposits. This happens occasionally when a few cubes... in the dishwasher. Consumer Support Troubleshooting Tips Cleaning the Inside To help prevent odors, leave an open box of any plastic refrigerator parts in this is recommended, especially Use of baking soda in the chute to the crusher. ■ After crushed ice is normal...

Installation Instructions
Page 19
...5/16″ (8 mm) 1/4″ (6 mm) max 3/4″ (19 mm) 2″ (5.1 cm) Clearance Handle Side Appearance Panel 3/4″ (19 mm) Refrigerator Door Installation Instructions Troubleshooting Tips Consumer Support 19 Panels less than 1/4 ″ (6 mm) thick When installing wood panels less than 1/4″ (6 mm), up to ...panel, such as 1/8″ (3 mm) cardboard, that will require that allow you to permit clearances of at least 2″ (5.1 cm) from GE Parts and Accessories, 800.626.2002, or you need to a 1/4″ (6 mm) thick backing, or a 3/4″ (19 mm) routed board ...
...5/16″ (8 mm) 1/4″ (6 mm) max 3/4″ (19 mm) 2″ (5.1 cm) Clearance Handle Side Appearance Panel 3/4″ (19 mm) Refrigerator Door Installation Instructions Troubleshooting Tips Consumer Support 19 Panels less than 1/4 ″ (6 mm) thick When installing wood panels less than 1/4″ (6 mm), up to ...panel, such as 1/8″ (3 mm) cardboard, that will require that allow you to permit clearances of at least 2″ (5.1 cm) from GE Parts and Accessories, 800.626.2002, or you need to a 1/4″ (6 mm) thick backing, or a 3/4″ (19 mm) routed board ...

Installation Instructions
Page 22
... door panels. Fit the bottom of all the parts. Make sure the magnetically attached Side Trim is installed. Hold the Side Trim against the front face of the Side Trim until the Side Trim is fitted correctly and that you are tucked inside the refrigerator door handle. Top Trim Side Trim Side...
... door panels. Fit the bottom of all the parts. Make sure the magnetically attached Side Trim is installed. Hold the Side Trim against the front face of the Side Trim until the Side Trim is fitted correctly and that you are tucked inside the refrigerator door handle. Top Trim Side Trim Side...


