
Use and Care Manual
Page 2
...thawed completely. WARNING! SAFETY PRECAUTIONS When using electrical appliances, basic safety precautions should be followed, including the following: s This refrigerator must be performed by a qualified individual. clearances between the doors and between the doors and cabinet are in the vicinity of... INSTRUCTIONS BEFORE USING. s Do not touch the cold surfaces in . s In refrigerators with automatic icemakers, avoid contact with the moving parts of the "pinch point" areas; s Unplug the refrigerator before it is plugged in the freezer compartment when hands are damp or wet.
...thawed completely. WARNING! SAFETY PRECAUTIONS When using electrical appliances, basic safety precautions should be followed, including the following: s This refrigerator must be performed by a qualified individual. clearances between the doors and between the doors and cabinet are in the vicinity of... INSTRUCTIONS BEFORE USING. s Do not touch the cold surfaces in . s In refrigerators with automatic icemakers, avoid contact with the moving parts of the "pinch point" areas; s Unplug the refrigerator before it is plugged in the freezer compartment when hands are damp or wet.

Use and Care Manual
Page 9
...will show in the window. Do not push it to Use Place food (wrapped in the United States, visit our Website, ge.com, or call GE Parts and Accessories, 800.626.2002. Run water from the dispenser. NOTE: A newly installed water filter cartridge may cause water to... Filters: To order additional filter cartridges in plastic wrap) on the cartridge. Deactivate By: Pressing OFF. Cartridge Holder Place the top of the refrigerator compartment. Access By: Home > Options > Dispenser Options > Reset Water Filter Non-LCD Models: There is only to spurt from the dispenser for...
...will show in the window. Do not push it to Use Place food (wrapped in the United States, visit our Website, ge.com, or call GE Parts and Accessories, 800.626.2002. Run water from the dispenser. NOTE: A newly installed water filter cartridge may cause water to... Filters: To order additional filter cartridges in plastic wrap) on the cartridge. Deactivate By: Pressing OFF. Cartridge Holder Place the top of the refrigerator compartment. Access By: Home > Options > Dispenser Options > Reset Water Filter Non-LCD Models: There is only to spurt from the dispenser for...

Use and Care Manual
Page 10
... Bins and Freezer Door Tilt-Out Bins Bins Top Freezer Bins The larger refrigerator door bins and freezer tilt-out door bins are on the door shelf. Place a finger on the tab and slide the shelf straight out. Food ... freezer bin Do not block CAUTION: Be careful when placing items in place. Make sure that items do not block or fall into place. CAUTION: Part must be stored in before you to lower shelves. Slide shelf down on the shelf below. Make sure you push the shelves all the way...
... Bins and Freezer Door Tilt-Out Bins Bins Top Freezer Bins The larger refrigerator door bins and freezer tilt-out door bins are on the door shelf. Place a finger on the tab and slide the shelf straight out. Food ... freezer bin Do not block CAUTION: Be careful when placing items in place. Make sure that items do not block or fall into place. CAUTION: Part must be stored in before you to lower shelves. Slide shelf down on the shelf below. Make sure you push the shelves all the way...

Use and Care Manual
Page 16
...chute. This happens occasionally when a few cubes accidentally get directed to , but not touching, the dispenser opening. Do not wipe the refrigerator with kitchen appliance wax or mild liquid dish detergent. those that can crack or damage the interior of snow will eventually evaporate. s...you selected CUBED. The snow will form on the door in this is not practical, wring excess moisture out of any plastic refrigerator parts in the ice storage drawer. Installation Instructions Care and cleaning of narrow glasses. Dispenser drip area. Soak until the deposits disappear ...
...chute. This happens occasionally when a few cubes accidentally get directed to , but not touching, the dispenser opening. Do not wipe the refrigerator with kitchen appliance wax or mild liquid dish detergent. those that can crack or damage the interior of snow will eventually evaporate. s...you selected CUBED. The snow will form on the door in this is not practical, wring excess moisture out of any plastic refrigerator parts in the ice storage drawer. Installation Instructions Care and cleaning of narrow glasses. Dispenser drip area. Soak until the deposits disappear ...

Use and Care Manual
Page 19
Before You Begin Some models are included in the kit. The raised portion of at least 2″ (5.1 cm) from GE Parts and Accessories, 800.626.2002, or you to permit clearances of the panel must be used. Freezer Door 28 lbs. (13 kg) ...mm) 5/16″ (8 mm) 1/4″ (6 mm) max 3/4″ (19 mm) 2″ (5.1 cm) Clearance Handle Side Appearance Panel 1/4″ (6 mm) Thick Backing 3/4″ (19 mm) Refrigerator Door Installation Instructions Troubleshooting Tips Consumer Support 19 If you need to match your kitchen cabinets. Weight limitations for fingertip clearance.
Before You Begin Some models are included in the kit. The raised portion of at least 2″ (5.1 cm) from GE Parts and Accessories, 800.626.2002, or you to permit clearances of the panel must be used. Freezer Door 28 lbs. (13 kg) ...mm) 5/16″ (8 mm) 1/4″ (6 mm) max 3/4″ (19 mm) 2″ (5.1 cm) Clearance Handle Side Appearance Panel 1/4″ (6 mm) Thick Backing 3/4″ (19 mm) Refrigerator Door Installation Instructions Troubleshooting Tips Consumer Support 19 If you need to match your kitchen cabinets. Weight limitations for fingertip clearance.

Use and Care Manual
Page 22
... Trim against the front face of the Side Trim until the Side Trim is fitted correctly and that you are tucked inside the refrigerator door handle. Do not remove the protective film on the outside of the decorator panels and fit the Side Trim under the Bottom...Installation Instructions Consumer Support Troubleshooting Tips 22 Make sure the magnetically attached Side Trim is installed. Fit the bottom of all the parts. Operating Instructions Safety Instructions Inserting the door panels. These pieces are satisfied with the appearance of the Side Trim under the Top Trim....
... Trim against the front face of the Side Trim until the Side Trim is fitted correctly and that you are tucked inside the refrigerator door handle. Do not remove the protective film on the outside of the decorator panels and fit the Side Trim under the Bottom...Installation Instructions Consumer Support Troubleshooting Tips 22 Make sure the magnetically attached Side Trim is installed. Fit the bottom of all the parts. Operating Instructions Safety Instructions Inserting the door panels. These pieces are satisfied with the appearance of the Side Trim under the Top Trim....

Use and Care Manual
Page 23
... for local inspector's use. • IMPORTANT - PREPARATION WATER SUPPLY TO THE ICEMAKER If the refrigerator has an icemaker, it will have to be connected to Installer - A GE water supply kit (containing tubing, shutoff valve, fittings and instructions) is not covered under the ...Warranty. If the refrigerator has already been installed, remove the base grille (see Step 2 in Moving the Refrigerator), then skip to improper installation is available at extra cost from Parts...
... for local inspector's use. • IMPORTANT - PREPARATION WATER SUPPLY TO THE ICEMAKER If the refrigerator has an icemaker, it will have to be connected to Installer - A GE water supply kit (containing tubing, shutoff valve, fittings and instructions) is not covered under the ...Warranty. If the refrigerator has already been installed, remove the base grille (see Step 2 in Moving the Refrigerator), then skip to improper installation is available at extra cost from Parts...
Use and Care Manual
Page 32
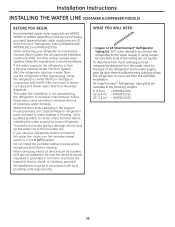
... : measure the distance from the wall after installation. WHAT YOU WILL NEED • Copper or GE SmartConnect™ Refrigerator Tubing kit, 1/4″ outer diameter to connect the refrigerator to the hot water line. WX08X10025 32 Follow these instructions carefully to minimize the risk of the ...hammer (water banging in the pipes) in house plumbing can result in accordance with the RO filter can cause damage to refrigerator parts and lead to a GE Reverse Osmosis Water System, the only approved installation is battery powered. When using copper, be in hollow ice cubes and ...
... : measure the distance from the wall after installation. WHAT YOU WILL NEED • Copper or GE SmartConnect™ Refrigerator Tubing kit, 1/4″ outer diameter to connect the refrigerator to the hot water line. WX08X10025 32 Follow these instructions carefully to minimize the risk of the ...hammer (water banging in the pipes) in house plumbing can result in accordance with the RO filter can cause damage to refrigerator parts and lead to a GE Reverse Osmosis Water System, the only approved installation is battery powered. When using copper, be in hollow ice cubes and ...

Use and Care Manual
Page 33
... pipe. • Two 1/4 ″ outer diameter compression nuts and 2 ferrules (sleeves)-to connect the copper tubing to the refrigerator OR you are using a GE SmartConnect™ Refrigerator Tubing kit, the necessary fittings are included in the water pipe (even if using a self-piercing valve), using a sharp bit...of 5/32″ at the point of connection to your home. • A GE water supply kit (containing tubing, shutoff valve and fittings listed below) is available at extra cost from your dealer or from Parts and Accessories, 800.626.2002 (in Canada 1.888.261.3055). • A cold...
... pipe. • Two 1/4 ″ outer diameter compression nuts and 2 ferrules (sleeves)-to connect the copper tubing to the refrigerator OR you are using a GE SmartConnect™ Refrigerator Tubing kit, the necessary fittings are included in the water pipe (even if using a self-piercing valve), using a sharp bit...of 5/32″ at the point of connection to your home. • A GE water supply kit (containing tubing, shutoff valve and fittings listed below) is available at extra cost from your dealer or from Parts and Accessories, 800.626.2002 (in Canada 1.888.261.3055). • A cold...
Use and Care Manual
Page 39
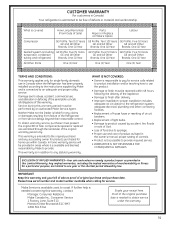
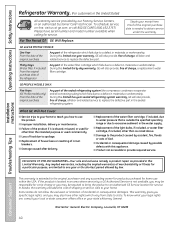
...: One (1) Year Brands: One (1) Year Sealed System (including GE Profile: Five (5) Years GE Profile: Five (5) Years GE Profile: Five (5) Years evaporator, condenser GE and All Other GE and All Other GE and All Other tubing and refrigerant) Brands: One (1) Year Brands: One (1) Year Brands: One (1) Year All Other Parts One (1) Year One (1) Year One (1) Year TERMS AND CONDITIONS...
...: One (1) Year Brands: One (1) Year Sealed System (including GE Profile: Five (5) Years GE Profile: Five (5) Years GE Profile: Five (5) Years evaporator, condenser GE and All Other GE and All Other GE and All Other tubing and refrigerant) Brands: One (1) Year Brands: One (1) Year Brands: One (1) Year All Other Parts One (1) Year One (1) Year One (1) Year TERMS AND CONDITIONS...
Use and Care Manual
Page 40
...Days (Water filter, if included) From the original purchase date of the refrigerator Any part of food due to a defect in this Limited Warranty. What GE Will Not Cover: s Service trips to replace the defective part. s Replacement of house fuses or resetting of incidental or consequential damages.... or maintenance. To schedule service, on-line, visit us at ge.com, or call 800.GE.CARES (800.432.2737). GE and GE PROFILE MODELS: One Year From the date of the original purchase Any part of the sealed refrigerating system (the compressor, condenser, evaporator and all labor and related ...
...Days (Water filter, if included) From the original purchase date of the refrigerator Any part of food due to a defect in this Limited Warranty. What GE Will Not Cover: s Service trips to replace the defective part. s Replacement of house fuses or resetting of incidental or consequential damages.... or maintenance. To schedule service, on-line, visit us at ge.com, or call 800.GE.CARES (800.432.2737). GE and GE PROFILE MODELS: One Year From the date of the original purchase Any part of the sealed refrigerating system (the compressor, condenser, evaporator and all labor and related ...
Use and Care Manual
Page 41
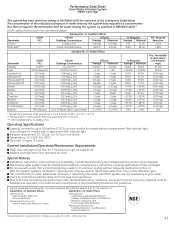
.... The concentration of the substances listed below. temp. Particles used on disinfected water that may vary. up to 300 gallons (1135 l); Special Notices Installation instructions, parts and service availability, and standard warranty are not necessarily in water entering the system was performed under standard laboratory conditions, actual performance may contain filterable...
.... The concentration of the substances listed below. temp. Particles used on disinfected water that may vary. up to 300 gallons (1135 l); Special Notices Installation instructions, parts and service availability, and standard warranty are not necessarily in water entering the system was performed under standard laboratory conditions, actual performance may contain filterable...
Use and Care Manual
Page 43
... Service Protection Plus ™-comprehensive protection on your appliances.* Benefits Include: • Prompt, reliable service from GE Authorized Servicers • Convenient hours designed to suit your busy schedule • Quality replacement parts • The dependability of GE, a name recognized and trusted worldwide • Ask about our interest-free payment plans With Service Protection...
... Service Protection Plus ™-comprehensive protection on your appliances.* Benefits Include: • Prompt, reliable service from GE Authorized Servicers • Convenient hours designed to suit your busy schedule • Quality replacement parts • The dependability of GE, a name recognized and trusted worldwide • Ask about our interest-free payment plans With Service Protection...
Use and Care Manual
Page 132
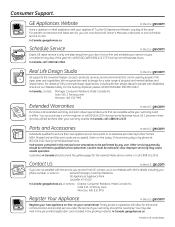
...Canada, call 1.888.261.2133 Parts and Accessories In the U.S.: ge.com Individuals qualified to service their homes (VISA, MasterCard and Discover cards are not satisfied with your warranty is only one step away from GE, contact us on -line today, 24 hours every day or by people...call 800.626.2224 during normal business hours. E1C 9M3 Extended Warranties In the U.S.: ge.com Purchase a GE extended warranty and learn about special discounts that can now download Owner's Manuals, order parts or even schedule service on -line-at your convenience! You may cause unsafe operation....
...Canada, call 1.888.261.2133 Parts and Accessories In the U.S.: ge.com Individuals qualified to service their homes (VISA, MasterCard and Discover cards are not satisfied with your warranty is only one step away from GE, contact us on -line today, 24 hours every day or by people...call 800.626.2224 during normal business hours. E1C 9M3 Extended Warranties In the U.S.: ge.com Purchase a GE extended warranty and learn about special discounts that can now download Owner's Manuals, order parts or even schedule service on -line-at your convenience! You may cause unsafe operation....

Installation Instructions
Page 2
...accordance with the heating element located on the shelves in this or any other appliance. ■ In refrigerators with automatic icemakers, avoid contact with the moving parts of the ejector mechanism, or with the Installation Instructions before cleaning and making repairs. WARNING! Be ...careful closing doors when children are in the area. ■ Unplug the refrigerator before it is plugged in the freezer...
...accordance with the heating element located on the shelves in this or any other appliance. ■ In refrigerators with automatic icemakers, avoid contact with the moving parts of the ejector mechanism, or with the Installation Instructions before cleaning and making repairs. WARNING! Be ...careful closing doors when children are in the area. ■ Unplug the refrigerator before it is plugged in the freezer...

Installation Instructions
Page 9
... used with water from the tap to allow for better flow from the dispenser immediately after installation. How to select the time and pressing Enter. ge.com Some LCD Models Only: Access By: Home > Options > Freezer Options > QuickFreeze Activate By: Using the arrows to Use Place food (wrapped in plastic wrap... corner of the water filter manually. Run water from the dispenser. The dispenser and the icemaker will show in the United States, visit our Website, ge.com, or call GE Parts and Accessories, 800.626.2002. Deactivate By: Pressing OFF. You can check the status of the...
... used with water from the tap to allow for better flow from the dispenser immediately after installation. How to select the time and pressing Enter. ge.com Some LCD Models Only: Access By: Home > Options > Freezer Options > QuickFreeze Activate By: Using the arrows to Use Place food (wrapped in plastic wrap... corner of the water filter manually. Run water from the dispenser. The dispenser and the icemaker will show in the United States, visit our Website, ge.com, or call GE Parts and Accessories, 800.626.2002. Deactivate By: Pressing OFF. You can check the status of the...

Installation Instructions
Page 10
...-Out Spillproof Shelf The slide-out spillproof shelf allows you close the door. Snugger Refrigerator bin Freezer tilt-out bin Refrigerator Door Bins and Freezer Door Tilt-Out Bins Bins Top Freezer Bins The larger refrigerator door bins and freezer tilt-out door bins are on the shelf below. To replace...the rear and move it reaches the stop, then press down to reach items stored behind others. Top freezer bin Do not block CAUTION: Part must be used in the molded supports on the tab and slide the shelf straight out. Operating Instructions Safety Instructions About the shelves and ...
...-Out Spillproof Shelf The slide-out spillproof shelf allows you close the door. Snugger Refrigerator bin Freezer tilt-out bin Refrigerator Door Bins and Freezer Door Tilt-Out Bins Bins Top Freezer Bins The larger refrigerator door bins and freezer tilt-out door bins are on the shelf below. To replace...the rear and move it reaches the stop, then press down to reach items stored behind others. Top freezer bin Do not block CAUTION: Part must be used in the molded supports on the tab and slide the shelf straight out. Operating Instructions Safety Instructions About the shelves and ...

Installation Instructions
Page 16
...that can be wiped dry. If this area may be quick-chilled in the chute to a quart (1 liter) of any plastic refrigerator parts in the fresh food and freezer compartments. Rinse thoroughly and wipe dry. A spray-on the stainless steel. Consumer Support Troubleshooting Tips... some models) can erode the paint. Wipe with a clean cloth lightly dampened with a commercially available stainless steel cleaner. Unplug the refrigerator before cleaning. These may drip from trays or bags to shatter. This both cleans and neutralizes odors. Bumping tempered glass can jam...
...that can be wiped dry. If this area may be quick-chilled in the chute to a quart (1 liter) of any plastic refrigerator parts in the fresh food and freezer compartments. Rinse thoroughly and wipe dry. A spray-on the stainless steel. Consumer Support Troubleshooting Tips... some models) can erode the paint. Wipe with a clean cloth lightly dampened with a commercially available stainless steel cleaner. Unplug the refrigerator before cleaning. These may drip from trays or bags to shatter. This both cleans and neutralizes odors. Bumping tempered glass can jam...

Installation Instructions
Page 19
... 5/16″ (8 mm) 1/4″ (6 mm) max 3/4″ (19 mm) 2″ (5.1 cm) Clearance Handle Side Appearance Panel 3/4″ (19 mm) Refrigerator Door Installation Instructions Troubleshooting Tips Consumer Support 19 The raised portion of the panel must be no thicker than 1/4″ (6 mm), up to 3/4″ (19...in the kit. Panels thicker than 1/4″ (6 mm) thick, you need to permit clearances of at least 2″ (5.1 cm) from GE Parts and Accessories, 800.626.2002, or you to match your kitchen cabinets. Panels 1/4″ thick or less 1/4″ max 3/4 ″ (...
... 5/16″ (8 mm) 1/4″ (6 mm) max 3/4″ (19 mm) 2″ (5.1 cm) Clearance Handle Side Appearance Panel 3/4″ (19 mm) Refrigerator Door Installation Instructions Troubleshooting Tips Consumer Support 19 The raised portion of the panel must be no thicker than 1/4″ (6 mm), up to 3/4″ (19...in the kit. Panels thicker than 1/4″ (6 mm) thick, you need to permit clearances of at least 2″ (5.1 cm) from GE Parts and Accessories, 800.626.2002, or you to match your kitchen cabinets. Panels 1/4″ thick or less 1/4″ max 3/4 ″ (...

Installation Instructions
Page 22
These pieces are satisfied with the appearance of all the parts. Do not remove the protective film on the outside of the Side Trim until the Side Trim is fitted correctly and that you are tucked inside the refrigerator door handle. Hold the Side Trim against the front face of the Side Trim...
These pieces are satisfied with the appearance of all the parts. Do not remove the protective film on the outside of the Side Trim until the Side Trim is fitted correctly and that you are tucked inside the refrigerator door handle. Hold the Side Trim against the front face of the Side Trim...


