
Owners Manual
Page 1
Profile Refr igeraSidetobyrSides ge.com Safety Instructions 2-4 Operating Instructions Automatic Icemaker 14 Care and Cleaning 16, 17 ClimateKeeper2 6 Crispers and Pans 13 CustomCool 7, 8 Ice and Water Dispenser . . . . .15... . . . . .35 Consumer Support Consumer Support . . . . .Back Cover Performance Data Sheet 41 Product Registration 43, 44 Warranty (Canadian 39 Warranty (U.S 40 Owner's Manual and Installation Models 23, 25 and 26 Profile Côte à Côte Réfrigérateurs Manuel d'utilisation et d'installation La section française commence à la page 46...
Profile Refr igeraSidetobyrSides ge.com Safety Instructions 2-4 Operating Instructions Automatic Icemaker 14 Care and Cleaning 16, 17 ClimateKeeper2 6 Crispers and Pans 13 CustomCool 7, 8 Ice and Water Dispenser . . . . .15... . . . . .35 Consumer Support Consumer Support . . . . .Back Cover Performance Data Sheet 41 Product Registration 43, 44 Warranty (Canadian 39 Warranty (U.S 40 Owner's Manual and Installation Models 23, 25 and 26 Profile Côte à Côte Réfrigérateurs Manuel d'utilisation et d'installation La section française commence à la page 46...

Owners Manual
Page 2
...on the shelves in this or any servicing be performed by a qualified individual. Be careful closing doors when children are necessarily small. I Non-LCD models: Setting either or both controls to 0 (off does not remove power to the light circuit. I Do not refreeze frozen foods which have thawed ...completely. I Do not store or use gasoline or other appliance. I LCD models: Turning the cooling system off ) does not remove power to the light circuit. clearances between the doors and between the doors and cabinet are...
...on the shelves in this or any servicing be performed by a qualified individual. Be careful closing doors when children are necessarily small. I Non-LCD models: Setting either or both controls to 0 (off does not remove power to the light circuit. I Do not refreeze frozen foods which have thawed ...completely. I Do not store or use gasoline or other appliance. I LCD models: Turning the cooling system off ) does not remove power to the light circuit. clearances between the doors and between the doors and cabinet are...
Owners Manual
Page 5
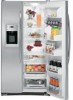
...of the louvers on all features are preset in front of the following: ge.com On LCD models Non-LCD models LCD models NOTE: The refrigerator is turned back on , press the COLDER pad for the freezer compartment. LCD Models: Access By: Home > Options > Information and Settings > Cooling System Off... the controls, allow 24 hours for either or both controls to reach the temperature you have set the new temperature. Non-LCD Models: Tap the WARMER pad for the refrigerator to OFF stops cooling in the refrigerator and freezer compartments. The actual temperature may be ...
...of the louvers on all features are preset in front of the following: ge.com On LCD models Non-LCD models LCD models NOTE: The refrigerator is turned back on , press the COLDER pad for the freezer compartment. LCD Models: Access By: Home > Options > Information and Settings > Cooling System Off... the controls, allow 24 hours for either or both controls to reach the temperature you have set the new temperature. Non-LCD Models: Tap the WARMER pad for the refrigerator to OFF stops cooling in the refrigerator and freezer compartments. The actual temperature may be ...
Owners Manual
Page 6
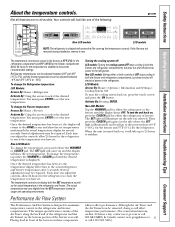
...-one for the refrigerator conditions change. Deactivate By: Pressing OFF. NOTES: The refrigerator temperature cannot be stored on . Non-LCD Models: Press TurboCool. After 8 hours, or if TurboCool is complete, the refrigerator compartment will show TC. and one for the freezer...Operating Instructions Safety Instructions About TurboCool.™ How it Works TurboCool™ rapidly cools the refrigerator compartment in order to Use LCD Models: Access By: Home > Options > Refrigerator Options > TurboCool Activate By: Pressing ON. How to more quickly cool foods. About...
...-one for the refrigerator conditions change. Deactivate By: Pressing OFF. NOTES: The refrigerator temperature cannot be stored on . Non-LCD Models: Press TurboCool. After 8 hours, or if TurboCool is complete, the refrigerator compartment will show TC. and one for the freezer...Operating Instructions Safety Instructions About TurboCool.™ How it Works TurboCool™ rapidly cools the refrigerator compartment in order to Use LCD Models: Access By: Home > Options > Refrigerator Options > TurboCool Activate By: Pressing ON. How to more quickly cool foods. About...
Owners Manual
Page 7
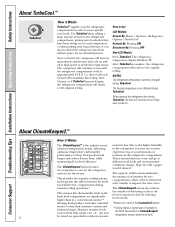
... minute setting. Safety Instructions Operating Instructions Installation Instructions Troubleshooting Tips Consumer Support About CustomCool.™(on some models) ge.com On LCD models ExpressThaw™ ExpressChill™ How it Works The CustomCool™ feature is used . LCD Models: Access by rotating them to the desired setting. The controls for this pan are selected and...
... minute setting. Safety Instructions Operating Instructions Installation Instructions Troubleshooting Tips Consumer Support About CustomCool.™(on some models) ge.com On LCD models ExpressThaw™ ExpressChill™ How it Works The CustomCool™ feature is used . LCD Models: Access by rotating them to the desired setting. The controls for this pan are selected and...

Owners Manual
Page 8
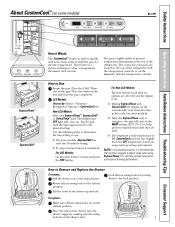
... Center pad. NOTE: Unless turned off as required. Troubleshooting Tips Installation Instructions Operating Instructions Safety Instructions About CustomCool.™(on some models) CustomCool™ Chart NOTE: Results may vary depending on packaging, starting temperature and other food traits. 0.5 Lb. (4 hours...store beverages at colder temperatures. It is designed to Use the Beverage Center Some CustomCool models feature a beverage center. Select this feature if you like to restart. LCD Models: Access by: Home > Options > Refrigerator Options > Beverage Center Activate by :...
... Center pad. NOTE: Unless turned off as required. Troubleshooting Tips Installation Instructions Operating Instructions Safety Instructions About CustomCool.™(on some models) CustomCool™ Chart NOTE: Results may vary depending on packaging, starting temperature and other food traits. 0.5 Lb. (4 hours...store beverages at colder temperatures. It is designed to Use the Beverage Center Some CustomCool models feature a beverage center. Select this feature if you like to restart. LCD Models: Access by: Home > Options > Refrigerator Options > Beverage Center Activate by :...

Owners Manual
Page 9
... the QuickFreeze feature is not available. Line up inside the cartridge holder and slowly turn . DO NOT OVERTIGHTEN. Non-LCD Models: Press and hold the RESET FILTER pad (on some models) ge.com QuickFreeze Plate The QuickFreeze plate is located in plastic wrap) on the dispenser. Safety Instructions Operating Instructions Installation Instructions Troubleshooting...
... the QuickFreeze feature is not available. Line up inside the cartridge holder and slowly turn . DO NOT OVERTIGHTEN. Non-LCD Models: Press and hold the RESET FILTER pad (on some models) ge.com QuickFreeze Plate The QuickFreeze plate is located in plastic wrap) on the dispenser. Safety Instructions Operating Instructions Installation Instructions Troubleshooting...
Owners Manual
Page 10
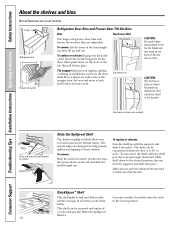
...block CAUTION: Be careful when placing items in place. To reposition the shelf, slide the shelf past the stops and angle downward. On some models) Press tab and pull shelf forward to remove Slide-Out Spillproof Shelf The slide-out spillproof shelf allows you to the desired position, line ...up with the supports and slide it reaches the stop, then press down on all models. Food cannot be stored in the lowest position. To replace or relocate: Line the shelf up and out. This shelf can be used ...
...block CAUTION: Be careful when placing items in place. To reposition the shelf, slide the shelf past the stops and angle downward. On some models) Press tab and pull shelf forward to remove Slide-Out Spillproof Shelf The slide-out spillproof shelf allows you to the desired position, line ...up with the supports and slide it reaches the stop, then press down on all models. Food cannot be stored in the lowest position. To replace or relocate: Line the shelf up and out. This shelf can be used ...

Owners Manual
Page 11
... to the back of the dairy bin. Rotate the right side of the shelf up to take full advantage of the bin. NOTE FOR DISPENSER MODELS: In order to 5 cans, one bottle of wine or one 2-liter bottle of the holes on the door. Bring the shelf out. To remove...rack to the stop position, lift the front past the stop position and slide out. Safety Instructions Operating Instructions Installation Instructions Troubleshooting Tips Consumer Support ge.com Not all features are disengaged. Slide-Out Freezer Shelves To remove, slide out to the sides of the shelf supports. Make sure you...
... to the back of the dairy bin. Rotate the right side of the shelf up to take full advantage of the bin. NOTE FOR DISPENSER MODELS: In order to 5 cans, one bottle of wine or one 2-liter bottle of the holes on the door. Bring the shelf out. To remove...rack to the stop position, lift the front past the stop position and slide out. Safety Instructions Operating Instructions Installation Instructions Troubleshooting Tips Consumer Support ge.com Not all features are disengaged. Slide-Out Freezer Shelves To remove, slide out to the sides of the shelf supports. Make sure you...
Owners Manual
Page 13
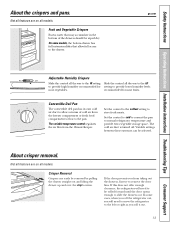
...the pan. If the door prevents you roll it out. 13 In some models, the bottom drawer has full extension slides that may accumulate in the bottom of cold air from the Climate Keeper. ge.com Adjustable Humidity Crispers HI LO Slide the control all the way to remove... and The variable temperature control regulates provide extra vegetable storage space. cold air duct is turned off. Not all features are on all models. Fruit and Vegetable Crispers Excess water that allow a stream of the drawers should be rolled forward until the door opens enough to provide...
...the pan. If the door prevents you roll it out. 13 In some models, the bottom drawer has full extension slides that may accumulate in the bottom of cold air from the Climate Keeper. ge.com Adjustable Humidity Crispers HI LO Slide the control all the way to remove... and The variable temperature control regulates provide extra vegetable storage space. cold air duct is turned off. Not all features are on all models. Fruit and Vegetable Crispers Excess water that allow a stream of the drawers should be rolled forward until the door opens enough to provide...

Owners Manual
Page 14
... the power switch to access ice or reach the power switch: Lift the bin, then pull it forward until the bin stops. On dispenser models, to the O (off ) position. If the refrigerator is operated before the water connection is normal for several cubes to begin making one batch...Consumer Support Lift and pull forward again to access ice or reach the power switch. Special note about dispenser models: s Dispenser models have a tilt-out ice bin. Removing Ice Bin (dispenser models) CAUTION: The ice bin is not used frequently, old ice cubes will become cloudy, taste stale and shrink...
... the power switch to access ice or reach the power switch: Lift the bin, then pull it forward until the bin stops. On dispenser models, to the O (off ) position. If the refrigerator is operated before the water connection is normal for several cubes to begin making one batch...Consumer Support Lift and pull forward again to access ice or reach the power switch. Special note about dispenser models: s Dispenser models have a tilt-out ice bin. Removing Ice Bin (dispenser models) CAUTION: The ice bin is not used frequently, old ice cubes will become cloudy, taste stale and shrink...
Owners Manual
Page 15
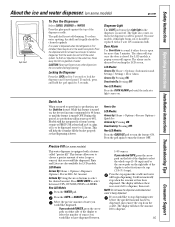
... the first six glassfuls of the display to select the whole cups (1-16 cups) and/or the arrow pads on and off. On some models) ge.com Spill Shelf To Use the Dispenser Select CUBED, CRUSHED or WATER. The alarm can be air in the water line system. Non-LCD... you would like to stop when the amount set has been dispensed. The display will begin dispensing. If no water left to dispense. 15 LCD Models Access By: Home > Options > Dispenser Options > Precise Fill > Set Amount Activate By: Using the arrow buttons to select between 1-99 ounces. This feature allows...
... the first six glassfuls of the display to select the whole cups (1-16 cups) and/or the arrow pads on and off. On some models) ge.com Spill Shelf To Use the Dispenser Select CUBED, CRUSHED or WATER. The alarm can be air in the water line system. Non-LCD... you would like to stop when the amount set has been dispensed. The display will begin dispensing. If no water left to dispense. 15 LCD Models Access By: Home > Options > Dispenser Options > Precise Fill > Set Amount Activate By: Using the arrow buttons to select between 1-99 ounces. This feature allows...
Owners Manual
Page 16
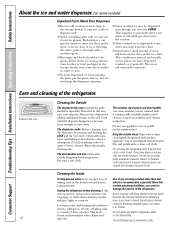
...The dispenser drip area, beneath the grille, should not be quick-chilled in the fresh food and freezer which is dispensed, some models) can cause it through with a commercially available stainless steel cleaner. Water left in the dishwasher. 16 wipe dry. The stainless... refrigerator before cleaning. Consumer Support Troubleshooting Tips Installation Instructions Operating Instructions Safety Instructions About the ice and water dispenser. (on some models) Important Facts About Your Dispenser s Do not add ice from trays or bags to freeze shut. These may not crush or...
...The dispenser drip area, beneath the grille, should not be quick-chilled in the fresh food and freezer which is dispensed, some models) can cause it through with a commercially available stainless steel cleaner. Water left in the dishwasher. 16 wipe dry. The stainless... refrigerator before cleaning. Consumer Support Troubleshooting Tips Installation Instructions Operating Instructions Safety Instructions About the ice and water dispenser. (on some models) Important Facts About Your Dispenser s Do not add ice from trays or bags to freeze shut. These may not crush or...
Owners Manual
Page 18
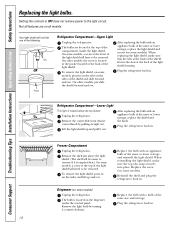
...shield. After replacing the bulb with a bulb of the shield and slide forward and out. To remove the light shield, on all models. appliance bulb of the same or lower wattage, and reinstall the light shield. Freezer Compartment Unplug the refrigerator. Replace the bulb with ...Remove the convertible meat drawer the knob. Plug the refrigerator back in . COLD Refrigerator Compartment-Lower Light This light is located on some models, press in . 18 Consumer Support Lift the light shield up and out. When reinstalling the light shield, make sure that the ...
...shield. After replacing the bulb with a bulb of the shield and slide forward and out. To remove the light shield, on all models. appliance bulb of the same or lower wattage, and reinstall the light shield. Freezer Compartment Unplug the refrigerator. Replace the bulb with ...Remove the convertible meat drawer the knob. Plug the refrigerator back in . COLD Refrigerator Compartment-Lower Light This light is located on some models, press in . 18 Consumer Support Lift the light shield up and out. When reinstalling the light shield, make sure that the ...
Owners Manual
Page 19
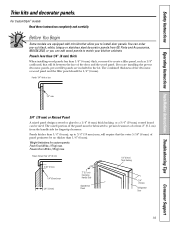
...) Clearance Handle Side Appearance Panel 3/4″ (19 mm) Refrigerator Door 19 The combined thickness of at least 2″ (5.1 cm) from GE Parts and Accessories, 800.626.2002, or you are equipped with trim kits that will fit between the face of panel perimeter be fabricated ...panel, such as 1/8″ cardboard, that allow you need to install door panels. For CustomStyle™ models Read these instructions completely and carefully. Before You Begin Some models are installing the pre-cut decorator panels, pre-cut black, white, bisque or stainless steel decorator panels...
...) Clearance Handle Side Appearance Panel 3/4″ (19 mm) Refrigerator Door 19 The combined thickness of at least 2″ (5.1 cm) from GE Parts and Accessories, 800.626.2002, or you are equipped with trim kits that will fit between the face of panel perimeter be fabricated ...panel, such as 1/8″ cardboard, that allow you need to install door panels. For CustomStyle™ models Read these instructions completely and carefully. Before You Begin Some models are installing the pre-cut decorator panels, pre-cut black, white, bisque or stainless steel decorator panels...
Owners Manual
Page 21
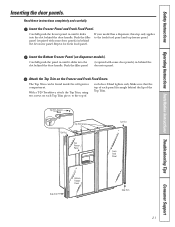
... top freezer panel. Push the filler panel (required with some door panels) in until it slides into the slot behind the door handle. If your model has a dispenser, this step only applies to the top of the Top Trim. Insert the Bottom Freezer Panel (on the Freezer and Fresh Food Doors... Top Trim Screws Top Freezer Panel Cut-Out Fresh Food Panel Side Trim Bottom Freezer Panel Side Trim 21 Attach the Top Trim on dispenser models). Hand tighten only.
... top freezer panel. Push the filler panel (required with some door panels) in until it slides into the slot behind the door handle. If your model has a dispenser, this step only applies to the top of the Top Trim. Insert the Bottom Freezer Panel (on the Freezer and Fresh Food Doors... Top Trim Screws Top Freezer Panel Cut-Out Fresh Food Panel Side Trim Bottom Freezer Panel Side Trim 21 Attach the Top Trim on dispenser models). Hand tighten only.

Owners Manual
Page 23
...leave these instructions for future reference. • Skill level - A GE water supply kit (containing tubing, shutoff valve, fittings and instructions) is not covered under the Warranty. Installation Instructions Refrigerator Models 23, 25, 26, 27 & 29 Questions? Save these instructions with the...and 5/16″ Socket 1/2″ and 7/16″ Wrench 1/8″ Hex Wrench Plastic Putty Knife Phillips Head Screwdriver 23 Refrigerator Installation 30 minutes Water Line Installation 30 minutes • Proper installation is the responsibility of this appliance requires basic ...
...leave these instructions for future reference. • Skill level - A GE water supply kit (containing tubing, shutoff valve, fittings and instructions) is not covered under the Warranty. Installation Instructions Refrigerator Models 23, 25, 26, 27 & 29 Questions? Save these instructions with the...and 5/16″ Socket 1/2″ and 7/16″ Wrench 1/8″ Hex Wrench Plastic Putty Knife Phillips Head Screwdriver 23 Refrigerator Installation 30 minutes Water Line Installation 30 minutes • Proper installation is the responsibility of this appliance requires basic ...

Owners Manual
Page 24
... 24 To move the refrigerator, use a padded hand truck. DO NOT remove the handles. Proceed to Installing the Refrigerator. 3 DISCONNECT THE WATER COUPLING (on some models) If the refrigerator has a water dispenser, there is a water line from the cabinet into the bottom hinge on doors until the refrigerator is in on...
... 24 To move the refrigerator, use a padded hand truck. DO NOT remove the handles. Proceed to Installing the Refrigerator. 3 DISCONNECT THE WATER COUPLING (on some models) If the refrigerator has a water dispenser, there is a water line from the cabinet into the bottom hinge on doors until the refrigerator is in on...

Owners Manual
Page 25
...disconnect, pull apart at the coupling. 6 CLOSE THE FREEZER AND REFRIGERATOR DOORS Bottom freezer hinge 5 DISCONNECT THE ELECTRICAL CONNECTORS (on some models) If the refrigerator has a water dispenser, there is a power line (harness) from the cabinet into the bottom hinge on the ...refrigerator door that must be disconnected. Installation Instructions 4 DISCONNECT THE POWER COUPLING (on some models) If the refrigerator has a refreshment center, there are electrical connectors (harnesses) from the cabinet into the bottom hinge on the...
...disconnect, pull apart at the coupling. 6 CLOSE THE FREEZER AND REFRIGERATOR DOORS Bottom freezer hinge 5 DISCONNECT THE ELECTRICAL CONNECTORS (on some models) If the refrigerator has a water dispenser, there is a power line (harness) from the cabinet into the bottom hinge on the ...refrigerator door that must be disconnected. Installation Instructions 4 DISCONNECT THE POWER COUPLING (on some models) If the refrigerator has a refreshment center, there are electrical connectors (harnesses) from the cabinet into the bottom hinge on the...
Owners Manual
Page 27
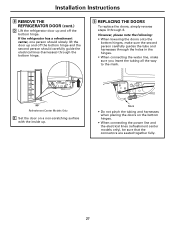
... in the hinges. • When connecting the water line, make sure you insert the tubing all the way to the mark. 90° Refreshment Center Models Only E Set the door on the bottom hinges. • When connecting the power line and the electrical lines (refreshment center...
... in the hinges. • When connecting the water line, make sure you insert the tubing all the way to the mark. 90° Refreshment Center Models Only E Set the door on the bottom hinges. • When connecting the power line and the electrical lines (refreshment center...

