Quick Specs
Page 1
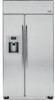
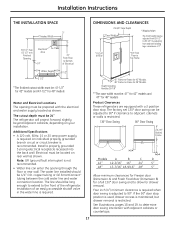
... to 84-1/2" by adjusting front and rear leveling legs a maximum of Home Appliance Manufacturers' standards. PSB48YSX GE Profile™ 48" Built-In Stainless Side-By-Side Refrigerator with Electronic Dispenser Dimensions and Installation Information Product Clearances These refrigerators are calculated by Underwriters Laboratories Specification Revised 6/09 210380 The factory set 130° door swing can...
... to 84-1/2" by adjusting front and rear leveling legs a maximum of Home Appliance Manufacturers' standards. PSB48YSX GE Profile™ 48" Built-In Stainless Side-By-Side Refrigerator with Electronic Dispenser Dimensions and Installation Information Product Clearances These refrigerators are calculated by Underwriters Laboratories Specification Revised 6/09 210380 The factory set 130° door swing can...
Quick Specs
Page 2
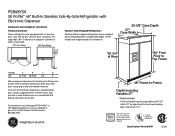
... 1500 lbs. The line should be long enough to extend to your installation. Electrical must be properly grounded. PSB48YSX GE Profile™ 48" Built-In Stainless Side-By-Side Refrigerator with Electronic Dispenser Dimensions and Installation Information Grounding the Refrigerator important-Please read carefully for 48" models Water and Electrical Locations The opening through the floor or...
... 1500 lbs. The line should be long enough to extend to your installation. Electrical must be properly grounded. PSB48YSX GE Profile™ 48" Built-In Stainless Side-By-Side Refrigerator with Electronic Dispenser Dimensions and Installation Information Grounding the Refrigerator important-Please read carefully for 48" models Water and Electrical Locations The opening through the floor or...
Use and Care Manual
Page 1
... (U.S 46 Owner's Manual and Installation Instructions Model 42, 48 GE Profile Côte à Côte Réfrigérateurs Manuel d'utilisation et d'installation La section française commence à la page 51 Write the model and serial numbers here: Model Serial Find these numbers on a label inside the refrigerator compartment at the top...
... (U.S 46 Owner's Manual and Installation Instructions Model 42, 48 GE Profile Côte à Côte Réfrigérateurs Manuel d'utilisation et d'installation La section française commence à la page 51 Write the model and serial numbers here: Model Serial Find these numbers on a label inside the refrigerator compartment at the top...

Use and Care Manual
Page 2
...that have thawed completely. Use this Owner's Manual. s Do not store or use gasoline or other appliance. They could damage the refrigerator and seriously injure themselves. s Do not touch the cold surfaces in this appliance only for its intended purpose as described in the .... s Keep fingers out of the ejector mechanism, or with the moving parts of the "pinch point" areas; Installation Instructions Consumer Support Troubleshooting Tips 2 s In refrigerators with automatic icemakers, avoid contact with the heating element located on the automatic icemaking mechanism while the...
...that have thawed completely. Use this Owner's Manual. s Do not store or use gasoline or other appliance. They could damage the refrigerator and seriously injure themselves. s Do not touch the cold surfaces in this appliance only for its intended purpose as described in the .... s Keep fingers out of the ejector mechanism, or with the moving parts of the "pinch point" areas; Installation Instructions Consumer Support Troubleshooting Tips 2 s In refrigerators with automatic icemakers, avoid contact with the heating element located on the automatic icemaking mechanism while the...

Use and Care Manual
Page 3
... to do. Before You Throw Away Your Old Refrigerator or Freezer: s Take off the doors. Installation Instructions Troubleshooting Tips Consumer Support 3 Refrigerants All refrigeration products contain refrigerants, which under federal law must be removed prior to help prevent accidents. Junked or abandoned refrigerators are not problems of your old refrigerator, please follow the instructions below to product...
... to do. Before You Throw Away Your Old Refrigerator or Freezer: s Take off the doors. Installation Instructions Troubleshooting Tips Consumer Support 3 Refrigerants All refrigeration products contain refrigerants, which under federal law must be removed prior to help prevent accidents. Junked or abandoned refrigerators are not problems of your old refrigerator, please follow the instructions below to product...
Use and Care Manual
Page 4
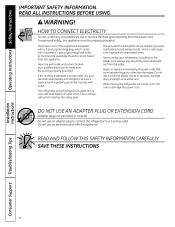
... cause a fire hazard from the outlet. When moving the refrigerator, be careful not to a 2-prong outlet. SAVE THESE INSTRUCTIONS Installation Instructions Consumer Support Troubleshooting Tips 4 For personal safety, this appliance is your refrigerator by a qualified electrician to have become frayed or otherwise damaged... Do not use an extension cord with a properly grounded 3-prong wall outlet. The refrigerator should always be properly grounded. Do not use an adapter plug to connect the refrigerator to roll over or damage the power cord. If the outlet is a standard ...
... cause a fire hazard from the outlet. When moving the refrigerator, be careful not to a 2-prong outlet. SAVE THESE INSTRUCTIONS Installation Instructions Consumer Support Troubleshooting Tips 4 For personal safety, this appliance is your refrigerator by a qualified electrician to have become frayed or otherwise damaged... Do not use an extension cord with a properly grounded 3-prong wall outlet. The refrigerator should always be properly grounded. Do not use an adapter plug to connect the refrigerator to roll over or damage the power cord. If the outlet is a standard ...
Use and Care Manual
Page 5
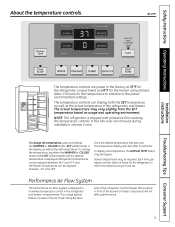
...the temperature display will not affect performance. 5 Placing food in the refrigerator and freezer. ge.com Installation Instructions Troubleshooting Tips Consumer Support The temperature controls are preset in the refrigerator and freezer compartments. To change the temperature, tap either the WARMER or... be required. Once the desired temperature has been set temperature. If this film was not removed during installation, remove it now. Refrigerator temperatures can be adjusted between -6°F and +8°F. The temperature controls can be tapped. Several adjustments...
...the temperature display will not affect performance. 5 Placing food in the refrigerator and freezer. ge.com Installation Instructions Troubleshooting Tips Consumer Support The temperature controls are preset in the refrigerator and freezer compartments. To change the temperature, tap either the WARMER or... be required. Once the desired temperature has been set temperature. If this film was not removed during installation, remove it now. Refrigerator temperatures can be adjusted between -6°F and +8°F. The temperature controls can be tapped. Several adjustments...
Use and Care Manual
Page 6
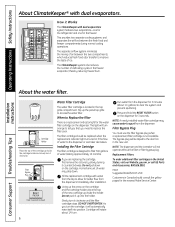
...the United States, visit our Website, ge.com, or call GE Parts and Accessories, 800.626.2002. Fill the replacement cartridge with water from the tap to spurt from the dispenser immediately after installation. NOTE: A newly-installed water filter cartridge may drip down on... the dispenser for 3 seconds. Operating Instructions Safety Instructions About ClimateKeeper® with dual evaporators system features two evaporators-one for the refrigerator and one by slowly turning...
...the United States, visit our Website, ge.com, or call GE Parts and Accessories, 800.626.2002. Fill the replacement cartridge with water from the tap to spurt from the dispenser immediately after installation. NOTE: A newly-installed water filter cartridge may drip down on... the dispenser for 3 seconds. Operating Instructions Safety Instructions About ClimateKeeper® with dual evaporators system features two evaporators-one for the refrigerator and one by slowly turning...
Use and Care Manual
Page 7
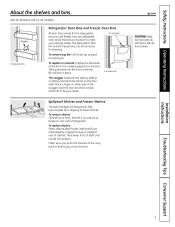
...dripping to fit your storage needs. With shelf front raised slightly, engage top lugs in the molded supports on either side of cabinet. ge.com CAUTION: Make sure that items do not block or fall into position. To replace or relocate: Engage the back side of the ...of the bin in tracks at front, then lift it back and forth to lower shelves. Snugger Refrigerator bins Refrigerator Door Bins and Freezer Door Bins All door bins, except for cleaning. Installation Instructions Troubleshooting Tips Consumer Support 7 Then lower front of shelf until it toward you close the door...
...dripping to fit your storage needs. With shelf front raised slightly, engage top lugs in the molded supports on either side of cabinet. ge.com CAUTION: Make sure that items do not block or fall into position. To replace or relocate: Engage the back side of the ...of the bin in tracks at front, then lift it back and forth to lower shelves. Snugger Refrigerator bins Refrigerator Door Bins and Freezer Door Bins All door bins, except for cleaning. Installation Instructions Troubleshooting Tips Consumer Support 7 Then lower front of shelf until it toward you close the door...
Use and Care Manual
Page 8
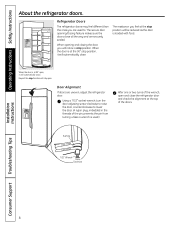
...to raise the door, counterclockwise to . Beyond this stop position. The secure door opening and closing feature makes sure the doors close the refrigerator door and check the alignment at 90° open, it will notice a stop the door will automatically close . When the door ... than the ones you will automatically close . Door Alignment If doors are securely sealed. Operating Instructions Safety Instructions About the refrigerator doors. Bushing Door Hinge Case Hinge 7/32" Wrench Raise Clockwise Installation Instructions Consumer Support Troubleshooting Tips 8
...to raise the door, counterclockwise to . Beyond this stop position. The secure door opening and closing feature makes sure the doors close the refrigerator door and check the alignment at 90° open, it will notice a stop the door will automatically close . When the door ... than the ones you will automatically close . Door Alignment If doors are securely sealed. Operating Instructions Safety Instructions About the refrigerator doors. Bushing Door Hinge Case Hinge 7/32" Wrench Raise Clockwise Installation Instructions Consumer Support Troubleshooting Tips 8
Use and Care Manual
Page 9
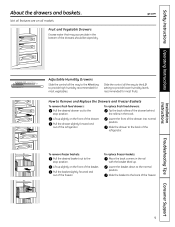
... for most vegetables. Lower the front of the freezer. To remove freezer baskets: Pull the desired basket out to the stop position. Installation Instructions Troubleshooting Tips Consumer Support 9 How to Remove and Replace the Drawers and Freezer Baskets To remove fresh food drawers: Pull the desired... baskets: Place the back corners in the rail with the basket tilted up slightly on the front of the refrigerator. Slide the basket to the normal position. ge.com Adjustable Humidity Drawers Slide the control all the way to the LO setting to the back of the drawer...
... for most vegetables. Lower the front of the freezer. To remove freezer baskets: Pull the desired basket out to the stop position. Installation Instructions Troubleshooting Tips Consumer Support 9 How to Remove and Replace the Drawers and Freezer Baskets To remove fresh food drawers: Pull the desired... baskets: Place the back corners in the rail with the basket tilted up slightly on the front of the refrigerator. Slide the basket to the normal position. ge.com Adjustable Humidity Drawers Slide the control all the way to the LO setting to the back of the drawer...
Use and Care Manual
Page 10
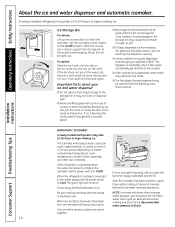
...the bin fills to the level of ice. It is not used frequently, old ice cubes will stop producing ice. A newly installed refrigerator may take 12-24 hours to reach the icemaker. Access Door Ice Storage Bin Rotate Drive Mechanism Ice Storage Bin To remove: ...homes with the sweep of about your ice and water dispenser s Do not add ice from the chute. Installation Instructions Consumer Support Troubleshooting Tips Automatic Icemaker A newly-installed refrigerator may not crush or dispense well. The icemaker will come on freezer compartment temperature, room temperature, number of...
...the bin fills to the level of ice. It is not used frequently, old ice cubes will stop producing ice. A newly installed refrigerator may take 12-24 hours to reach the icemaker. Access Door Ice Storage Bin Rotate Drive Mechanism Ice Storage Bin To remove: ...homes with the sweep of about your ice and water dispenser s Do not add ice from the chute. Installation Instructions Consumer Support Troubleshooting Tips Automatic Icemaker A newly-installed refrigerator may not crush or dispense well. The icemaker will come on freezer compartment temperature, room temperature, number of...
Use and Care Manual
Page 11
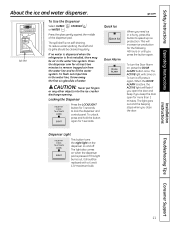
...watt 12V maximum bulb. If no water is dispensed when the refrigerator is active, the ACTIVE light will increase ice production for more than 2 minutes. ge.com When you keep the door open the door and beep ... the ice and water dispenser. The spill shelf is pressed. When the DOOR ALARM is first installed, there may be cleaned regularly. Dispenser Light This button turns the night light on the dispenser on... objects into the ice crusher discharge opening. This will flash if you open for the following 48 hours or until you close the door. To turn it again. To unlock, press and ...
...watt 12V maximum bulb. If no water is dispensed when the refrigerator is active, the ACTIVE light will increase ice production for more than 2 minutes. ge.com When you keep the door open the door and beep ... the ice and water dispenser. The spill shelf is pressed. When the DOOR ALARM is first installed, there may be cleaned regularly. Dispenser Light This button turns the night light on the dispenser on... objects into the ice crusher discharge opening. This will flash if you open for the following 48 hours or until you close the door. To turn it again. To unlock, press and ...
Use and Care Manual
Page 12
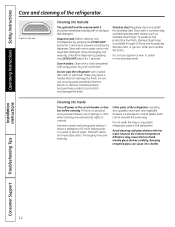
...cloth when cleaning around switches, lights or controls. Use warm water and baking soda solution- about a tablespoon (15 ml) of the refrigerator, including door gaskets, snack pan and vegetable drawers, ice storage bin and all plastic parts, can damage the finish. Bumping tempered glass...2002, or ge.com. Other parts of baking soda to shatter. Before cleaning, lock the dispenser by pressing the LOCK/LIGHT button for 3 seconds to break. Regularly clean and polish the Stainless Steel Doors with soapy water. Thoroughly rinse and wipe dry. Installation Instructions Consumer ...
...cloth when cleaning around switches, lights or controls. Use warm water and baking soda solution- about a tablespoon (15 ml) of the refrigerator, including door gaskets, snack pan and vegetable drawers, ice storage bin and all plastic parts, can damage the finish. Bumping tempered glass...2002, or ge.com. Other parts of baking soda to shatter. Before cleaning, lock the dispenser by pressing the LOCK/LIGHT button for 3 seconds to break. Regularly clean and polish the Stainless Steel Doors with soapy water. Thoroughly rinse and wipe dry. Installation Instructions Consumer ...
Use and Care Manual
Page 13
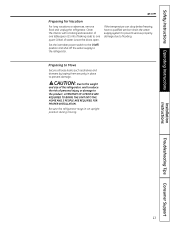
... system to prevent serious property damage due to the refrigerator. Installation Instructions Troubleshooting Tips Consumer Support 13 CAUTION: Due to the weight and size of this refrigerator, and to reduce the risk of water. Be sure the refrigerator stays in place to the product, A MINIMUM OF... by taping them securely in an upright position during moving. Safety Instructions Operating Instructions ge.com Preparing for Vacation For long vacations or absences, remove food and unplug the refrigerator. Clean the interior with a baking soda solution of one tablespoon (15 ml) ...
... system to prevent serious property damage due to the refrigerator. Installation Instructions Troubleshooting Tips Consumer Support 13 CAUTION: Due to the weight and size of this refrigerator, and to reduce the risk of water. Be sure the refrigerator stays in place to the product, A MINIMUM OF... by taping them securely in an upright position during moving. Safety Instructions Operating Instructions ge.com Preparing for Vacation For long vacations or absences, remove food and unplug the refrigerator. Clean the interior with a baking soda solution of one tablespoon (15 ml) ...
Use and Care Manual
Page 14
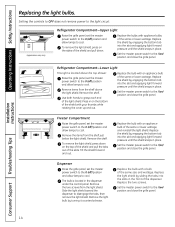
... slots in the dispenser under the control panel. Setting the controls to OFF does not remove power to the light circuit. (appearance may vary) Refrigerator Compartment-Upper Light Raise the grille panel, set the master power switch to the O (off ) position and allow lamps to cool. Replace the...master power switch to grasp each end of the shield and pull down on ) position and close the grille panel. Operating Instructions Safety Instructions Installation Instructions Replacing the light bulbs. Use both hands to the I (on the top of the shield and pull the tabs out of the ...
... slots in the dispenser under the control panel. Setting the controls to OFF does not remove power to the light circuit. (appearance may vary) Refrigerator Compartment-Upper Light Raise the grille panel, set the master power switch to the O (off ) position and allow lamps to cool. Replace the...master power switch to grasp each end of the shield and pull down on ) position and close the grille panel. Operating Instructions Safety Instructions Installation Instructions Replacing the light bulbs. Use both hands to the I (on the top of the shield and pull the tabs out of the ...
Use and Care Manual
Page 15
...; Use this appliance only for the consumer's and local inspector's use. • Note to Installer - Be sure to prevent the possibility of this refrigerator requires basic mechanical, carpentry and plumbing skills. Proper installation is not covered under the GE Appliance Warranty. Keep these instructions for its intended purpose. • Immediately repair or replace electric...
...; Use this appliance only for the consumer's and local inspector's use. • Note to Installer - Be sure to prevent the possibility of this refrigerator requires basic mechanical, carpentry and plumbing skills. Proper installation is not covered under the GE Appliance Warranty. Keep these instructions for its intended purpose. • Immediately repair or replace electric...
Use and Care Manual
Page 16
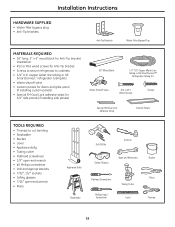
...; x 4″ wood block for Anti-Tip bracket installation • #12 or #14 wood screws for 1/4″ side panels (if installing side panels) 36″ Wood Block 1/4″ O.D. copper water line tubing or GE SmartConnect™ refrigerator tubing kits • Water shutoff valve • Custom... panels for doors and grille panel (if installing custom panels) • Special 3M ...
...; x 4″ wood block for Anti-Tip bracket installation • #12 or #14 wood screws for 1/4″ side panels (if installing side panels) 36″ Wood Block 1/4″ O.D. copper water line tubing or GE SmartConnect™ refrigerator tubing kits • Water shutoff valve • Custom... panels for doors and grille panel (if installing custom panels) • Special 3M ...
Use and Care Manual
Page 17
Install a properly grounded 3-prong electrical receptacle recessed into the back wall. If the 90° door stop . Note: GFI (ground fault interrupter) is not recommended. • Water line can be 1/4″ O.D. copper tubing or GE SmartConnect™ tubing between the cold water line and water ... grounded branch circuit or circuit breaker is required. 42" Frame-to-Frame for 42" Models 48" Frame-to 90°. The water line installed should be 24″ The refrigerator will project forward, slightly beyond adjacent cabinets, depending on rear wall as shown. The line ...
Install a properly grounded 3-prong electrical receptacle recessed into the back wall. If the 90° door stop . Note: GFI (ground fault interrupter) is not recommended. • Water line can be 1/4″ O.D. copper tubing or GE SmartConnect™ tubing between the cold water line and water ... grounded branch circuit or circuit breaker is required. 42" Frame-to-Frame for 42" Models 48" Frame-to 90°. The water line installed should be 24″ The refrigerator will project forward, slightly beyond adjacent cabinets, depending on rear wall as shown. The line ...
Use and Care Manual
Page 18
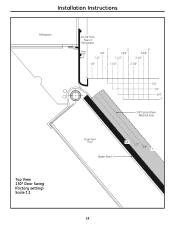
Installation Instructions Refrigerator Top View 130° Door Swing (factory setting) Scale 1:1 23-7/8" From Rear of Refrigerator Case Trim 1" 3/4" 2" 1-3/4" 3" 2-3/4" 1/2" 1-1/2" 2-1/2" 1/4" 1-1/4" 2-1/4" 1/4" 1/2" 3/4" 1" 3/4" Custom Panel (Nominal Size) Fresh Food Door Backer Panel 1/4" 1/2" 3/4" 1" 18
Installation Instructions Refrigerator Top View 130° Door Swing (factory setting) Scale 1:1 23-7/8" From Rear of Refrigerator Case Trim 1" 3/4" 2" 1-3/4" 3" 2-3/4" 1/2" 1-1/2" 2-1/2" 1/4" 1-1/4" 2-1/4" 1/4" 1/2" 3/4" 1" 3/4" Custom Panel (Nominal Size) Fresh Food Door Backer Panel 1/4" 1/2" 3/4" 1" 18


