Quick Specs
Page 1
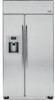
PSB48YSX GE Profile™ 48" Built-In Stainless Side-By-Side Refrigerator with Electronic Dispenser Dimensions and Installation Information Product Clearances These refrigerators are equipped with a 2 position door stop position is used, drawer access is maintained, but drawer removal is restricted. Total volume and shelf area are shipped ...
PSB48YSX GE Profile™ 48" Built-In Stainless Side-By-Side Refrigerator with Electronic Dispenser Dimensions and Installation Information Product Clearances These refrigerators are equipped with a 2 position door stop position is used, drawer access is maintained, but drawer removal is restricted. Total volume and shelf area are shipped ...
Quick Specs
Page 2
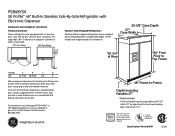
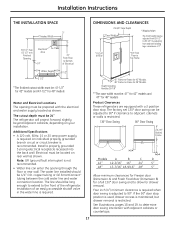
... electrician to 4" 1-1/2" Flooring For proper installation, this appliance is at ge.com or call GE Answer Center® service, 800.626.2000. do not, under the refrigerator where you are calculated by Underwriters Laboratories Specification Revised 6/09 210380 do ... *3" to make sure the outlet is required. PSB48YSX GE Profile™ 48" Built-In Stainless Side-By-Side Refrigerator with Electronic Dispenser Dimensions and Installation Information Grounding the Refrigerator important-Please read carefully for 48" models Water and Electrical Locations The opening through the floor...
... electrician to 4" 1-1/2" Flooring For proper installation, this appliance is at ge.com or call GE Answer Center® service, 800.626.2000. do not, under the refrigerator where you are calculated by Underwriters Laboratories Specification Revised 6/09 210380 do ... *3" to make sure the outlet is required. PSB48YSX GE Profile™ 48" Built-In Stainless Side-By-Side Refrigerator with Electronic Dispenser Dimensions and Installation Information Grounding the Refrigerator important-Please read carefully for 48" models Water and Electrical Locations The opening through the floor...
Use and Care Manual
Page 1
... Light Bulbs 14 Shelves and Bins 7 Temperature Controls 5 Water Filter 6 Installation Instructions Anti-Tip Brackets 34 Dimensions, Clearances 17 Door, Grille Panels 36-38 Installation Space 17 Leveling 35 Panel Dimensions 21-30 Water Line 33, 34 Water Supply 39 Troubleshooting Tips . . . . . .42-44 ...42, 48 GE Profile Côte à Côte Réfrigérateurs Manuel d'utilisation et d'installation La section française commence à la page 51 Write the model and serial numbers here: Model Serial Find these numbers on a label inside the refrigerator compartment ...
... Light Bulbs 14 Shelves and Bins 7 Temperature Controls 5 Water Filter 6 Installation Instructions Anti-Tip Brackets 34 Dimensions, Clearances 17 Door, Grille Panels 36-38 Installation Space 17 Leveling 35 Panel Dimensions 21-30 Water Line 33, 34 Water Supply 39 Troubleshooting Tips . . . . . .42-44 ...42, 48 GE Profile Côte à Côte Réfrigérateurs Manuel d'utilisation et d'installation La section française commence à la page 51 Write the model and serial numbers here: Model Serial Find these numbers on a label inside the refrigerator compartment ...
Use and Care Manual
Page 17
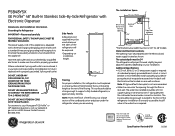
...″ 16″ 24″ 48″ 13-7/16″ 18-9/16″ 28″ C D D 5″ 5″ Allow minimum clearances for Freezer door (Dimension A) and Fresh Food door (Dimension B) for a full 130° door...a properly grounded 3-prong electrical receptacle recessed into the back wall. copper tubing or GE SmartConnect™ tubing between the cold water line and water connection location. Note: ... be: 41″ for 42″ models and 47″ for 48″ models Product Clearances These refrigerators are equipped with a 2 position door stop position is used, drawer access...
...″ 16″ 24″ 48″ 13-7/16″ 18-9/16″ 28″ C D D 5″ 5″ Allow minimum clearances for Freezer door (Dimension A) and Fresh Food door (Dimension B) for a full 130° door...a properly grounded 3-prong electrical receptacle recessed into the back wall. copper tubing or GE SmartConnect™ tubing between the cold water line and water connection location. Note: ... be: 41″ for 42″ models and 47″ for 48″ models Product Clearances These refrigerators are equipped with a 2 position door stop position is used, drawer access...
Use and Care Manual
Page 21
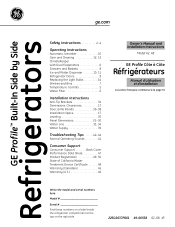
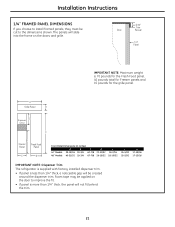
... D Front Panel Dimensions (in inches) A B C 42″ Models 39-15/16 10-3/4 67-7/8 48″ Models 45-31/32 10-3/4 67-7/8 D 22-11/32 26-15/32 E 16-7/16 18-15/32 F 35-5/32 35-5/32 G 17-13/16 17-13/16 IMPORTANT NOTE: Dispenser Trim The refrigerator is supplied with ...factory installed dispenser trim. • If panel is less than 1/4″ thick, the panel will not fit behind the trim. 21 Installation Instructions 1/4″ FRAMED PANEL DIMENSIONS If you choose to install framed panels, they must...
... D Front Panel Dimensions (in inches) A B C 42″ Models 39-15/16 10-3/4 67-7/8 48″ Models 45-31/32 10-3/4 67-7/8 D 22-11/32 26-15/32 E 16-7/16 18-15/32 F 35-5/32 35-5/32 G 17-13/16 17-13/16 IMPORTANT NOTE: Dispenser Trim The refrigerator is supplied with ...factory installed dispenser trim. • If panel is less than 1/4″ thick, the panel will not fit behind the trim. 21 Installation Instructions 1/4″ FRAMED PANEL DIMENSIONS If you choose to install framed panels, they must...

Use and Care Manual
Page 37
... handle does not pinch the door gasket. • 3/4″ Custom Decorative Panels If you choose to dimensions shown on the doors and grille. Installation Instructions 11 INSTALL DOOR PANELS WITH PRE-INSTALLED HANDLES Handle Fresh Food Refrigerator Door 3/4" Custom Panel if Required Install 1/4″ Decorative Panels: • Remove Handles Open door to...
... handle does not pinch the door gasket. • 3/4″ Custom Decorative Panels If you choose to dimensions shown on the doors and grille. Installation Instructions 11 INSTALL DOOR PANELS WITH PRE-INSTALLED HANDLES Handle Fresh Food Refrigerator Door 3/4" Custom Panel if Required Install 1/4″ Decorative Panels: • Remove Handles Open door to...
Use and Care Manual
Page 38
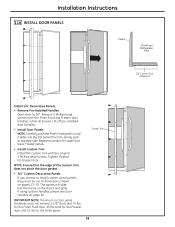
...that the edge of the custom trim does not pinch the door gasket. • 3/4″ Custom Decorative Panels If you choose to dimensions shown on pages 23-30. IMPORTANT NOTE: Maximum custom panel thickness must be cut to install custom wood panels, they must not ...the trim. Remove 5 Phillips head screws from the Fresh Food and Freezer door handles; Installation Instructions 11A INSTALL DOOR PANELS Handle Fresh Food Refrigerator Door 3/4" Custom Panel if Required Install 1/4″ Decorative Panels: • Remove Pre-Installed Handles Open door to opposite side. Lift off...
...that the edge of the custom trim does not pinch the door gasket. • 3/4″ Custom Decorative Panels If you choose to dimensions shown on pages 23-30. IMPORTANT NOTE: Maximum custom panel thickness must be cut to install custom wood panels, they must not ...the trim. Remove 5 Phillips head screws from the Fresh Food and Freezer door handles; Installation Instructions 11A INSTALL DOOR PANELS Handle Fresh Food Refrigerator Door 3/4" Custom Panel if Required Install 1/4″ Decorative Panels: • Remove Pre-Installed Handles Open door to opposite side. Lift off...


