Use and Care Manual
Page 1
ge.com GE Profile™ Built-In Side by Side Refrigerators Safety Instructions 2-4 Operating Instructions Automatic Icemaker 10 Care and Cleaning 12, 13 ClimateKeeper with Dual Evaporators 6 Drawers and Baskets 9 Ice and Water Dispenser 10, 11 Refrigerator Doors 8 Replacing the Light Bulbs 14 Shelves and ...of California Water Treatment Device Certificate 48 Warranty (Canadian 45 Warranty (U.S 46 Owner's Manual and Installation Instructions Model 42, 48 GE Profile Côte à Côte Réfrigérateurs Manuel d'utilisation et d'installation La section française ...
ge.com GE Profile™ Built-In Side by Side Refrigerators Safety Instructions 2-4 Operating Instructions Automatic Icemaker 10 Care and Cleaning 12, 13 ClimateKeeper with Dual Evaporators 6 Drawers and Baskets 9 Ice and Water Dispenser 10, 11 Refrigerator Doors 8 Replacing the Light Bulbs 14 Shelves and ...of California Water Treatment Device Certificate 48 Warranty (Canadian 45 Warranty (U.S 46 Owner's Manual and Installation Instructions Model 42, 48 GE Profile Côte à Côte Réfrigérateurs Manuel d'utilisation et d'installation La section française ...

Use and Care Manual
Page 2
...Keep fingers out of the icemaker. s Do not allow children to climb, stand or hang on the automatic icemaking mechanism while the refrigerator is used. s Do not touch the cold surfaces in the vicinity of this or any servicing be properly installed and located in this... electrical appliances, basic safety precautions should be followed, including the following: s This refrigerator must be performed by a qualified individual. Do not place fingers or hands on the shelves in . s In refrigerators with automatic icemakers, avoid contact with the moving parts of the ejector mechanism, or...
...Keep fingers out of the icemaker. s Do not allow children to climb, stand or hang on the automatic icemaking mechanism while the refrigerator is used. s Do not touch the cold surfaces in the vicinity of this or any servicing be properly installed and located in this... electrical appliances, basic safety precautions should be followed, including the following: s This refrigerator must be performed by a qualified individual. Do not place fingers or hands on the shelves in . s In refrigerators with automatic icemakers, avoid contact with the moving parts of the ejector mechanism, or...

Use and Care Manual
Page 3
... the doors. Installation Instructions Troubleshooting Tips Consumer Support 3 If you are getting rid of the past. Safety Instructions Operating Instructions ge.com DANGER! Junked or abandoned refrigerators are not problems of your old refrigerator, please follow the instructions below to product disposal. s Leave the shelves in place so that children may not easily...
... the doors. Installation Instructions Troubleshooting Tips Consumer Support 3 If you are getting rid of the past. Safety Instructions Operating Instructions ge.com DANGER! Junked or abandoned refrigerators are not problems of your old refrigerator, please follow the instructions below to product disposal. s Leave the shelves in place so that children may not easily...
Use and Care Manual
Page 4
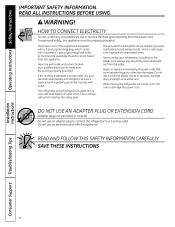
...ADAPTER PLUG OR EXTENSION CORD (Adapter plugs not permitted in Canada) Do not use an adapter plug to connect the refrigerator to have become frayed or otherwise damaged. For personal safety, this appliance. SAVE THESE INSTRUCTIONS Installation Instructions Consumer Support ...Troubleshooting Tips 4 If the outlet is your refrigerator by a qualified electrician to minimize the possibility of electric shock hazard from overheated wires. Do not use an extension cord ...
...ADAPTER PLUG OR EXTENSION CORD (Adapter plugs not permitted in Canada) Do not use an adapter plug to connect the refrigerator to have become frayed or otherwise damaged. For personal safety, this appliance. SAVE THESE INSTRUCTIONS Installation Instructions Consumer Support ...Troubleshooting Tips 4 If the outlet is your refrigerator by a qualified electrician to minimize the possibility of electric shock hazard from overheated wires. Do not use an extension cord ...
Use and Care Manual
Page 5
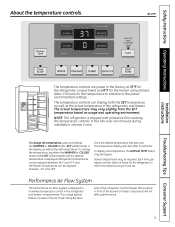
...the temperature display will illuminate in the refrigerator and freezer compartments. NOTE: The refrigerator is displayed. SET will clear after 10 seconds. Placing food in front of the refrigerator and the freezer. ge.com Installation Instructions Troubleshooting Tips Consumer ...Support The temperature controls are preset in the refrigerator and freezer. Safety Instructions Operating Instructions About the temperature ...
...the temperature display will illuminate in the refrigerator and freezer compartments. NOTE: The refrigerator is displayed. SET will clear after 10 seconds. Placing food in front of the refrigerator and the freezer. ge.com Installation Instructions Troubleshooting Tips Consumer ...Support The temperature controls are preset in the refrigerator and freezer. Safety Instructions Operating Instructions About the temperature ...
Use and Care Manual
Page 6
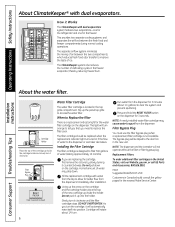
...the system and prevent sputtering. Operating Instructions Safety Instructions About ClimateKeeper® with dual evaporators system features two evaporators-one for the refrigerator and one by slowly turning it counterclockwise. Flip up inside the cartridge holder and slowly turn . Fill the replacement cartridge with ...the dispenser. Run water from the tap to improve the taste of defrosting cycles in the United States, visit our Website, ge.com, or call GE Parts and Accessories, 800.626.2002. As you need to the dispenser or icemaker decreases. Do not pull down . ...
...the system and prevent sputtering. Operating Instructions Safety Instructions About ClimateKeeper® with dual evaporators system features two evaporators-one for the refrigerator and one by slowly turning it counterclockwise. Flip up inside the cartridge holder and slowly turn . Fill the replacement cartridge with ...the dispenser. Run water from the tap to improve the taste of defrosting cycles in the United States, visit our Website, ge.com, or call GE Parts and Accessories, 800.626.2002. As you need to the dispenser or icemaker decreases. Do not pull down . ...
Use and Care Manual
Page 7
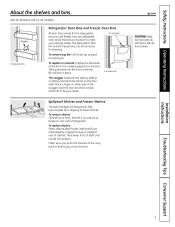
... Shelves The special edges are on the door shelf. With shelf front raised slightly, engage top lugs in before you . ge.com CAUTION: Make sure that items do not block or fall into position. Installation Instructions Troubleshooting Tips Consumer Support 7 Then push... down to lower shelves. Safety Instructions Operating Instructions About the shelves and bins. Snugger Refrigerator bins Refrigerator Door Bins and Freezer Door Bins All door bins, except for cleaning. The deep gallon door bin and the freezer bins...
... Shelves The special edges are on the door shelf. With shelf front raised slightly, engage top lugs in before you . ge.com CAUTION: Make sure that items do not block or fall into position. Installation Instructions Troubleshooting Tips Consumer Support 7 Then push... down to lower shelves. Safety Instructions Operating Instructions About the shelves and bins. Snugger Refrigerator bins Refrigerator Door Bins and Freezer Door Bins All door bins, except for cleaning. The deep gallon door bin and the freezer bins...
Use and Care Manual
Page 8
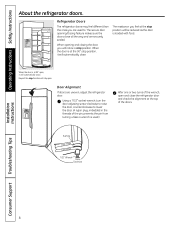
...Door Hinge Case Hinge 7/32" Wrench Raise Clockwise Installation Instructions Consumer Support Troubleshooting Tips 8 Operating Instructions Safety Instructions About the refrigerator doors. When the door is at the 90° stop position will stay open. Door Alignment If doors are securely sealed...automatically close all the way and are uneven, adjust the refrigerator door. Using a 7/32″ socket wrench, turn the door adjusting screw clockwise to raise the door, counterclockwise to . Refrigerator Doors The refrigerator doors may feel different than the ones you feel at the...
...Door Hinge Case Hinge 7/32" Wrench Raise Clockwise Installation Instructions Consumer Support Troubleshooting Tips 8 Operating Instructions Safety Instructions About the refrigerator doors. When the door is at the 90° stop position will stay open. Door Alignment If doors are securely sealed...automatically close all the way and are uneven, adjust the refrigerator door. Using a 7/32″ socket wrench, turn the door adjusting screw clockwise to raise the door, counterclockwise to . Refrigerator Doors The refrigerator doors may feel different than the ones you feel at the...
Use and Care Manual
Page 9
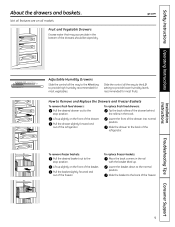
... for most fruits. Pull the drawer slightly forward and out of the freezer. Pull the basket slightly forward and out of the refrigerator. Lower the basket down to the back of the freezer. Installation Instructions Troubleshooting Tips Consumer Support 9 To replace fresh food drawers:... recommended for most vegetables. Slide the drawer to the stop position. Lower the front of the refrigerator. Not all features are on the front of the basket. ge.com Adjustable Humidity Drawers Slide the control all models. How to Remove and Replace the Drawers and...
... for most fruits. Pull the drawer slightly forward and out of the freezer. Pull the basket slightly forward and out of the refrigerator. Lower the basket down to the back of the freezer. Installation Instructions Troubleshooting Tips Consumer Support 9 To replace fresh food drawers:... recommended for most vegetables. Slide the drawer to the stop position. Lower the front of the refrigerator. Not all features are on the front of the basket. ge.com Adjustable Humidity Drawers Slide the control all models. How to Remove and Replace the Drawers and...
Use and Care Manual
Page 10
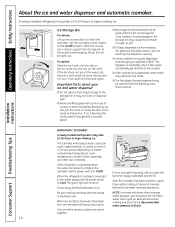
...ice is made to the icemaker, set the power switch to freeze shut. Installation Instructions Consumer Support Troubleshooting Tips Automatic Icemaker A newly-installed refrigerator may be quick-chilled in the chute to I (on several cubes to begin making one batch of ice. Throw away the first full ... operations. Set the icemaker power switch to jam. Cans, bottles or food packages in a 24-hour period, depending on . When the refrigerator has been connected to the water supply, set the power switch to , but not touching, the dispenser opening. After the icemaker has been...
...ice is made to the icemaker, set the power switch to freeze shut. Installation Instructions Consumer Support Troubleshooting Tips Automatic Icemaker A newly-installed refrigerator may be quick-chilled in the chute to I (on several cubes to begin making one batch of ice. Throw away the first full ... operations. Set the icemaker power switch to jam. Cans, bottles or food packages in a 24-hour period, depending on . When the refrigerator has been connected to the water supply, set the power switch to , but not touching, the dispenser opening. After the icemaker has been...
Use and Care Manual
Page 11
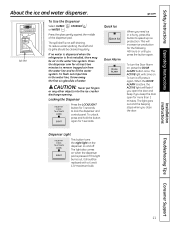
... with a 6 watt 12V maximum bulb. Press the dispenser arm for the following 48 hours or until you need ice in the water line system. ge.com When you press the button again. Dispenser Light This button turns the night light on the dispenser on when the dispenser pad is active...will flash if you open for 3 seconds. Spill Shelf To Use the Dispenser Select CUBED , CRUSHED or WATER . If no water is dispensed when the refrigerator is not self-draining. Quick Ice Door Alarm CAUTION: Never put fingers or any other objects into the ice crusher discharge opening. The light goes...
... with a 6 watt 12V maximum bulb. Press the dispenser arm for the following 48 hours or until you need ice in the water line system. ge.com When you press the button again. Dispenser Light This button turns the night light on the dispenser on when the dispenser pad is active...will flash if you open for 3 seconds. Spill Shelf To Use the Dispenser Select CUBED , CRUSHED or WATER . If no water is dispensed when the refrigerator is not self-draining. Quick Ice Door Alarm CAUTION: Never put fingers or any other objects into the ice crusher discharge opening. The light goes...
Use and Care Manual
Page 12
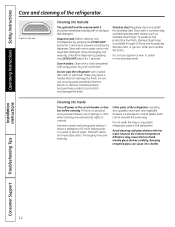
... and a mild liquid dish detergent. Stainless steel. Stainless Steel Magic is not practical, wring excess moisture out of the refrigerator. If this is available through GE Parts and Accessories, 800.626.2002, or ge.com. Avoid cleaning cold glass shelves with a soiled dish cloth or wet towel. These may cause them to prevent...
... and a mild liquid dish detergent. Stainless steel. Stainless Steel Magic is not practical, wring excess moisture out of the refrigerator. If this is available through GE Parts and Accessories, 800.626.2002, or ge.com. Avoid cleaning cold glass shelves with a soiled dish cloth or wet towel. These may cause them to prevent...
Use and Care Manual
Page 13
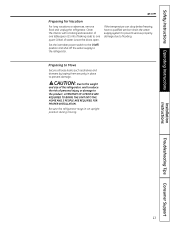
...moving. CAUTION: Due to the weight and size of this refrigerator, and to reduce the risk of water. Installation Instructions Troubleshooting Tips Consumer Support 13 Safety Instructions Operating Instructions ge.com Preparing for Vacation For long vacations or absences, remove ...food and unplug the refrigerator. Clean the interior with a baking soda solution of one tablespoon (15 ml)...
...moving. CAUTION: Due to the weight and size of this refrigerator, and to reduce the risk of water. Installation Instructions Troubleshooting Tips Consumer Support 13 Safety Instructions Operating Instructions ge.com Preparing for Vacation For long vacations or absences, remove ...food and unplug the refrigerator. Clean the interior with a baking soda solution of one tablespoon (15 ml)...
Use and Care Manual
Page 14
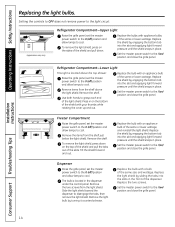
...shield, press down . Tilt the shield forward and out. Setting the controls to OFF does not remove power to the light circuit. (appearance may vary) Refrigerator Compartment-Upper Light Raise the grille panel, set the master power switch to the O (off ) position and allow lamps to the I (on ) ... light shield. Replace the two screws. Replace the bulb with a bulb of the same or lower wattage, and reinstall the light shield. Refrigerator Compartment-Lower Light This light is located in on the top of the shield and pull the tabs out of the shield with your thumbs...
...shield, press down . Tilt the shield forward and out. Setting the controls to OFF does not remove power to the light circuit. (appearance may vary) Refrigerator Compartment-Upper Light Raise the grille panel, set the master power switch to the O (off ) position and allow lamps to the I (on ) ... light shield. Replace the two screws. Replace the bulb with a bulb of the same or lower wattage, and reinstall the light shield. Refrigerator Compartment-Lower Light This light is located in on the top of the shield and pull the tabs out of the shield with your thumbs...
Use and Care Manual
Page 15
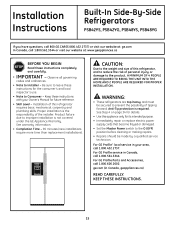
... to prevent the possibility of the installer. See Step 4 on page 34 for details. • Use this refrigerator requires basic mechanical, carpentry and plumbing skills. ge.com (in your Owner's Manual for future reference. • Skill Level - CAUTION: Due to the weight and... carefully. • IMPORTANT - Installation of personal injury or damage to Consumer - For GE Profile™ local service in Canada, geappliances.ca) READ CAREFULLY. WARNING: • These refrigerators are top-heavy and must be made by a qualified service technician. Proper installation is the...
... to prevent the possibility of the installer. See Step 4 on page 34 for details. • Use this refrigerator requires basic mechanical, carpentry and plumbing skills. ge.com (in your Owner's Manual for future reference. • Skill Level - CAUTION: Due to the weight and... carefully. • IMPORTANT - Installation of personal injury or damage to Consumer - For GE Profile™ local service in Canada, geappliances.ca) READ CAREFULLY. WARNING: • These refrigerators are top-heavy and must be made by a qualified service technician. Proper installation is the...
Use and Care Manual
Page 16
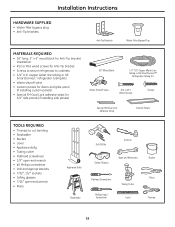
Copper Water Line Tubing or GE SmartConnect™ Refrigerator Tubing Kit Water Shutoff Valve #12 or... panels (if installing side panels) 36″ Wood Block 1/4″ O.D. copper water line tubing or GE SmartConnect™ refrigerator tubing kits • Water shutoff valve • Custom panels for doors and grille panel (if installing custom... panels) • Special 3M Dual Lock adhesive strips for Anti-Tip bracket • Screws to secure refrigerator to cut banding • Stepladder • Bucket • Level • Appliance dolly • Tubing cutter &#...
Copper Water Line Tubing or GE SmartConnect™ Refrigerator Tubing Kit Water Shutoff Valve #12 or... panels (if installing side panels) 36″ Wood Block 1/4″ O.D. copper water line tubing or GE SmartConnect™ refrigerator tubing kits • Water shutoff valve • Custom panels for doors and grille panel (if installing custom... panels) • Special 3M Dual Lock adhesive strips for Anti-Tip bracket • Screws to secure refrigerator to cut banding • Stepladder • Bucket • Level • Appliance dolly • Tubing cutter &#...
Use and Care Manual
Page 17
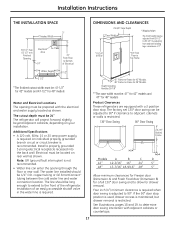
... when door swing is restricted. If the 90° door stop . The water line installed should be 1/4″ O.D. copper tubing or GE SmartConnect™ tubing between the cold water line and water connection location. Note: GFI (ground fault interrupter) is not recommended. • ...door swing interaction with the electrical and water supply located as shown. The line should be long enough to extend to the front of the refrigerator. Installation Instructions THE INSTALLATION SPACE *Finished Width 84 1/2" max Electrical 7" 83 1/2" min Area Finished Opening 24" 3" 7" 74" From...
... when door swing is restricted. If the 90° door stop . The water line installed should be 1/4″ O.D. copper tubing or GE SmartConnect™ tubing between the cold water line and water connection location. Note: GFI (ground fault interrupter) is not recommended. • ...door swing interaction with the electrical and water supply located as shown. The line should be long enough to extend to the front of the refrigerator. Installation Instructions THE INSTALLATION SPACE *Finished Width 84 1/2" max Electrical 7" 83 1/2" min Area Finished Opening 24" 3" 7" 74" From...
Use and Care Manual
Page 18
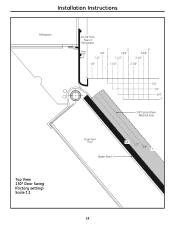
Installation Instructions Refrigerator Top View 130° Door Swing (factory setting) Scale 1:1 23-7/8" From Rear of Refrigerator Case Trim 1" 3/4" 2" 1-3/4" 3" 2-3/4" 1/2" 1-1/2" 2-1/2" 1/4" 1-1/4" 2-1/4" 1/4" 1/2" 3/4" 1" 3/4" Custom Panel (Nominal Size) Fresh Food Door Backer Panel 1/4" 1/2" 3/4" 1" 18
Installation Instructions Refrigerator Top View 130° Door Swing (factory setting) Scale 1:1 23-7/8" From Rear of Refrigerator Case Trim 1" 3/4" 2" 1-3/4" 3" 2-3/4" 1/2" 1-1/2" 2-1/2" 1/4" 1-1/4" 2-1/4" 1/4" 1/2" 3/4" 1" 3/4" Custom Panel (Nominal Size) Fresh Food Door Backer Panel 1/4" 1/2" 3/4" 1" 18
Use and Care Manual
Page 19
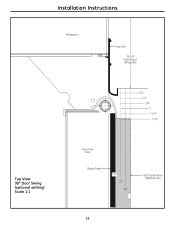
Installation Instructions Refrigerator Case Trim 23-7/8" From Rear of Refrigerator 1/4" 1/2" 3/4" 1" 1-1/4" 1-1/2" Top View 90° Door Swing (optional setting) Scale 1:1 Fresh Food Door Backer Panel 1/4" 1/2" 3/4" 1" 3/4" Custom Panel (Nominal Size) 19
Installation Instructions Refrigerator Case Trim 23-7/8" From Rear of Refrigerator 1/4" 1/2" 3/4" 1" 1-1/4" 1-1/2" Top View 90° Door Swing (optional setting) Scale 1:1 Fresh Food Door Backer Panel 1/4" 1/2" 3/4" 1" 3/4" Custom Panel (Nominal Size) 19
Use and Care Manual
Page 20
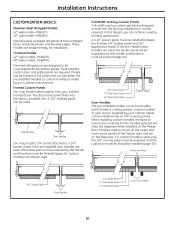
... wrapped doors and grille panels, and beveled edges. Trimmed Models 42″ wide models-PSB42YG 48″ wide models-PSB48YG Trimmed refrigerators are required. Field installed custom door and grille panels are designed to be customized with decorative panels. Handles need to slide into the factory installed ...
... wrapped doors and grille panels, and beveled edges. Trimmed Models 42″ wide models-PSB42YG 48″ wide models-PSB48YG Trimmed refrigerators are required. Field installed custom door and grille panels are designed to be customized with decorative panels. Handles need to slide into the factory installed ...


