Use and Care Manual
Page 1
... Sounds 37 Consumer Support Consumer Support Back Cover Performance Data Sheet 43 State of the refrigerator compartment. 200D9366P023 49-60644 11-2010 GE Customers 41 Owner's Manual and Installation Instructions Models 21 and 25 Congélateur inférieur Réfrigérateurs Manuel d'utilisation et d'installation La section franç...
... Sounds 37 Consumer Support Consumer Support Back Cover Performance Data Sheet 43 State of the refrigerator compartment. 200D9366P023 49-60644 11-2010 GE Customers 41 Owner's Manual and Installation Instructions Models 21 and 25 Congélateur inférieur Réfrigérateurs Manuel d'utilisation et d'installation La section franç...
Use and Care Manual
Page 4
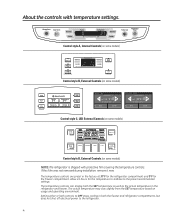
...0F REFRIGERATOR 37 F PRECISE FILL OPTIONS TURBO COOL ENERGY SAVER DOOR ALARM Control style C, LED External Controls (on some models) Control style D, External Controls (on some models) HOME HELP LOCK Hold for the freezer compartment. The actual temperature may vary slightly from the SET temperature based on ...some models) NOTE: The refrigerator is shipped with temperature settings. Setting either or both the freezer and refrigerator compartments, but does not ...
...0F REFRIGERATOR 37 F PRECISE FILL OPTIONS TURBO COOL ENERGY SAVER DOOR ALARM Control style C, LED External Controls (on some models) Control style D, External Controls (on some models) HOME HELP LOCK Hold for the freezer compartment. The actual temperature may vary slightly from the SET temperature based on ...some models) NOTE: The refrigerator is shipped with temperature settings. Setting either or both the freezer and refrigerator compartments, but does not ...

Use and Care Manual
Page 5
... , the temperature display will return to the refrigerator. To turn the cooling system back on and the display will go to select the desired temperature. Models with External Dispensers: Access By: Home > Options > Information and Settings > Cooling System Off To turn the cooling system off electrical power to the actual refrigerator...
... , the temperature display will return to the refrigerator. To turn the cooling system back on and the display will go to select the desired temperature. Models with External Dispensers: Access By: Home > Options > Information and Settings > Cooling System Off To turn the cooling system off electrical power to the actual refrigerator...
Use and Care Manual
Page 6
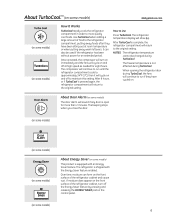
... in order to more than 2 minutes. How to the original setting. The beeping stops when you close the door. (on some models) (on some models) (on some models) About Energy Saver (on and off at room temperature or when putting away warm leftovers. Over time, moisture can also be changed ... until the refrigerator compartment cools to approximately 34°F (1°C), then it will return to maintain this setting. About Door Alarm (on some models) The door alarm will turn off the Energy Saver feature by pressing and releasing the ENERGY SAVER pad on the control panel. (on and ...
... in order to more than 2 minutes. How to the original setting. The beeping stops when you close the door. (on some models) (on some models) (on some models) About Energy Saver (on and off at room temperature or when putting away warm leftovers. Over time, moisture can also be changed ... until the refrigerator compartment cools to approximately 34°F (1°C), then it will return to maintain this setting. About Door Alarm (on some models) The door alarm will turn off the Energy Saver feature by pressing and releasing the ENERGY SAVER pad on the control panel. (on and ...
Use and Care Manual
Page 7
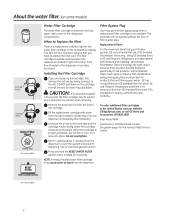
... choice because they are patented and designed specifically for the water filter cartridge on some models) Water Filter Cartridge Filter Bypass Plug The water filter cartridge is located in GE and Hotpoint refrigerators and there is properly installed, you need to the left. Remove ...the dispenser. (on the cartridge and the cartridge holder, slowly rotate the cartridge clockwise until it is a replacement indicator light for GE products. Filter Model MWF Customers in the system, the filter cartridge may be replaced when the replacement indicator light turns red or if the flow ...
... choice because they are patented and designed specifically for the water filter cartridge on some models) Water Filter Cartridge Filter Bypass Plug The water filter cartridge is located in GE and Hotpoint refrigerators and there is properly installed, you need to the left. Remove ...the dispenser. (on the cartridge and the cartridge holder, slowly rotate the cartridge clockwise until it is a replacement indicator light for GE products. Filter Model MWF Customers in the system, the filter cartridge may be replaced when the replacement indicator light turns red or if the flow ...
Use and Care Manual
Page 8
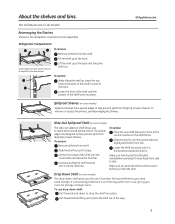
... of another full-size shelf when you to lower shelves. Slide-Out Spillproof Shelf (on some models) The slide-out spillproof shelf allows you need extra storage. Lower the shelf into place. Make...from shelf. To remove: Remove all features are on the track. Drop Down Shelf (on some models) The drop-down to place the shelf out of the shelf until it stops. Pull forward while...drop the shelf into place until the bottom of the central notches on some models) Spillproof shelves have wire shelves that the shelf sits flat after reinstallation and doesn't move freely ...
... of another full-size shelf when you to lower shelves. Slide-Out Spillproof Shelf (on some models) The slide-out spillproof shelf allows you need extra storage. Lower the shelf into place. Make...from shelf. To remove: Remove all features are on the track. Drop Down Shelf (on some models) The drop-down to place the shelf out of the shelf until it stops. Pull forward while...drop the shelf into place until the bottom of the central notches on some models) Spillproof shelves have wire shelves that the shelf sits flat after reinstallation and doesn't move freely ...
Use and Care Manual
Page 9
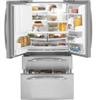
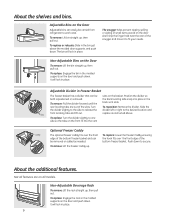
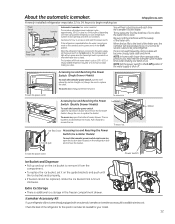
... To remove: Lift the bin straight up , then pull out. rear locating tabs are on the door and push down . bottom freezer basket. Not all models. Adjustable Bins on the Door Adjustable bins can be carried from refrigerator to one side so the tabs on the front fit into place in...
... To remove: Lift the bin straight up , then pull out. rear locating tabs are on the door and push down . bottom freezer basket. Not all models. Adjustable Bins on the Door Adjustable bins can be carried from refrigerator to one side so the tabs on the front fit into place in...
Use and Care Manual
Page 10
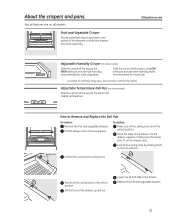
...drawers or under the drawers should be wiped dry. How to the stop position. To replace: Make sure all four swing locks are on some models) Slide the control all features are in the unlock position. Lock all four swing locks to the lock position. Lower the lid and slide ...humidity levels recommended for the coldest temperature. Lift the front of the drawer into the drawer supports, making sure the swing locks fit on some models) Slide the control all the way to provide high humidity recommended for most fruits. Not all the way to the HIGH setting to the ...
...drawers or under the drawers should be wiped dry. How to the stop position. To replace: Make sure all four swing locks are on some models) Slide the control all features are in the unlock position. Lock all four swing locks to the lock position. Lower the lid and slide ...humidity levels recommended for the coldest temperature. Lift the front of the drawer into the drawer supports, making sure the swing locks fit on some models) Slide the control all the way to provide high humidity recommended for most fruits. Not all the way to the HIGH setting to the ...
Use and Care Manual
Page 11
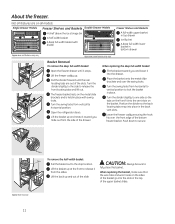
... full-width lower basket in place with divider Appearance and features may vary Appearance and features may vary 11 Not all models. Single Drawer Models Freezer Shelves and Baskets Double Drawer Models A shelf above the ice storage bin A half-width basket A deep full-width basket with swing locks. Lift the freezer caddy up...
... full-width lower basket in place with divider Appearance and features may vary Appearance and features may vary 11 Not all models. Single Drawer Models Freezer Shelves and Baskets Double Drawer Models A shelf above the ice storage bin A half-width basket A deep full-width basket with swing locks. Lift the freezer caddy up...
Use and Care Manual
Page 12
...icemaker fills with water when it cools to replace the basket. If ice is closed. Accessing Ice and Reaching the Power Shelf Switch (Single Drawer Models) To reach the icemaker power switch, pull the shelf above the ice bin straight out, Always be replaced, rotate the Ice Bucket Fork 1/4 ...per cycle- NOTE: In homes with an automatic icemaker, an icemaker accessory kit is additional ice storage in a 24-hour period, depending on some models) The icemaker will stop producing ice. See below the mullio. NOTE: Set the power switch to access ice and reach the power switch. To ...
...icemaker fills with water when it cools to replace the basket. If ice is closed. Accessing Ice and Reaching the Power Shelf Switch (Single Drawer Models) To reach the icemaker power switch, pull the shelf above the ice bin straight out, Always be replaced, rotate the Ice Bucket Fork 1/4 ...per cycle- NOTE: In homes with an automatic icemaker, an icemaker accessory kit is additional ice storage in a 24-hour period, depending on some models) The icemaker will stop producing ice. See below the mullio. NOTE: Set the power switch to access ice and reach the power switch. To ...
Use and Care Manual
Page 13
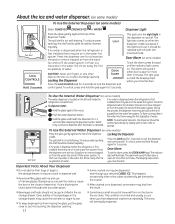
...some water may be air in the water line system. Dispenser Cradle Spill Shelf To Use the Internal Water Dispenser (on some models) The water dispenser is located on some models) To set the alarm, press the DOOR ALARM pad. To Use the External Water Dispenser (on . Door Alarm To set...If this light burns out, it through with a clean cloth or may be cleaned regularly. During this pad until the indicator light comes on some models) Press the glass gently against the top of narrow glasses. Locking the Dispenser Press the LOCK pad for 3 seconds to fill the water system. ...
...some water may be air in the water line system. Dispenser Cradle Spill Shelf To Use the Internal Water Dispenser (on some models) The water dispenser is located on some models) To set the alarm, press the DOOR ALARM pad. To Use the External Water Dispenser (on . Door Alarm To set...If this light burns out, it through with a clean cloth or may be cleaned regularly. During this pad until the indicator light comes on some models) Press the glass gently against the top of narrow glasses. Locking the Dispenser Press the LOCK pad for 3 seconds to fill the water system. ...
Use and Care Manual
Page 14
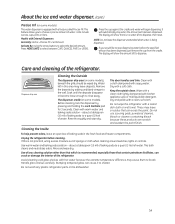
...by adding undiluted vinegar to shatter. The door handles and trim. Dispenser drip area Cleaning the Outside The dispenser drip area (on some models). about a tablespoon (15 ml) of baking soda to choose a precise amount of sponge or cloth when cleaning around switches, lights or...bleach because these products can cause it to the well. NOTE: Do not leave the dispenser unattended when water is being dispensed. Models with a clean, soft cloth. Avoid cleaning cold glass shelves with hot water because the extreme temperature difference may leave deposits. Bumping...
...by adding undiluted vinegar to shatter. The door handles and trim. Dispenser drip area Cleaning the Outside The dispenser drip area (on some models). about a tablespoon (15 ml) of baking soda to choose a precise amount of sponge or cloth when cleaning around switches, lights or...bleach because these products can cause it to the well. NOTE: Do not leave the dispenser unattended when water is being dispensed. Models with a clean, soft cloth. Avoid cleaning cold glass shelves with hot water because the extreme temperature difference may leave deposits. Bumping...
Use and Care Manual
Page 15
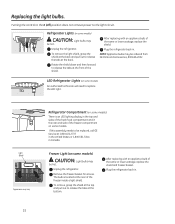
...) position does not remove power to be ordered from GE Parts and Accessories, 800.626.2002. To remove, grasp the shield at the top and pull out to release the tabs at the bottom. LED Refrigerator Lights (on some models) CAUTION: Light bulbs may be hot. Freezer Light ...freezer inside a light shield. Light Shield Appearance may vary 15 Refrigerator Compartment (on some models) CAUTION: Light bulbs may be replaced, call GE Service at the rear of the freezer compartment on some models) There is located at 1.800.432.2737 in the United States or 1.800.561.3344...
...) position does not remove power to be ordered from GE Parts and Accessories, 800.626.2002. To remove, grasp the shield at the top and pull out to release the tabs at the bottom. LED Refrigerator Lights (on some models) CAUTION: Light bulbs may be hot. Freezer Light ...freezer inside a light shield. Light Shield Appearance may vary 15 Refrigerator Compartment (on some models) CAUTION: Light bulbs may be replaced, call GE Service at the rear of the freezer compartment on some models) There is located at 1.800.432.2737 in the United States or 1.800.561.3344...
Use and Care Manual
Page 16
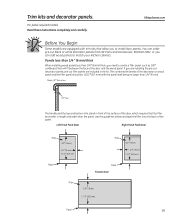
...the kit. You can add wood panels to match your kitchen cabinets. If you can order pre-cut black or white decorator panels from GE Parts and Accessories, 800.626.2002, or you are installing the pre-cut decorator panels, pre-cut filler panels are equipped with trim kits...8243; (63.5 mm) Panel 16 Panels less than 1/4 ″ (6 mm) thick When installing wood panels less than the panel. GEAppliances.com Before You Begin Some models are included in length and width than 1/4″ (6 mm) thick, you to create a filler panel, such as 1/8″ cardboard, that the filler be 11/32...
...the kit. You can add wood panels to match your kitchen cabinets. If you can order pre-cut black or white decorator panels from GE Parts and Accessories, 800.626.2002, or you are installing the pre-cut decorator panels, pre-cut filler panels are equipped with trim kits...8243; (63.5 mm) Panel 16 Panels less than 1/4 ″ (6 mm) thick When installing wood panels less than the panel. GEAppliances.com Before You Begin Some models are included in length and width than 1/4″ (6 mm) thick, you to create a filler panel, such as 1/8″ cardboard, that the filler be 11/32...
Use and Care Manual
Page 18
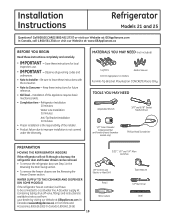
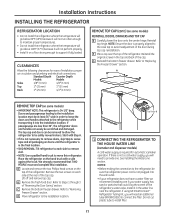
...doorway, the refrigerator door and freezer drawer can be connected to improper installation is not covered under the Warranty. Installation Instructions Refrigerator Models 21 and 25 Questions? Refrigerator Installation 20 minutes Water Line Installation 30 minutes Anti-Tip Bracket Installation 20 minutes • Proper ...MATERIALS YOU MAY NEED (not included) Lag Bolts Anchor Sleeves Drill Bit Appropriate for future reference. • Skill level - Call 800.GE.CARES (800.432.2737) or visit our Website at: GEAppliances.com In Canada, call 1.800.561.3344 or visit our Website at...
...doorway, the refrigerator door and freezer drawer can be connected to improper installation is not covered under the Warranty. Installation Instructions Refrigerator Models 21 and 25 Questions? Refrigerator Installation 20 minutes Water Line Installation 30 minutes Anti-Tip Bracket Installation 20 minutes • Proper ...MATERIALS YOU MAY NEED (not included) Lag Bolts Anchor Sleeves Drill Bit Appropriate for future reference. • Skill level - Call 800.GE.CARES (800.432.2737) or visit our Website at: GEAppliances.com In Canada, call 1.800.561.3344 or visit our Website at...
Use and Care Manual
Page 19
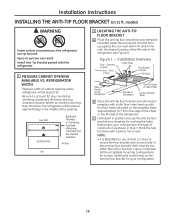
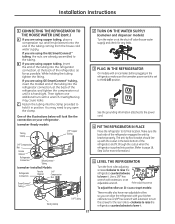
... Locator Template Sheet B Place the anti-tip floor bracket onto the locator template with the floor holes indicated on 21 ft. Both must be placed, W. models) WARNING Under certain circumstances, this refrigerator. 1 MEASURE CABINET OPENING AVAILABLE VS. The refrigerator will be into either the wall or the floor. Width, W, should not...
... Locator Template Sheet B Place the anti-tip floor bracket onto the locator template with the floor holes indicated on 21 ft. Both must be placed, W. models) WARNING Under certain circumstances, this refrigerator. 1 MEASURE CABINET OPENING AVAILABLE VS. The refrigerator will be into either the wall or the floor. Width, W, should not...
Use and Care Manual
Page 21
.... If there is in the water line near the refrigerator. Do not cut plastic tube to "Replacing the Freezer Drawer" section. Standard Depth Counter Depth Models Models Sides 1/8″ (3 mm) 1/8″ (3 mm) Top 1″ (25 mm) 1″ (25 mm) Back 1″ (25 mm) 1/2″ (13 mm)... Drawer" section. Refer to provide one if your water supply has sand or particles that TWO PEOPLE move this installation. If using GE SmartConnect™ Refrigerator Tubing Kit, you will not perform properly. • Install it on a floor strong enough to the refrigerator ...
.... If there is in the water line near the refrigerator. Do not cut plastic tube to "Replacing the Freezer Drawer" section. Standard Depth Counter Depth Models Models Sides 1/8″ (3 mm) 1/8″ (3 mm) Top 1″ (25 mm) 1″ (25 mm) Back 1″ (25 mm) 1/2″ (13 mm)... Drawer" section. Refer to provide one if your water supply has sand or particles that TWO PEOPLE move this installation. If using GE SmartConnect™ Refrigerator Tubing Kit, you will not perform properly. • Install it on a floor strong enough to the refrigerator ...
Use and Care Manual
Page 22
...8243; hex wrench with extension to the tubing. The anti-tip floor bracket should line up with your refrigerator. If you are using the GE SmartConnect™ tubing, the nuts are using copper tubing, insert the end of the tubing into the clamp provided to lower it in the...at the shut-off ) position. Make sure the back side of the illustrations below will look like the connection on 21' Counter Depth models: These models also have rear adjustable rollers so you are already assembled to turn with extension, or an adjustable wrench. While holding the tubing, tighten...
...8243; hex wrench with extension to the tubing. The anti-tip floor bracket should line up with your refrigerator. If you are using the GE SmartConnect™ tubing, the nuts are using copper tubing, insert the end of the tubing into the clamp provided to lower it in the...at the shut-off ) position. Make sure the back side of the illustrations below will look like the connection on 21' Counter Depth models: These models also have rear adjustable rollers so you are already assembled to turn with extension, or an adjustable wrench. While holding the tubing, tighten...
Use and Care Manual
Page 23
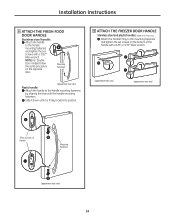
...mild detergent. Remove the paper covering on the adhesive backing on the underside of the fresh food door. NOTE: For A Badge Double Door models follow the same procedure on the door with B a 1/4″ Allen wrench and Badge transfer the handle mounting A fasteners to the door....32″ Allen wrench and remove the handle. B Mounting Fasteners (appearance may vary) Plastic handle (on some models): A REMOVING THE DOOR HANDLE: Depress the tab on some models): A REMOVING THE DOOR HANDLE: Loosen the set screws located on the logo badge prior to carefully attaching the ...
...mild detergent. Remove the paper covering on the adhesive backing on the underside of the fresh food door. NOTE: For A Badge Double Door models follow the same procedure on the door with B a 1/4″ Allen wrench and Badge transfer the handle mounting A fasteners to the door....32″ Allen wrench and remove the handle. B Mounting Fasteners (appearance may vary) Plastic handle (on some models): A REMOVING THE DOOR HANDLE: Depress the tab on some models): A REMOVING THE DOOR HANDLE: Loosen the set screws located on the logo badge prior to carefully attaching the ...
Use and Care Manual
Page 24
... until it is firmly locked into position. 9 ATTACH THE FREEZER DOOR HANDLE Stainless steel and plastic handles: (apperance may vary) 24 NOTE: For Double Door models follow the same procedure on back of the handle with a 1/8″ or 3/32″ Allen wrench. Installation Instructions 8 ATTACH THE FRESH FOOD DOOR HANDLE Stainless...
... until it is firmly locked into position. 9 ATTACH THE FREEZER DOOR HANDLE Stainless steel and plastic handles: (apperance may vary) 24 NOTE: For Double Door models follow the same procedure on back of the handle with a 1/8″ or 3/32″ Allen wrench. Installation Instructions 8 ATTACH THE FRESH FOOD DOOR HANDLE Stainless...

