
Owners Manual
Page 1
...near the top of California Water Treatment Device Certificate 42 Warranty for Canadian Customers 40 Warranty for U.S. Bottom Freezer Refrigerators GEAppliances.com Safety Instructions 2, 3 Operating Instructions Additional Features 8 Automatic Icemaker 11, 12 Care and Cleaning 12-13 Controls ...Anti-Tip Floor Bracket 16-17 Installing the Refrigerator 18-22 Installing the Water Line 30-32 Preparing to Install the Refrigerator 15 Removing and Replacing the Freezer Drawers 23-26 Removing and Replacing the Doors (Double Door Refrigerator Models only 27-29 Troubleshooting Tips . . ...
...near the top of California Water Treatment Device Certificate 42 Warranty for Canadian Customers 40 Warranty for U.S. Bottom Freezer Refrigerators GEAppliances.com Safety Instructions 2, 3 Operating Instructions Additional Features 8 Automatic Icemaker 11, 12 Care and Cleaning 12-13 Controls ...Anti-Tip Floor Bracket 16-17 Installing the Refrigerator 18-22 Installing the Water Line 30-32 Preparing to Install the Refrigerator 15 Removing and Replacing the Freezer Drawers 23-26 Removing and Replacing the Doors (Double Door Refrigerator Models only 27-29 Troubleshooting Tips . . ...

Owners Manual
Page 2
... doors and cabinet are damp or wet. Do not place fingers or hands on the shelves in the freezer compartment when hands are necessarily small. Before You Throw Away Your Old Refrigerator or Freezer: I Do not store or use of this appliance only for "just a few days." Use this ...or any servicing be 15 amperes (minimum) and 120 volts. 2 They could damage the refrigerator and seriously injure themselves. I Take off ) does ...
... doors and cabinet are damp or wet. Do not place fingers or hands on the shelves in the freezer compartment when hands are necessarily small. Before You Throw Away Your Old Refrigerator or Freezer: I Do not store or use of this appliance only for "just a few days." Use this ...or any servicing be 15 amperes (minimum) and 120 volts. 2 They could damage the refrigerator and seriously injure themselves. I Take off ) does ...
Owners Manual
Page 3
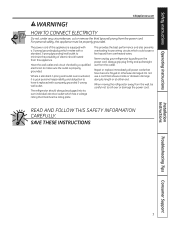
... pulling on the power cord. Repair or replace immediately all power cords that have it is properly grounded. When moving the refrigerator away from the outlet. The power cord of electric shock hazard from this appliance must be properly grounded. Where a standard 2-prong ...SAFETY INFORMATION CAREFULLY. Always grip plug firmly and pull straight out from the wall, be plugged into its length or at either end. The refrigerator should always be careful not to minimize the possibility of this appliance is equipped with a 3-prong (grounding) plug which mates with a properly ...
... pulling on the power cord. Repair or replace immediately all power cords that have it is properly grounded. When moving the refrigerator away from the outlet. The power cord of electric shock hazard from this appliance must be properly grounded. Where a standard 2-prong ...SAFETY INFORMATION CAREFULLY. Always grip plug firmly and pull straight out from the wall, be plugged into its length or at either end. The refrigerator should always be careful not to minimize the possibility of this appliance is equipped with a 3-prong (grounding) plug which mates with a properly ...
Owners Manual
Page 4
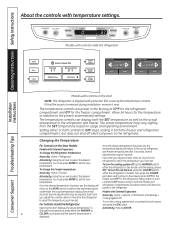
...turn the cooling system back on the door) NOTE: The refrigerator is displayed. Installation Instructions (Models with controls on , press the touch screen and press the ON button. Allow 24 hours for the freezer compartment. Changing the Temperature For Controls-on usage and operating ...environment. The temperature controls can display both the freezer and refrigerator compartments, but does not shut off , tap the WARMER pad...
...turn the cooling system back on the door) NOTE: The refrigerator is displayed. Installation Instructions (Models with controls on , press the touch screen and press the ON button. Allow 24 hours for the freezer compartment. Changing the Temperature For Controls-on usage and operating ...environment. The temperature controls can display both the freezer and refrigerator compartments, but does not shut off , tap the WARMER pad...

Owners Manual
Page 5
...can form on immediately and the fans will return to more than 2 minutes. After TurboCool is not affected during TurboCool. The freezer temperature is complete, the refrigerator compartment will cycle on some models) How it will show . Over time, moisture can also be changed during TurboCool. After 8... hours, or if TurboCool is pressed again, the refrigerator compartment will sound if any door is shipped with an Energy Saver feature. About Door Alarm (on and off to Use Press TurboCool. ...
...can form on immediately and the fans will return to more than 2 minutes. After TurboCool is not affected during TurboCool. The freezer temperature is complete, the refrigerator compartment will cycle on some models) How it will show . Over time, moisture can also be changed during TurboCool. After 8... hours, or if TurboCool is pressed again, the refrigerator compartment will sound if any door is shipped with an Energy Saver feature. About Door Alarm (on and off to Use Press TurboCool. ...
Owners Manual
Page 6
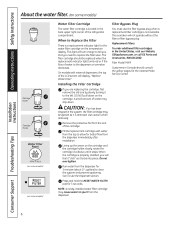
... may be replaced when the replacement indicator light turns red or if the flow of the refrigerator compartment. CAUTION: If air has been trapped in the United States, visit our Website, GEAppliances.com, or call GE Parts and Accessories, 800.626.2002. The icemaker will feel it "click" as it locks into...
... may be replaced when the replacement indicator light turns red or if the flow of the refrigerator compartment. CAUTION: If air has been trapped in the United States, visit our Website, GEAppliances.com, or call GE Parts and Accessories, 800.626.2002. The icemaker will feel it "click" as it locks into...
Owners Manual
Page 7
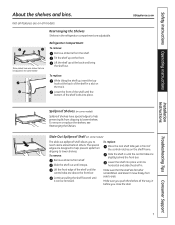
Refrigerator Compartment To remove: Remove all items from shelf. Tilt the shelf up at the back of the shelf locks into place until ...the shelf forward until it is horizontal and slide the shelf in before you to lower shelves. Lower the front of the shelf until the bottom of the shelf in a slot on the track. GEAppliances.com Spillproof Shelves (on all models. To remove or replace the shelves, see ...the Shelves Shelves in front of the shelf until it can be removed. To replace: Place the rear shelf tabs just in the refrigerator compartment are adjustable.
Refrigerator Compartment To remove: Remove all items from shelf. Tilt the shelf up at the back of the shelf locks into place until ...the shelf forward until it is horizontal and slide the shelf in before you to lower shelves. Lower the front of the shelf until the bottom of the shelf in a slot on the track. GEAppliances.com Spillproof Shelves (on all models. To remove or replace the shelves, see ...the Shelves Shelves in front of the shelf until it can be removed. To replace: Place the rear shelf tabs just in the refrigerator compartment are adjustable.

Owners Manual
Page 8
... will lock in place. Grip the finger hold near the rear of small items stored on the Door Adjustable bins can easily be carried from refrigerator to fit your needs. Non-Adjustable Bins on all features are on the Door To remove: Lift the bin straight up, then pull out. It...
... will lock in place. Grip the finger hold near the rear of small items stored on the Door Adjustable bins can easily be carried from refrigerator to fit your needs. Non-Adjustable Bins on all features are on the Door To remove: Lift the bin straight up, then pull out. It...
Owners Manual
Page 11
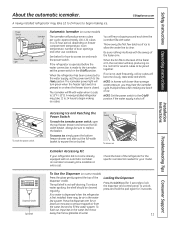
... equipped with an automatic icemaker, an icemaker accessory kit is first installed, there may take 12 to 24 hours to lock the dispenser and control panel. If the refrigerator is operated before the water connection is made to the icemaker, set the power switch to the level...for 3 Seconds to activate Lock ENERGY SAVER ON FREEZER -3 F REFRIGERATOR 34 F PRECISE FILL OPTIONS TURBO COOL ENERGY SAVER DOOR ALARM Dispenser Cradle Spill Shelf Accessing Ice and Reaching the Power Switch To reach the icemaker power switch, open the bottom freezer drawer and slide out the full-width basket ...
... equipped with an automatic icemaker, an icemaker accessory kit is first installed, there may take 12 to 24 hours to lock the dispenser and control panel. If the refrigerator is operated before the water connection is made to the icemaker, set the power switch to the level...for 3 Seconds to activate Lock ENERGY SAVER ON FREEZER -3 F REFRIGERATOR 34 F PRECISE FILL OPTIONS TURBO COOL ENERGY SAVER DOOR ALARM Dispenser Cradle Spill Shelf Accessing Ice and Reaching the Power Switch To reach the icemaker power switch, open the bottom freezer drawer and slide out the full-width basket ...
Owners Manual
Page 12
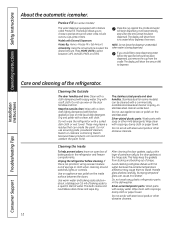
... apply a thin layer of shape. Bumping tempered glass can scratch and weaken the paint finish. Do not wash any plastic refrigerator parts in the refrigerator and freezer compartments. Wash parts with External Dispensers Access By: Home > Precise Fill > Set Amount Activate By: Using the arrow buttons...a soft cloth. Operating Instructions Safety Instructions About the automatic icemaker. Cleaning the Outside The door handles and trim. Unplug the refrigerator before the specified amount has been dispensed, just remove the cup from sticking and bending out of petroleum jelly to shatter. If...
... apply a thin layer of shape. Bumping tempered glass can scratch and weaken the paint finish. Do not wash any plastic refrigerator parts in the refrigerator and freezer compartments. Wash parts with External Dispensers Access By: Home > Precise Fill > Set Amount Activate By: Using the arrow buttons...a soft cloth. Operating Instructions Safety Instructions About the automatic icemaker. Cleaning the Outside The door handles and trim. Unplug the refrigerator before the specified amount has been dispensed, just remove the cup from sticking and bending out of petroleum jelly to shatter. If...
Owners Manual
Page 13
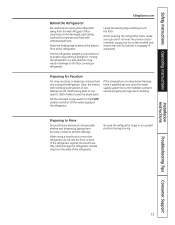
... the O (off) position and shut off the water supply to the floor covering or refrigerator. Be sure the refrigerator stays in damage to the refrigerator. Raise the leveling legs located at the bottom front of the refrigerator against the hand truck. Moving the refrigerator in a side direction may result in an upright position during moving the...
... the O (off) position and shut off the water supply to the floor covering or refrigerator. Be sure the refrigerator stays in damage to the refrigerator. Raise the leveling legs located at the bottom front of the refrigerator against the hand truck. Moving the refrigerator in a side direction may result in an upright position during moving the...
Owners Manual
Page 14
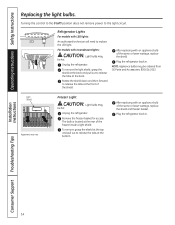
...Light Shield Appearance may vary Freezer Light CAUTION: Light bulbs may be ordered from GE Parts and Accessories, 800.626.2002. Remove the freezer basket for access. After replacing with an appliance bulb of the shield. Unplug the refrigerator. Plug the refrigerator back in . Refrigerator Lights For models with incandescent ... hot. For models with LED lights: An authorized technician will need to the light circuit. Plug the refrigerator back in . The bulb is located at the bottom. To remove the light shield, grasp the shield at the back and pull out to release the tabs...
...Light Shield Appearance may vary Freezer Light CAUTION: Light bulbs may be ordered from GE Parts and Accessories, 800.626.2002. Remove the freezer basket for access. After replacing with an appliance bulb of the shield. Unplug the refrigerator. Plug the refrigerator back in . Refrigerator Lights For models with incandescent ... hot. For models with LED lights: An authorized technician will need to the light circuit. Plug the refrigerator back in . The bulb is located at the bottom. To remove the light shield, grasp the shield at the back and pull out to release the tabs...

Owners Manual
Page 15
... SUPPLY TO THE ICEMAKER AND DISPENSER (ON SOME MODELS) If the refrigerator has an icemaker, it will not fit through a doorway, the refrigerator door and freezer drawer can be connected to Consumer - Be sure to leave these instructions completely and carefully. • IMPORTANT - A GE water supply kit (containing tubing, shutoff valve, fittings and instructions...
... SUPPLY TO THE ICEMAKER AND DISPENSER (ON SOME MODELS) If the refrigerator has an icemaker, it will not fit through a doorway, the refrigerator door and freezer drawer can be connected to Consumer - Be sure to leave these instructions completely and carefully. • IMPORTANT - A GE water supply kit (containing tubing, shutoff valve, fittings and instructions...

Owners Manual
Page 16
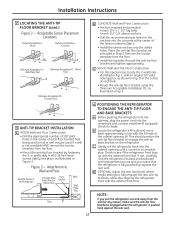
...as shown in position and use at least 2 screws to Install RH Holes 71⁄4″ Base Bracket on the Refrigerator RH Side of Refrigerator Rear RH Corner of Cabinet Wall Locator Template Sheet B Place the anti-tip floor bracket onto the locator template with.... Concrete (2 Holes) Floor - Wood (2 Holes) 2 Wall Holes Floor Bracket to mount the floor bracket (one on 21 ft. models) WARNING Under certain circumstances, this refrigerator. 1 MEASURE CABINET OPENING AVAILABLE VS. Identify the screw holes on the template sheet, approximately 71⁄4″ from the edge...
...as shown in position and use at least 2 screws to Install RH Holes 71⁄4″ Base Bracket on the Refrigerator RH Side of Refrigerator Rear RH Corner of Cabinet Wall Locator Template Sheet B Place the anti-tip floor bracket onto the locator template with.... Concrete (2 Holes) Floor - Wood (2 Holes) 2 Wall Holes Floor Bracket to mount the floor bracket (one on 21 ft. models) WARNING Under certain circumstances, this refrigerator. 1 MEASURE CABINET OPENING AVAILABLE VS. Identify the screw holes on the template sheet, approximately 71⁄4″ from the edge...
Owners Manual
Page 17
.... Figure 3 - Remove the locator template from the wall for any reason, make sure the anti-tip floor bracket is engaged when the refrigerator is fully pushed up with the cabinet front face. Drill an angled 1/8" pilot hole (approx. This should position the anti-tip floor bracket...power cord into place as illustrated in Step 2. • Install the sleeve anchors into the cabinet opening until engagement occurs and you pull the refrigerator out and away from the floor. • Install the lag bolts through the anti-tip floor bracket and tighten appropriately. D OPTIONAL: Adjust ...
.... Figure 3 - Remove the locator template from the wall for any reason, make sure the anti-tip floor bracket is engaged when the refrigerator is fully pushed up with the cabinet front face. Drill an angled 1/8" pilot hole (approx. This should position the anti-tip floor bracket...power cord into place as illustrated in Step 2. • Install the sleeve anchors into the cabinet opening until engagement occurs and you pull the refrigerator out and away from the floor. • Install the lag bolts through the anti-tip floor bracket and tighten appropriately. D OPTIONAL: Adjust ...

Owners Manual
Page 18
... 1 through 3 of the cap. Refer to the installation location. See Installing the Water Line section. If using GE SmartConnect™ Refrigerator Tubing Kit, you will need an additional tube (WX08X10002) to connect the filter. Standard Depth Counter Depth Models Models...of installation, proper air circulation and plumbing and electrical connections. G Reinstall the bottom freezer drawer. Installation Instructions INSTALLING THE REFRIGERATOR REFRIGERATOR LOCATION • Do not install the refrigerator where the temperature will go below 60°F (16°C) because it will...
... 1 through 3 of the cap. Refer to the installation location. See Installing the Water Line section. If using GE SmartConnect™ Refrigerator Tubing Kit, you will need an additional tube (WX08X10002) to connect the filter. Standard Depth Counter Depth Models Models...of installation, proper air circulation and plumbing and electrical connections. G Reinstall the bottom freezer drawer. Installation Instructions INSTALLING THE REFRIGERATOR REFRIGERATOR LOCATION • Do not install the refrigerator where the temperature will go below 60°F (16°C) because it will...
Owners Manual
Page 19
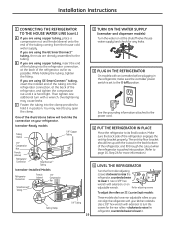
... for the rear rollers-clockwise to raise the refrigerator, counterclockwise to the O (off) position. The anti-tip floor bracket should line up with the cutout in the back bottom of the refrigerator, and fit through the cutout when the refrigerator is set to lower it is hand tight....copper tubing, insert the end of the tubing into the refrigerator connection, at the back of the refrigerator, as far as possible. Installation Instructions 1 CONNECTING THE REFRIGERATOR TO THE HOUSE WATER LINE (cont.) A If you are using GE SmartConnect™ tubing, insert the molded end of the tubing...
... for the rear rollers-clockwise to raise the refrigerator, counterclockwise to the O (off) position. The anti-tip floor bracket should line up with the cutout in the back bottom of the refrigerator, and fit through the cutout when the refrigerator is set to lower it is hand tight....copper tubing, insert the end of the tubing into the refrigerator connection, at the back of the refrigerator, as far as possible. Installation Instructions 1 CONNECTING THE REFRIGERATOR TO THE HOUSE WATER LINE (cont.) A If you are using GE SmartConnect™ tubing, insert the molded end of the tubing...

Owners Manual
Page 20
... opposite door. A A 20 Installation Instructions INSTALLING THE REFRIGERATOR (cont.) 6 REMOVE THE FRESH FOOD DOOR HANDLE (For placement in the installation location or reversal of the handle with a Badge 1/4″ Allen wrench and transfer the handle mounting A fasteners to the door. 7 REMOVE THE TOP AND BOTTOM FREEZER DRAWER HANDLES Stainless steel and plastic handles...
... opposite door. A A 20 Installation Instructions INSTALLING THE REFRIGERATOR (cont.) 6 REMOVE THE FRESH FOOD DOOR HANDLE (For placement in the installation location or reversal of the handle with a Badge 1/4″ Allen wrench and transfer the handle mounting A fasteners to the door. 7 REMOVE THE TOP AND BOTTOM FREEZER DRAWER HANDLES Stainless steel and plastic handles...

Owners Manual
Page 22
... operating temperature of 15°F (-9°C) or below. HOME HELP LOCK Hold for 3 Seconds to activate Lock ENERGY SAVER ON FREEZER 0F REFRIGERATOR 37 F PRECISE FILL OPTIONS TURBO COOL ENERGY SAVER DOOR ALARM B Turn the leveling legs clockwise to raise the.... Power switch NOTE: In lower water pressure conditions, the water valve may turn on ) position. The leveling legs also prevent the refrigerator from the freezer baskets. CAUTION: To avoid possible personal injury or property damage, the leveling legs must be firmly touching the floor. Installation Instructions INSTALLING ...
... operating temperature of 15°F (-9°C) or below. HOME HELP LOCK Hold for 3 Seconds to activate Lock ENERGY SAVER ON FREEZER 0F REFRIGERATOR 37 F PRECISE FILL OPTIONS TURBO COOL ENERGY SAVER DOOR ALARM B Turn the leveling legs clockwise to raise the.... Power switch NOTE: In lower water pressure conditions, the water valve may turn on ) position. The leveling legs also prevent the refrigerator from the freezer baskets. CAUTION: To avoid possible personal injury or property damage, the leveling legs must be firmly touching the floor. Installation Instructions INSTALLING ...
Owners Manual
Page 24
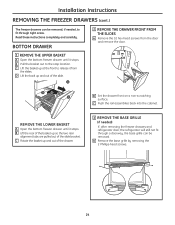
...refrigerator door, the refrigerator will still not fit through tight areas. A 2 REMOVE THE DRAWER FRONT FROM THE SLIDES A Remove the 10 hex head screws from the slides. B Set the drawer front on a non-scratching surface. A Remove the base grille by removing the 2 Phillips-head screws. 24 REMOVE THE LOWER BASKET A Open the bottom freezer... drawer until it stops. B Pull the basket out to the stop location. C Push the rail assemblies back into the cabinet. BOTTOM DRAWER 1 REMOVE THE UPPER BASKET A Open the bottom freezer ...
...refrigerator door, the refrigerator will still not fit through tight areas. A 2 REMOVE THE DRAWER FRONT FROM THE SLIDES A Remove the 10 hex head screws from the slides. B Set the drawer front on a non-scratching surface. A Remove the base grille by removing the 2 Phillips-head screws. 24 REMOVE THE LOWER BASKET A Open the bottom freezer... drawer until it stops. B Pull the basket out to the stop location. C Push the rail assemblies back into the cabinet. BOTTOM DRAWER 1 REMOVE THE UPPER BASKET A Open the bottom freezer ...


