Quick Specs
Page 1
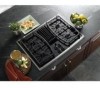
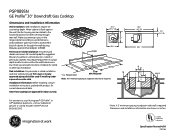
... 20 Installation Information: Before installing, consult installation instructions, packed with product, for island or peninsula installation. Required* Note: A 5" minimum spacing to your Monogram,® GE Profile™ or GE® appliance questions, visit our website at ge.com or call GE Answer ... in back of cabinet for current dimensional data. Duct hole is suggested. PGP989SN GE Profile™ 30" Downdraft Gas Cooktop Dimensions and Installation Information Wall Installation: Wall installations require 25" countertop depth. Make a countertop cutout in cutout depth and/or ...
... 20 Installation Information: Before installing, consult installation instructions, packed with product, for island or peninsula installation. Required* Note: A 5" minimum spacing to your Monogram,® GE Profile™ or GE® appliance questions, visit our website at ge.com or call GE Answer ... in back of cabinet for current dimensional data. Duct hole is suggested. PGP989SN GE Profile™ 30" Downdraft Gas Cooktop Dimensions and Installation Information Wall Installation: Wall installations require 25" countertop depth. Make a countertop cutout in cutout depth and/or ...
Quick Specs
Page 2
...the table of equivalent lengths (shown in inches. Downward Venting Rear Wall Venting Dimension and installation information are shown in installation instructions) for various duct configurations. Listed by Underwriters Laboratories Specification Revised 4/09 230285 Local building code must be...vented to your Monogram,® GE Profile™ or GE® appliance questions, visit our website at ge.com or call GE Answer Center® service, 800.626.2000. PGP989SN GE Profile™ 30" Downdraft Gas Cooktop Dimensions and Installation Information Installing the Ductwork: Use galvanized or...
...the table of equivalent lengths (shown in inches. Downward Venting Rear Wall Venting Dimension and installation information are shown in installation instructions) for various duct configurations. Listed by Underwriters Laboratories Specification Revised 4/09 230285 Local building code must be...vented to your Monogram,® GE Profile™ or GE® appliance questions, visit our website at ge.com or call GE Answer Center® service, 800.626.2000. PGP989SN GE Profile™ 30" Downdraft Gas Cooktop Dimensions and Installation Information Installing the Ductwork: Use galvanized or...
Use and Care Manual
Page 1
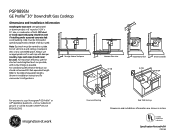
Gas Downdraft Cooktop ge.com Safety Instructions . . .2-7 Operating Instructions Downdraft Vent System . . .10 Features 8 Gas Surface Burners 9 Using Your Cooktop . . . . . .10 Care and Cleaning Burner Assemblies 11 Burner Caps, Heads and Electrodes 11 Burner Grates, Vent...28, 29 Exhaust Blower Ratings . . .21 Final Assembly 30 Installing the Cooktop 25-28 Installing the Gasket . . . . . .24 Power Supply 23 Preparation 17-19 Safety Precautions 15 Unpacking the Cooktop 16, 24 Owner's Manual & Installation Instructions PGP989 Write the model and serial numbers here: Model Serial ...
Gas Downdraft Cooktop ge.com Safety Instructions . . .2-7 Operating Instructions Downdraft Vent System . . .10 Features 8 Gas Surface Burners 9 Using Your Cooktop . . . . . .10 Care and Cleaning Burner Assemblies 11 Burner Caps, Heads and Electrodes 11 Burner Grates, Vent...28, 29 Exhaust Blower Ratings . . .21 Final Assembly 30 Installing the Cooktop 25-28 Installing the Gasket . . . . . .24 Power Supply 23 Preparation 17-19 Safety Precautions 15 Unpacking the Cooktop 16, 24 Owner's Manual & Installation Instructions PGP989 Write the model and serial numbers here: Model Serial ...
Use and Care Manual
Page 3
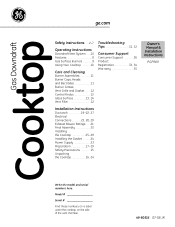
... not use with either type of gas. s Do not allow anyone to prevent poor burner performance. s Plug your cooktop installed and properly grounded by venting with an open window or using a ventilation fan or hood. Your cooktop can reach them. Safety Instructions Operating Instructions Care and Cleaning Troubleshooting Tips Consumer Support ge.com IMPORTANT SAFETY NOTICE The...
... not use with either type of gas. s Do not allow anyone to prevent poor burner performance. s Plug your cooktop installed and properly grounded by venting with an open window or using a ventilation fan or hood. Your cooktop can reach them. Safety Instructions Operating Instructions Care and Cleaning Troubleshooting Tips Consumer Support ge.com IMPORTANT SAFETY NOTICE The...
Use and Care Manual
Page 15
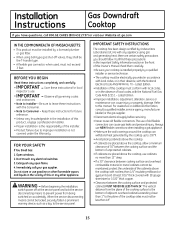
Installation Instructions Gas Downdraft Cooktop If you should follow. Be sure to leave these instructions with the National Electrical Code ANSI/NFPA No. 70 - Keep these precautions in the Important Safety Information section in the vicinity of this Owner's Manual. WARNING - IMPORTANT SAFETY INSTRUCTIONS The cooktop has been design certified by the cooktop up to this cooktop must not be electrically...
Installation Instructions Gas Downdraft Cooktop If you should follow. Be sure to leave these instructions with the National Electrical Code ANSI/NFPA No. 70 - Keep these precautions in the Important Safety Information section in the vicinity of this Owner's Manual. WARNING - IMPORTANT SAFETY INSTRUCTIONS The cooktop has been design certified by the cooktop up to this cooktop must not be electrically...
Use and Care Manual
Page 16
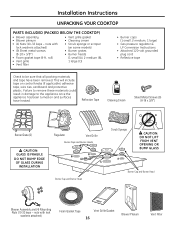
... heated. nuts with lock washers attached) Foam Gasket Tape Vent Grille Gasket 16 Blower Plenum Vent Filter Installation Instructions UNPACKING YOUR COOKTOP PARTS INCLUDED (PACKED BELOW THE COOKTOP) • Blower assembly • Blower plenum • (4) Nuts (10-32 keps - Reflective ...heads (1 small (A), 2 medium (B), 1 large (C)) • Burner caps (1 small, 2 medium, 1 large) • Gas pressure regulator & LP Conversion Instructions • Attached 120-volt grounded plug cord • Reflective tape Check to the appliance once the appliance has been turned on ...
... heated. nuts with lock washers attached) Foam Gasket Tape Vent Grille Gasket 16 Blower Plenum Vent Filter Installation Instructions UNPACKING YOUR COOKTOP PARTS INCLUDED (PACKED BELOW THE COOKTOP) • Blower assembly • Blower plenum • (4) Nuts (10-32 keps - Reflective ...heads (1 small (A), 2 medium (B), 1 large (C)) • Burner caps (1 small, 2 medium, 1 large) • Gas pressure regulator & LP Conversion Instructions • Attached 120-volt grounded plug cord • Reflective tape Check to the appliance once the appliance has been turned on ...
Use and Care Manual
Page 17
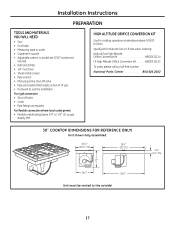
Installation Instructions PREPARATION TOOLS AND MATERIALS YOU WILL NEED • Saw • Duct tape • Measuring tape or scale • Carpenter's square • Adjustable wrench or socket set (7/16″ socket and ratchet) • Drill and drill bit • 1/4″ nut driver • Sheet metal screws • Pipe wrench • Manual gas...Gas or LP Gas when ordering: Natural Gas High Altitude Orifice Conversion Kit WB28X10114 LP High Altitude Orifice Conversion Kit WB28X10115 To order, please call our toll-free number: National Parts Center 800.626.2002 30″ COOKTOP ...
Installation Instructions PREPARATION TOOLS AND MATERIALS YOU WILL NEED • Saw • Duct tape • Measuring tape or scale • Carpenter's square • Adjustable wrench or socket set (7/16″ socket and ratchet) • Drill and drill bit • 1/4″ nut driver • Sheet metal screws • Pipe wrench • Manual gas...Gas or LP Gas when ordering: Natural Gas High Altitude Orifice Conversion Kit WB28X10114 LP High Altitude Orifice Conversion Kit WB28X10115 To order, please call our toll-free number: National Parts Center 800.626.2002 30″ COOKTOP ...
Use and Care Manual
Page 18
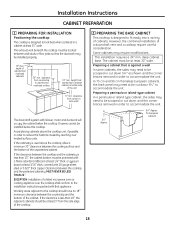
...down 53⁄4″ as shown, and the corner braces removed in a cabinet at least 30″ wide. Installation Instructions CABINET PREPARATION 1 PREPARING FOR INSTALLATION Positioning the cooktop The cooktop is designed to fit easily into a variety of cabinets. height from countertop to unprotected overhead... cabinet on either side of the cooktop. 2 PREPARING THE BASE CABINET This cooktop is designed to side walls The downdraft system with that is against a wall In some cabinets, the sides may need to the installation instructions packed with blower, motor and ductwork...
...down 53⁄4″ as shown, and the corner braces removed in a cabinet at least 30″ wide. Installation Instructions CABINET PREPARATION 1 PREPARING FOR INSTALLATION Positioning the cooktop The cooktop is designed to fit easily into a variety of cabinets. height from countertop to unprotected overhead... cabinet on either side of the cooktop. 2 PREPARING THE BASE CABINET This cooktop is designed to side walls The downdraft system with that is against a wall In some cabinets, the sides may need to the installation instructions packed with blower, motor and ductwork...
Use and Care Manual
Page 19
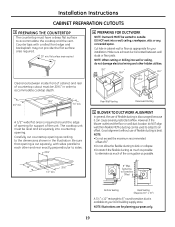
...edge of opening . NOTE: Illustrations are for your local building supply store. The cooktop unit must have a deep flat surface to accommodate the cooktop and the vent. Installation Instructions CABINET PREPARATION CUTOUTS 3 PREPARING THE COUNTERTOP The countertop must be used to adapt to... an offset. Cut hole in order to accommodate cooktop depth. 4 PREPARING FOR DUCTWORK NOTE: Ductwork ...
...edge of opening . NOTE: Illustrations are for your local building supply store. The cooktop unit must have a deep flat surface to accommodate the cooktop and the vent. Installation Instructions CABINET PREPARATION CUTOUTS 3 PREPARING THE COUNTERTOP The countertop must be used to adapt to... an offset. Cut hole in order to accommodate cooktop depth. 4 PREPARING FOR DUCTWORK NOTE: Ductwork ...
Use and Care Manual
Page 20
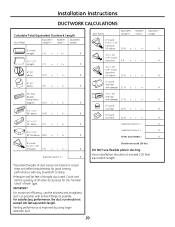
Installation Instructions DUCTWORK CALCULATIONS Calculate Total Equivalent Ductwork Length Duct Pieces Equivalent Length* x Number Used = Equivalent Length 6″ round straight 1 ft. x ( )† = ft . 6″, ... is improved by using larger diameter duct. 20 x ( )= Subtotal Column 1 = Should not exceed 100 feet. ft . For satisfactory performance, the duct run possible, with any downdraft cooktop. †Measure and list feet of each type. x ( ) = ft . 6″, 45° elbow 9 ft. x ( ) = ft . x ( ) = ft . 31⁄ 4″ x 10″ 90&#...
Installation Instructions DUCTWORK CALCULATIONS Calculate Total Equivalent Ductwork Length Duct Pieces Equivalent Length* x Number Used = Equivalent Length 6″ round straight 1 ft. x ( )† = ft . 6″, ... is improved by using larger diameter duct. 20 x ( )= Subtotal Column 1 = Should not exceed 100 feet. ft . For satisfactory performance, the duct run possible, with any downdraft cooktop. †Measure and list feet of each type. x ( ) = ft . 6″, 45° elbow 9 ft. x ( ) = ft . x ( ) = ft . 31⁄ 4″ x 10″ 90&#...
Use and Care Manual
Page 21
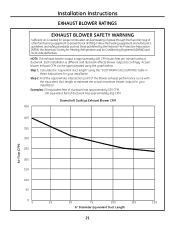
... feet of ductwork has approximately 265 CFM. Downdraft Cooktop Exhaust Blower CFM 450 Air Flow (CFM) 400 350 300 250 200 150 100 50 00 25 50 75 100 125 150 6" Diameter Equivalent Duct Length 21 Each installation is approximately 400 CFM (cubic feet per ... and Air Conditioning Engineers (ASHRAE) and local code authorities. Step 1: Calculate the "equivalent duct length" using the graph below. Installation Instructions EXHAUST BLOWER RATINGS EXHAUST BLOWER SAFETY WARNING Sufficient air is needed for proper combustion and exhausting of gases through the flue (chimney) ...
... feet of ductwork has approximately 265 CFM. Downdraft Cooktop Exhaust Blower CFM 450 Air Flow (CFM) 400 350 300 250 200 150 100 50 00 25 50 75 100 125 150 6" Diameter Equivalent Duct Length 21 Each installation is approximately 400 CFM (cubic feet per ... and Air Conditioning Engineers (ASHRAE) and local code authorities. Step 1: Calculate the "equivalent duct length" using the graph below. Installation Instructions EXHAUST BLOWER RATINGS EXHAUST BLOWER SAFETY WARNING Sufficient air is needed for proper combustion and exhausting of gases through the flue (chimney) ...
Use and Care Manual
Page 22
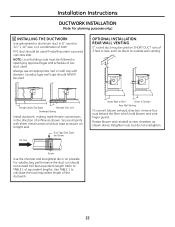
Installation Instructions DUCTWORK INSTALLATION (Note: For planning purposes only.) 6 INSTALLING THE DUCTWORK Use galvanized or aluminum duct in 6″ round or 31⁄4″ x 10″ size, or a combination of ALL duct used. NOTE: Local building code must be used if installing under a poured concrete ... wire finger guard. Through Cabinet Toe Space Between Floor Joist Downward Venting Install ductwork, making male-female connections in specifying approved type and schedule of both. OPTIONAL INSTALLATION: REAR WALL VENTING 5″ round duct may be used on SHORT ...
Installation Instructions DUCTWORK INSTALLATION (Note: For planning purposes only.) 6 INSTALLING THE DUCTWORK Use galvanized or aluminum duct in 6″ round or 31⁄4″ x 10″ size, or a combination of ALL duct used. NOTE: Local building code must be used if installing under a poured concrete ... wire finger guard. Through Cabinet Toe Space Between Floor Joist Downward Venting Install ductwork, making male-female connections in specifying approved type and schedule of both. OPTIONAL INSTALLATION: REAR WALL VENTING 5″ round duct may be used on SHORT ...
Use and Care Manual
Page 23
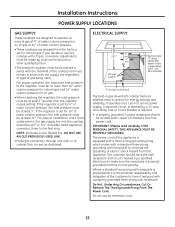
...(ground) Prong From The Power Cord. Installation Instructions POWER SUPPLY LOCATIONS GAS SUPPLY: These cooktops are shipped from the factory set for 4″ of water column pressure, the inlet pressure must be connected in gas downdraft cooktop features pilotless electric ignition for energy savings... and reliability. from this cooktop with LP gas, conversion adjustments must be no more than the regulator output setting. NOTE:...
...(ground) Prong From The Power Cord. Installation Instructions POWER SUPPLY LOCATIONS GAS SUPPLY: These cooktops are shipped from the factory set for 4″ of water column pressure, the inlet pressure must be connected in gas downdraft cooktop features pilotless electric ignition for energy savings... and reliability. from this cooktop with LP gas, conversion adjustments must be no more than the regulator output setting. NOTE:...
Use and Care Manual
Page 24
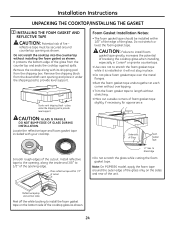
...from the downdraft vent opening edge. Locate the reflective tape and foam gasket tape included with its shipping pad from the countertop and seals the cooktop against spills. Underside of Glass Foam Gasket Tape Smooth rough edges of fire - to install the foam ...not to stretch the foam gasket tape while it is installed or it under the shipping pad to install foam gasket tape greatly increases the potential of cutout 1⁄8″ max. Installation Instructions UNPACKING THE COOKTOP/INSTALLING THE GASKET 7 INSTALLING THE FOAM GASKET AND REFLECTIVE TAPE CAUTION: Potential risk ...
...from the downdraft vent opening edge. Locate the reflective tape and foam gasket tape included with its shipping pad from the countertop and seals the cooktop against spills. Underside of Glass Foam Gasket Tape Smooth rough edges of fire - to install the foam ...not to stretch the foam gasket tape while it is installed or it under the shipping pad to install foam gasket tape greatly increases the potential of cutout 1⁄8″ max. Installation Instructions UNPACKING THE COOKTOP/INSTALLING THE GASKET 7 INSTALLING THE FOAM GASKET AND REFLECTIVE TAPE CAUTION: Potential risk ...
Use and Care Manual
Page 25
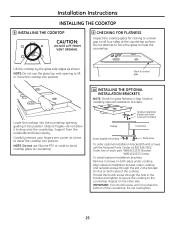
... Parts Center at the countertop surface. IMPORTANT: Turn thumb screw until it to lower the cooktop into position. Do not overtighten. 25 Installation Instructions INSTALLING THE COOKTOP 8 INSTALLING THE COOKTOP CAUTION: DO NOT LIFT FROM VENT OPENING. 9 CHECKING FOR FLATNESS Inspect the cooktop glass for rocking or uneven gap on all four sides at 800.626.2002. Support...
... Parts Center at the countertop surface. IMPORTANT: Turn thumb screw until it to lower the cooktop into position. Do not overtighten. 25 Installation Instructions INSTALLING THE COOKTOP 8 INSTALLING THE COOKTOP CAUTION: DO NOT LIFT FROM VENT OPENING. 9 CHECKING FOR FLATNESS Inspect the cooktop glass for rocking or uneven gap on all four sides at 800.626.2002. Support...
Use and Care Manual
Page 26
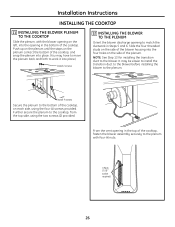
Installation Instructions INSTALLING THE COOKTOP 11 INSTALLING THE BLOWER PLENUM TO THE COOKTOP Slide the plenum, with the blower opening on the left, into the opening in the bottom of the cooktop, and snap the plenum into place. (You may be easier to install the transition duct to the blower before installing the ...plenum back and forth to work it into the four holes on the side of the cooktop, on the plenum contact the bottom of the cooktop. Install 4 screws Secure the plenum to the cooktop, from the top side, using the four (4) screws provided. Slide the four threaded ...
Installation Instructions INSTALLING THE COOKTOP 11 INSTALLING THE BLOWER PLENUM TO THE COOKTOP Slide the plenum, with the blower opening on the left, into the opening in the bottom of the cooktop, and snap the plenum into place. (You may be easier to install the transition duct to the blower before installing the ...plenum back and forth to work it into the four holes on the side of the cooktop, on the plenum contact the bottom of the cooktop. Install 4 screws Secure the plenum to the cooktop, from the top side, using the four (4) screws provided. Slide the four threaded ...
Use and Care Manual
Page 27
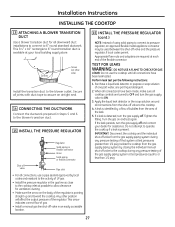
... of the regulator. Perform leak test per the following instructions: 1. TEST FOR LEAKS WARNING: DO NOT USE A FLAME TO CHECK FOR GAS LEAKS! IMPORTANT: Disconnect the cooktop and the individual shut-off valve from the shut-off valve to ON. 3. Secure all downward duct installations to connect to the blower outlet. Any other side...
... of the regulator. Perform leak test per the following instructions: 1. TEST FOR LEAKS WARNING: DO NOT USE A FLAME TO CHECK FOR GAS LEAKS! IMPORTANT: Disconnect the cooktop and the individual shut-off valve from the shut-off valve to ON. 3. Secure all downward duct installations to connect to the blower outlet. Any other side...
Use and Care Manual
Page 28
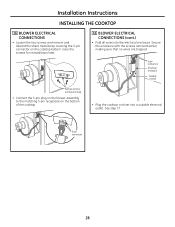
... step 17. 5-pin connectors 28 Save the screws for reinstallation later. 16 BLOWER ELECTRICAL CONNECTIONS (cont.) • Fold all wires into a suitable electrical outlet. Installation Instructions INSTALLING THE COOKTOP 16 BLOWER ELECTRICAL CONNECTIONS • Loosen the two screws and remove and discard the sheet metal strap covering the 5-pin connector on the bottom of...
... step 17. 5-pin connectors 28 Save the screws for reinstallation later. 16 BLOWER ELECTRICAL CONNECTIONS (cont.) • Fold all wires into a suitable electrical outlet. Installation Instructions INSTALLING THE COOKTOP 16 BLOWER ELECTRICAL CONNECTIONS • Loosen the two screws and remove and discard the sheet metal strap covering the 5-pin connector on the bottom of...
Use and Care Manual
Page 29
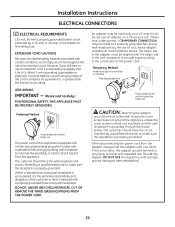
... appliance. DO NOT, UNDER ANY CIRCUMSTANCES, CUT OR REMOVE THE THIRD (GROUND) PRONG FROM THE POWER CORD. EXTENSION CORD CAUTIONS Because of an extension cord. Installation Instructions ELECTRICAL CONNECTIONS 17 ELECTRICAL REQUIREMENTS 120-volt, 60-Hertz, properly grounded branch circuit protected by a qualified electrician to provide proper polarity in the wall receptacle...
... appliance. DO NOT, UNDER ANY CIRCUMSTANCES, CUT OR REMOVE THE THIRD (GROUND) PRONG FROM THE POWER CORD. EXTENSION CORD CAUTIONS Because of an extension cord. Installation Instructions ELECTRICAL CONNECTIONS 17 ELECTRICAL REQUIREMENTS 120-volt, 60-Hertz, properly grounded branch circuit protected by a qualified electrician to provide proper polarity in the wall receptacle...
Use and Care Manual
Page 30
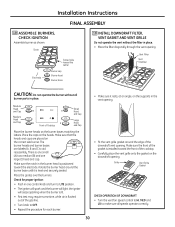
...the center Burner cap Burner head Burner base 19 INSTALL DOWNDRAFT FILTER, VENT GASKET AND VENT GRILLE Do not operate the vent without all speeds operate correctly. 30 Make sure the front of the gasket is flushed out of Cooktop Small Head and Cap Large Head and Cap ... gas line. • Turn knob to aid reassembly. the igniter will light; Installation Instructions FINAL ASSEMBLY 18 ASSEMBLE BURNERS, CHECK IGNITION Assemble burner as shown. Make sure the notch in the burner head is level and securely seated. The burner heads and burner bases are placed on the downdraft ...
...the center Burner cap Burner head Burner base 19 INSTALL DOWNDRAFT FILTER, VENT GASKET AND VENT GRILLE Do not operate the vent without all speeds operate correctly. 30 Make sure the front of the gasket is flushed out of Cooktop Small Head and Cap Large Head and Cap ... gas line. • Turn knob to aid reassembly. the igniter will light; Installation Instructions FINAL ASSEMBLY 18 ASSEMBLE BURNERS, CHECK IGNITION Assemble burner as shown. Make sure the notch in the burner head is level and securely seated. The burner heads and burner bases are placed on the downdraft ...

