
Use and Care Manual
Page 1
... 2, 3 Operating Instructions Additional Features 8 Automatic Icemaker 11, 12 Care and Cleaning 12-13 Controls 4-5 Crispers and Pans 9 Freezer 10 Replacing the Light Bulbs 14 Shelves and Bins 7, 8 Water Filter 6 Installation Instructions Installing the Anti-Tip Floor Bracket 16-17 Installing the Refrigerator... . . .18-22 Installing the Water Line 30-32 Preparing to Install the Refrigerator 15 Removing and Replacing the Freezer Drawers 23-26 Removing and Replacing the Doors (Double Door Refrigerator Models only 27-29 Troubleshooting Tips . . . . . .33-37 Normal Operating Sounds 33 ...
... 2, 3 Operating Instructions Additional Features 8 Automatic Icemaker 11, 12 Care and Cleaning 12-13 Controls 4-5 Crispers and Pans 9 Freezer 10 Replacing the Light Bulbs 14 Shelves and Bins 7, 8 Water Filter 6 Installation Instructions Installing the Anti-Tip Floor Bracket 16-17 Installing the Refrigerator... . . .18-22 Installing the Water Line 30-32 Preparing to Install the Refrigerator 15 Removing and Replacing the Freezer Drawers 23-26 Removing and Replacing the Doors (Double Door Refrigerator Models only 27-29 Troubleshooting Tips . . . . . .33-37 Normal Operating Sounds 33 ...

Use and Care Manual
Page 7
... the shelf into place. Continue pulling the shelf forward until it is horizontal and slide the shelf in a slot on the track. To replace: Place the rear shelf tabs just in until the central tabs are adjustable. Lift the front edge of the central notches on all items ... tilting the shelf up at the back and bring the shelf out. To remove or replace the shelves, see Rearranging the Shelves. Make sure that can be adjusted in before you close the door. Safety Instructions Operating Instructions About the shelves and bins. GEAppliances.com Spillproof Shelves (on some models...
... the shelf into place. Continue pulling the shelf forward until it is horizontal and slide the shelf in a slot on the track. To replace: Place the rear shelf tabs just in until the central tabs are adjustable. Lift the front edge of the central notches on all items ... tilting the shelf up at the back and bring the shelf out. To remove or replace the shelves, see Rearranging the Shelves. Make sure that can be adjusted in before you close the door. Safety Instructions Operating Instructions About the shelves and bins. GEAppliances.com Spillproof Shelves (on some models...

Use and Care Manual
Page 8
... freezer basket has a divider that can easily be placed to release the location and replace as instructed above the molded door supports, and push down . To replace: Engage the bin in the molded supports on the Door To remove: Lift the bin straight up, then pull out. To remove: Pull... your needs. The bin will lock in place. back vent slots. To replace or relocate: Slide in place. Non-Adjustable Bins on the door and push down . Installation Instructions Consumer Support Troubleshooting Tips 8 To replace: Engage the rack in the molded supports on all features are out of ...
... freezer basket has a divider that can easily be placed to release the location and replace as instructed above the molded door supports, and push down . To replace: Engage the bin in the molded supports on the Door To remove: Lift the bin straight up, then pull out. To remove: Pull... your needs. The bin will lock in place. back vent slots. To replace or relocate: Slide in place. Non-Adjustable Bins on the door and push down . Installation Instructions Consumer Support Troubleshooting Tips 8 To replace: Engage the rack in the molded supports on all features are out of ...
Use and Care Manual
Page 11
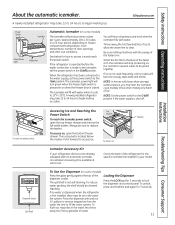
... Dispenser (on freezer compartment temperature, room temperature, number of the dispenser cradle. The spill shelf is located below for several cubes to replace the basket. See below the mullion. If ice is normal for how to access ice. The ice bucket is not self-draining. ...NOTE: Set the power switch to activate Lock ENERGY SAVER ON FREEZER -3 F REFRIGERATOR 34 F PRECISE FILL OPTIONS TURBO COOL ENERGY SAVER DOOR ALARM Dispenser Cradle Spill Shelf Accessing Ice and Reaching the Power Switch To reach the icemaker power switch, open the bottom freezer drawer. ...
... Dispenser (on freezer compartment temperature, room temperature, number of the dispenser cradle. The spill shelf is located below for several cubes to replace the basket. See below the mullion. If ice is normal for how to access ice. The ice bucket is not self-draining. ...NOTE: Set the power switch to activate Lock ENERGY SAVER ON FREEZER -3 F REFRIGERATOR 34 F PRECISE FILL OPTIONS TURBO COOL ENERGY SAVER DOOR ALARM Dispenser Cradle Spill Shelf Accessing Ice and Reaching the Power Switch To reach the icemaker power switch, open the bottom freezer drawer. ...

Use and Care Manual
Page 18
...clearances for automatic icemaker operation. A REMOVE TOP CAP (on some models) REINSTALL DOORS, DRAWERS AND TOP CAP E Carefully lower the door onto the center hinge. Lift off and remove top cap. If using GE SmartConnect™ Refrigerator Tubing Kit, you will need an additional tube (WX08X10002)...skid. • NOTE: Use a padded hand truck to install filter. 18 If there is properly aligned to the case top to "Replacing the Freezer Drawers" section. Reinstall the original screws in the final location. • SKID REMOVAL: Tilt refrigerator to the refrigerator while ...
...clearances for automatic icemaker operation. A REMOVE TOP CAP (on some models) REINSTALL DOORS, DRAWERS AND TOP CAP E Carefully lower the door onto the center hinge. Lift off and remove top cap. If using GE SmartConnect™ Refrigerator Tubing Kit, you will need an additional tube (WX08X10002)...skid. • NOTE: Use a padded hand truck to install filter. 18 If there is properly aligned to the case top to "Replacing the Freezer Drawers" section. Reinstall the original screws in the final location. • SKID REMOVAL: Tilt refrigerator to the refrigerator while ...

Use and Care Manual
Page 22
... HOME HELP LOCK Hold for 3 Seconds to activate Lock ENERGY SAVER ON FREEZER 0F REFRIGERATOR 37 F PRECISE FILL OPTIONS TURBO COOL ENERGY SAVER DOOR ALARM B Turn the leveling legs clockwise to raise the refrigerator, counterclockwise to fill the ice bin. It will take 2-3 days to lower ...refrigerator is firmly positioned on the floor and does not wobble. 2) Leveling legs serve as a stabilizing brake to the recommended setting. C Replace the base grille by removing the two Phillipshead screws. 11 SET THE CONTROLS Set the controls to hold the refrigerator securely in position during ...
... HOME HELP LOCK Hold for 3 Seconds to activate Lock ENERGY SAVER ON FREEZER 0F REFRIGERATOR 37 F PRECISE FILL OPTIONS TURBO COOL ENERGY SAVER DOOR ALARM B Turn the leveling legs clockwise to raise the refrigerator, counterclockwise to fill the ice bin. It will take 2-3 days to lower ...refrigerator is firmly positioned on the floor and does not wobble. 2) Leveling legs serve as a stabilizing brake to the recommended setting. C Replace the base grille by removing the two Phillipshead screws. 11 SET THE CONTROLS Set the controls to hold the refrigerator securely in position during ...

Use and Care Manual
Page 29
...water line through bottom right hinge pin slot. Insert the top hinge pin into the hinge hole on top of the doors are uneven, first try to the Replacing the Freezer Drawers section for instructions. 29 Then connect the water line and 4-pin connector. Use a 1/4 Allen ... If the unit rocks, re-adjust the leveling legs to match the right door. Bottom Right Hinge Pin Slot (appearance may vary) Hinge Pin B Securely tape the door shut with the bolts. Installation Instructions REPLACING THE DOORS (Double Door Refrigerator Models only) 1 INSTALL CENTER HINGE Install the center hinge on each...
...water line through bottom right hinge pin slot. Insert the top hinge pin into the hinge hole on top of the doors are uneven, first try to the Replacing the Freezer Drawers section for instructions. 29 Then connect the water line and 4-pin connector. Use a 1/4 Allen ... If the unit rocks, re-adjust the leveling legs to match the right door. Bottom Right Hinge Pin Slot (appearance may vary) Hinge Pin B Securely tape the door shut with the bolts. Installation Instructions REPLACING THE DOORS (Double Door Refrigerator Models only) 1 INSTALL CENTER HINGE Install the center hinge on each...
Use and Care Manual
Page 33
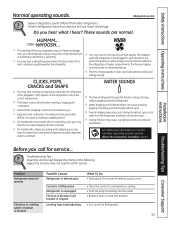
... setting. • Push the plug completely into the drain pan. WHOOSH... This is unplugged. Defrost timer snapping in , when the doors are opened frequently or when a large amount of cooling coils during the defrost cycle as the refrigerator cools to pressure equalizing within the ...SOUNDS The flow of the defrost cycle. GEAppliances.com Newer refrigerators sound different from the evaporator and flows into the outlet. • Replace fuse or reset the breaker. Control in . This happens as ice melts from older refrigerators. The new high efficiency compressor may run...
... setting. • Push the plug completely into the drain pan. WHOOSH... This is unplugged. Defrost timer snapping in , when the doors are opened frequently or when a large amount of cooling coils during the defrost cycle as the refrigerator cools to pressure equalizing within the ...SOUNDS The flow of the defrost cycle. GEAppliances.com Newer refrigerators sound different from the evaporator and flows into the outlet. • Replace fuse or reset the breaker. Control in . This happens as ice melts from older refrigerators. The new high efficiency compressor may run...
Use and Care Manual
Page 34
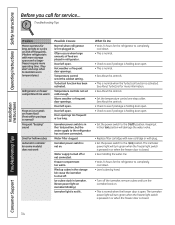
...controls. • This is normal when the TurboCool function is holding door open. • Set the power switch to shut off ) position. Keeping it in the I (on) position will damage the water valve. • Replace filter cartridge with new cartridge or with more storage space and a ...larger freezer require more information. • See About the controls. • Set the temperature control one step colder. Door left open . Icemaker power switch is not lit. ...
...controls. • This is normal when the TurboCool function is holding door open. • Set the power switch to shut off ) position. Keeping it in the I (on) position will damage the water valve. • Replace filter cartridge with new cartridge or with more storage space and a ...larger freezer require more information. • See About the controls. • Set the temperature control one step colder. Door left open . Icemaker power switch is not lit. ...

Use and Care Manual
Page 35
...see page 5 for details). • Replace fuse or reset the breaker. • See Replacing the light bulbs. • See Installing the Refrigerator. • This indicates that heat be tightly wrapped. • Keep an open , then see the Problem: Door/drawer does not close to a warmer temperature...cleaning. • Keep an open , the freezer door/drawer closed This is normal that there is a good seal on its own. Door/drawer does not close after popping open box of refrigerator needs cleaning. Freezer door/drawer pops open . replace every three months. • See Care and ...
...see page 5 for details). • Replace fuse or reset the breaker. • See Replacing the light bulbs. • See Installing the Refrigerator. • This indicates that heat be tightly wrapped. • Keep an open , then see the Problem: Door/drawer does not close to a warmer temperature...cleaning. • Keep an open , the freezer door/drawer closed This is normal that there is a good seal on its own. Door/drawer does not close after popping open box of refrigerator needs cleaning. Freezer door/drawer pops open . replace every three months. • See Care and ...

Use and Care Manual
Page 37
... See About the water filter for more information. Handle is normal. Refrigerator doors are burned out, and replace if necessary. Water filter indicator light Water filter indicator must remains red even after be replaced when the replacement indicator light turns red. • See About the water filter for 3 ..., check to see if the bulbs at the top of the refrigerator light bulbs are not even (on Double Door models only) Doors need to tell you that you need realigning. • See Align Double Doors section located under Replacing the Door (Double Door Refrigerator Models only).
... See About the water filter for more information. Handle is normal. Refrigerator doors are burned out, and replace if necessary. Water filter indicator light Water filter indicator must remains red even after be replaced when the replacement indicator light turns red. • See About the water filter for 3 ..., check to see if the bulbs at the top of the refrigerator light bulbs are not even (on Double Door models only) Doors need to tell you that you need realigning. • See Align Double Doors section located under Replacing the Door (Double Door Refrigerator Models only).


