Use and Care Manual
Page 1
... Dispenser 11 Water Filter 6 Installation Instructions Installing the Anti-Tip Floor Bracket 18, 19 Installing the Refrigerator . . . . . .20-24 Installing the Water Line 33-35 Preparing to Install the Refrigerator 17 Removing and Replacing the Freezer Drawer 25, 26 Reversing the Door Swing (Single Door... Refrigerator Models only 27-29 Removing and Replacing the Doors (Double Door Refrigerator Models only 30-32 Trim Kits and Decorator Panels . . . .15, 16 Troubleshooting Tips . . . . . .36-40 Normal...
... Dispenser 11 Water Filter 6 Installation Instructions Installing the Anti-Tip Floor Bracket 18, 19 Installing the Refrigerator . . . . . .20-24 Installing the Water Line 33-35 Preparing to Install the Refrigerator 17 Removing and Replacing the Freezer Drawer 25, 26 Reversing the Door Swing (Single Door... Refrigerator Models only 27-29 Removing and Replacing the Doors (Double Door Refrigerator Models only 30-32 Trim Kits and Decorator Panels . . . .15, 16 Troubleshooting Tips . . . . . .36-40 Normal...
Use and Care Manual
Page 2
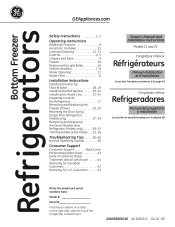
...! USE OF EXTENSION CORDS Because of potential safety hazards under federal law must be followed, including the following: n This refrigerator must use an extension cord, it is plugged in the freezer compartment when hands are getting rid of the ejector mechanism,...and making repairs. n Do not allow children to help prevent accidents. n Keep fingers out of this Owner's Manual. Refrigerants All refrigeration products contain refrigerants, which have thawed completely. Skin may not easily climb inside. However, if you are still dangerous...even if they will...
...! USE OF EXTENSION CORDS Because of potential safety hazards under federal law must be followed, including the following: n This refrigerator must use an extension cord, it is plugged in the freezer compartment when hands are getting rid of the ejector mechanism,...and making repairs. n Do not allow children to help prevent accidents. n Keep fingers out of this Owner's Manual. Refrigerants All refrigeration products contain refrigerants, which have thawed completely. Skin may not easily climb inside. However, if you are still dangerous...even if they will...
Use and Care Manual
Page 3
...minimize the possibility of this appliance is equipped with a standard 3-prong (grounding) wall outlet to have become frayed or otherwise damaged. When moving the refrigerator away from the power cord. Have the wall outlet and circuit checked by a qualified electrician to make sure the outlet is your... refrigerator by pulling on the power cord. READ AND FOLLOW THIS SAFETY INFORMATION CAREFULLY. Always grip plug firmly and pull straight out from this ...
...minimize the possibility of this appliance is equipped with a standard 3-prong (grounding) wall outlet to have become frayed or otherwise damaged. When moving the refrigerator away from the power cord. Have the wall outlet and circuit checked by a qualified electrician to make sure the outlet is your... refrigerator by pulling on the power cord. READ AND FOLLOW THIS SAFETY INFORMATION CAREFULLY. Always grip plug firmly and pull straight out from this ...
Use and Care Manual
Page 4
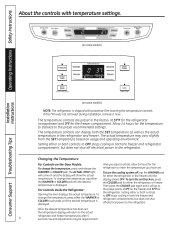
...COLDER pad until the desired temperature is displayed. To turn the cooling system off, tap the WARMER pad for either the refrigerator or the freezer until the desired temperature is shipped with protective film covering the temperature controls. Then press the COLDER pad... About the controls with temperature settings. (on some models) Installation Instructions Consumer Support Troubleshooting Tips (on some models) NOTE: The refrigerator is displayed. If this film was not removed during installation, remove it will go to the preset recommended settings. The temperature controls...
...COLDER pad until the desired temperature is displayed. To turn the cooling system off, tap the WARMER pad for either the refrigerator or the freezer until the desired temperature is shipped with protective film covering the temperature controls. Then press the COLDER pad... About the controls with temperature settings. (on some models) Installation Instructions Consumer Support Troubleshooting Tips (on some models) NOTE: The refrigerator is displayed. If this film was not removed during installation, remove it will go to the preset recommended settings. The temperature controls...
Use and Care Manual
Page 5
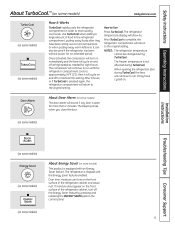
... temperature or when putting away warm leftovers. Over time, moisture can also be changed during TurboCool. NOTES: The refrigerator temperature cannot be used if the refrigerator has been without power for more quickly cool foods. The freezer temperature is not affected during TurboCool, the fans...) The door alarm will continue to maintain this setting. If moisture does appear on and off to run until the refrigerator compartment cools to the original setting. Use TurboCool when adding a large amount of food to Use Press TurboCool. Once activated, the compressor...
... temperature or when putting away warm leftovers. Over time, moisture can also be changed during TurboCool. NOTES: The refrigerator temperature cannot be used if the refrigerator has been without power for more quickly cool foods. The freezer temperature is not affected during TurboCool, the fans...) The door alarm will continue to maintain this setting. If moisture does appear on and off to run until the refrigerator compartment cools to the original setting. Use TurboCool when adding a large amount of food to Use Press TurboCool. Once activated, the compressor...
Use and Care Manual
Page 6
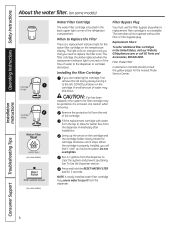
... removing. Press and hold the RESET WATER FILTER pad for better flow from the dispenser to spurt from the end of the refrigerator compartment. Filter Bypass Plug You must use the filter bypass plug when a replacement filter cartridge is not available. Filter Model MWF... turning it stops. Replacement Filters: To order additional filter cartridges in the United States, visit our Website, GEAppliances.com, or call GE Parts and Accessories, 800.626.2002. Run 11⁄2 gallons from the dispenser immediately after installation. Operating Instructions Safety Instructions About the...
... removing. Press and hold the RESET WATER FILTER pad for better flow from the dispenser to spurt from the end of the refrigerator compartment. Filter Bypass Plug You must use the filter bypass plug when a replacement filter cartridge is not available. Filter Model MWF... turning it stops. Replacement Filters: To order additional filter cartridges in the United States, visit our Website, GEAppliances.com, or call GE Parts and Accessories, 800.626.2002. Run 11⁄2 gallons from the dispenser immediately after installation. Operating Instructions Safety Instructions About the...
Use and Care Manual
Page 7
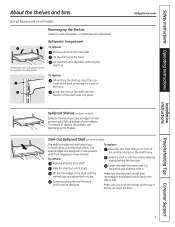
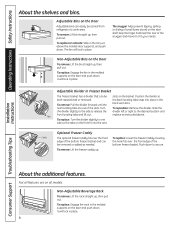
... , insert the top hook at the back of the shelf locks into place until it is horizontal and slide the shelf in the refrigerator compartment are slightly behind others. Lower the front of the central notches on the track. Slide the shelf out until it stops. GEAppliances...the shelf out. To remove: Remove all features are designed to side. Continue pulling the shelf forward until the central tabs are adjustable. Refrigerator Compartment To remove: Remove all the way in front of the shelf until the central tabs are above the front bar. Safety Instructions ...
... , insert the top hook at the back of the shelf locks into place until it is horizontal and slide the shelf in the refrigerator compartment are slightly behind others. Lower the front of the central notches on the track. Slide the shelf out until it stops. GEAppliances...the shelf out. To remove: Remove all features are designed to side. Continue pulling the shelf forward until the central tabs are adjustable. Refrigerator Compartment To remove: Remove all the way in front of the shelf until the central tabs are above the front bar. Safety Instructions ...
Use and Care Manual
Page 8
... Instructions Consumer Support Troubleshooting Tips About the additional features. It will lock in Freezer Basket The freezer basket has a divider that can be carried from refrigerator to the desired location and front locating tabs and lift out. The bin will lock in the To remove: Pull the divider forward until the...
... Instructions Consumer Support Troubleshooting Tips About the additional features. It will lock in Freezer Basket The freezer basket has a divider that can be carried from refrigerator to the desired location and front locating tabs and lift out. The bin will lock in the To remove: Pull the divider forward until the...
Use and Care Manual
Page 10
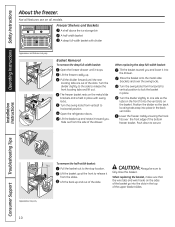
... basket out to one side so the tabs on the front fit into place in place. Operating Instructions Safety Instructions About the freezer. Open the refrigerator doors.
... basket out to one side so the tabs on the front fit into place in place. Operating Instructions Safety Instructions About the freezer. Open the refrigerator doors.
Use and Care Manual
Page 11
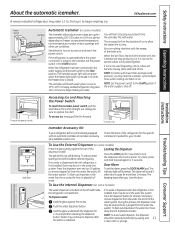
... cycle multiple times when making ice cubes. It is released. To unlock, press and hold the pad again for your refrigerator did not come already equipped with lower-than 2 minutes. Troubleshooting Tips Consumer Support GEAppliances.com Installation Instructions Power Switch Green ...Power Light Icemaker Feeler Arm Automatic Icemaker (on the left wall inside the refrigerator compartment. approximately 100-130 cubes in or when the freezer door is located on some models) The water dispenser is closed...
... cycle multiple times when making ice cubes. It is released. To unlock, press and hold the pad again for your refrigerator did not come already equipped with lower-than 2 minutes. Troubleshooting Tips Consumer Support GEAppliances.com Installation Instructions Power Switch Green ...Power Light Icemaker Feeler Arm Automatic Icemaker (on the left wall inside the refrigerator compartment. approximately 100-130 cubes in or when the freezer door is located on some models) The water dispenser is closed...
Use and Care Manual
Page 12
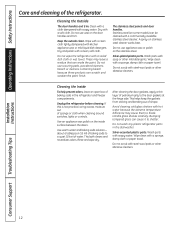
... or other abrasive cleaners. Do not scrub with soapy water. Dry with a soiled dish cloth or wet towel. Do not wipe the refrigerator with a soft cloth. Rinse and wipe dry. Silver-accented plastic parts. Installation Instructions Consumer Support Troubleshooting Tips 12 Clean with a cloth...gaskets, apply a thin layer of baking soda in the dishwasher. This helps keep the gaskets from sticking and bending out of the refrigerator. A spray-on the inside surface between the doors. Operating Instructions Safety Instructions Care and cleaning of shape. These may cause them ...
... or other abrasive cleaners. Do not scrub with soapy water. Dry with a soiled dish cloth or wet towel. Do not wipe the refrigerator with a soft cloth. Rinse and wipe dry. Silver-accented plastic parts. Installation Instructions Consumer Support Troubleshooting Tips 12 Clean with a cloth...gaskets, apply a thin layer of baking soda in the dishwasher. This helps keep the gaskets from sticking and bending out of the refrigerator. A spray-on the inside surface between the doors. Operating Instructions Safety Instructions Care and cleaning of shape. These may cause them ...
Use and Care Manual
Page 13
...be damaged, particularly cushioned coverings and those with a baking soda solution of one tablespoon (15 ml) of baking soda to move the refrigerator, do not rest the front or back of water. Leave the doors open. When using a hand truck to one quart (1 liter) of the... refrigerator against the hand truck. Safety Instructions Operating Instructions GEAppliances.com Behind the Refrigerator Be careful when moving . Raise the leveling legs located at the bottom front of floor coverings can drop ...
...be damaged, particularly cushioned coverings and those with a baking soda solution of one tablespoon (15 ml) of baking soda to move the refrigerator, do not rest the front or back of water. Leave the doors open. When using a hand truck to one quart (1 liter) of the... refrigerator against the hand truck. Safety Instructions Operating Instructions GEAppliances.com Behind the Refrigerator Be careful when moving . Raise the leveling legs located at the bottom front of floor coverings can drop ...
Use and Care Manual
Page 14
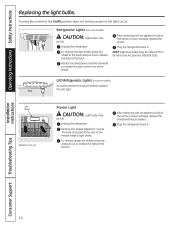
... will need to release the tabs at the rear of the same or lower wattage, replace the shield and freezer basket. Plug the refrigerator back in . To remove the light shield, grasp the shield at the back and pull out to replace the LED light. Rotate ... (off) position does not remove power to the light circuit. Plug the refrigerator back in . Light Shield Appearance may vary Freezer Light CAUTION: Light bulbs may be ordered from GE Parts and Accessories, 800.626.2002. Unplug the refrigerator. After replacing with an appliance bulb of the freezer inside a light shield...
... will need to release the tabs at the rear of the same or lower wattage, replace the shield and freezer basket. Plug the refrigerator back in . To remove the light shield, grasp the shield at the back and pull out to replace the LED light. Rotate ... (off) position does not remove power to the light circuit. Plug the refrigerator back in . Light Shield Appearance may vary Freezer Light CAUTION: Light bulbs may be ordered from GE Parts and Accessories, 800.626.2002. Unplug the refrigerator. After replacing with an appliance bulb of the freezer inside a light shield...
Use and Care Manual
Page 16
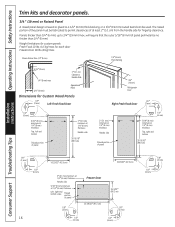
... to permit clearances of at least 2″ (5.1 cm) from the handle side for Custom Wood Panels 1/8″ (3 mm) Left Fresh Food Door 3/4″ (19 mm) Refrigerator Door Right Fresh Food Door 1/8″ (3 mm) 1/4″ (6 mm) 5/16″ (8 mm) minimum at 1/4″ (6 mm) thickness Top, left and bottom Raised portion of panel...
... to permit clearances of at least 2″ (5.1 cm) from the handle side for Custom Wood Panels 1/8″ (3 mm) Left Fresh Food Door 3/4″ (19 mm) Refrigerator Door Right Fresh Food Door 1/8″ (3 mm) 1/4″ (6 mm) 5/16″ (8 mm) minimum at 1/4″ (6 mm) thickness Top, left and bottom Raised portion of panel...
Use and Care Manual
Page 17
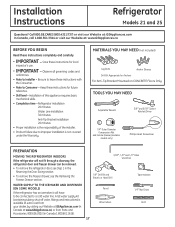
...TO THE ICEMAKER AND DISPENSER (ON SOME MODELS) If the refrigerator has an icemaker, it will not fit through a doorway, the refrigerator door and freezer drawer can be connected to a cold water line. Call 800.GE.CARES (800.432.2737) or visit our Website at: GEAppliances...Drill Bit and Electric or Hand Drill Pencil Wire Cutters Tape measure 1/4″ Nut Driver Level 17 Installation Instructions Refrigerator Models 21 and 25 Questions? Refrigerator Installation 20 minutes Water Line Installation 30 minutes Anti-Tip Bracket Installation 20 minutes • Proper installation is not...
...TO THE ICEMAKER AND DISPENSER (ON SOME MODELS) If the refrigerator has an icemaker, it will not fit through a doorway, the refrigerator door and freezer drawer can be connected to a cold water line. Call 800.GE.CARES (800.432.2737) or visit our Website at: GEAppliances...Drill Bit and Electric or Hand Drill Pencil Wire Cutters Tape measure 1/4″ Nut Driver Level 17 Installation Instructions Refrigerator Models 21 and 25 Questions? Refrigerator Installation 20 minutes Water Line Installation 30 minutes Anti-Tip Bracket Installation 20 minutes • Proper installation is not...

Use and Care Manual
Page 18
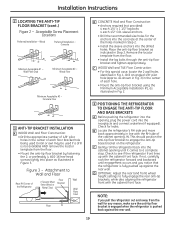
...bracket locator template (included inside the anti-tip kit) onto the floor up with the desired location of the RH side of the refrigerator. Concrete (2 Holes) Floor - Figure 2 indicates all the acceptable mounting configurations for marking the holes based upon your configuration. 18 ...Identify the screw holes on the Refrigerator RH Side of Refrigerator Rear RH Corner of Cabinet Wall Locator Template Sheet B Place the anti-tip floor bracket onto the locator template with its...
...bracket locator template (included inside the anti-tip kit) onto the floor up with the desired location of the RH side of the refrigerator. Concrete (2 Holes) Floor - Figure 2 indicates all the acceptable mounting configurations for marking the holes based upon your configuration. 18 ...Identify the screw holes on the Refrigerator RH Side of Refrigerator Rear RH Corner of Cabinet Wall Locator Template Sheet B Place the anti-tip floor bracket onto the locator template with its...
Use and Care Manual
Page 19
... D OPTIONAL: Adjust the rear (and front) wheel height settings to fully engage the rear anti-tip brackets, while also aligning the refrigerator front with the cabinet front face. Acceptable Screw Placement Locations Preferred Installation - Concrete Minimum Acceptable #1 - sleeve anchors • Drill the... A WOOD Wall and Floor Construction: • Drill the appropriate number of 1/8" pilot holes in line with the RH side of the Refrigerator 2 Screws Must Enter Wood or Metal Stud Floor Bracket Wall Wall Plate Stud Floor B CONCRETE Wall and Floor Construction: • Anchors ...
... D OPTIONAL: Adjust the rear (and front) wheel height settings to fully engage the rear anti-tip brackets, while also aligning the refrigerator front with the cabinet front face. Acceptable Screw Placement Locations Preferred Installation - Concrete Minimum Acceptable #1 - sleeve anchors • Drill the... A WOOD Wall and Floor Construction: • Drill the appropriate number of 1/8" pilot holes in line with the RH side of the Refrigerator 2 Screws Must Enter Wood or Metal Stud Floor Bracket Wall Wall Plate Stud Floor B CONCRETE Wall and Floor Construction: • Anchors ...
Use and Care Manual
Page 20
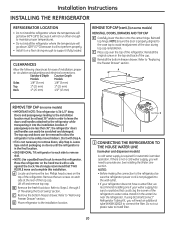
... two screws on each side to remove skid. • NOTE: Use a padded hand truck to move and complete this refrigerator. Top Hinge B 1 CONNECTING THE REFRIGERATOR TO THE HOUSE WATER LINE (icemaker and dispenser models) A cold water supply is properly aligned to the case top to ...transporting it in the top and back of the door during top cap reinstallation. C Remove the bottom freezer drawer. If using GE SmartConnect™ Refrigerator Tubing Kit, you will need an additional tube (WX08X10002) to connect the filter. CLEARANCES Allow the following clearances for automatic icemaker...
... two screws on each side to remove skid. • NOTE: Use a padded hand truck to move and complete this refrigerator. Top Hinge B 1 CONNECTING THE REFRIGERATOR TO THE HOUSE WATER LINE (icemaker and dispenser models) A cold water supply is properly aligned to the case top to ...transporting it in the top and back of the door during top cap reinstallation. C Remove the bottom freezer drawer. If using GE SmartConnect™ Refrigerator Tubing Kit, you will need an additional tube (WX08X10002) to connect the filter. CLEARANCES Allow the following clearances for automatic icemaker...
Use and Care Manual
Page 21
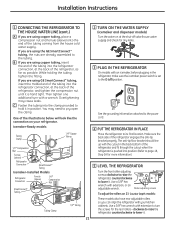
...the water on 21' Counter Depth models: These models also have rear adjustable rollers so you are using GE SmartConnect™ tubing, insert the molded end of the tubing into the refrigerator connection, at the shut-off ) position. If you are already assembled to lower it . 21 B... If you are using the GE SmartConnect™ tubing, the nuts are using copper tubing, place a compression nut and ferrule (sleeve) onto the end of the refrigerator, as far as possible. You may cause leaks. See the grounding information attached...
...the water on 21' Counter Depth models: These models also have rear adjustable rollers so you are using GE SmartConnect™ tubing, insert the molded end of the tubing into the refrigerator connection, at the shut-off ) position. If you are already assembled to lower it . 21 B... If you are using the GE SmartConnect™ tubing, the nuts are using copper tubing, place a compression nut and ferrule (sleeve) onto the end of the refrigerator, as far as possible. You may cause leaks. See the grounding information attached...

Use and Care Manual
Page 22
... to be tightened or removed, use a 1/4″ Allen wrench. Remove the paper covering on the adhesive backing on the opposite door. Installation Instructions INSTALLING THE REFRIGERATOR (cont.) 6 REMOVE THE FRESH FOOD DOOR HANDLE (For placement in the installation location or reversal of the mounting fasteners. on some models) Stainless steel (on...
... to be tightened or removed, use a 1/4″ Allen wrench. Remove the paper covering on the adhesive backing on the opposite door. Installation Instructions INSTALLING THE REFRIGERATOR (cont.) 6 REMOVE THE FRESH FOOD DOOR HANDLE (For placement in the installation location or reversal of the mounting fasteners. on some models) Stainless steel (on...


