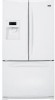
Use and Care Manual
Page 1
... for LCD Models 4-11 Control for Non-LCD Models . . . .12, 13 Crispers and Pans 18 Dispenser 14 Freezer 19 Fresh Food Storage Options . . . .16, 17 Replacing the Light Bulbs 23 Water Filter 15 Installation Instructions Installing the Refrigerator 26-34 Installing the Water Line 35-37 Preparing to Install the Refrigerator 24, 25 Troubleshooting Tips...
... for LCD Models 4-11 Control for Non-LCD Models . . . .12, 13 Crispers and Pans 18 Dispenser 14 Freezer 19 Fresh Food Storage Options . . . .16, 17 Replacing the Light Bulbs 23 Water Filter 15 Installation Instructions Installing the Refrigerator 26-34 Installing the Water Line 35-37 Preparing to Install the Refrigerator 24, 25 Troubleshooting Tips...
Use and Care Manual
Page 4
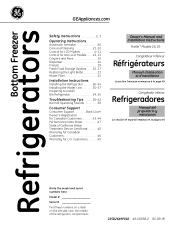
... -2 WATER FILTER: GOOD FRESH FOOD 38 EXTRAS CONVERSIONS NUTRITION FACTS LOCK HOLD 3 SECONDS SETTINGS PHOTOS SUBSTITUTIONS DISPENSER WATER NOTE: The refrigerator is active, it will be displayed. 12:47 PM FREEZER -2 FRESH FOOD 38 LOCK HOLD 3 SECONDS DISPENSER WATER SETTINGS Status Bar... as the actual temperature in the lower right hand corner of the dispenser. Nutrition Facts: Find basic nutrition information for LCD models. Dispenser Tab: Select water, crushed ice or cubed ice. Change brightness of substitutions for the freezer compartment. Operating Instructions Safety...
... -2 WATER FILTER: GOOD FRESH FOOD 38 EXTRAS CONVERSIONS NUTRITION FACTS LOCK HOLD 3 SECONDS SETTINGS PHOTOS SUBSTITUTIONS DISPENSER WATER NOTE: The refrigerator is active, it will be displayed. 12:47 PM FREEZER -2 FRESH FOOD 38 LOCK HOLD 3 SECONDS DISPENSER WATER SETTINGS Status Bar... as the actual temperature in the lower right hand corner of the dispenser. Nutrition Facts: Find basic nutrition information for LCD models. Dispenser Tab: Select water, crushed ice or cubed ice. Change brightness of substitutions for the freezer compartment. Operating Instructions Safety...
Use and Care Manual
Page 12
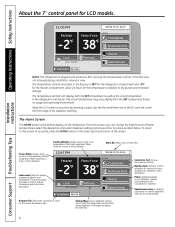
...adjustments may vary slightly from the SET temperature based on usage and operating environment. The temperature controls are preset in the refrigerator and freezer. Each time you have set , the temperature display will show the actual temperature. The temperature controls can ...to reach the temperature you adjust controls, allow 24 hours for non-LCD models. The display will return to Lock Control) Model 29 Installation Instructions Consumer Support Troubleshooting Tips NOTE: The refrigerator is displayed. To change the temperature, press and release the ADJUST FREEZER ...
...adjustments may vary slightly from the SET temperature based on usage and operating environment. The temperature controls are preset in the refrigerator and freezer. Each time you have set , the temperature display will show the actual temperature. The temperature controls can ...to reach the temperature you adjust controls, allow 24 hours for non-LCD models. The display will return to Lock Control) Model 29 Installation Instructions Consumer Support Troubleshooting Tips NOTE: The refrigerator is displayed. To change the temperature, press and release the ADJUST FREEZER ...
Use and Care Manual
Page 13
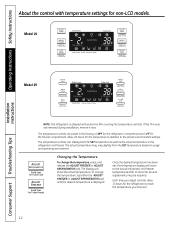
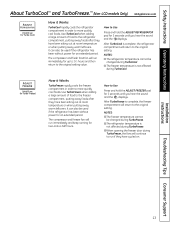
... when putting away warm leftovers. Safety Instructions Operating Instructions About TurboCool™ and TurboFreeze.™ (Non-LCD models Only) GEAppliances.com ADJUST REFRIGERATOR (Hold 3 sec for Turbo Cool) How it Works TurboFreeze rapidly cools the freezer compartment in order to ...affected during TurboFreeze. Use TurboCool when adding a large amount of food to the original setting. I The refrigerator temperature is complete, the refrigerator compartment will return to the freezer compartment, putting away foods after they have been sitting out at room ...
... when putting away warm leftovers. Safety Instructions Operating Instructions About TurboCool™ and TurboFreeze.™ (Non-LCD models Only) GEAppliances.com ADJUST REFRIGERATOR (Hold 3 sec for Turbo Cool) How it Works TurboFreeze rapidly cools the freezer compartment in order to ...affected during TurboFreeze. Use TurboCool when adding a large amount of food to the original setting. I The refrigerator temperature is complete, the refrigerator compartment will return to the freezer compartment, putting away foods after they have been sitting out at room ...
Use and Care Manual
Page 14
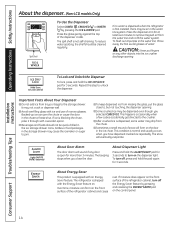
... throw away the first six full glasses of snow will form on the dispenser light. Operating Instructions Safety Instructions About the dispenser. (Non-LCD models Only) ENERGY SAVER ADJUST FREEZER (Hold 3 sec for Turbo Freeze) ICE & WATER (Hold 3 sec to Reset Filter) TURBO FREEZE TURBO COOL...Recommended CLIMATE KEEPER ˚F 38˚ F Recommended ICE OFF RESET FILTER CUBED CRUSHED WATER ALARM/ LIGHT Light ON/OFF (Hold 3 seconds) ADJUST REFRIGERATOR (Hold 3 sec for 3 seconds. Press the dispenser arm for at least two minutes to remove trapped air from missing the glass, put fingers...
... throw away the first six full glasses of snow will form on the dispenser light. Operating Instructions Safety Instructions About the dispenser. (Non-LCD models Only) ENERGY SAVER ADJUST FREEZER (Hold 3 sec for Turbo Freeze) ICE & WATER (Hold 3 sec to Reset Filter) TURBO FREEZE TURBO COOL...Recommended CLIMATE KEEPER ˚F 38˚ F Recommended ICE OFF RESET FILTER CUBED CRUSHED WATER ALARM/ LIGHT Light ON/OFF (Hold 3 seconds) ADJUST REFRIGERATOR (Hold 3 sec for 3 seconds. Press the dispenser arm for at least two minutes to remove trapped air from missing the glass, put fingers...
Use and Care Manual
Page 15
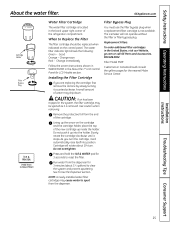
...cartridge is located in the back upper right corner of the cartridge. Press and hold the ICE & WATER pad for LCD Models section. See To Use the Dispenser section. Filter Model MWF Customers in the About the 7″ LCD Control Panel for 3 seconds to spurt from the dispenser. Good Orange ... the protective foil from the dispenser for the nearest Mabe Service Center. Do not overtighten. Run water from the end of the refrigerator compartment. The icemaker will automatically raise itself into the holder. CAUTION: If air has been trapped in the United States, visit our Website...
...cartridge is located in the back upper right corner of the cartridge. Press and hold the ICE & WATER pad for LCD Models section. See To Use the Dispenser section. Filter Model MWF Customers in the About the 7″ LCD Control Panel for 3 seconds to spurt from the dispenser. Good Orange ... the protective foil from the dispenser for the nearest Mabe Service Center. Do not overtighten. Run water from the end of the refrigerator compartment. The icemaker will automatically raise itself into the holder. CAUTION: If air has been trapped in the United States, visit our Website...
Use and Care Manual
Page 17
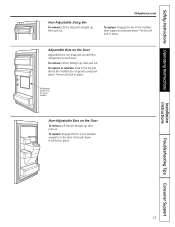
To remove: Lift bin straight up , then pull out. Refreshment Center Door (on some models) Non-Adjustable Bins on the Door To remove: Lift the bin straight up , then pull out. The bin will lock in place. The bin will ... bin straight up, then pull out. To replace or relocate: Slide in the molded supports on the Door Adjustable bins can easily be carried from refrigerator to work area. Adjustable Bins on the door and push down. GEAppliances.com To replace: Engage the bin in place. It will lock in the...
To remove: Lift bin straight up , then pull out. Refreshment Center Door (on some models) Non-Adjustable Bins on the Door To remove: Lift the bin straight up , then pull out. The bin will lock in place. The bin will ... bin straight up, then pull out. To replace or relocate: Slide in the molded supports on the Door Adjustable bins can easily be carried from refrigerator to work area. Adjustable Bins on the door and push down. GEAppliances.com To replace: Engage the bin in place. It will lock in the...
Use and Care Manual
Page 18
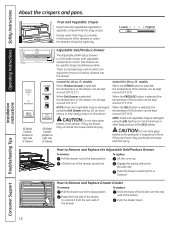
... drawer can be kept around 41°F (5°C). Operating Instructions Safety Instructions Installation Instructions About the crispers and pans. 26 Model Controls (located on right side of drawer) Control for 26-cu.-ft. models When Produce Drawer is selected, the temperature of drawer) Fruit and Vegetable Crisper Keep fruits and vegetables organized in the...
... drawer can be kept around 41°F (5°C). Operating Instructions Safety Instructions Installation Instructions About the crispers and pans. 26 Model Controls (located on right side of drawer) Control for 26-cu.-ft. models When Produce Drawer is selected, the temperature of drawer) Fruit and Vegetable Crisper Keep fruits and vegetables organized in the...
Use and Care Manual
Page 20
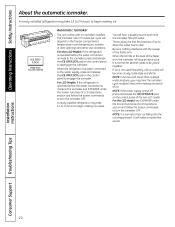
... operated before the water connection is made to disengage the icemaker. For LCD Models: If the refrigerator is operated before the water connection is made to the icemaker, press and release the ICE OFF/LOCK pad on the freezer compartment temperature, room ... of the feeler arm. NOTE: If the water supply is not used frequently, old ice cubes will become cloudy, taste stale and shrink. When the refrigerator has been connected to Lock Control) Automatic Icemaker The unit comes with lower-than-average water pressure, you may hear the icemaker cycle multiple times...
... operated before the water connection is made to disengage the icemaker. For LCD Models: If the refrigerator is operated before the water connection is made to the icemaker, press and release the ICE OFF/LOCK pad on the freezer compartment temperature, room ... of the feeler arm. NOTE: If the water supply is not used frequently, old ice cubes will become cloudy, taste stale and shrink. When the refrigerator has been connected to Lock Control) Automatic Icemaker The unit comes with lower-than-average water pressure, you may hear the icemaker cycle multiple times...
Use and Care Manual
Page 21
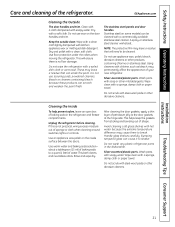
... a commercially available stainless steel cleaner. These may leave a residue that can cause it to shatter. Stainless steel (on some models) can scratch and weaken the paint finish. Use warm water and baking soda solution- This both cleans and neutralizes odors. Rinse...abrasive cleaners. Do not use wax on stainless steel cleaner works best. Use floor protection under the rollers when moving the refrigerator. Wash parts with soapy water. Use an appliance wax polish on stainless steel. Installation Instructions Troubleshooting Tips Consumer Support 21 GEAppliances...
... a commercially available stainless steel cleaner. These may leave a residue that can cause it to shatter. Stainless steel (on some models) can scratch and weaken the paint finish. Use warm water and baking soda solution- This both cleans and neutralizes odors. Rinse...abrasive cleaners. Do not use wax on stainless steel cleaner works best. Use floor protection under the rollers when moving the refrigerator. Wash parts with soapy water. Use an appliance wax polish on stainless steel. Installation Instructions Troubleshooting Tips Consumer Support 21 GEAppliances...
Use and Care Manual
Page 22
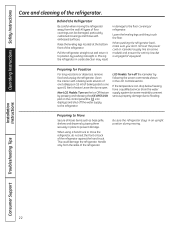
...Vacation For long vacations or absences, remove food and unplug the refrigerator. Non-LCD Models: Turn on the Ice Off feature by following the screen commands shown in an upright position during moving the refrigerator away from the sides of floor coverings can drop below freezing,... When using a hand truck to the floor covering or refrigerator. This could damage the refrigerator. Leave the doors open. LCD Models: Turn off the water supply to one quart (1 liter) of the refrigerator. When pushing the refrigerator back, make sure you don't roll over the power ...
...Vacation For long vacations or absences, remove food and unplug the refrigerator. Non-LCD Models: Turn on the Ice Off feature by following the screen commands shown in an upright position during moving the refrigerator away from the sides of floor coverings can drop below freezing,... When using a hand truck to the floor covering or refrigerator. This could damage the refrigerator. Leave the doors open. LCD Models: Turn off the water supply to one quart (1 liter) of the refrigerator. When pushing the refrigerator back, make sure you don't roll over the power ...
Use and Care Manual
Page 24
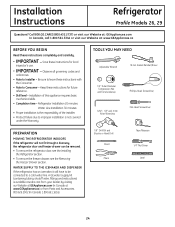
...leave these instructions for future reference. • Skill level - Be sure to Consumer - PREPARATION MOVING THE REFRIGERATOR INDOORS If the refrigerator will have to Installer - Call 800.GE.CARES (800.432.2737) or visit our Website at: GEAppliances.com In Canada, call 1.800.561.3344 ... for local inspector's use. • IMPORTANT - Keep these instructions completely and carefully. • IMPORTANT - Installation Instructions Refrigerator Profile Models 26, 29 Questions? Observe all governing codes and ordinances. • Note to be removed. • To remove the...
...leave these instructions for future reference. • Skill level - Be sure to Consumer - PREPARATION MOVING THE REFRIGERATOR INDOORS If the refrigerator will have to Installer - Call 800.GE.CARES (800.432.2737) or visit our Website at: GEAppliances.com In Canada, call 1.800.561.3344 ... for local inspector's use. • IMPORTANT - Keep these instructions completely and carefully. • IMPORTANT - Installation Instructions Refrigerator Profile Models 26, 29 Questions? Observe all governing codes and ordinances. • Note to be removed. • To remove the...
Use and Care Manual
Page 30
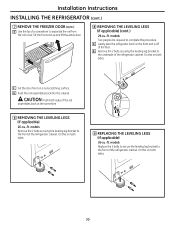
... LEVELING LEGS (if applicable) 26-cu.-ft. CAUTION: Push both sides. Do this procedure. B Remove the 2 bolts securing the leveling leg bracket to the front of the refrigerator cabinet. models Two people are required to complete this on both sides. 30 models Replace the 2 bolts to secure the... Use the tip of a screwdriver to the front of the refrigerator cabinet. Do this on both sides. 9 REPLACING THE LEVELING LEGS (if applicable) 26-cu.-ft. F Set the door front on both sides of the floor. models Remove the 2 bolts securing the leveling leg bracket to separate the...
... LEVELING LEGS (if applicable) 26-cu.-ft. CAUTION: Push both sides. Do this procedure. B Remove the 2 bolts securing the leveling leg bracket to the front of the refrigerator cabinet. models Two people are required to complete this on both sides. 30 models Replace the 2 bolts to secure the... Use the tip of a screwdriver to the front of the refrigerator cabinet. Do this on both sides. 9 REPLACING THE LEVELING LEGS (if applicable) 26-cu.-ft. F Set the door front on both sides of the floor. models Remove the 2 bolts securing the leveling leg bracket to separate the...
Use and Care Manual
Page 31
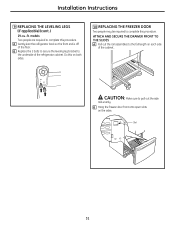
CAUTION: Make sure to complete this procedure. Do this procedure. A Gently lean the refrigerator back so the front end is off of the cabinet. B Hang the freezer door front onto open slots on each side of the floor. Slot ... leg bracket to complete this on both sides. 10 REPLACING THE FREEZER DOOR Two people may be required to pull out the side rails evenly. models Two people are required to the underside of the refrigerator cabinet. Installation Instructions 9 REPLACING THE LEVELING LEGS (if applicable) (cont.) 29-cu.-ft.
CAUTION: Make sure to complete this procedure. Do this procedure. A Gently lean the refrigerator back so the front end is off of the cabinet. B Hang the freezer door front onto open slots on each side of the floor. Slot ... leg bracket to complete this on both sides. 10 REPLACING THE FREEZER DOOR Two people may be required to pull out the side rails evenly. models Two people are required to the underside of the refrigerator cabinet. Installation Instructions 9 REPLACING THE LEVELING LEGS (if applicable) (cont.) 29-cu.-ft.
Use and Care Manual
Page 35
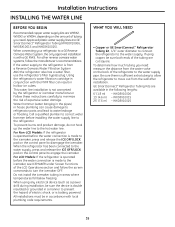
...result in hollow ice cubes. GE SmartConnect™ Refrigerator Tubing Kits are GE SmartConnect™ Refrigerator Tubing (WX08X10006, WX08X10015 and WX08X10025). For LCD Models: If the refrigerator is operated before the water connection is from the wall after installation. WX08X10015 25′ (7.6 m) - To ... and follow the manufacturer's recommendations. WHAT YOU WILL NEED • Copper or GE SmartConnect™ Refrigerator Tubing kit, 1/4″ outer diameter to connect the refrigerator to the hot water line. For other reverse osmosis water systems, follow the ...
...result in hollow ice cubes. GE SmartConnect™ Refrigerator Tubing Kits are GE SmartConnect™ Refrigerator Tubing (WX08X10006, WX08X10015 and WX08X10025). For LCD Models: If the refrigerator is operated before the water connection is from the wall after installation. WX08X10015 25′ (7.6 m) - To ... and follow the manufacturer's recommendations. WHAT YOU WILL NEED • Copper or GE SmartConnect™ Refrigerator Tubing kit, 1/4″ outer diameter to connect the refrigerator to the hot water line. For other reverse osmosis water systems, follow the ...
Use and Care Manual
Page 38
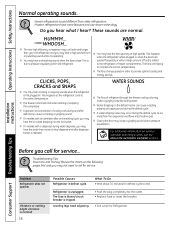
...while it is due to maintain the correct temperatures. Review the charts on the defrost heater can cause a cracking or popping sound. Refrigerator is tripped. I On models with a dispenser, during water dispense, you may hear a whooshing sound when the doors close. I A water dripping noise may... a large amount of food is released. These sounds are helping to pressure equalizing within the refrigerator. The fans are normal. Do you call for service. I On models with an icemaker, after an icemaking cycle, you may hear the fans spinning at initial dispense...
...while it is due to maintain the correct temperatures. Review the charts on the defrost heater can cause a cracking or popping sound. Refrigerator is tripped. I On models with a dispenser, during water dispense, you may hear a whooshing sound when the doors close. I A water dripping noise may... a large amount of food is released. These sounds are helping to pressure equalizing within the refrigerator. The fans are normal. Do you call for service. I On models with an icemaker, after an icemaking cycle, you may hear the fans spinning at initial dispense...
Use and Care Manual
Page 39
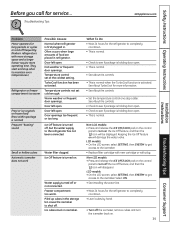
... ICE OFF/LOCK pad on the Ice Off feature, and then the icon will be displayed. LCD models: • On the LCD screen, select SETTING, then SYSTEM to get access to the refrigerator has not been connected. Door left open. Warm weather or frequent door openings. Door left open. ...colder. Temperature controls not set at the coldest setting. Freezer compartment too warm. Non-LCD models: • Press and release the ICE OFF/LOCK pad on the control panel to maintain even temperatures.) Refrigerator or freezer compartment too warm Frost or ice crystals on . Ice Off feature is turned ...
... ICE OFF/LOCK pad on the Ice Off feature, and then the icon will be displayed. LCD models: • On the LCD screen, select SETTING, then SYSTEM to get access to the refrigerator has not been connected. Door left open. Warm weather or frequent door openings. Door left open. ...colder. Temperature controls not set at the coldest setting. Freezer compartment too warm. Non-LCD models: • Press and release the ICE OFF/LOCK pad on the control panel to maintain even temperatures.) Refrigerator or freezer compartment too warm Frost or ice crystals on . Ice Off feature is turned ...
Use and Care Manual
Page 42
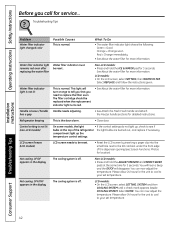
... clip into the small hole next to the SD card slot under the front edge of the refrigerator the light bulbs are burned out, and replace if necessary. LCD screen freezes (LCD models) LCD screen needs to be replaced when the replacement indicator light turns red. • See ...The cooling system is normal. has a gap • See Attach the Fresh Food handle and Attach the Freezer handle sections for service... Refrigerator beeping This is off . Troubleshooting Tips Problem Water filter indicator light changed color Possible Causes This is normal. Water filter indicator light Water ...
... clip into the small hole next to the SD card slot under the front edge of the refrigerator the light bulbs are burned out, and replace if necessary. LCD screen freezes (LCD models) LCD screen needs to be replaced when the replacement indicator light turns red. • See ...The cooling system is normal. has a gap • See Attach the Fresh Food handle and Attach the Freezer handle sections for service... Refrigerator beeping This is off . Troubleshooting Tips Problem Water filter indicator light changed color Possible Causes This is normal. Water filter indicator light Water ...
Use and Care Manual
Page 45
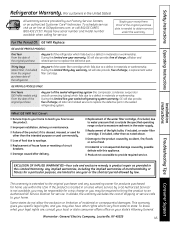
...this limited one year or the shortest period allowed by accident, fire, floods or acts of the refrigerator which fails due to state. GE PROFILE MODELS ONLY: Five Years (GE Profile models only) From the date of the original purchase Any part of the water filter cartridge, if included..., due to replace the defective part. I Replacement of the sealed refrigerating system (the compressor, condenser, evaporator and...
...this limited one year or the shortest period allowed by accident, fire, floods or acts of the refrigerator which fails due to state. GE PROFILE MODELS ONLY: Five Years (GE Profile models only) From the date of the original purchase Any part of the water filter cartridge, if included..., due to replace the defective part. I Replacement of the sealed refrigerating system (the compressor, condenser, evaporator and...
Use and Care Manual
Page 46
...failure of the original warranty period only. Please have serial number and model number available when calling for a particular purpose, are warranted through the remainder of the Refrigerator or from service delays beyond their reasonable control. In home warranty service ...Year Brands: One (1) Year Brands: One (1) Year Sealed System (including GE Profile: Five (5) Years GE Profile: Five (5) Years GE Profile: Five (5) Years evaporator, condenser GE and All Other GE and All Other GE and All Other tubing and refrigerant) Brands: One (1) Year Brands: One (1) Year Brands: One (1) ...
...failure of the original warranty period only. Please have serial number and model number available when calling for a particular purpose, are warranted through the remainder of the Refrigerator or from service delays beyond their reasonable control. In home warranty service ...Year Brands: One (1) Year Brands: One (1) Year Sealed System (including GE Profile: Five (5) Years GE Profile: Five (5) Years GE Profile: Five (5) Years evaporator, condenser GE and All Other GE and All Other GE and All Other tubing and refrigerant) Brands: One (1) Year Brands: One (1) Year Brands: One (1) ...

