Use and Care Manual
Page 2
...; I Do not touch the cold surfaces in the vicinity of the past. I Take off the doors. Junked or abandoned refrigerators are necessarily small. Before You Throw Away Your Old Refrigerator or Freezer: I Do not refreeze frozen foods which under certain conditions, we strongly recommend against the ...use gasoline or other flammable vapors and liquids in the freezer compartment when hands are in this or any servicing be removed prior to help ...
...; I Do not touch the cold surfaces in the vicinity of the past. I Take off the doors. Junked or abandoned refrigerators are necessarily small. Before You Throw Away Your Old Refrigerator or Freezer: I Do not refreeze frozen foods which under certain conditions, we strongly recommend against the ...use gasoline or other flammable vapors and liquids in the freezer compartment when hands are in this or any servicing be removed prior to help ...
Use and Care Manual
Page 4
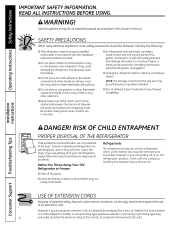
... actual as well as set temperatures in the refrigerator and freezer. The lock will change the fresh food and freezer temperatures, select the desired ice and water dispenser setting and access other functions as TurboCool, Energy Saver and Door Alarm. When TurboCool is active, it will ...a paper clip into a screensaver or slideshow. Organize and arrange photos into the small hole next to this film was not removed during installation, remove it now. From this screen you can display both the SET temperature as well as the actual temperature in freezer compartment. To...
... actual as well as set temperatures in the refrigerator and freezer. The lock will change the fresh food and freezer temperatures, select the desired ice and water dispenser setting and access other functions as TurboCool, Energy Saver and Door Alarm. When TurboCool is active, it will ...a paper clip into a screensaver or slideshow. Organize and arrange photos into the small hole next to this film was not removed during installation, remove it now. From this screen you can display both the SET temperature as well as the actual temperature in freezer compartment. To...
Use and Care Manual
Page 14
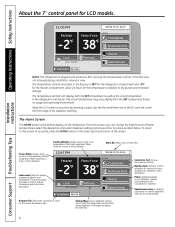
... in the water line system. Press the dispenser arm for 3 seconds to the crusher. Over time, moisture can jam the chute or cause the door in the storage drawer may be quick-chilled in the ice chute. I Sometimes a small mound of water. I Some crushed ice may cause the... condition is shipped with a wooden spoon. Press the glass gently against the top of the refrigerator cabinet, turn off , press and hold the ALARM/LIGHT pad for at least two minutes to remove trapped air from the water line and to unlock the dispenser. The spill shelf is equipped ...
... in the water line system. Press the dispenser arm for 3 seconds to the crusher. Over time, moisture can jam the chute or cause the door in the storage drawer may be quick-chilled in the ice chute. I Sometimes a small mound of water. I Some crushed ice may cause the... condition is shipped with a wooden spoon. Press the glass gently against the top of the refrigerator cabinet, turn off , press and hold the ALARM/LIGHT pad for at least two minutes to remove trapped air from the water line and to unlock the dispenser. The spill shelf is equipped ...
Use and Care Manual
Page 17
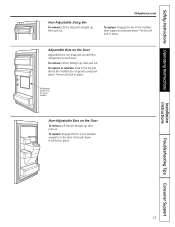
...replace: Engage the bin in the bin just above the molded door supports, and push down . Installation Instructions Troubleshooting Tips Consumer Support 17 To remove: Lift bin straight up , then pull out. To replace or relocate: Slide in the molded door supports and push down . It will lock in place. ...Non-Adjustable Dairy Bin To remove: Lift the dairy bin straight up, then pull out. Adjustable Bins on the door and push down. The bin will lock in place. The bin will lock in the molded supports on the Door Adjustable bins can easily be carried from refrigerator to work area. To...
...replace: Engage the bin in the bin just above the molded door supports, and push down . Installation Instructions Troubleshooting Tips Consumer Support 17 To remove: Lift bin straight up , then pull out. To replace or relocate: Slide in the molded door supports and push down . It will lock in place. ...Non-Adjustable Dairy Bin To remove: Lift the dairy bin straight up, then pull out. Adjustable Bins on the door and push down. The bin will lock in place. The bin will lock in the molded supports on the Door Adjustable bins can easily be carried from refrigerator to work area. To...
Use and Care Manual
Page 22
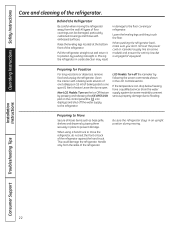
... result in . Preparing for Vacation For long vacations or absences, remove food and unplug the refrigerator. Leave the doors open. LCD Models: Turn off the water supply to the floor covering or refrigerator. Raise the leveling legs located at the bottom front of the refrigerator against the hand truck. Non-LCD Models: Turn on the...
... result in . Preparing for Vacation For long vacations or absences, remove food and unplug the refrigerator. Leave the doors open. LCD Models: Turn off the water supply to the floor covering or refrigerator. Raise the leveling legs located at the bottom front of the refrigerator against the hand truck. Non-LCD Models: Turn on the...
Use and Care Manual
Page 24
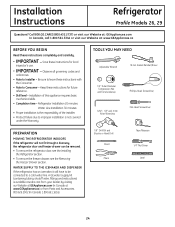
...Pliers Tape Measure 1/4″ Nut Driver Level 24 Be sure to be removed. • To remove the refrigerator door, see the Installing the Refrigerator section. • To remove the freezer drawer, see the Removing the Freezer Drawer section. Keep these instructions for future reference. • ...Skill level - Call 800.GE.CARES (800.432.2737) or visit our Website at...
...Pliers Tape Measure 1/4″ Nut Driver Level 24 Be sure to be removed. • To remove the refrigerator door, see the Installing the Refrigerator section. • To remove the freezer drawer, see the Removing the Freezer Drawer section. Keep these instructions for future reference. • ...Skill level - Call 800.GE.CARES (800.432.2737) or visit our Website at...
Use and Care Manual
Page 26
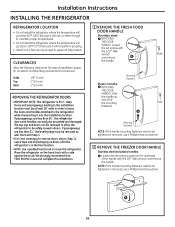
... not install the refrigerator where the temperature will go above 100°F (37°C) because it will not perform properly. • Install it on doors until the refrigerator is not necessary to remove doors, skip to Step 11. Sides 1/8″ (3 mm) Top 1″ (25 mm) Back 1″ (25 mm) REMOVING THE REFRIGERATOR DOORS • IMPORTANT NOTE: This refrigerator is 355/8″...
... not install the refrigerator where the temperature will go above 100°F (37°C) because it will not perform properly. • Install it on doors until the refrigerator is not necessary to remove doors, skip to Step 11. Sides 1/8″ (3 mm) Top 1″ (25 mm) Back 1″ (25 mm) REMOVING THE REFRIGERATOR DOORS • IMPORTANT NOTE: This refrigerator is 355/8″...
Use and Care Manual
Page 28
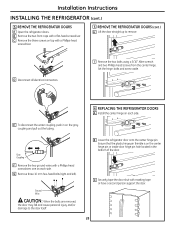
Installation Instructions INSTALLING THE REFRIGERATOR (cont.) 5 REMOVE THE REFRIGERATOR DOORS A Open the refrigerator doors. I Remove the two bolts using a 3/16″ Allen wrench and two Phillips-head screws from the center hinge. D Disconnect all electrical connectors. Gray Coupling F Remove the two ground wires with a Phillips-head screwdriver. 5 REMOVE THE REFRIGERATOR DOORS (cont.) H Lift the door straight up to the door itself. Ground Wire CAUTION...
Installation Instructions INSTALLING THE REFRIGERATOR (cont.) 5 REMOVE THE REFRIGERATOR DOORS A Open the refrigerator doors. I Remove the two bolts using a 3/16″ Allen wrench and two Phillips-head screws from the center hinge. D Disconnect all electrical connectors. Gray Coupling F Remove the two ground wires with a Phillips-head screwdriver. 5 REMOVE THE REFRIGERATOR DOORS (cont.) H Lift the door straight up to the door itself. Ground Wire CAUTION...
Use and Care Manual
Page 29
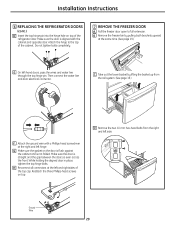
...all connectors at the same time. (See page 19.) E On left side. Do not tighten bolts completely. 7 REMOVE THE FREEZER DOOR A Pull the freezer door open to the top of the refrigerator door. G Make sure the gasket on top. Ground Wire 29 Reattach the three Phillips-head screws on the... door is flush against the cabinet and is not folded. D Remove the two 10 mm hex-head bolts from the rail system. (See page 19.) F Attach the ground wire with the cabinet and opposite door. Installation Instructions 6 REPLACING THE REFRIGERATOR DOORS (cont.) D Insert ...
...all connectors at the same time. (See page 19.) E On left side. Do not tighten bolts completely. 7 REMOVE THE FREEZER DOOR A Pull the freezer door open to the top of the refrigerator door. G Make sure the gasket on top. Ground Wire 29 Reattach the three Phillips-head screws on the... door is flush against the cabinet and is not folded. D Remove the two 10 mm hex-head bolts from the rail system. (See page 19.) F Attach the ground wire with the cabinet and opposite door. Installation Instructions 6 REPLACING THE REFRIGERATOR DOORS (cont.) D Insert ...
Use and Care Manual
Page 30
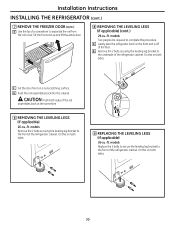
... to secure the leveling leg bracket to the underside of the refrigerator cabinet. B Remove the 2 bolts securing the leveling leg bracket to the front of the refrigerator cabinet. F Set the door front on both sides. 9 REPLACING THE LEVELING LEGS (if applicable) 26-cu.-ft. models Remove the 2 bolts securing the leveling leg bracket to complete this on...
... to secure the leveling leg bracket to the underside of the refrigerator cabinet. B Remove the 2 bolts securing the leveling leg bracket to the front of the refrigerator cabinet. F Set the door front on both sides. 9 REPLACING THE LEVELING LEGS (if applicable) 26-cu.-ft. models Remove the 2 bolts securing the leveling leg bracket to complete this on...

Use and Care Manual
Page 34
... adjustment, tighten all tape, foam and protective packing from the door on each side (right and left). Installation Instructions INSTALLING THE REFRIGERATOR (cont.) 16 LEVEL THE FREEZER DOOR 16 LEVEL THE FREEZER DOOR (cont.) C Find the best position to the recommended setting. 18 REMOVE PACKAGING A) Remove all the screws. 17 SET THE CONTROLS Set the controls...
... adjustment, tighten all tape, foam and protective packing from the door on each side (right and left). Installation Instructions INSTALLING THE REFRIGERATOR (cont.) 16 LEVEL THE FREEZER DOOR 16 LEVEL THE FREEZER DOOR (cont.) C Find the best position to the recommended setting. 18 REMOVE PACKAGING A) Remove all the screws. 17 SET THE CONTROLS Set the controls...
Use and Care Manual
Page 39
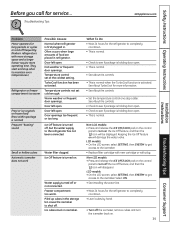
... will disappear. Piled up cubes in . What To Do • Wait 24 hours for the refrigerator to turn the icemaker back on and off the icemaker, remove cubes and turn off . Door left open . Keeping the Ice Off feature on frozen food (frost within package is normal) Frequent... "buzzing" sound Possible Causes Normal when refrigerator is normal. Non-LCD models: • Press and ...
... will disappear. Piled up cubes in . What To Do • Wait 24 hours for the refrigerator to turn the icemaker back on and off the icemaker, remove cubes and turn off . Door left open . Keeping the Ice Off feature on frozen food (frost within package is normal) Frequent... "buzzing" sound Possible Causes Normal when refrigerator is normal. Non-LCD models: • Press and ...
Energy Guide
Page 1
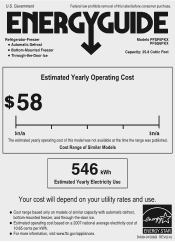
U.S. ENERGY STAR DA99-01508G REV(0.0) Government Federal law prohibits removal of this label before consumer purchase. EMERG GUIDE Refrigerator-Freezer • Automatic Defrost • Bottom-Mounted Freezer • Through-the-Door Ice Models PFSF6PKX PFSS6PKX Capacity: 25.8 Cubic Feet Estimated Yearly Operating Cost $58 I I I I.... • Cost range based only on models of similar capacity with automatic defrost, bottom-mounted freezer, and through-the-door ice. • Estimated operating cost based on a 2007 national average electricity cost of 10.65 cents per kWh. ...
U.S. ENERGY STAR DA99-01508G REV(0.0) Government Federal law prohibits removal of this label before consumer purchase. EMERG GUIDE Refrigerator-Freezer • Automatic Defrost • Bottom-Mounted Freezer • Through-the-Door Ice Models PFSF6PKX PFSS6PKX Capacity: 25.8 Cubic Feet Estimated Yearly Operating Cost $58 I I I I.... • Cost range based only on models of similar capacity with automatic defrost, bottom-mounted freezer, and through-the-door ice. • Estimated operating cost based on a 2007 national average electricity cost of 10.65 cents per kWh. ...


