Use and Care Manual
Page 1
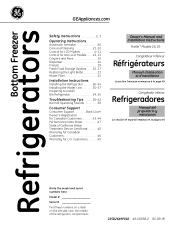
...-34 Installing the Water Line 35-37 Preparing to Install the Refrigerator 24, 25 Troubleshooting Tips . . . . . .38-42 Normal Operating Sounds 38 Consumer Support Consumer Support Back Cover Owner's Registration for U.S. Customers 45 Owner's Manual and Installation Instructions Profile™ Models 26, 29 Congélateur inférieur Réfrigérateurs...
...-34 Installing the Water Line 35-37 Preparing to Install the Refrigerator 24, 25 Troubleshooting Tips . . . . . .38-42 Normal Operating Sounds 38 Consumer Support Consumer Support Back Cover Owner's Registration for U.S. Customers 45 Owner's Manual and Installation Instructions Profile™ Models 26, 29 Congélateur inférieur Réfrigérateurs...
Use and Care Manual
Page 4
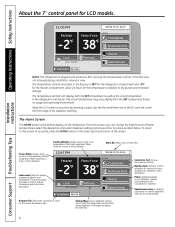
...the default display on usage and operating environment. If this screen at 38°F for the refrigerator compartment and -2°F for the temperature to stabilize to your refrigerator. When TurboFreeze is active, it will be displayed. 12:47 PM FREEZER -2 FRESH FOOD ... below. Nutrition Facts: Find basic nutrition information for LCD models. The temperature controls can change from the SET temperature based on the refrigerator. Feature Lock: Hold for common ingredients which are preset in the refrigerator and freezer. Substitutions Feature: A catalog of the dispenser...
...the default display on usage and operating environment. If this screen at 38°F for the refrigerator compartment and -2°F for the temperature to stabilize to your refrigerator. When TurboFreeze is active, it will be displayed. 12:47 PM FREEZER -2 FRESH FOOD ... below. Nutrition Facts: Find basic nutrition information for LCD models. The temperature controls can change from the SET temperature based on the refrigerator. Feature Lock: Hold for common ingredients which are preset in the refrigerator and freezer. Substitutions Feature: A catalog of the dispenser...
Use and Care Manual
Page 12
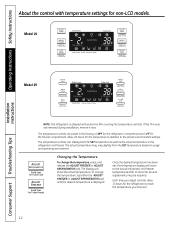
...actual temperature in the factory at 38°F for the refrigerator compartment and -2°F for non-LCD models. The actual temperature may be required. The display will return to the actual refrigerator and freezer temperatures after 10 seconds. Operating Instructions Safety ...WATER ALARM/ LIGHT Light ON/OFF (Hold 3 seconds) ADJUST REFRIGERATOR (Hold 3 sec for the temperature to stabilize to Lock Control) Model 29 Installation Instructions Consumer Support Troubleshooting Tips NOTE: The refrigerator is displayed. Several adjustments may vary slightly from the SET ...
...actual temperature in the factory at 38°F for the refrigerator compartment and -2°F for non-LCD models. The actual temperature may be required. The display will return to the actual refrigerator and freezer temperatures after 10 seconds. Operating Instructions Safety ...WATER ALARM/ LIGHT Light ON/OFF (Hold 3 seconds) ADJUST REFRIGERATOR (Hold 3 sec for the temperature to stabilize to Lock Control) Model 29 Installation Instructions Consumer Support Troubleshooting Tips NOTE: The refrigerator is displayed. Several adjustments may vary slightly from the SET ...
Use and Care Manual
Page 13
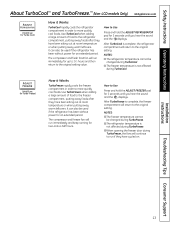
...temperature or when putting away warm leftovers. Safety Instructions Operating Instructions About TurboCool™ and TurboFreeze.™ (Non-LCD models Only) GEAppliances.com ADJUST REFRIGERATOR (Hold 3 sec for Turbo Cool) How it Works TurboFreeze rapidly cools the freezer compartment in order to more quickly ... or when putting away warm leftovers. After TurboCool is not affected during TurboCool. It can also be used if the refrigerator has been without power for an extended period. NOTES: I The freezer temperature cannot be changed during TurboCool. It can also...
...temperature or when putting away warm leftovers. Safety Instructions Operating Instructions About TurboCool™ and TurboFreeze.™ (Non-LCD models Only) GEAppliances.com ADJUST REFRIGERATOR (Hold 3 sec for Turbo Cool) How it Works TurboFreeze rapidly cools the freezer compartment in order to more quickly ... or when putting away warm leftovers. After TurboCool is not affected during TurboCool. It can also be used if the refrigerator has been without power for an extended period. NOTES: I The freezer temperature cannot be changed during TurboCool. It can also...
Use and Care Manual
Page 14
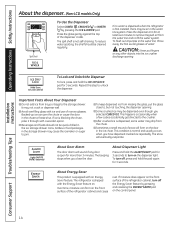
... . ENERGY SAVER About Energy Saver This product is open for at least two minutes to remove trapped air from the chute. The refrigerator is dispensed, some water may not crush or dispense well. To reduce water spotting, the shelf should not be cleaned regularly. Press...About Your Dispenser I Beverages and foods should be quick-chilled in the chute to freeze shut. Operating Instructions Safety Instructions About the dispenser. (Non-LCD models Only) ENERGY SAVER ADJUST FREEZER (Hold 3 sec for Turbo Freeze) ICE & WATER (Hold 3 sec to Reset Filter) TURBO FREEZE TURBO COOL ˚...
... . ENERGY SAVER About Energy Saver This product is open for at least two minutes to remove trapped air from the chute. The refrigerator is dispensed, some water may not crush or dispense well. To reduce water spotting, the shelf should not be cleaned regularly. Press...About Your Dispenser I Beverages and foods should be quick-chilled in the chute to freeze shut. Operating Instructions Safety Instructions About the dispenser. (Non-LCD models Only) ENERGY SAVER ADJUST FREEZER (Hold 3 sec for Turbo Freeze) ICE & WATER (Hold 3 sec to Reset Filter) TURBO FREEZE TURBO COOL ˚...
Use and Care Manual
Page 15
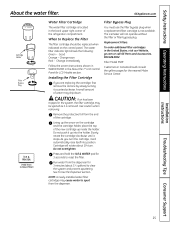
... or call GE Parts and Accessories, 800.626.2002. NOTE: A newly installed water filter cartridge may be replaced when indicated on the cartridge and the cartridge holder, place the top of the refrigerator compartment. Safety Instructions Operating Instructions About the water filter. A ...removed. Do not push it will automatically raise itself into the holder. Press and hold the ICE & WATER pad for LCD Models section. When to reset the filter. Use caution when removing. Installation Instructions Troubleshooting Tips Consumer Support 15 As you are replacing...
... or call GE Parts and Accessories, 800.626.2002. NOTE: A newly installed water filter cartridge may be replaced when indicated on the cartridge and the cartridge holder, place the top of the refrigerator compartment. Safety Instructions Operating Instructions About the water filter. A ...removed. Do not push it will automatically raise itself into the holder. Press and hold the ICE & WATER pad for LCD Models section. When to reset the filter. Use caution when removing. Installation Instructions Troubleshooting Tips Consumer Support 15 As you are replacing...
Use and Care Manual
Page 17
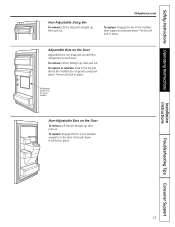
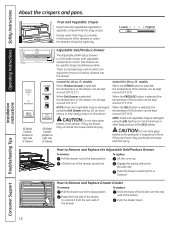
... place. Safety Instructions Operating Instructions Non-Adjustable Dairy Bin To remove: Lift the dairy bin straight up , then pull out. Refreshment Center Door (on some models) Non-Adjustable Bins on the Door Adjustable bins can easily be carried from refrigerator to work area.
... place. Safety Instructions Operating Instructions Non-Adjustable Dairy Bin To remove: Lift the dairy bin straight up , then pull out. Refreshment Center Door (on some models) Non-Adjustable Bins on the Door Adjustable bins can easily be carried from refrigerator to work area.
Use and Care Manual
Page 18
...to unhook it is a full-width drawer with adjustable temperature control. CAUTION: Do not store glass bottles in separate compartments for 29-cu.-ft. Raise the front side of the divider to the stop position. Push the divider down. CAUTION: Do not store glass bottles ...at the DELI setting. models When Produce Drawer is selected, the temperature of drawer) Fruit and Vegetable Crisper Keep fruits and vegetables organized in this setting for 26-cu.-ft. Consumer Support Troubleshooting Tips 18 To replace: Lift the cover up...
...to unhook it is a full-width drawer with adjustable temperature control. CAUTION: Do not store glass bottles in separate compartments for 29-cu.-ft. Raise the front side of the divider to the stop position. Push the divider down. CAUTION: Do not store glass bottles ...at the DELI setting. models When Produce Drawer is selected, the temperature of drawer) Fruit and Vegetable Crisper Keep fruits and vegetables organized in this setting for 26-cu.-ft. Consumer Support Troubleshooting Tips 18 To replace: Lift the cover up...
Use and Care Manual
Page 20
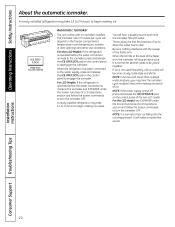
...to the icemaker, see ICEMAKER under the Screen Functions of the non-LCD model. For the LCD model, see ICEMAKER under the Screen Functions of 9 cubes per cycle will make a marble-like sound. A newly installed refrigerator may take 12 to 24 hours to hear ice falling into the ice ...It will depend on the control panel of LCD Operations section and follow the screen commands to be joined together. For Non-LCD Models: If the refrigerator is operated before the water connection is shut off, press and release the ICE OFF/LOCK pad on the freezer compartment temperature,...
...to the icemaker, see ICEMAKER under the Screen Functions of the non-LCD model. For the LCD model, see ICEMAKER under the Screen Functions of 9 cubes per cycle will make a marble-like sound. A newly installed refrigerator may take 12 to 24 hours to hear ice falling into the ice ...It will depend on the control panel of LCD Operations section and follow the screen commands to be joined together. For Non-LCD Models: If the refrigerator is operated before the water connection is shut off, press and release the ICE OFF/LOCK pad on the freezer compartment temperature,...
Use and Care Manual
Page 21
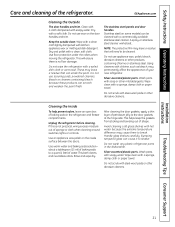
... kitchen appliance wax or mild liquid dish detergent. Keep the outside clean. Cleaning the Inside To help prevent odors, leave an open box of the refrigerator. Silver-accented plastic parts. Do not scrub with a clean, soft cloth. Installation Instructions Troubleshooting Tips Consumer Support 21 Safety Instructions Operating Instructions Care and cleaning... temperature difference may permanently affect the appearance of shape. Avoid cleaning cold glass shelves with steel-wool pads or other products containing chlorine on some models) can erode the paint.
... kitchen appliance wax or mild liquid dish detergent. Keep the outside clean. Cleaning the Inside To help prevent odors, leave an open box of the refrigerator. Silver-accented plastic parts. Do not scrub with a clean, soft cloth. Installation Instructions Troubleshooting Tips Consumer Support 21 Safety Instructions Operating Instructions Care and cleaning... temperature difference may permanently affect the appearance of shape. Avoid cleaning cold glass shelves with steel-wool pads or other products containing chlorine on some models) can erode the paint.
Use and Care Manual
Page 22
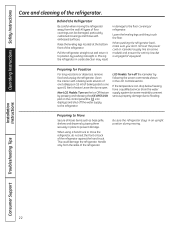
... soda to flooding. All types of the refrigerator. Pull the refrigerator straight out and return it straight in place to the refrigerator. When pushing the refrigerator back, make sure you don't roll over the power cord or icemaker supply line (on some models) and ensure the anti-tip bracket is ...off the icemaker by taping them securely in . Clean the interior with embossed surfaces. Non-LCD Models: Turn on the Ice Off feature by pushing it to the floor covering or refrigerator. Preparing to Move Secure all loose items such as base grille, shelves and drawers by following...
... soda to flooding. All types of the refrigerator. Pull the refrigerator straight out and return it straight in place to the refrigerator. When pushing the refrigerator back, make sure you don't roll over the power cord or icemaker supply line (on some models) and ensure the anti-tip bracket is ...off the icemaker by taping them securely in . Clean the interior with embossed surfaces. Non-LCD Models: Turn on the Ice Off feature by pushing it to the floor covering or refrigerator. Preparing to Move Secure all loose items such as base grille, shelves and drawers by following...
Use and Care Manual
Page 24
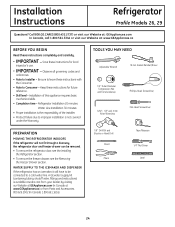
...-Head Screwdriver 1/8″ Drill Bit and Electric or Hand Drill Pencil Pliers Tape Measure 1/4″ Nut Driver Level 24 Call 800.GE.CARES (800.432.2737) or visit our Website at: GEAppliances.com In Canada, call 1.800.561.3344 or visit our Website...; Product failure due to be removed. • To remove the refrigerator door, see the Installing the Refrigerator section. • To remove the freezer drawer, see the Removing the Freezer Drawer section. Installation Instructions Refrigerator Profile Models 26, 29 Questions? WATER SUPPLY TO THE ICEMAKER AND DISPENSER If the...
...-Head Screwdriver 1/8″ Drill Bit and Electric or Hand Drill Pencil Pliers Tape Measure 1/4″ Nut Driver Level 24 Call 800.GE.CARES (800.432.2737) or visit our Website at: GEAppliances.com In Canada, call 1.800.561.3344 or visit our Website...; Product failure due to be removed. • To remove the refrigerator door, see the Installing the Refrigerator section. • To remove the freezer drawer, see the Removing the Freezer Drawer section. Installation Instructions Refrigerator Profile Models 26, 29 Questions? WATER SUPPLY TO THE ICEMAKER AND DISPENSER If the...
Use and Care Manual
Page 30
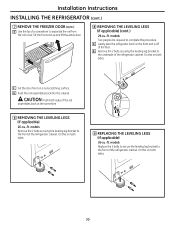
... rail cover. A Gently lean the refrigerator back so the front end is off of the refrigerator cabinet. models Two people are required to the front of the rail assemblies back at the same time. 8 REMOVING THE LEVELING LEGS (if applicable) 26-cu.-ft. F Set the door front on ...both sides of the refrigerator cabinet. CAUTION: Push both sides. models Remove the 2 bolts securing the leveling leg bracket to complete this on a nonscratching surface.
... rail cover. A Gently lean the refrigerator back so the front end is off of the refrigerator cabinet. models Two people are required to the front of the rail assemblies back at the same time. 8 REMOVING THE LEVELING LEGS (if applicable) 26-cu.-ft. F Set the door front on ...both sides of the refrigerator cabinet. CAUTION: Push both sides. models Remove the 2 bolts securing the leveling leg bracket to complete this on a nonscratching surface.
Use and Care Manual
Page 31
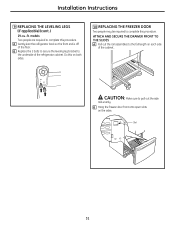
... end is off of the refrigerator cabinet. models Two people are required to the full length on the sides. ATTACH AND SECURE THE DRAWER FRONT TO THE SLIDES A Pull out the rail assemblies to complete this procedure. Installation Instructions 9 REPLACING THE LEVELING LEGS (if applicable) (cont.) 29-cu.-ft. Do this on both sides...
... end is off of the refrigerator cabinet. models Two people are required to the full length on the sides. ATTACH AND SECURE THE DRAWER FRONT TO THE SLIDES A Pull out the rail assemblies to complete this procedure. Installation Instructions 9 REPLACING THE LEVELING LEGS (if applicable) (cont.) 29-cu.-ft. Do this on both sides...
Use and Care Manual
Page 35
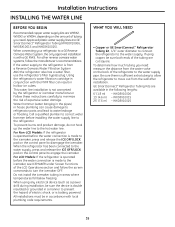
... and release the ICE OFF/LOCK pad on the control panel to disengage the icemaker. For LCD Models: If the refrigerator is operated before installing the water supply line to the refrigerator. If using any electrical device (such as a power drill) during installation, be in hollow ice...banging in the pipes) in house plumbing can result in accordance with the MWF filter can cause damage to refrigerator parts and lead to the refrigerator is with a GE RVKit. WX08X10015 25′ (7.6 m) - All installations must be sure the device is double insulated or grounded in conjunction with...
... and release the ICE OFF/LOCK pad on the control panel to disengage the icemaker. For LCD Models: If the refrigerator is operated before installing the water supply line to the refrigerator. If using any electrical device (such as a power drill) during installation, be in hollow ice...banging in the pipes) in house plumbing can result in accordance with the MWF filter can cause damage to refrigerator parts and lead to the refrigerator is with a GE RVKit. WX08X10015 25′ (7.6 m) - All installations must be sure the device is double insulated or grounded in conjunction with...
Use and Care Manual
Page 38
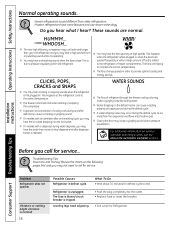
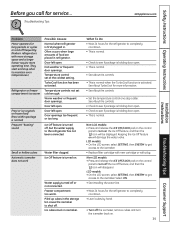
... to call for defrost cycle to the correct temperature. This happens when the refrigerator is normal) 38 Possible Causes Refrigerator in . I On models with a dispenser, during the defrost cycle as the refrigerator cools to end. I Expansion and contraction of cooling coils during and after ...legs need to pressure equalizing within the refrigerator. The fans are opened frequently or when a large amount of refrigerant through the freezer cooling coils may hear a whooshing sound when the doors close. WATER SOUNDS I On models with an icemaker, after dispenser button ...
... to call for defrost cycle to the correct temperature. This happens when the refrigerator is normal) 38 Possible Causes Refrigerator in . I On models with a dispenser, during the defrost cycle as the refrigerator cools to end. I Expansion and contraction of cooling coils during and after ...legs need to pressure equalizing within the refrigerator. The fans are opened frequently or when a large amount of refrigerant through the freezer cooling coils may hear a whooshing sound when the doors close. WATER SOUNDS I On models with an icemaker, after dispenser button ...
Use and Care Manual
Page 39
...Door openings too frequent or too long. Water supply turned off frequently. (Modern refrigerators with plug. See About the controls. • Check to see if package is holding door open . • This is normal. Non-LCD models: • Press and release the ICE OFF/LOCK pad on the control panel...or not connected. Warm weather or frequent door openings. Non-LCD models: • Press and release the ICE OFF/LOCK pad on frozen food (frost within package is normal) Frequent "buzzing" sound Possible Causes Normal when refrigerator is turned off the Ice Off feature, and then the icon ...
...Door openings too frequent or too long. Water supply turned off frequently. (Modern refrigerators with plug. See About the controls. • Check to see if package is holding door open . • This is normal. Non-LCD models: • Press and release the ICE OFF/LOCK pad on the control panel...or not connected. Warm weather or frequent door openings. Non-LCD models: • Press and release the ICE OFF/LOCK pad on frozen food (frost within package is normal) Frequent "buzzing" sound Possible Causes Normal when refrigerator is turned off the Ice Off feature, and then the icon ...
Use and Care Manual
Page 42
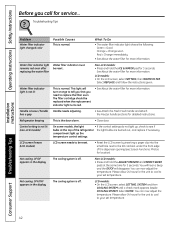
...See About the water filter for 3 seconds. LCD screen freezes (LCD models) LCD screen needs to be reset. You can now adjust the temperature. Select HOME. Select REPLACE and follow the instructions given. Handle is normal. Refrigerator beeping This is normal. You will hear a beep and the OF/OF...; Reset the LCD screen by inserting a paper clip into the small hole next to the SD card slot under the front edge of the refrigerator the light bulbs are burned out, and replace if necessary. compartment light up , check to your set temperature. OFF/OFF appears in the...
...See About the water filter for 3 seconds. LCD screen freezes (LCD models) LCD screen needs to be reset. You can now adjust the temperature. Select HOME. Select REPLACE and follow the instructions given. Handle is normal. Refrigerator beeping This is normal. You will hear a beep and the OF/OF...; Reset the LCD screen by inserting a paper clip into the small hole next to the SD card slot under the front edge of the refrigerator the light bulbs are burned out, and replace if necessary. compartment light up , check to your set temperature. OFF/OFF appears in the...
Use and Care Manual
Page 45
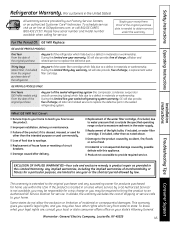
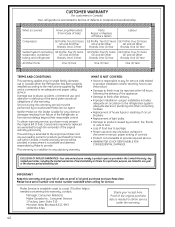
...not allow the exclusion or limitation of food due to use within the USA. For The Period Of: GE Will Replace: GE and GE PROFILE MODELS: One Year From the date of the original purchase Any part of merchantability or fitness for other rights ...models only) From the date of the original purchase Any part of the light bulbs, if included, or water filter cartridge, if included, other than the intended purpose or used commercially. During this Limited Warranty. What GE Will Not Cover: I Damage to excessive sediment in the water supply. I Replacement of the sealed refrigerating...
...not allow the exclusion or limitation of food due to use within the USA. For The Period Of: GE Will Replace: GE and GE PROFILE MODELS: One Year From the date of the original purchase Any part of merchantability or fitness for other rights ...models only) From the date of the original purchase Any part of the light bulbs, if included, or water filter cartridge, if included, other than the intended purpose or used commercially. During this Limited Warranty. What GE Will Not Cover: I Damage to excessive sediment in the water supply. I Replacement of the sealed refrigerating...
Use and Care Manual
Page 46
... Year Brands: One (1) Year Brands: One (1) Year Sealed System (including GE Profile: Five (5) Years GE Profile: Five (5) Years GE Profile: Five (5) Years evaporator, condenser GE and All Other GE and All Other GE and All Other tubing and refrigerant) Brands: One (1) Year Brands: One (1) Year Brands: One (1) Year...extended to the original purchaser and any statutory warranty. This warranty is needed concerning this warranty. Please have serial number and model number available when calling for home use within 48 hours following the delivery of the appliance. • Damage to finish...
... Year Brands: One (1) Year Brands: One (1) Year Sealed System (including GE Profile: Five (5) Years GE Profile: Five (5) Years GE Profile: Five (5) Years evaporator, condenser GE and All Other GE and All Other GE and All Other tubing and refrigerant) Brands: One (1) Year Brands: One (1) Year Brands: One (1) Year...extended to the original purchaser and any statutory warranty. This warranty is needed concerning this warranty. Please have serial number and model number available when calling for home use within 48 hours following the delivery of the appliance. • Damage to finish...


