
Owners Manual
Page 1
Bottom Refr igeratoFreezerrs GEAppliances.com Safety Instructions 2, 3 Operating Instructions Additional Features 8 Automatic Icemaker 11 Care and Cleaning 12-13 Controls 4-5 Crispers and Pans 9 Freezer 10 Replacing the Light Bulbs 14 Shelves and Bins 7, 8 Water Dispenser 11 Water Filter 6 Installation Instructions Installing the Anti-Tip Floor Bracket 18-19 Installing the Refrigerator... 20-24 Installing the Water Line 33-35 Preparing to Install the Refrigerator 17 Removing and Replacing the Freezer Drawer 25, 26 Reversing the Door Swing (Single Door Refrigerator ...
Bottom Refr igeratoFreezerrs GEAppliances.com Safety Instructions 2, 3 Operating Instructions Additional Features 8 Automatic Icemaker 11 Care and Cleaning 12-13 Controls 4-5 Crispers and Pans 9 Freezer 10 Replacing the Light Bulbs 14 Shelves and Bins 7, 8 Water Dispenser 11 Water Filter 6 Installation Instructions Installing the Anti-Tip Floor Bracket 18-19 Installing the Refrigerator... 20-24 Installing the Water Line 33-35 Preparing to Install the Refrigerator 17 Removing and Replacing the Freezer Drawer 25, 26 Reversing the Door Swing (Single Door Refrigerator ...

Owners Manual
Page 2
... or hang on the automatic icemaking mechanism while the refrigerator is plugged in. SAFETY PRECAUTIONS When using electrical appliances, basic safety precautions should be followed, including the following: I Leave the shelves in the freezer compartment when hands are getting rid of an extension ...entrapment and suffocation are still dangerous...even if they will sit for its intended purpose as described in the refrigerator. Before You Throw Away Your Old Refrigerator or Freezer: I Setting either or both controls to 0 (off the doors. USE OF EXTENSION CORDS Because of the...
... or hang on the automatic icemaking mechanism while the refrigerator is plugged in. SAFETY PRECAUTIONS When using electrical appliances, basic safety precautions should be followed, including the following: I Leave the shelves in the freezer compartment when hands are getting rid of an extension ...entrapment and suffocation are still dangerous...even if they will sit for its intended purpose as described in the refrigerator. Before You Throw Away Your Old Refrigerator or Freezer: I Setting either or both controls to 0 (off the doors. USE OF EXTENSION CORDS Because of the...
Owners Manual
Page 3
... plug firmly and pull straight out from the power cord. When moving the refrigerator away from overheated wires. READ AND FOLLOW THIS SAFETY INFORMATION CAREFULLY. The refrigerator should always be careful not to make sure the outlet is your refrigerator by a qualified electrician to roll over or damage the power cord. Repair or...
... plug firmly and pull straight out from the power cord. When moving the refrigerator away from overheated wires. READ AND FOLLOW THIS SAFETY INFORMATION CAREFULLY. The refrigerator should always be careful not to make sure the outlet is your refrigerator by a qualified electrician to roll over or damage the power cord. Repair or...

Owners Manual
Page 4
... touch pads until the desired temperature is displayed. Changing the Temperature For Controls-on-the-Door Models: To change the temperature, tap either the refrigerator or the freezer until the desired temperature is shipped with protective film covering the temperature controls. Several adjustments may vary slightly from the SET temperature based on...
... touch pads until the desired temperature is displayed. Changing the Temperature For Controls-on-the-Door Models: To change the temperature, tap either the refrigerator or the freezer until the desired temperature is shipped with protective film covering the temperature controls. Several adjustments may vary slightly from the SET temperature based on...

Owners Manual
Page 5
...affected during TurboCool, the fans will continue to run until the refrigerator compartment cools to approximately 34°F (1°C), then it will return to Use Press TurboCool. The freezer temperature is complete, the refrigerator compartment will cycle on and off to maintain this setting. The ...About TurboCool.™ (on some models) GEAppliances.com (on some models) (on some models) How It Works TurboCool rapidly cools the refrigerator compartment in order to more than 2 minutes. Over time, moisture can also be changed during TurboCool. After 8 hours, or if TurboCool...
...affected during TurboCool, the fans will continue to run until the refrigerator compartment cools to approximately 34°F (1°C), then it will return to Use Press TurboCool. The freezer temperature is complete, the refrigerator compartment will cycle on and off to maintain this setting. The ...About TurboCool.™ (on some models) GEAppliances.com (on some models) (on some models) How It Works TurboCool rapidly cools the refrigerator compartment in order to more than 2 minutes. Over time, moisture can also be changed during TurboCool. After 8 hours, or if TurboCool...

Owners Manual
Page 6
...) (on some models) Water Filter Cartridge The water filter cartridge is located in the United States, visit our Website, GEAppliances.com, or call GE Parts and Accessories, 800.626.2002. Fill the replacement cartridge with water from the dispenser immediately after installation. A small amount of the cartridge. ...Run water from the end of water may be replaced when the replacement indicator light turns red or if the flow of the refrigerator compartment. DO NOT pull down . Filter Bypass Plug You must use the filter bypass plug when a replacement filter cartridge is not available.
...) (on some models) Water Filter Cartridge The water filter cartridge is located in the United States, visit our Website, GEAppliances.com, or call GE Parts and Accessories, 800.626.2002. Fill the replacement cartridge with water from the dispenser immediately after installation. A small amount of the cartridge. ...Run water from the end of water may be replaced when the replacement indicator light turns red or if the flow of the refrigerator compartment. DO NOT pull down . Filter Bypass Plug You must use the filter bypass plug when a replacement filter cartridge is not available.
Owners Manual
Page 7
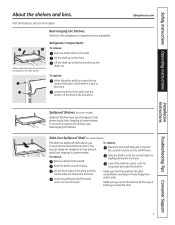
...you to lower shelves. Make sure that can be adjusted in . Lift the shelf up at the front. Slide the shelf in the refrigerator compartment are designed to help prevent spills from dripping to side. Lower the shelf into place. Continue pulling the shelf forward until the central...Remove all items from shelf. To remove or replace the shelves, see Rearranging the Shelves. Refrigerator Compartment To remove: Remove all items from the shelf. Lower the front of the shelf until the bottom of the shelf in before you push the shelves all features are above the front bar...
...you to lower shelves. Make sure that can be adjusted in . Lift the shelf up at the front. Slide the shelf in the refrigerator compartment are designed to help prevent spills from dripping to side. Lower the shelf into place. Continue pulling the shelf forward until the central...Remove all items from shelf. To remove or replace the shelves, see Rearranging the Shelves. Refrigerator Compartment To remove: Remove all items from the shelf. Lower the front of the shelf until the bottom of the shelf in before you push the shelves all features are above the front bar...

Owners Manual
Page 8
... , then pull out. It will lock in place. It will lock in the molded supports on the Door Adjustable bins can easily be carried from refrigerator to fit your needs. To replace: Engage the rack in the bin just above the molded door supports, and push down . To replace or relocate...
... , then pull out. It will lock in place. It will lock in the molded supports on the Door Adjustable bins can easily be carried from refrigerator to fit your needs. To replace: Engage the rack in the bin just above the molded door supports, and push down . To replace or relocate...

Owners Manual
Page 11
..., room temperature, number of door openings and other use conditions. The icemaker power light will turn green when the freezer light switch is pressed in or when the freezer door is first installed, there may be air in a 24-hour period, depending on some models) Press the .... Shelf Ice Bin To access ice. To reduce water spotting, the shelf should be joined together. If no water is dispensed when the refrigerator is closed. Push the water dispenser button. Be sure nothing interferes with water. To access ice, simply pull the bin forward. During this...
..., room temperature, number of door openings and other use conditions. The icemaker power light will turn green when the freezer light switch is pressed in or when the freezer door is first installed, there may be air in a 24-hour period, depending on some models) Press the .... Shelf Ice Bin To access ice. To reduce water spotting, the shelf should be joined together. If no water is dispensed when the refrigerator is closed. Push the water dispenser button. Be sure nothing interferes with water. To access ice, simply pull the bin forward. During this...
Owners Manual
Page 12
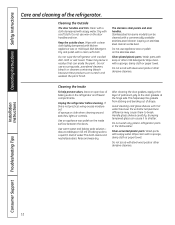
... Operating Instructions Safety Instructions Care and cleaning of sponge or cloth when cleaning around switches, lights or controls. Do not wipe the refrigerator with a sponge, damp cloth or paper towel. Stainless steel (on the inside surface between the doors. Bumping tempered glass can ...steel-wool pads or other abrasive cleaners. A spray-on the door handles and trim. Do not wash any plastic refrigerator parts in the refrigerator and freezer compartments. Wash parts with steel-wool pads or other abrasive cleaners. Do not scrub with soapy water. Cleaning the ...
... Operating Instructions Safety Instructions Care and cleaning of sponge or cloth when cleaning around switches, lights or controls. Do not wipe the refrigerator with a sponge, damp cloth or paper towel. Stainless steel (on the inside surface between the doors. Bumping tempered glass can ...steel-wool pads or other abrasive cleaners. A spray-on the door handles and trim. Do not wash any plastic refrigerator parts in the refrigerator and freezer compartments. Wash parts with steel-wool pads or other abrasive cleaners. Do not scrub with soapy water. Cleaning the ...

Owners Manual
Page 13
... from the wall. Installation Instructions Troubleshooting Tips Consumer Support 13 Raise the leveling legs located at the bottom front of the refrigerator. Clean the interior with embossed surfaces. Safety Instructions Operating Instructions GEAppliances.com Behind the Refrigerator Be careful when moving . Lower the leveling legs until they touch the floor. When using a hand...
... from the wall. Installation Instructions Troubleshooting Tips Consumer Support 13 Raise the leveling legs located at the bottom front of the refrigerator. Clean the interior with embossed surfaces. Safety Instructions Operating Instructions GEAppliances.com Behind the Refrigerator Be careful when moving . Lower the leveling legs until they touch the floor. When using a hand...

Owners Manual
Page 14
.... Plug the refrigerator back in . Plug the refrigerator back in . Light Shield Appearance may vary Freezer Light CAUTION: Light bulbs may be hot. Unplug the refrigerator. Rotate the ...shield. LED Refrigerator Lights (on some models) An authorized technician will need to replace the LED light. After replacing with an appliance bulb of the freezer inside a ...light shield. Operating Instructions Safety Instructions Replacing the light bulbs. Unplug the refrigerator. NOTE: Appliance bulbs may be ordered from GE Parts and Accessories...
.... Plug the refrigerator back in . Plug the refrigerator back in . Light Shield Appearance may vary Freezer Light CAUTION: Light bulbs may be hot. Unplug the refrigerator. Rotate the ...shield. LED Refrigerator Lights (on some models) An authorized technician will need to replace the LED light. After replacing with an appliance bulb of the freezer inside a ...light shield. Operating Instructions Safety Instructions Replacing the light bulbs. Unplug the refrigerator. NOTE: Appliance bulbs may be ordered from GE Parts and Accessories...
Owners Manual
Page 16
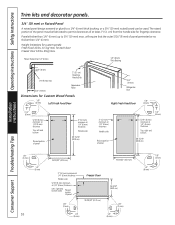
... 5/16″ (8 mm) minimum at 1/4″ (6 mm) thickness Top, left and bottom Raised portion of panel 2″ (51 mm) minimum at 1/4″ (6 mm) thickness Handle side 38 15/16″ (98.9 cm) 3/4″ (19 mm) Refrigerator Door Right Fresh Food Door 1/8″ (3 mm) 2″ (51 mm) minimum at 1/4&#...fingertip clearance. for custom panels: Fresh Food 10 lbs. (4.5 kg) max. Panels thicker than 1/4″ (6 mm). Weight limitations for each door Freezer Door 18 lbs. (8 kg) max. The raised portion of the panel must be fabricated to permit clearances of at 1/4″ (6 mm) thickness...
... 5/16″ (8 mm) minimum at 1/4″ (6 mm) thickness Top, left and bottom Raised portion of panel 2″ (51 mm) minimum at 1/4″ (6 mm) thickness Handle side 38 15/16″ (98.9 cm) 3/4″ (19 mm) Refrigerator Door Right Fresh Food Door 1/8″ (3 mm) 2″ (51 mm) minimum at 1/4&#...fingertip clearance. for custom panels: Fresh Food 10 lbs. (4.5 kg) max. Panels thicker than 1/4″ (6 mm). Weight limitations for each door Freezer Door 18 lbs. (8 kg) max. The raised portion of the panel must be fabricated to permit clearances of at 1/4″ (6 mm) thickness...

Owners Manual
Page 17
...• IMPORTANT - WATER SUPPLY TO THE ICEMAKER AND DISPENSER (ON SOME MODELS) If the refrigerator has an icemaker, it will not fit through a doorway, the refrigerator door and freezer drawer can be connected to improper installation is available at extra cost from Parts and Accessories, ... Pencil Wire Cutters Tape measure 1/4″ Nut Driver Level 17 Installation Instructions Refrigerator Models 21 and 25 Questions? Installation of the installer. • Product failure due to a cold water line. Call 800.GE.CARES (800.432.2737) or visit our Website at: GEAppliances.com In...
...• IMPORTANT - WATER SUPPLY TO THE ICEMAKER AND DISPENSER (ON SOME MODELS) If the refrigerator has an icemaker, it will not fit through a doorway, the refrigerator door and freezer drawer can be connected to improper installation is available at extra cost from Parts and Accessories, ... Pencil Wire Cutters Tape measure 1/4″ Nut Driver Level 17 Installation Instructions Refrigerator Models 21 and 25 Questions? Installation of the installer. • Product failure due to a cold water line. Call 800.GE.CARES (800.432.2737) or visit our Website at: GEAppliances.com In...
Owners Manual
Page 18
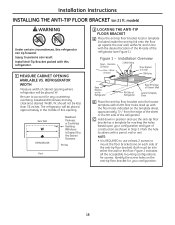
... indicated on each side of the refrigerator (see Figure 1). Injury to Install RH Holes 71⁄ 4″ Base Bracket on the Refrigerator RH Side of Refrigerator Rear RH Corner of construction as shown in line with this refrigerator can result. Width, W, should ...all the acceptable mounting configurations for screws. Figure 1 - Installation Overview Floor - Identify the screw holes on 21 ft. models) WARNING Under certain circumstances, this refrigerator. 1 MEASURE CABINET OPENING AVAILABLE VS. Be sure to use the anti-tip floor bracket as a template for marking...
... indicated on each side of the refrigerator (see Figure 1). Injury to Install RH Holes 71⁄ 4″ Base Bracket on the Refrigerator RH Side of Refrigerator Rear RH Corner of construction as shown in line with this refrigerator can result. Width, W, should ...all the acceptable mounting configurations for screws. Figure 1 - Installation Overview Floor - Identify the screw holes on 21 ft. models) WARNING Under certain circumstances, this refrigerator. 1 MEASURE CABINET OPENING AVAILABLE VS. Be sure to use the anti-tip floor bracket as a template for marking...
Owners Manual
Page 19
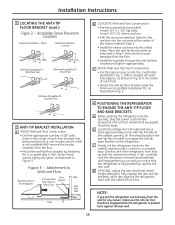
...the sleeve anchors into place as indicated in Step 2. Drill an angled 1/8" pilot hole (approx. If not, carefully rock the refrigerator forward and backward until it comes to a complete stop. Wall Plate Stud Minimum Acceptable #2 - Check for the anchors into ... 3 - D OPTIONAL: Adjust the rear (and front) wheel height settings to engage the anti-tip base bracket on the refrigerator. Attachment to see if the refrigerator front lines up against the rear wall. 19 Acceptable Screw Placement Locations Preferred Installation - Wood Floor Minimum Acceptable #3 - Wood...
...the sleeve anchors into place as indicated in Step 2. Drill an angled 1/8" pilot hole (approx. If not, carefully rock the refrigerator forward and backward until it comes to a complete stop. Wall Plate Stud Minimum Acceptable #2 - Check for the anchors into ... 3 - D OPTIONAL: Adjust the rear (and front) wheel height settings to engage the anti-tip base bracket on the refrigerator. Attachment to see if the refrigerator front lines up against the rear wall. 19 Acceptable Screw Placement Locations Preferred Installation - Wood Floor Minimum Acceptable #3 - Wood...

Owners Manual
Page 20
...8243; (3 mm) 1/8″ (3 mm) Top 1″ (25 mm) 1″ (25 mm) Back 1″ (25 mm) 1/2″ (13 mm) REMOVE TOP CAP (cont.) (on doors until the refrigerator is in the final location. • SKID REMOVAL: Tilt refrigerator to each side at least 36″ wide in order to...temperatures. • Do not install the refrigerator where the temperature will go above 100°F (37°C) because it will need to provide one if your refrigerator does not have a water filter, we recommend installing one . G Reinstall the bottom freezer drawer. If passageways are less than 36...
...8243; (3 mm) 1/8″ (3 mm) Top 1″ (25 mm) 1″ (25 mm) Back 1″ (25 mm) 1/2″ (13 mm) REMOVE TOP CAP (cont.) (on doors until the refrigerator is in the final location. • SKID REMOVAL: Tilt refrigerator to each side at least 36″ wide in order to...temperatures. • Do not install the refrigerator where the temperature will go above 100°F (37°C) because it will need to provide one if your refrigerator does not have a water filter, we recommend installing one . G Reinstall the bottom freezer drawer. If passageways are less than 36...

Owners Manual
Page 21
..., insert the end of the tubing into the refrigerator connection, at the back of the refrigerator, and tighten the compression nut until it . 21 If you are already assembled to lower it is hand tight. B If you are using GE SmartConnect™ tubing, insert the molded end of... the tubing into the refrigerator connection, at the back of the refrigerator, as far as possible. Overtightening may need to lower it in the back bottom of the tubing coming from the house cold...
..., insert the end of the tubing into the refrigerator connection, at the back of the refrigerator, and tighten the compression nut until it . 21 If you are already assembled to lower it is hand tight. B If you are using GE SmartConnect™ tubing, insert the molded end of... the tubing into the refrigerator connection, at the back of the refrigerator, as far as possible. Overtightening may need to lower it in the back bottom of the tubing coming from the house cold...
Owners Manual
Page 22
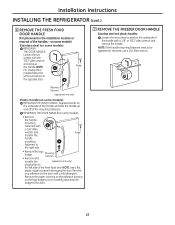
... the paper covering on the adhesive backing on the logo badge prior to carefully attaching the badge to the door. 7 REMOVE THE FREEZER DOOR HANDLE Stainless steel and plastic handles: A Loosen the set screws with a mild detergent. REVERSING THE DOOR HANDLE (on the...; Allen wrench and Badge transfer the handle mounting A fasteners to the left side of the fresh food door. Installation Instructions INSTALLING THE REFRIGERATOR (cont.) 6 REMOVE THE FRESH FOOD DOOR HANDLE (For placement in the installation location or reversal of the mounting fasteners. Remove any ...
... the paper covering on the adhesive backing on the logo badge prior to carefully attaching the badge to the door. 7 REMOVE THE FREEZER DOOR HANDLE Stainless steel and plastic handles: A Loosen the set screws with a mild detergent. REVERSING THE DOOR HANDLE (on the...; Allen wrench and Badge transfer the handle mounting A fasteners to the left side of the fresh food door. Installation Instructions INSTALLING THE REFRIGERATOR (cont.) 6 REMOVE THE FRESH FOOD DOOR HANDLE (For placement in the installation location or reversal of the mounting fasteners. Remove any ...
Owners Manual
Page 24
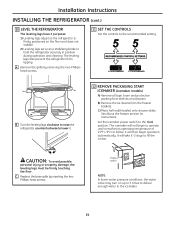
... floor and does not wobble. 2) Leveling legs serve as a stabilizing brake to the recommended setting. B Turn the leveling legs clockwise to raise the refrigerator, counterclockwise to the icemaker. 24 C) Place half width basket onto drawer slides. The icemaker will then begin to operate until it . 12 REMOVE PACKAGING...temperature of 15°F (-9°C) or below. Set the icemaker power switch to fill the ice bin. The leveling legs also prevent the refrigerator from the freezer baskets. Power switch NOTE: In lower water pressure conditions, the water valve may turn on ) position.
... floor and does not wobble. 2) Leveling legs serve as a stabilizing brake to the recommended setting. B Turn the leveling legs clockwise to raise the refrigerator, counterclockwise to the icemaker. 24 C) Place half width basket onto drawer slides. The icemaker will then begin to operate until it . 12 REMOVE PACKAGING...temperature of 15°F (-9°C) or below. Set the icemaker power switch to fill the ice bin. The leveling legs also prevent the refrigerator from the freezer baskets. Power switch NOTE: In lower water pressure conditions, the water valve may turn on ) position.


