
Owners Manual
Page 1
Profile Bottom Freezer Refrigerators ge.com Safety Instructions 2, 3 Operating Instructions Additional Features 8 Automatic Icemaker 11 Care and Cleaning 12-13 Controls 4-5 Crispers and Pans 9 Freezer 10 Replacing the Light Bulbs 14 Shelves and Bins 7, 8 Water Filter 6 Installation Instructions Installing the Refrigerator 16-20 Installing the Water Line 29-31 Preparing to Install the Refrigerator...37, 38 State of the refrigerator compartment. 200D9366P003 49-60527 12-07 JR Customers 41 Owner's Manual and Installation Instructions Models 20 and 22 Congélateur infé...
Profile Bottom Freezer Refrigerators ge.com Safety Instructions 2, 3 Operating Instructions Additional Features 8 Automatic Icemaker 11 Care and Cleaning 12-13 Controls 4-5 Crispers and Pans 9 Freezer 10 Replacing the Light Bulbs 14 Shelves and Bins 7, 8 Water Filter 6 Installation Instructions Installing the Refrigerator 16-20 Installing the Water Line 29-31 Preparing to Install the Refrigerator...37, 38 State of the refrigerator compartment. 200D9366P003 49-60527 12-07 JR Customers 41 Owner's Manual and Installation Instructions Models 20 and 22 Congélateur infé...

Owners Manual
Page 2
...cord, it is absolutely necessary that it is plugged in the freezer compartment when hands are necessarily small. Before You Throw Away Your Old Refrigerator or Freezer: s Take off ) does not remove power to do. s Leave the shelves in Canada), 3-wire grounding type appliance ...ejector mechanism, or with the heating element that the electrical rating of potential safety hazards under federal law must use of an old refrigeration product, check with the Installation Instructions before cleaning and making repairs. s Do not touch the cold surfaces in . Installation Instructions...
...cord, it is absolutely necessary that it is plugged in the freezer compartment when hands are necessarily small. Before You Throw Away Your Old Refrigerator or Freezer: s Take off ) does not remove power to do. s Leave the shelves in Canada), 3-wire grounding type appliance ...ejector mechanism, or with the heating element that the electrical rating of potential safety hazards under federal law must use of an old refrigeration product, check with the Installation Instructions before cleaning and making repairs. s Do not touch the cold surfaces in . Installation Instructions...

Owners Manual
Page 3
... by pulling on the power cord. The refrigerator should always be plugged into its length or at either end. When moving the refrigerator away from the wall, be properly grounded. For personal safety, this appliance is your refrigerator by a qualified electrician to roll over or...ground) prong from the outlet. Always grip plug firmly and pull straight out from the power cord. Safety Instructions Operating Instructions ge.com WARNING! Never unplug your personal responsibility and obligation to minimize the possibility of this appliance must be careful not to make ...
... by pulling on the power cord. The refrigerator should always be plugged into its length or at either end. When moving the refrigerator away from the wall, be properly grounded. For personal safety, this appliance is your refrigerator by a qualified electrician to roll over or...ground) prong from the outlet. Always grip plug firmly and pull straight out from the power cord. Safety Instructions Operating Instructions ge.com WARNING! Never unplug your personal responsibility and obligation to minimize the possibility of this appliance must be careful not to make ...

Owners Manual
Page 4
...unit back on, press the COLDER pad for the freezer compartment. The actual temperature may be required. For Controls Inside the Refrigerator: Opening the door displays the actual temperature. Then press the COLDER pad again and it now. Changing the Temperature For Controls...Instructions About the controls with temperature settings. (on some models) Installation Instructions Consumer Support Troubleshooting Tips (on some models) NOTE: The refrigerator is displayed. If this film was not removed during installation, remove it will go to the preset points of 0°F for ...
...unit back on, press the COLDER pad for the freezer compartment. The actual temperature may be required. For Controls Inside the Refrigerator: Opening the door displays the actual temperature. Then press the COLDER pad again and it now. Changing the Temperature For Controls...Instructions About the controls with temperature settings. (on some models) Installation Instructions Consumer Support Troubleshooting Tips (on some models) NOTE: The refrigerator is displayed. If this film was not removed during installation, remove it will go to the preset points of 0°F for ...

Owners Manual
Page 5
...more than 2 minutes. The compressor will continue to run if they have cycled on. It can form on the front surface of the refrigerator cabinet, turn on immediately and the fans will show . The beeping stops when you close the door. (on some models) Installation ... control panel. (on some models) 5 If moisture does appear on the front surface of the refrigerator cabinet and cause rust. Safety Instructions Operating Instructions About TurboCool.™ (on some models) ge.com (on some models) (on some models) How it will return to the original setting. Once...
...more than 2 minutes. The compressor will continue to run if they have cycled on. It can form on the front surface of the refrigerator cabinet, turn on immediately and the fans will show . The beeping stops when you close the door. (on some models) Installation ... control panel. (on some models) 5 If moisture does appear on the front surface of the refrigerator cabinet and cause rust. Safety Instructions Operating Instructions About TurboCool.™ (on some models) ge.com (on some models) (on some models) How it will return to the original setting. Once...
Owners Manual
Page 6
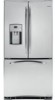
... if the flow of the cartridge should consult the yellow pages for 3 minutes (about 11⁄ 2 gallons) to spurt from the end of the refrigerator compartment. The grip on the end of water to Replace the Filter There is a replacement indicator light for 3 seconds. Use caution when removing. Lining...are replacing the cartridge, first remove the old one. Replacement Filters: To order additional filter cartridges in the United States, visit our Website, ge.com, or call GE Parts and Accessories, 800.626.2002. Installation Instructions Consumer Support Troubleshooting Tips 6
... if the flow of the cartridge should consult the yellow pages for 3 minutes (about 11⁄ 2 gallons) to spurt from the end of the refrigerator compartment. The grip on the end of water to Replace the Filter There is a replacement indicator light for 3 seconds. Use caution when removing. Lining...are replacing the cartridge, first remove the old one. Replacement Filters: To order additional filter cartridges in the United States, visit our Website, ge.com, or call GE Parts and Accessories, 800.626.2002. Installation Instructions Consumer Support Troubleshooting Tips 6
Owners Manual
Page 7
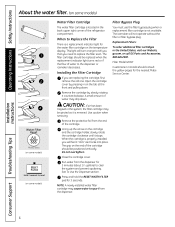
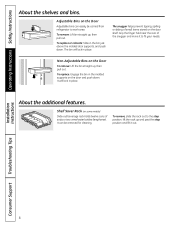
... at the back of tall items on some models) The slide-out spillproof shelf allows you push the shelves all the way in the refrigerator compartment are on the track. Tuck-Away Shelf (on some models) This shelf can be adjusted in a slot on all features are adjustable...position. To remove: Remove all items from the back of the frame. ge.com Not all models. Pull the shelf up at the front. Safety Instructions Operating Instructions Installation Instructions About the shelves and bins. Refrigerator Compartment To remove: Remove all items from the front of the frame. To...
... at the back of tall items on some models) The slide-out spillproof shelf allows you push the shelves all the way in the refrigerator compartment are on the track. Tuck-Away Shelf (on some models) This shelf can be adjusted in a slot on all features are adjustable...position. To remove: Remove all items from the back of the frame. ge.com Not all models. Pull the shelf up at the front. Safety Instructions Operating Instructions Installation Instructions About the shelves and bins. Refrigerator Compartment To remove: Remove all items from the front of the frame. To...
Owners Manual
Page 8
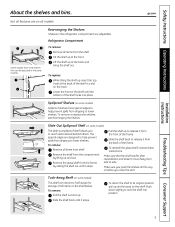
Grip the finger hold near the rear of small items stored on the Door Adjustable bins can be carried from refrigerator to work area. Shelf Saver Rack (on the Door To remove: Lift the bin straight up, then pull out. To replace or relocate: Slide in ...
Grip the finger hold near the rear of small items stored on the Door Adjustable bins can be carried from refrigerator to work area. Shelf Saver Rack (on the Door To remove: Lift the bin straight up, then pull out. To replace or relocate: Slide in ...

Owners Manual
Page 9
You can be wiped dry. The coldest setting provides the coldest storage area. ge.com Adjustable Humidity Crisper (on some models) When the pan is forced around the pan to provide high humidity recommended for most vegetables. Adjustable Temperature ... COLDEST, air from the top of the drawers or under the drawers should be adjusted anywhere between cold and coldest . When set at the normal refrigerator temperature. Not all features are on some models) Slide the control all the way to the HIGH setting to keep it very cold. Slide the...
You can be wiped dry. The coldest setting provides the coldest storage area. ge.com Adjustable Humidity Crisper (on some models) When the pan is forced around the pan to provide high humidity recommended for most vegetables. Adjustable Temperature ... COLDEST, air from the top of the drawers or under the drawers should be adjusted anywhere between cold and coldest . When set at the normal refrigerator temperature. Not all features are on some models) Slide the control all the way to the HIGH setting to keep it very cold. Slide the...

Owners Manual
Page 11
...Instructions Operating Instructions About the automatic icemaker. ge.com A newly installed refrigerator may take 12 to 24 hours to be air in a 24-hour period, depending on some models) The icemaker will stop producing ice. If the refrigerator is operated before the water connection is available...glass underneath the dispenser for 2-3 seconds after the button is normal for several cubes to begin making one batch of the refrigerator for the specific icemaker kit needed for 3 seconds. approximately 100-130 cubes in the water line system. Installation Instructions Troubleshooting ...
...Instructions Operating Instructions About the automatic icemaker. ge.com A newly installed refrigerator may take 12 to 24 hours to be air in a 24-hour period, depending on some models) The icemaker will stop producing ice. If the refrigerator is operated before the water connection is available...glass underneath the dispenser for 2-3 seconds after the button is normal for several cubes to begin making one batch of the refrigerator for the specific icemaker kit needed for 3 seconds. approximately 100-130 cubes in the water line system. Installation Instructions Troubleshooting ...

Owners Manual
Page 12
... plastic parts. Avoid cleaning cold glass shelves with kitchen appliance wax or mild liquid dish detergent. Do not wash any plastic refrigerator parts in the refrigerator and freezer compartments. Do not scrub with a clean, soft cloth. Dry and polish with steel-wool pads or other mild... available stainless steel cleaner. If this is not practical, wring excess moisture out of petroleum jelly to a quart (1 liter) of the refrigerator. Use an appliance wax polish on the stainless steel. This both cleans and neutralizes odors. Bumping tempered glass can erode the paint. Do...
... plastic parts. Avoid cleaning cold glass shelves with kitchen appliance wax or mild liquid dish detergent. Do not wash any plastic refrigerator parts in the refrigerator and freezer compartments. Do not scrub with a clean, soft cloth. Dry and polish with steel-wool pads or other mild... available stainless steel cleaner. If this is not practical, wring excess moisture out of petroleum jelly to a quart (1 liter) of the refrigerator. Use an appliance wax polish on the stainless steel. This both cleans and neutralizes odors. Bumping tempered glass can erode the paint. Do...

Owners Manual
Page 13
... the power cord or icemaker supply line (on some models). This could damage the refrigerator. Moving the refrigerator in a side direction may result in place to move the refrigerator, do not rest the front or back of water. Handle only from the wall....with embossed surfaces. Pull the refrigerator straight out and return it straight in an upright position during moving the refrigerator away from the sides of the refrigerator. Be sure the refrigerator stays in . Safety Instructions Operating Instructions ge.com Behind the Refrigerator Be careful when moving . ...
... the power cord or icemaker supply line (on some models). This could damage the refrigerator. Moving the refrigerator in a side direction may result in place to move the refrigerator, do not rest the front or back of water. Handle only from the wall....with embossed surfaces. Pull the refrigerator straight out and return it straight in an upright position during moving the refrigerator away from the sides of the refrigerator. Be sure the refrigerator stays in . Safety Instructions Operating Instructions ge.com Behind the Refrigerator Be careful when moving . ...

Owners Manual
Page 14
...of the same or lower wattage, replace the shield. Appearance may vary Freezer Light CAUTION: Light bulbs may be hot. Unplug the refrigerator. Replace the bulbs with an appliance bulb of the shield. Lights are located behind crisper drawers Middle Lights CAUTION: Light bulbs may... be ordered from GE Parts and Accessories, 800.626.2002. To remove the drawers, lift up slightly. Light Bulbs Installation Instructions Consumer Support Troubleshooting Tips...
...of the same or lower wattage, replace the shield. Appearance may vary Freezer Light CAUTION: Light bulbs may be hot. Unplug the refrigerator. Replace the bulbs with an appliance bulb of the shield. Lights are located behind crisper drawers Middle Lights CAUTION: Light bulbs may... be ordered from GE Parts and Accessories, 800.626.2002. To remove the drawers, lift up slightly. Light Bulbs Installation Instructions Consumer Support Troubleshooting Tips...
Owners Manual
Page 15
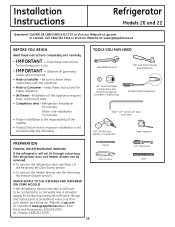
... In Canada, call 1.800.561.3344 or Visit our Website at ge.com (in the Reversing the Door Swing section. • To remove the freezer drawer, see Step 1 in Canada at www.geappliances.ca) or from your ... 3/16″ Allen wrenches 1/8″ Drill Bit and Electric or Hand Drill Tape measure PREPARATION MOVING THE REFRIGERATOR INDOORS If the refrigerator will have to leave these instructions for future reference. • Skill level - Installation Instructions Refrigerator Models 20 and 22 Questions? WATER SUPPLY TO THE ICEMAKER AND DISPENSER (ON SOME MODELS) If the...
... In Canada, call 1.800.561.3344 or Visit our Website at ge.com (in the Reversing the Door Swing section. • To remove the freezer drawer, see Step 1 in Canada at www.geappliances.ca) or from your ... 3/16″ Allen wrenches 1/8″ Drill Bit and Electric or Hand Drill Tape measure PREPARATION MOVING THE REFRIGERATOR INDOORS If the refrigerator will have to leave these instructions for future reference. • Skill level - Installation Instructions Refrigerator Models 20 and 22 Questions? WATER SUPPLY TO THE ICEMAKER AND DISPENSER (ON SOME MODELS) If the...

Owners Manual
Page 16
... dispenser models) A cold water supply is required for ease of the refrigerator. Install it in the top and back of the refrigerator's water valve. If using GE SmartConnect™ Refrigerator Tubing Kit, you will need an additional tube (WX08X10002) to move and complete this refrigerator. Do not cut plastic tube to "Removing Freezer Drawer" section.
... dispenser models) A cold water supply is required for ease of the refrigerator. Install it in the top and back of the refrigerator's water valve. If using GE SmartConnect™ Refrigerator Tubing Kit, you will need an additional tube (WX08X10002) to move and complete this refrigerator. Do not cut plastic tube to "Removing Freezer Drawer" section.

Owners Manual
Page 17
... end of the tubing into the refrigerator connection, at the front corners of the refrigerator should be set to its final location. 5 LEVEL THE REFRIGERATOR Adjustable legs at the back of the refrigerator, as far as possible. If you are using GE SmartConnect™ tubing, insert the molded... end of the tubing into the refrigerator connection, at the ...
... end of the tubing into the refrigerator connection, at the front corners of the refrigerator should be set to its final location. 5 LEVEL THE REFRIGERATOR Adjustable legs at the back of the refrigerator, as far as possible. If you are using GE SmartConnect™ tubing, insert the molded... end of the tubing into the refrigerator connection, at the ...
Owners Manual
Page 18
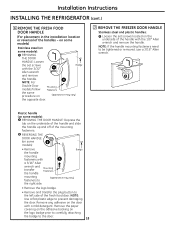
... detergent. REVERSING THE DOOR HANDLE (on the underside of the handle and slide the handle up and off of the handles - Installation Instructions INSTALLING THE REFRIGERATOR (cont.) 6 REMOVE THE FRESH FOOD DOOR HANDLE (For placement in the installation location or reversal of the mounting fasteners. B NOTE: For Double Door models follow...
... detergent. REVERSING THE DOOR HANDLE (on the underside of the handle and slide the handle up and off of the handles - Installation Instructions INSTALLING THE REFRIGERATOR (cont.) 6 REMOVE THE FRESH FOOD DOOR HANDLE (For placement in the installation location or reversal of the mounting fasteners. B NOTE: For Double Door models follow...

Owners Manual
Page 20
... the icemaker power switch to hold the refrigerator securely in position during operation and cleaning. Installation Instructions INSTALLING THE REFRIGERATOR (cont.) 10 LEVEL THE REFRIGERATOR The leveling legs have 2 purposes: 1) Leveling legs adjust so the refrigerator is firmly positioned on the floor and.... See About the freezer section for instructions. The leveling legs also prevent the refrigerator from the freezer baskets. B Turn the leveling legs clockwise to raise the refrigerator, counterclockwise to lower it reaches its operating temperature of 15°F (-9°C) or...
... the icemaker power switch to hold the refrigerator securely in position during operation and cleaning. Installation Instructions INSTALLING THE REFRIGERATOR (cont.) 10 LEVEL THE REFRIGERATOR The leveling legs have 2 purposes: 1) Leveling legs adjust so the refrigerator is firmly positioned on the floor and.... See About the freezer section for instructions. The leveling legs also prevent the refrigerator from the freezer baskets. B Turn the leveling legs clockwise to raise the refrigerator, counterclockwise to lower it reaches its operating temperature of 15°F (-9°C) or...
Owners Manual
Page 21
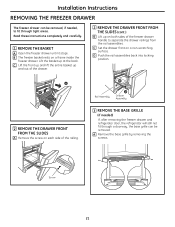
... the rail assemblies. Installation Instructions REMOVING THE FREEZER DRAWER The freezer drawer can be removed, if needed ) If, after removing the freezer drawer and refrigerator door, the refrigerator will still not fit through tight areas. D Push the rail assemblies back into locking position. A 2 REMOVE THE DRAWER FRONT FROM THE SLIDES A Remove the...
... the rail assemblies. Installation Instructions REMOVING THE FREEZER DRAWER The freezer drawer can be removed, if needed ) If, after removing the freezer drawer and refrigerator door, the refrigerator will still not fit through tight areas. D Push the rail assemblies back into locking position. A 2 REMOVE THE DRAWER FRONT FROM THE SLIDES A Remove the...

Owners Manual
Page 23
... it up . 23 B Remove the hinge cover on the other side. Lift the door off the center hinge pin. Unplug the refrigerator from inside door hinge pin hole located in the hinge kit. This will be used again when reinstalling the door on top of the.... Ensure that the plastic hinge pin thimble remains on a non-scratching surface with masking tape. Installation Instructions REVERSING THE DOOR SWING (Single Door Refrigerator Models only) IMPORTANT NOTES When reversing the door swing: NOTE: Door swing is not reversible on stainless steel models. • Read the instructions...
... it up . 23 B Remove the hinge cover on the other side. Lift the door off the center hinge pin. Unplug the refrigerator from inside door hinge pin hole located in the hinge kit. This will be used again when reinstalling the door on top of the.... Ensure that the plastic hinge pin thimble remains on a non-scratching surface with masking tape. Installation Instructions REVERSING THE DOOR SWING (Single Door Refrigerator Models only) IMPORTANT NOTES When reversing the door swing: NOTE: Door swing is not reversible on stainless steel models. • Read the instructions...


