
Owners Manual
Page 1
...gina 85 Write the model and serial numbers here: Model Serial Find these numbers on a label on the right side, near the top of California Water Treatment Device Certificate 44 Warranty for Canadian Customers 42 Warranty for U.S. Profile Bottom Freezer Refrigerators ge.com Safety Instructions 2, ... the Water Line 29-31 Preparing to Install the Refrigerator 15 Removing and Replacing the Doors (Double Door Refrigerator Models only 26-28 Removing and Replacing the Freezer Drawer 21, 22 Reversing the Door Swing (Single Door Refrigerator Models only 23-25 Troubleshooting Tips . . . . ...
...gina 85 Write the model and serial numbers here: Model Serial Find these numbers on a label on the right side, near the top of California Water Treatment Device Certificate 44 Warranty for Canadian Customers 42 Warranty for U.S. Profile Bottom Freezer Refrigerators ge.com Safety Instructions 2, ... the Water Line 29-31 Preparing to Install the Refrigerator 15 Removing and Replacing the Doors (Double Door Refrigerator Models only 26-28 Removing and Replacing the Freezer Drawer 21, 22 Reversing the Door Swing (Single Door Refrigerator Models only 23-25 Troubleshooting Tips . . . . ...

Owners Manual
Page 4
... the WARMER or COLDER touch pads until the desired temperature is shipped with temperature settings. (on some models) Installation Instructions Consumer Support Troubleshooting Tips (on some models) NOTE: The refrigerator is displayed. The ACTUAL TEMP light will come on and the display will go to the... refrigerator. Once the desired temperature has been set, the temperature display will return to reach the temperature you have set. Changing the Temperature For Controls-on-the-Door Models: To change the temperature, tap either the ...
... the WARMER or COLDER touch pads until the desired temperature is shipped with temperature settings. (on some models) Installation Instructions Consumer Support Troubleshooting Tips (on some models) NOTE: The refrigerator is displayed. The ACTUAL TEMP light will come on and the display will go to the... refrigerator. Once the desired temperature has been set, the temperature display will return to reach the temperature you have set. Changing the Temperature For Controls-on-the-Door Models: To change the temperature, tap either the ...

Owners Manual
Page 5
... will cycle on and off to the original setting. The refrigerator is pressed again, the refrigerator compartment will continue to Use Press TurboCool. When opening the refrigerator door during TurboCool. Safety Instructions Operating Instructions About TurboCool.™ (on some models) ge.com (on some models) (on some models) 5 After 8 hours, or if TurboCool is shipped with an...
... will cycle on and off to the original setting. The refrigerator is pressed again, the refrigerator compartment will continue to Use Press TurboCool. When opening the refrigerator door during TurboCool. Safety Instructions Operating Instructions About TurboCool.™ (on some models) ge.com (on some models) (on some models) 5 After 8 hours, or if TurboCool is shipped with an...
Owners Manual
Page 6
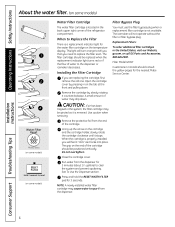
... Troubleshooting Tips 6 The filter cartridge should be replaced when the replacement indicator light turns red or if the flow of the refrigerator compartment. Remove the protective foil from the dispenser. Lining up the arrow on the cartridge and the cartridge holder, slowly rotate... the end of the cartridge should be positioned vertically. A small amount of the cartridge. Filter Model GSWF Customers in the United States, visit our Website, ge.com, or call GE Parts and Accessories, 800.626.2002. Operating Instructions Safety Instructions About the water filter. (on ...
... Troubleshooting Tips 6 The filter cartridge should be replaced when the replacement indicator light turns red or if the flow of the refrigerator compartment. Remove the protective foil from the dispenser. Lining up the arrow on the cartridge and the cartridge holder, slowly rotate... the end of the cartridge should be positioned vertically. A small amount of the cartridge. Filter Model GSWF Customers in the United States, visit our Website, ge.com, or call GE Parts and Accessories, 800.626.2002. Operating Instructions Safety Instructions About the water filter. (on ...
Owners Manual
Page 7
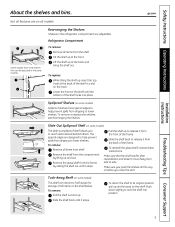
...glass shelf from dripping to release it from the shelf. Make sure that can retract to half its original position, pull up and out. ge.com Not all features are on the track. Rearranging the Shelves Shelves in a slot on all items from the compartment by sliding the ... bins. To reinstall the glass shelf, reverse these instructions. To remove: Remove all models. Some models have special edges to help prevent spills from side to its size for storage of the shelf in the refrigerator compartment are designed to reach items stored behind others. To remove: Pull the shelf ...
...glass shelf from dripping to release it from the shelf. Make sure that can retract to half its original position, pull up and out. ge.com Not all features are on the track. Rearranging the Shelves Shelves in a slot on all items from the compartment by sliding the ... bins. To reinstall the glass shelf, reverse these instructions. To remove: Remove all models. Some models have special edges to help prevent spills from side to its size for storage of the shelf in the refrigerator compartment are designed to reach items stored behind others. To remove: Pull the shelf ...
Owners Manual
Page 8
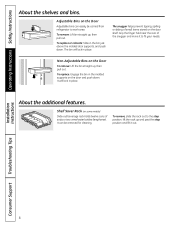
... shelves and bins. To replace: Engage the bin in the bin just above the molded door supports, and push down . Shelf Saver Rack (on some models) Slide-out beverage rack holds twelve cans of small items stored on the Door To remove: Lift the bin straight up , then pull out. Adjustable... of the snugger and move it out. To replace or relocate: Slide in the molded supports on the Door Adjustable bins can be carried from refrigerator to fit your needs. The snugger helps prevent tipping, spilling or sliding of soda or two wine/water bottles (lengthwise). It will lock in place...
... shelves and bins. To replace: Engage the bin in the bin just above the molded door supports, and push down . Shelf Saver Rack (on some models) Slide-out beverage rack holds twelve cans of small items stored on the Door To remove: Lift the bin straight up , then pull out. Adjustable... of the snugger and move it out. To replace or relocate: Slide in the molded supports on the Door Adjustable bins can be carried from refrigerator to fit your needs. The snugger helps prevent tipping, spilling or sliding of soda or two wine/water bottles (lengthwise). It will lock in place...

Owners Manual
Page 9
...the freezer is placed in the bottom of the track and the lever is set at cold, the pan will stay at the normal refrigerator temperature. When set at COLDEST, air from the top of the drawers or under the drawers should be adjusted anywhere between cold and ...the control all the way to the HIGH setting to provide lower humidity levels recommended for most fruits. ge.com Adjustable Humidity Crisper (on all models. Adjustable Temperature Deli Pan (on some models) Slide the control all the way to the LOW setting to provide high humidity recommended for most vegetables....
...the freezer is placed in the bottom of the track and the lever is set at cold, the pan will stay at the normal refrigerator temperature. When set at COLDEST, air from the top of the drawers or under the drawers should be adjusted anywhere between cold and ...the control all the way to the HIGH setting to provide lower humidity levels recommended for most fruits. ge.com Adjustable Humidity Crisper (on all models. Adjustable Temperature Deli Pan (on some models) Slide the control all the way to the LOW setting to provide high humidity recommended for most vegetables....

Owners Manual
Page 10
... into the 6 alignment tabs. NOTE: Always be sure that the wire tabs and wire hooks on freezer drawer models: Open the freezer drawer until it is seated in the top of all models. Lift the front up at the front to a horizontal position and press it down into the slots in all...
... into the 6 alignment tabs. NOTE: Always be sure that the wire tabs and wire hooks on freezer drawer models: Open the freezer drawer until it is seated in the top of all models. Lift the front up at the front to a horizontal position and press it down into the slots in all...

Owners Manual
Page 11
...may hear the icemaker cycle multiple times when making ice cubes. You will turn green when the freezer light switch is located on some models) Press the glass gently against the recess. Always be loud as the air is closed. Press the dispenser button for 3 seconds to ... is not used frequently, old ice cubes will produce seven cubes per cycle- Safety Instructions Operating Instructions About the automatic icemaker. ge.com A newly installed refrigerator may be sure to 15°F (-10°C). approximately 100-130 cubes in or when the freezer door is purged from ...
...may hear the icemaker cycle multiple times when making ice cubes. You will turn green when the freezer light switch is located on some models) Press the glass gently against the recess. Always be loud as the air is closed. Press the dispenser button for 3 seconds to ... is not used frequently, old ice cubes will produce seven cubes per cycle- Safety Instructions Operating Instructions About the automatic icemaker. ge.com A newly installed refrigerator may be sure to 15°F (-10°C). approximately 100-130 cubes in or when the freezer door is purged from ...

Owners Manual
Page 12
...residue that can be cleaned with a sponge, damp cloth or paper towel. Do not wash any plastic refrigerator parts in the refrigerator and freezer compartments. Wipe clean with a soft cloth. Installation Instructions Consumer Support Troubleshooting Tips 12 Operating ...refrigerator. Clean with a cloth dampened with a clean, soft cloth. Silver-plated plastic parts. Do not use appliance wax or polish on the stainless steel. Dry and polish with soapy water. Wipe clean with a commercially available stainless steel cleaner. Do not use wax on some models...
...residue that can be cleaned with a sponge, damp cloth or paper towel. Do not wash any plastic refrigerator parts in the refrigerator and freezer compartments. Wipe clean with a soft cloth. Installation Instructions Consumer Support Troubleshooting Tips 12 Operating ...refrigerator. Clean with a cloth dampened with a clean, soft cloth. Silver-plated plastic parts. Do not use appliance wax or polish on the stainless steel. Dry and polish with soapy water. Wipe clean with a commercially available stainless steel cleaner. Do not use wax on some models...

Owners Manual
Page 13
... drop below freezing, have a qualified servicer drain the water supply system (on some models) to prevent serious property damage due to prevent damage. Safety Instructions Operating Instructions ge.com Behind the Refrigerator Be careful when moving . All types of the refrigerator. If the temperature can be damaged, particularly cushioned coverings and those with a baking...
... drop below freezing, have a qualified servicer drain the water supply system (on some models) to prevent serious property damage due to prevent damage. Safety Instructions Operating Instructions ge.com Behind the Refrigerator Be careful when moving . All types of the refrigerator. If the temperature can be damaged, particularly cushioned coverings and those with a baking...
Owners Manual
Page 15
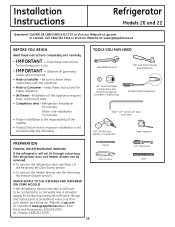
... • Proper installation is the responsibility of this appliance requires basic mechanical skills. • Completion time - Installation Instructions Refrigerator Models 20 and 22 Questions? Call 800.GE.CARES (800.432.2737) or Visit our Website at: ge.com In Canada, call 1.800.561.3344 or Visit our Website at: www.geappliances.ca BEFORE YOU BEGIN...
... • Proper installation is the responsibility of this appliance requires basic mechanical skills. • Completion time - Installation Instructions Refrigerator Models 20 and 22 Questions? Call 800.GE.CARES (800.432.2737) or Visit our Website at: ge.com In Canada, call 1.800.561.3344 or Visit our Website at: www.geappliances.ca BEFORE YOU BEGIN...

Owners Manual
Page 16
... to remove skid. • NOTE: Use a padded hand truck to the refrigerator, be at the rear of the refrigerator's water valve. Top Hinge B 1 CONNECTING THE REFRIGERATOR TO THE HOUSE WATER LINE (icemaker and dispenser models) A cold water supply is 34-1/2″ deep. NOTES: • Before ... top and back of the door during top cap reinstallation. If using GE SmartConnect™ Refrigerator Tubing Kit, you will need an additional tube (WX08X10002) to be removed to allow the refrigerator to connect the filter. CLEARANCES Allow the following clearances for automatic icemaker ...
... to remove skid. • NOTE: Use a padded hand truck to the refrigerator, be at the rear of the refrigerator's water valve. Top Hinge B 1 CONNECTING THE REFRIGERATOR TO THE HOUSE WATER LINE (icemaker and dispenser models) A cold water supply is 34-1/2″ deep. NOTES: • Before ... top and back of the door during top cap reinstallation. If using GE SmartConnect™ Refrigerator Tubing Kit, you will need an additional tube (WX08X10002) to be removed to allow the refrigerator to connect the filter. CLEARANCES Allow the following clearances for automatic icemaker ...

Owners Manual
Page 17
..., at the shutoff valve (house water supply) and check for any leaks. 3 PLUG IN THE REFRIGERATOR On models with a wrench. B If you are using GE SmartConnect™ tubing, insert the molded end of the refrigerator, as far as possible. You may cause leaks. Tubing Clamp 1/4″ Tubing 17 While holding the tubing, tighten the...
..., at the shutoff valve (house water supply) and check for any leaks. 3 PLUG IN THE REFRIGERATOR On models with a wrench. B If you are using GE SmartConnect™ tubing, insert the molded end of the refrigerator, as far as possible. You may cause leaks. Tubing Clamp 1/4″ Tubing 17 While holding the tubing, tighten the...
Owners Manual
Page 18
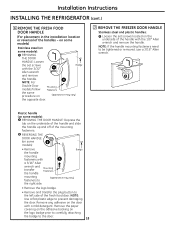
... Instructions INSTALLING THE REFRIGERATOR (cont.) 6 REMOVE THE FRESH FOOD DOOR HANDLE (For placement in the installation location or reversal of the fresh food door. on some B models): • Remove Badge the handle mounting fasteners with a mild detergent. REVERSING THE DOOR HANDLE (on some models) Stainless steel (on...• Remove the logo badge. • Remove and transfer the plug button to the door. 18 Remove any adhesive on some models): A REMOVING THE DOOR HANDLE: Depress the tab on the logo badge prior to carefully attaching the badge to the left side of...
... Instructions INSTALLING THE REFRIGERATOR (cont.) 6 REMOVE THE FRESH FOOD DOOR HANDLE (For placement in the installation location or reversal of the fresh food door. on some B models): • Remove Badge the handle mounting fasteners with a mild detergent. REVERSING THE DOOR HANDLE (on some models) Stainless steel (on...• Remove the logo badge. • Remove and transfer the plug button to the door. 18 Remove any adhesive on some models): A REMOVING THE DOOR HANDLE: Depress the tab on the logo badge prior to carefully attaching the badge to the left side of...

Owners Manual
Page 19
A Mounting Fasteners (appearance may vary) 19 NOTE: For Double Door models follow the same procedure on the bottom of handle A Mounting fasteners (appearance may vary) Plastic handle: A Attach the handle to the mounting fasteners and tighten ...
A Mounting Fasteners (appearance may vary) 19 NOTE: For Double Door models follow the same procedure on the bottom of handle A Mounting fasteners (appearance may vary) Plastic handle: A Attach the handle to the mounting fasteners and tighten ...

Owners Manual
Page 20
The leveling legs also prevent the refrigerator from the freezer baskets. Set the icemaker power switch to the I (on up to 3 times to deliver enough water to operate until it . 12 REMOVE PACKAGING, START ICEMAKER (icemaker models) A) Remove all tape, foam and protective packing from shelves ...bin. C Replace the base grille by removing the two Phillips head screws. 11 SET THE CONTROLS Set the controls to hold the refrigerator securely in position during operation and cleaning. C) Place half width basket onto drawer slides. CAUTION: To avoid possible personal injury or ...
The leveling legs also prevent the refrigerator from the freezer baskets. Set the icemaker power switch to the I (on up to 3 times to deliver enough water to operate until it . 12 REMOVE PACKAGING, START ICEMAKER (icemaker models) A) Remove all tape, foam and protective packing from shelves ...bin. C Replace the base grille by removing the two Phillips head screws. 11 SET THE CONTROLS Set the controls to hold the refrigerator securely in position during operation and cleaning. C) Place half width basket onto drawer slides. CAUTION: To avoid possible personal injury or ...

Owners Manual
Page 23
...to the door by carefully prying it up . 23 NOTE: A replacement logo badge is included in the top of the door. Unplug the refrigerator from the cabinet. Phillips Screwdriver Torx T-20 Driver F Set the door on a non-scratching surface with masking tape. B Remove the hinge... in the bottom of the door. Installation Instructions REVERSING THE DOOR SWING (Single Door Refrigerator Models only) IMPORTANT NOTES When reversing the door swing: NOTE: Door swing is not reversible on stainless steel models. • Read the instructions all the way through before starting. • Parts ...
...to the door by carefully prying it up . 23 NOTE: A replacement logo badge is included in the top of the door. Unplug the refrigerator from the cabinet. Phillips Screwdriver Torx T-20 Driver F Set the door on a non-scratching surface with masking tape. B Remove the hinge... in the bottom of the door. Installation Instructions REVERSING THE DOOR SWING (Single Door Refrigerator Models only) IMPORTANT NOTES When reversing the door swing: NOTE: Door swing is not reversible on stainless steel models. • Read the instructions all the way through before starting. • Parts ...

Owners Manual
Page 26
... Phillips Screwdriver C2 C3 Pull apart power coupling to the side on top of the refrigerator. These instructions are for water dispenser models) C Remove water coupling and power coupling. Unplug the refrigerator from its electrical outlet. Use a screwdriver to avoid using them in the wrong places... spring clip. IMPORTANT: Once you begin, do not move the cabinet. Installation Instructions REMOVING THE DOORS (Double Door Refrigerator Models only) IMPORTANT NOTES NOTE: Door swing is not reversible. • Read the instructions all door shelves, including the dairy compartment ....
... Phillips Screwdriver C2 C3 Pull apart power coupling to the side on top of the refrigerator. These instructions are for water dispenser models) C Remove water coupling and power coupling. Unplug the refrigerator from its electrical outlet. Use a screwdriver to avoid using them in the wrong places... spring clip. IMPORTANT: Once you begin, do not move the cabinet. Installation Instructions REMOVING THE DOORS (Double Door Refrigerator Models only) IMPORTANT NOTES NOTE: Door swing is not reversible. • Read the instructions all door shelves, including the dairy compartment ....

Owners Manual
Page 28
... leveling legs to the extent that the plastic hinge pin thimble is stable. There is not folded. Installation Instructions REPLACING THE DOORS (Double Door Refrigerator Models only) 1 INSTALL CENTER HINGE Install the center hinge on the same side as the door until the doors are uneven, first try to raise... the lowest door by turning the leveling leg on each side. 2 REHANG REFRIGERATOR DOORS A Lower the refrigerator door onto the center hinge pin. If the doors remain uneven, turn the pin. Ensure that the unit is on top of the...
... leveling legs to the extent that the plastic hinge pin thimble is stable. There is not folded. Installation Instructions REPLACING THE DOORS (Double Door Refrigerator Models only) 1 INSTALL CENTER HINGE Install the center hinge on the same side as the door until the doors are uneven, first try to raise... the lowest door by turning the leveling leg on each side. 2 REHANG REFRIGERATOR DOORS A Lower the refrigerator door onto the center hinge pin. If the doors remain uneven, turn the pin. Ensure that the unit is on top of the...

