Use and Care Manual
Page 2
...recommend that it be 15 amperes (minimum) and 120 volts. DANGER! Before You Throw Away Your Old Refrigerator or Freezer: I In refrigerators with automatic icemakers, avoid contact with the moving parts of the cord be a UL-listed (in the United States) or a CSA certified (in accordance... with the Installation Instructions before cleaning and making repairs. I Leave the shelves in . I This refrigerator must be properly installed and located in...
...recommend that it be 15 amperes (minimum) and 120 volts. DANGER! Before You Throw Away Your Old Refrigerator or Freezer: I In refrigerators with automatic icemakers, avoid contact with the moving parts of the cord be a UL-listed (in the United States) or a CSA certified (in accordance... with the Installation Instructions before cleaning and making repairs. I Leave the shelves in . I This refrigerator must be properly installed and located in...
Use and Care Manual
Page 6
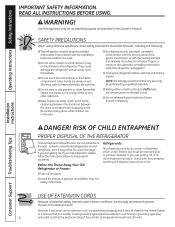
... Filters: To order additional filter cartridges in the back upper right corner of the refrigerator compartment. Do not overtighten. Run water from the dispenser. Filter Bypass Plug You must... Filter There is located in the United States, visit our Website, GEAppliances.com, or call GE Parts and Accessories, 800.626.2002. When to spurt from the dispenser for 3 minutes (about ...the left. DO NOT pull down . Operating Instructions Safety Instructions About the water filter. (on 22 and 23 models only) Cartridge Holder Cartridge Holder (on some models) (on some models) Water ...
... Filters: To order additional filter cartridges in the back upper right corner of the refrigerator compartment. Do not overtighten. Run water from the dispenser. Filter Bypass Plug You must... Filter There is located in the United States, visit our Website, GEAppliances.com, or call GE Parts and Accessories, 800.626.2002. When to spurt from the dispenser for 3 minutes (about ...the left. DO NOT pull down . Operating Instructions Safety Instructions About the water filter. (on 22 and 23 models only) Cartridge Holder Cartridge Holder (on some models) (on some models) Water ...
Use and Care Manual
Page 7
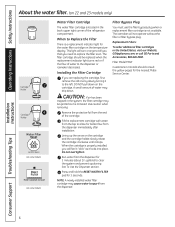
A small amount of the refrigerator compartment. CAUTION: If air has been trapped in the system, the filter cartridge may drip down . Use caution when removing. Lining up the arrow on ... Instructions Troubleshooting Tips Consumer Support 7 When the cartridge is removed. Filter Model GSWF Customers in the United States, visit our Website, GEAppliances.com, or call GE Parts and Accessories, 800.626.2002. The grip on the end of the cartridge should be replaced when the flow of the cartridge. Installing the Filter...
A small amount of the refrigerator compartment. CAUTION: If air has been trapped in the system, the filter cartridge may drip down . Use caution when removing. Lining up the arrow on ... Instructions Troubleshooting Tips Consumer Support 7 When the cartridge is removed. Filter Model GSWF Customers in the United States, visit our Website, GEAppliances.com, or call GE Parts and Accessories, 800.626.2002. The grip on the end of the cartridge should be replaced when the flow of the cartridge. Installing the Filter...

Use and Care Manual
Page 13
... other abrasive cleaners. Do not use wax on stainless steel cleaner works best. Keep the outside clean. Silver-plated plastic parts. Unplug the refrigerator before cleaning. Use warm water and baking soda solution- Rinse and wipe dry. Bumping tempered glass can scratch and weaken the... cleaning around switches, lights or controls. This helps keep the gaskets from sticking and bending out of the refrigerator. Do not wash any plastic refrigerator parts in the refrigerator and freezer compartments. Wipe clean with soapy water. Use an appliance wax polish on the stainless steel. Avoid...
... other abrasive cleaners. Do not use wax on stainless steel cleaner works best. Keep the outside clean. Silver-plated plastic parts. Unplug the refrigerator before cleaning. Use warm water and baking soda solution- Rinse and wipe dry. Bumping tempered glass can scratch and weaken the... cleaning around switches, lights or controls. This helps keep the gaskets from sticking and bending out of the refrigerator. Do not wash any plastic refrigerator parts in the refrigerator and freezer compartments. Wipe clean with soapy water. Use an appliance wax polish on the stainless steel. Avoid...

Use and Care Manual
Page 15
...: Light bulbs may be hot. Appearance may vary Freezer Light CAUTION: Light bulbs may be hot. Plug the refrigerator back in . NOTE: Appliance bulbs may be ordered from GE Parts and Accessories, 800.626.2002. The bulb is located at the front of the same or lower wattage, replace... the shield. Replace the bulbs with an appliance bulb of the shield. Plug the refrigerator back in. After replacing with an ...
...: Light bulbs may be hot. Appearance may vary Freezer Light CAUTION: Light bulbs may be hot. Plug the refrigerator back in . NOTE: Appliance bulbs may be ordered from GE Parts and Accessories, 800.626.2002. The bulb is located at the front of the same or lower wattage, replace... the shield. Replace the bulbs with an appliance bulb of the shield. Plug the refrigerator back in. After replacing with an ...

Use and Care Manual
Page 16
... will not fit through a doorway, the refrigerator door and freezer drawer can be connected to Installer - Installation Instructions Refrigerator Models 20, 22 and 23 Questions? Installation of the installer. • Product failure due to Consumer - Call 800.GE.CARES (800.432.2737) or visit our... Website at: GEAppliances.com In Canada, call 1.800.561.3344 or visit our Website at www.GEAppliances.ca) or from Parts...
... will not fit through a doorway, the refrigerator door and freezer drawer can be connected to Installer - Installation Instructions Refrigerator Models 20, 22 and 23 Questions? Installation of the installer. • Product failure due to Consumer - Call 800.GE.CARES (800.432.2737) or visit our... Website at: GEAppliances.com In Canada, call 1.800.561.3344 or visit our Website at www.GEAppliances.ca) or from Parts...

Use and Care Manual
Page 24
Ensure that the plastic hinge pin thimble remains on top of the refrigerator door by carefully prying it up with a putty knife, if necessary. These instructions are included in the door hinge kit. • Handle parts carefully to avoid scratching paint. • Set screws down by removing ... the bolts securing the top hinge to the door by their related parts to free the hinge pin from the socket in the top of the door. Installation Instructions REVERSING THE DOOR SWING (Single Door Refrigerator Models only) IMPORTANT NOTES When reversing the door swing: NOTE: Door...
Ensure that the plastic hinge pin thimble remains on top of the refrigerator door by carefully prying it up with a putty knife, if necessary. These instructions are included in the door hinge kit. • Handle parts carefully to avoid scratching paint. • Set screws down by removing ... the bolts securing the top hinge to the door by their related parts to free the hinge pin from the socket in the top of the door. Installation Instructions REVERSING THE DOOR SWING (Single Door Refrigerator Models only) IMPORTANT NOTES When reversing the door swing: NOTE: Door...

Use and Care Manual
Page 27
...Remove water coupling and power coupling. Use a screwdriver to push the red plastic locking clip down by their related parts to the side on top of the refrigerator. Power Coupling Black mark flush with left-hand door first: Remove the screw securing the center hinge cover, lift ...doors shut with masking tape. (for water dispenser models) B Start with collar assembly Unplug the refrigerator from its electrical outlet. Empty all the way through before starting. • Handle parts carefully to disconnect 27 Water Coupling Remove the metal spring clip. C1 Phillips Screwdriver C2 C3 ...
...Remove water coupling and power coupling. Use a screwdriver to push the red plastic locking clip down by their related parts to the side on top of the refrigerator. Power Coupling Black mark flush with left-hand door first: Remove the screw securing the center hinge cover, lift ...doors shut with masking tape. (for water dispenser models) B Start with collar assembly Unplug the refrigerator from its electrical outlet. Empty all the way through before starting. • Handle parts carefully to disconnect 27 Water Coupling Remove the metal spring clip. C1 Phillips Screwdriver C2 C3 ...
Use and Care Manual
Page 30
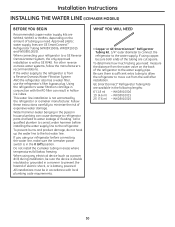
... hammer before connecting the water line, make sure the icemaker power switch is in conjunction with the RO filter can cause damage to refrigerator parts and lead to prevent the hazard of electric shock, or is sufficient extra tubing to allow the.... Do not install the icemaker tubing in the following lengths: 6′ (1.8 m) - WHAT YOU WILL NEED • Copper or GE SmartConnect™ Refrigerator Tubing kit, 1/4″ outer diameter to connect the refrigerator to minimize the risk of the tubing are cut square. Approved plastic water supply lines are available in areas where...
... hammer before connecting the water line, make sure the icemaker power switch is in conjunction with the RO filter can cause damage to refrigerator parts and lead to prevent the hazard of electric shock, or is sufficient extra tubing to allow the.... Do not install the icemaker tubing in the following lengths: 6′ (1.8 m) - WHAT YOU WILL NEED • Copper or GE SmartConnect™ Refrigerator Tubing kit, 1/4″ outer diameter to connect the refrigerator to minimize the risk of the tubing are cut square. Approved plastic water supply lines are available in areas where...
Use and Care Manual
Page 31
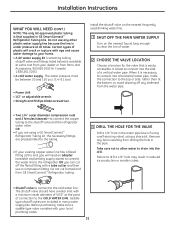
... It is best to connect into the drill. Failure to drill a 1/4″ hole may result in GE SmartConnect™ Refrigerator Tubing kits. Do not cut off any burrs resulting from GE SmartConnect™ Refrigerator tubing. 3 DRILL THE HOLE FOR THE VALVE Drill a 1/4″ hole in the water pipe (even...that supplied in reduced ice production or smaller cubes. • Shutoff valve to connect to the cold water line. Remove any sediment from Parts and Accessories, 800.626.2002 (in Canada 1.888.261.3055). • A cold water supply. Installation Instructions WHAT YOU WILL NEED (...
... It is best to connect into the drill. Failure to drill a 1/4″ hole may result in GE SmartConnect™ Refrigerator Tubing kits. Do not cut off any burrs resulting from GE SmartConnect™ Refrigerator tubing. 3 DRILL THE HOLE FOR THE VALVE Drill a 1/4″ hole in the water pipe (even...that supplied in reduced ice production or smaller cubes. • Shutoff valve to connect to the cold water line. Remove any sediment from Parts and Accessories, 800.626.2002 (in Canada 1.888.261.3055). • A cold water supply. Installation Instructions WHAT YOU WILL NEED (...
Use and Care Manual
Page 41
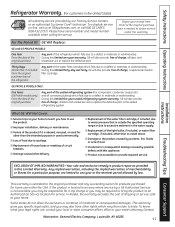
.... For The Period Of: GE Will Replace: GE and GE PROFILE MODELS: One Year From the date of the original purchase Any part of the refrigerator which vary from state to one -year warranty, GE will also provide, free of the sealed refrigerating system (the compressor, condenser...provided in materials or workmanship. GE PROFILE MODELS ONLY: Five Years (GE Profile models only) From the date of the original purchase Any part of charge, all labor and related service to your receipt here. Safety Instructions Operating Instructions Refrigerator Warranty. (For customers in materials...
.... For The Period Of: GE Will Replace: GE and GE PROFILE MODELS: One Year From the date of the original purchase Any part of the refrigerator which vary from state to one -year warranty, GE will also provide, free of the sealed refrigerating system (the compressor, condenser...provided in materials or workmanship. GE PROFILE MODELS ONLY: Five Years (GE Profile models only) From the date of the original purchase Any part of charge, all labor and related service to your receipt here. Safety Instructions Operating Instructions Refrigerator Warranty. (For customers in materials...
Use and Care Manual
Page 42
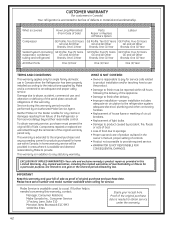
... (1) Year Brands: One (1) Year Brands: One (1) Year Sealed System (including GE Profile: Five (5) Years GE Profile: Five (5) Years GE Profile: Five (5) Years evaporator, condenser GE and All Other GE and All Other GE and All Other tubing and refrigerant) Brands: One (1) Year Brands: One (1) Year Brands: One (1) Year All Other Parts One (1) Year One (1) Year One (1) Year TERMS AND CONDITIONS: This...
... (1) Year Brands: One (1) Year Brands: One (1) Year Sealed System (including GE Profile: Five (5) Years GE Profile: Five (5) Years GE Profile: Five (5) Years evaporator, condenser GE and All Other GE and All Other GE and All Other tubing and refrigerant) Brands: One (1) Year Brands: One (1) Year Brands: One (1) Year All Other Parts One (1) Year One (1) Year One (1) Year TERMS AND CONDITIONS: This...
Use and Care Manual
Page 43
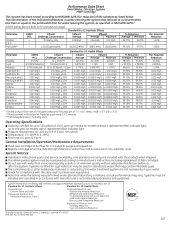
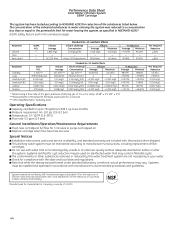
...95% 98.32% 94.50% 93.44% 91.67% 96.51% 95.83% 98.78% 98.65% 99.78% 99.77% 94.22% 93.33% Min. up to six months for 3 minutes to purge out trapped air. I The contaminants or other substances removed or reduced by... Turbidity units Operating Specifications I Check for compliance with the state and local laws and regulations. Particles used on non-indicator units. I Installation instructions, parts and service availability, and standard warranty are not necessarily in accordance with a replacement filter indicator light I Pressure requirement: 40-120 psi (2.8-8.2 bar), ...
...95% 98.32% 94.50% 93.44% 91.67% 96.51% 95.83% 98.78% 98.65% 99.78% 99.77% 94.22% 93.33% Min. up to six months for 3 minutes to purge out trapped air. I The contaminants or other substances removed or reduced by... Turbidity units Operating Specifications I Check for compliance with the state and local laws and regulations. Particles used on non-indicator units. I Installation instructions, parts and service availability, and standard warranty are not necessarily in accordance with a replacement filter indicator light I Pressure requirement: 40-120 psi (2.8-8.2 bar), ...
Use and Care Manual
Page 44
.... I Flush new cartridge at full flow for compliance with the product when shipped. I and Standard 53 for reduction of the substances listed below. I Installation instructions, parts and service availability, and standard warranty are not necessarily in for : General Electric Company, Louisville, KY 40225 NSF® 44 System tested and certified by...
.... I Flush new cartridge at full flow for compliance with the product when shipped. I and Standard 53 for reduction of the substances listed below. I Installation instructions, parts and service availability, and standard warranty are not necessarily in for : General Electric Company, Louisville, KY 40225 NSF® 44 System tested and certified by...
Use and Care Manual
Page 132
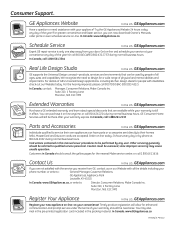
...during normal business hours. E1C 9M3 Extended Warranties In the U.S.: GEAppliances.com Purchase a GE extended warranty and learn about special discounts that can now download Owner's Manuals, order parts or even schedule service on -line-at 800.626.2002 during normal business hours.... servicing generally should the need to qualified service personnel. Consumer Support. Try the GE Appliances Website 24 hours a day, any user. Get on -line anytime, or call 1.888.261.2133 Parts and Accessories In the U.S.: GEAppliances.com Individuals qualified to service their own appliances can...
...during normal business hours. E1C 9M3 Extended Warranties In the U.S.: GEAppliances.com Purchase a GE extended warranty and learn about special discounts that can now download Owner's Manuals, order parts or even schedule service on -line-at 800.626.2002 during normal business hours.... servicing generally should the need to qualified service personnel. Consumer Support. Try the GE Appliances Website 24 hours a day, any user. Get on -line anytime, or call 1.888.261.2133 Parts and Accessories In the U.S.: GEAppliances.com Individuals qualified to service their own appliances can...


