
Use and Care Manual
Page 2
... the vicinity of this or any refrigerator before disposing of it breaks. „ Keep fingers out of the cord be properly installed and located in accordance with warm water when they are damp or wet, skin may break if exposed to potential hazards that releases the cubes. Do... it is designed to children, remove the fresh food and freezer doors from any other appliance. „ Because of an extension cord. SAFETY GE Appliances website For more information on the automatic ice making repairs, replacing a light bulb, or cleaning. clearances between the doors and between the ...
... the vicinity of this or any refrigerator before disposing of it breaks. „ Keep fingers out of the cord be properly installed and located in accordance with warm water when they are damp or wet, skin may break if exposed to potential hazards that releases the cubes. Do... it is designed to children, remove the fresh food and freezer doors from any other appliance. „ Because of an extension cord. SAFETY GE Appliances website For more information on the automatic ice making repairs, replacing a light bulb, or cleaning. clearances between the doors and between the ...
Use and Care Manual
Page 5
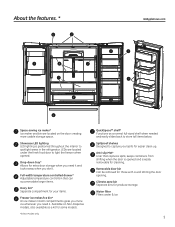
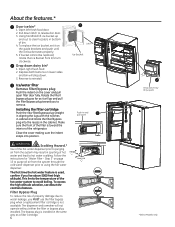
... easier clean up. Spillproof shelves Designed to store tall items below. About the features. * GEAppliances.com Space-saving ice maker* Ice maker and bin are located under the fresh food door to spotlight areas in both compartments gives you more usable storage space. LEDs are... located on Non-Dispense models, also available as a kit for extra door storage when you need it and tucks away when you don't. Drop-down tray* ...
... easier clean up. Spillproof shelves Designed to store tall items below. About the features. * GEAppliances.com Space-saving ice maker* Ice maker and bin are located under the fresh food door to spotlight areas in both compartments gives you more usable storage space. LEDs are... located on Non-Dispense models, also available as a kit for extra door storage when you need it and tucks away when you don't. Drop-down tray* ...
Use and Care Manual
Page 6
... filter/bypass plug toward the interior of bin. 4. Rotate the filter/ bypass plug as far as a filter cartridge. 6 Push \ Pull 2 Drop down latch to clear locators in the same way as it on the cover and pull open ) *Select Models Only Step 3" on lower sides and bin will not operate without...
... filter/bypass plug toward the interior of bin. 4. Rotate the filter/ bypass plug as far as a filter cartridge. 6 Push \ Pull 2 Drop down latch to clear locators in the same way as it on the cover and pull open ) *Select Models Only Step 3" on lower sides and bin will not operate without...
Use and Care Manual
Page 8
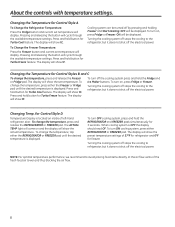
... or Fridge pad. The display will be displayed. To turn ON cooling system, press either the Freezer or Fridge pad until the desired temperature is located on , press Fridge or Freezer. To turn on and the display will show the set temperature will display. for Turbo Freeze feature. The ACTUAL TEMP...
... or Fridge pad. The display will be displayed. To turn ON cooling system, press either the Freezer or Fridge pad until the desired temperature is located on , press Fridge or Freezer. To turn on and the display will show the set temperature will display. for Turbo Freeze feature. The ACTUAL TEMP...
Use and Care Manual
Page 11
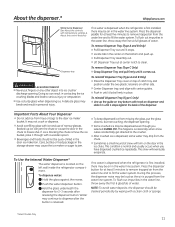
...; Use a sturdy glass when dispensing ice. Backed-up the guide on tray bottom with track on dispenser and slide it in until it stops. „ Locate tab in the center on the door in the ice chute. If ice is blocking the chute remove the ice bucket, poke it locks firmly... in place. To Use the Internal Water Dispenser* The water dispenser is located on either side. „ Center Dispenser tray, and align with center guides. „ Push in until it comes out. Press the dispenser paddle for at...
...; Use a sturdy glass when dispensing ice. Backed-up the guide on tray bottom with track on dispenser and slide it in until it stops. „ Locate tab in the center on the door in the ice chute. If ice is blocking the chute remove the ice bucket, poke it locks firmly... in place. To Use the Internal Water Dispenser* The water dispenser is located on either side. „ Center Dispenser tray, and align with center guides. „ Push in until it comes out. Press the dispenser paddle for at...

Use and Care Manual
Page 12
...; Handles, straws, and garnishes on the rim of the container my cause overfilling or variation in fill volumes. • Splashing may occur depending on the location of the container, water flow rate, container shape, and ice cubes. • Keep sensors clean with household water pressure of 60 to stop. About Autofill...
...; Handles, straws, and garnishes on the rim of the container my cause overfilling or variation in fill volumes. • Splashing may occur depending on the location of the container, water flow rate, container shape, and ice cubes. • Keep sensors clean with household water pressure of 60 to stop. About Autofill...
Use and Care Manual
Page 13
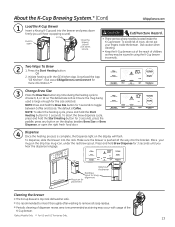
...". Ensure the mug being used is recommended as they may occur with the GE Kitchen App. Make sure the brewer is pushed all soap residue. „ Periodic cleaning of the K-Cup brewer. *Select Models Only ** For US and US ... heating process is recommended to rinse it thoroughly after washing to choose 6, 8, or 10 oz. CAUTION Cut/Puncture Hazard. • There are two sharp needles located inside the brewer. To avoid risk of children, as staining may be injured in using the K-Cup brewer incorrectly. Use caution when cleaning. • Keep...
...". Ensure the mug being used is recommended as they may occur with the GE Kitchen App. Make sure the brewer is pushed all soap residue. „ Periodic cleaning of the K-Cup brewer. *Select Models Only ** For US and US ... heating process is recommended to rinse it thoroughly after washing to choose 6, 8, or 10 oz. CAUTION Cut/Puncture Hazard. • There are two sharp needles located inside the brewer. To avoid risk of children, as staining may be injured in using the K-Cup brewer incorrectly. Use caution when cleaning. • Keep...
Use and Care Manual
Page 14
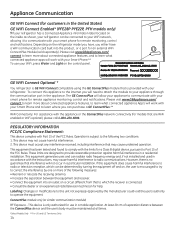
...This device may cause undesired operation. However, there is provided with your smart phone for remote monitoring, control and notifications. The GE ConnectPlus will not occur in a particular installation. This equipment has been tested and found to comply with the limits for a Class... Enabled* (PFE28P PYE22P, PFH models only) YIf your refrigerator has a Connected Appliance information label located on the inside as shown, your refrigerator can purchase a GE ConnectPlus.** WiFi Connectivity: For assistance with the appliance or the ConnectPlus network connectivity (for models that...
...This device may cause undesired operation. However, there is provided with your smart phone for remote monitoring, control and notifications. The GE ConnectPlus will not occur in a particular installation. This equipment has been tested and found to comply with the limits for a Class... Enabled* (PFE28P PYE22P, PFH models only) YIf your refrigerator has a Connected Appliance information label located on the inside as shown, your refrigerator can purchase a GE ConnectPlus.** WiFi Connectivity: For assistance with the appliance or the ConnectPlus network connectivity (for models that...
Use and Care Manual
Page 15
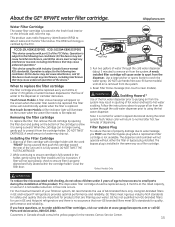
...will return to swing outward. Reset Filter Status message (non-touch screen models). Follow the instructions above to purge all air is located in GE and Hotpoint® refrigerators provides optimal performance and reliability. Water color will not swing easily, check to using the hot water ...about 5 minutes) to small parts during the initial system flush. DO NOT use of your water. For the maximum benefit of GE-branded filters only. GEAppliances.com Water Filter Cartridge The water filter cartridge is removed from the dispenser. DO NOT TWIST THE FILTER CARTRIDGE...
...will return to swing outward. Reset Filter Status message (non-touch screen models). Follow the instructions above to purge all air is located in GE and Hotpoint® refrigerators provides optimal performance and reliability. Water color will not swing easily, check to using the hot water ...about 5 minutes) to small parts during the initial system flush. DO NOT use of your water. For the maximum benefit of GE-branded filters only. GEAppliances.com Water Filter Cartridge The water filter cartridge is removed from the dispenser. DO NOT TWIST THE FILTER CARTRIDGE...
Use and Care Manual
Page 16
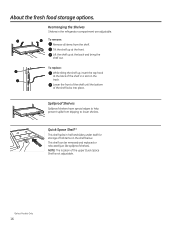
... storage of the shelf in the refrigerator compartment are adjustable. This shelf can be removed and replaced or relocated (just like spillproof shelves). NOTE: The location of the shelf locks into place. Tilt the shelf up at the back and bring the shelf out. Spillproof Shelves Spillproof shelves have special edges...
... storage of the shelf in the refrigerator compartment are adjustable. This shelf can be removed and replaced or relocated (just like spillproof shelves). NOTE: The location of the shelf locks into place. Tilt the shelf up at the back and bring the shelf out. Spillproof Shelves Spillproof shelves have special edges...

Use and Care Manual
Page 17
... molded supports on the Door Adjustable bins can easily be carried from refrigerator to reinstall. GEAppliances.com To replace: Engage the bin in its proper location. *Select Models Only 17 Reverse to work area. See page 36. Depress both buttons on the Door (Dispenser Models - Open right fresh food door 2. Left... Door) To remove: Lift the bin straight up, then pull out. It will drop down . The ice maker door bins are not interchangeable, note the location upon removal and replace the bin in the molded door supports and push down . 3.
... molded supports on the Door Adjustable bins can easily be carried from refrigerator to reinstall. GEAppliances.com To replace: Engage the bin in its proper location. *Select Models Only 17 Reverse to work area. See page 36. Depress both buttons on the Door (Dispenser Models - Open right fresh food door 2. Left... Door) To remove: Lift the bin straight up, then pull out. It will drop down . The ice maker door bins are not interchangeable, note the location upon removal and replace the bin in the molded door supports and push down . 3.

Use and Care Manual
Page 20
... freezer basket by lifting up the rear of the basket and moving basket rearward until the front of the basket and rotate it locks into location until it upward. To replace: Reverse step 1 through 4 to remove. Lift it out to the stop position. Open freezer door to remove. Freezer Basket and...
... freezer basket by lifting up the rear of the basket and moving basket rearward until the front of the basket and rotate it locks into location until it upward. To replace: Reverse step 1 through 4 to remove. Lift it out to the stop position. Open freezer door to remove. Freezer Basket and...

Use and Care Manual
Page 21
... IM Kit for some models) There is additional ice storage in the freezer compartment drawer. • Open the freezer drawer. • The ice bucket is located on the ice bucket in . Ice maker Feeler Arm Automatic Ice Maker* The ice maker will produce seven cubes per cycle approximately 100-130 cubes...
... IM Kit for some models) There is additional ice storage in the freezer compartment drawer. • Open the freezer drawer. • The ice bucket is located on the ice bucket in . Ice maker Feeler Arm Automatic Ice Maker* The ice maker will produce seven cubes per cycle approximately 100-130 cubes...
Use and Care Manual
Page 22
... an open . Be sure the refrigerator stays in the direction of sponge or cloth when cleaning around switches, lights or controls. Raise the leveling legs located at the bottom front of the refrigerator. Use only a liquid cleanser free of water. Moving the refrigerator in a side direction coverings and those with soap...
... an open . Be sure the refrigerator stays in the direction of sponge or cloth when cleaning around switches, lights or controls. Raise the leveling legs located at the bottom front of the refrigerator. Use only a liquid cleanser free of water. Moving the refrigerator in a side direction coverings and those with soap...
Use and Care Manual
Page 25
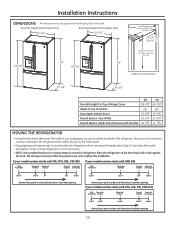
... Slides (no hinges) 31.375" 29.375" 28.875" 25.875" 24.625" Remove door parts in the final location. • NOTE: Use a padded hand truck or moving it to the final location. • If passageways are given with leveling leg fully retracted. Ensure you have clearance to prevent damage to the...
... Slides (no hinges) 31.375" 29.375" 28.875" 25.875" 24.625" Remove door parts in the final location. • NOTE: Use a padded hand truck or moving it to the final location. • If passageways are given with leveling leg fully retracted. Ensure you have clearance to prevent damage to the...
Use and Care Manual
Page 26
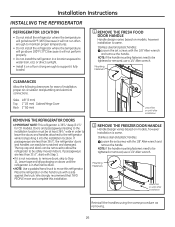
... Allen wrench and remove the handle. Stainless steel and plastic handles: Loosen the set screws with Step 1. • If it into the installation location. NOTE: If the handle mounting fasteners need to move and complete this refrigerator. Sides 1/8" (3 mm) Top 1" (25 mm) Cabinet/Hinge Cover...2 REMOVE THE FREEZER DOOR HANDLE Handle Design varies based on models, however Installation is same. Installation Instructions INSTALLING THE REFRIGERATOR REFRIGERATOR LOCATION • Do not install the refrigerator where the temperature will go below 60°F (16°C) because it will not ...
... Allen wrench and remove the handle. Stainless steel and plastic handles: Loosen the set screws with Step 1. • If it into the installation location. NOTE: If the handle mounting fasteners need to move and complete this refrigerator. Sides 1/8" (3 mm) Top 1" (25 mm) Cabinet/Hinge Cover...2 REMOVE THE FREEZER DOOR HANDLE Handle Design varies based on models, however Installation is same. Installation Instructions INSTALLING THE REFRIGERATOR REFRIGERATOR LOCATION • Do not install the refrigerator where the temperature will go below 60°F (16°C) because it will not ...

Use and Care Manual
Page 27
... water line. Hinge Cover C Disconnect both electrical connectors at the top cover. Remove the 1/4" hex head screw to remove the strain relief from the location in a proper location. Single person lift could cause injury. Installation Instructions 3 REMOVE THE REFRIGERATOR DOORS A Securely tape the door shut with left-hand door first: Remove the...
... water line. Hinge Cover C Disconnect both electrical connectors at the top cover. Remove the 1/4" hex head screw to remove the strain relief from the location in a proper location. Single person lift could cause injury. Installation Instructions 3 REMOVE THE REFRIGERATOR DOORS A Securely tape the door shut with left-hand door first: Remove the...

Use and Care Manual
Page 29
... Lifting Hazard Freezer door is heavy Use both hands. Align and insert tab on Freezer Door Bracket with slot on the slides. B Remove 3 attachment screws, located at the bottom on each side of the freezer door using both hands to disengage it from the slide mechanism The door can safely rest...
... Lifting Hazard Freezer door is heavy Use both hands. Align and insert tab on Freezer Door Bracket with slot on the slides. B Remove 3 attachment screws, located at the bottom on each side of the freezer door using both hands to disengage it from the slide mechanism The door can safely rest...

Use and Care Manual
Page 32
... -1 - Slightly loosen the three door attachment screws on the side requiring adjustment, rotate the cam to 65 in the freezer door. B Locate and loosen the cam screw using the T-27 screw driver. 0 - Lift by 0.150" B After adjustment, tighten the 3 attachment screws using to required position.... A Locate the height adjuster cam in -lb. 10 REMOVE PACKAGING A) Remove all tape, foam and protective packing from shelves and drawers. 32 Installation Instructions...
... -1 - Slightly loosen the three door attachment screws on the side requiring adjustment, rotate the cam to 65 in the freezer door. B Locate and loosen the cam screw using the T-27 screw driver. 0 - Lift by 0.150" B After adjustment, tighten the 3 attachment screws using to required position.... A Locate the height adjuster cam in -lb. 10 REMOVE PACKAGING A) Remove all tape, foam and protective packing from shelves and drawers. 32 Installation Instructions...
Use and Care Manual
Page 33
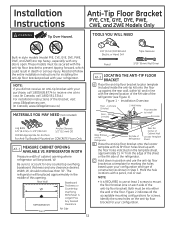
...Tip Floor Bracket PYE, CYE, GYE, DYE, PWE, CWE, and ZWE Models Only TOOLS YOU WILL NEED Built-in line with the desired location of the RH side of the refrigerator (see Figure 1). NOTE: If you did not receive an anti-tip bracket with the floor holes ... packed with a pencil, nail or awl. Concrete (2 Holes) Floor - REFRIGERATOR WIDTH Measure width of the anti-tip floor bracket). Mark the hole locations with your configuration and type of this opening where refrigerator will be placed approximately in Step 3. These models must be less than 36". Figure 2 indicates...
...Tip Floor Bracket PYE, CYE, GYE, DYE, PWE, CWE, and ZWE Models Only TOOLS YOU WILL NEED Built-in line with the desired location of the RH side of the refrigerator (see Figure 1). NOTE: If you did not receive an anti-tip bracket with the floor holes ... packed with a pencil, nail or awl. Concrete (2 Holes) Floor - REFRIGERATOR WIDTH Measure width of the anti-tip floor bracket). Mark the hole locations with your configuration and type of this opening where refrigerator will be placed approximately in Step 3. These models must be less than 36". Figure 2 indicates...

