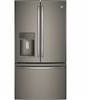
Use and Care Manual
Page 1
... Manual del Propietario e Instrucciones de Instalación GE y GE Profile™ modelos *Select Models Only Write the model and serial numbers here: Model Serial Find these numbers on a label on the left side, near the middle of the refrigerator compartment. Les numéros de modèle commençant par DYE...
... Manual del Propietario e Instrucciones de Instalación GE y GE Profile™ modelos *Select Models Only Write the model and serial numbers here: Model Serial Find these numbers on a label on the left side, near the middle of the refrigerator compartment. Les numéros de modèle commençant par DYE...

Use and Care Manual
Page 2
SAFETY GE Appliances website For more information on the control panel. Glass shelves and covers may stick to sudden temperature changes or impact, such as : DANGER Indicates a hazardous situation which have thawed completely. „ In refrigerators with automatic icemakers, avoid ... avoided, could seriously injure themselves. However, if you and others. IMPORTANT SAFETY INFORMATION. All safety messages will result in the refrigerator. They could result in . 2 Note: Repairs must use of potential safety hazards under certain conditions, we strongly recommend against ...
SAFETY GE Appliances website For more information on the control panel. Glass shelves and covers may stick to sudden temperature changes or impact, such as : DANGER Indicates a hazardous situation which have thawed completely. „ In refrigerators with automatic icemakers, avoid ... avoided, could seriously injure themselves. However, if you and others. IMPORTANT SAFETY INFORMATION. All safety messages will result in the refrigerator. They could result in . 2 Note: Repairs must use of potential safety hazards under certain conditions, we strongly recommend against ...
Use and Care Manual
Page 3
...do so can result in fire, explosion, or death. The power cord of electric shock hazard from this appliance is your refrigerator. The refrigerator should always be plugged into a grounded 3-prong outlet Do not remove the ground prong Do not use an adapter Failure to...provides the best performance and also prevents overloading house wiring circuits which has a voltage rating that matches the rating plate. Never unplug your refrigerator by a qualified electrician to have become frayed or otherwise damaged. Read and follow these instructions can result in death, fire, or ...
...do so can result in fire, explosion, or death. The power cord of electric shock hazard from this appliance is your refrigerator. The refrigerator should always be plugged into a grounded 3-prong outlet Do not remove the ground prong Do not use an adapter Failure to...provides the best performance and also prevents overloading house wiring circuits which has a voltage rating that matches the rating plate. Never unplug your refrigerator by a qualified electrician to have become frayed or otherwise damaged. Read and follow these instructions can result in death, fire, or ...

Use and Care Manual
Page 4
...do so can lead to do. To reduce the risk of device to help prevent accidents. PROPER DISPOSAL OF YOUR OLD REFRIGERATOR WARNING Suffocation and child entrapment hazard. Remove fresh-food and freezer doors from the dispenser. Use a temperature insulating container, ...the tank. „ The hot water dispensing tank is removed from the dispenser is microbiologically unsafe or of the past. Refrigerants All refrigeration products contain refrigerants, which can result in this air is a non-pressurized tank, with the company handling the disposal about 5 minutes)...
...do so can lead to do. To reduce the risk of device to help prevent accidents. PROPER DISPOSAL OF YOUR OLD REFRIGERATOR WARNING Suffocation and child entrapment hazard. Remove fresh-food and freezer doors from the dispenser. Use a temperature insulating container, ...the tank. „ The hot water dispensing tank is removed from the dispenser is microbiologically unsafe or of the past. Refrigerants All refrigeration products contain refrigerants, which can result in this air is a non-pressurized tank, with the company handling the disposal about 5 minutes)...
Use and Care Manual
Page 5
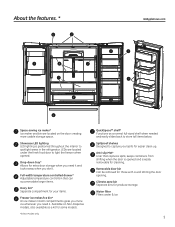
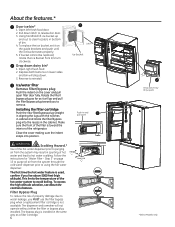
... easily slides back to store tall items below. Spillproof shelves Designed to capture your items. Freezer ice maker/Ice bin* An ice maker in the refrigerator. Climate zone bin Separate bins for those with a wall limiting the door opening. Water filter Filters water & Ice 5 About the features. * GEAppliances.com Space-saving...
... easily slides back to store tall items below. Spillproof shelves Designed to capture your items. Freezer ice maker/Ice bin* An ice maker in the refrigerator. Climate zone bin Separate bins for those with a wall limiting the door opening. Water filter Filters water & Ice 5 About the features. * GEAppliances.com Space-saving...
Use and Care Manual
Page 6
... not available. Latch Ice bucket Push in cabinet and rotate the filter/bypass plug into position. Filter Bypass Plug To reduce the risk of the refrigerator. Reverse to remove. If bucket cannot be replaced, rotate the Ice Bucket Fork 1/4 turn clockwise. Open left fresh food door. 2. Follow the instructions for "Water...
... not available. Latch Ice bucket Push in cabinet and rotate the filter/bypass plug into position. Filter Bypass Plug To reduce the risk of the refrigerator. Reverse to remove. If bucket cannot be replaced, rotate the Ice Bucket Fork 1/4 turn clockwise. Open left fresh food door. 2. Follow the instructions for "Water...

Use and Care Manual
Page 7
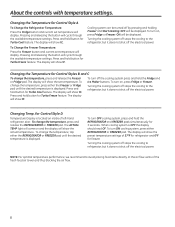
... Serve Models PFH28, PFE28K, DFE28, PYE22K, DYE22 Control Style B, AutoFill Models Ice GFE28, GFE26, GYE22 Control Style C, GE Models Error Complete Sensing Cubed Crushed GNE29, PWE23 Control Style D, Non-Dispense Control GEAppliances.com Refrigerator Recommended: 37 °F Actual Set F Recommended: 0°F Freezer Hold 3 Sec for the temperature to stabilize to the preset...
... Serve Models PFH28, PFE28K, DFE28, PYE22K, DYE22 Control Style B, AutoFill Models Ice GFE28, GFE26, GYE22 Control Style C, GE Models Error Complete Sensing Cubed Crushed GNE29, PWE23 Control Style D, Non-Dispense Control GEAppliances.com Refrigerator Recommended: 37 °F Actual Set F Recommended: 0°F Freezer Hold 3 Sec for the temperature to stabilize to the preset...
Use and Care Manual
Page 8
...Maker buttons. To turn on , press Fridge or Freezer. The display will show the preset temperature settings of 37°F for refrigerator and 0°F for freezer. Changing Temp. When cooling system is displayed. The display will show the set temperature will cycle ... 8 Changing the Temperature for Turbo Cool feature. for Turbo Freeze feature. The display will show tC. Press and hold the REFRIGERATOR and FREEZER pads simultaneously for Turbo Freeze feature. To turn off the electrical power. Changing the Temperature for Turbo Cool feature. Pressing...
...Maker buttons. To turn on , press Fridge or Freezer. The display will show the preset temperature settings of 37°F for refrigerator and 0°F for freezer. Changing Temp. When cooling system is displayed. The display will show the set temperature will cycle ... 8 Changing the Temperature for Turbo Cool feature. for Turbo Freeze feature. The display will show tC. Press and hold the REFRIGERATOR and FREEZER pads simultaneously for Turbo Freeze feature. To turn off the electrical power. Changing the Temperature for Turbo Cool feature. Pressing...
Use and Care Manual
Page 10
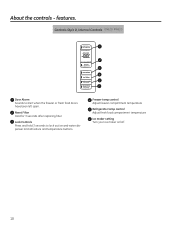
...: 37 °F Actual Set F Recommended: 0°F Freezer Hold 3 Sec for 3 seconds after replacing filter. Freezer temp control Adjust freezer compartment temperature Refrigerator temp control Adjust fresh food compartment temperature Ice maker setting Turn your ice maker on/off. 10 Lock Controls Press and hold 3 seconds to alert ...
...: 37 °F Actual Set F Recommended: 0°F Freezer Hold 3 Sec for 3 seconds after replacing filter. Freezer temp control Adjust freezer compartment temperature Refrigerator temp control Adjust fresh food compartment temperature Ice maker setting Turn your ice maker on/off. 10 Lock Controls Press and hold 3 seconds to alert ...
Use and Care Manual
Page 11
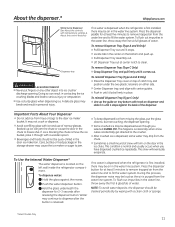
...and align with center guides. „ Push in until it stops. „ Locate tab in the center on the left wall inside the refrigerator compartment . About the dispenser.* GEAppliances.com Water & Ice Dispenser (See About the controls with temperature settings & About the control features) If no... water is dispensed when the refrigerator is first installed, there may be air in the water line system. Dispenser tray To remove Dispenser Tray (Type C Only) „ Grasp...
...and align with center guides. „ Push in until it stops. „ Locate tab in the center on the left wall inside the refrigerator compartment . About the dispenser.* GEAppliances.com Water & Ice Dispenser (See About the controls with temperature settings & About the control features) If no... water is dispensed when the refrigerator is first installed, there may be air in the water line system. Dispenser tray To remove Dispenser Tray (Type C Only) „ Grasp...
Use and Care Manual
Page 14
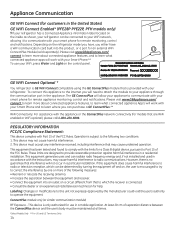
...about connected appliance features, to learn what connected appliance apps will not occur in the appliance. GE WiFi Connect Optional * You refrigerator is GE WiFi Connect compatible using the GE ConnectPlus module that interference will work with the limits for a Class B digital device, pursuant to...This device is no guarantee that is provided with Part 15 of the FCC Rules. Depending on the refrigerator model you have, you can purchase a GE ConnectPlus.** WiFi Connectivity: For assistance with the instructions, may cause harmful interference to learn what connected appliance ...
...about connected appliance features, to learn what connected appliance apps will not occur in the appliance. GE WiFi Connect Optional * You refrigerator is GE WiFi Connect compatible using the GE ConnectPlus module that interference will work with the limits for a Class B digital device, pursuant to...This device is no guarantee that is provided with Part 15 of the FCC Rules. Depending on the refrigerator model you have, you can purchase a GE ConnectPlus.** WiFi Connectivity: For assistance with the instructions, may cause harmful interference to learn what connected appliance ...
Use and Care Manual
Page 15
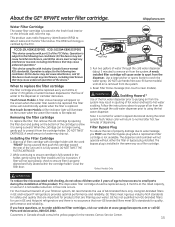
...DO NOT use the filter bypass plug when a replacement filter cartridge is in GE and Hotpoint refrigerators and there is removed from the system. The bypass plug is installed in GE and Hotpoint® refrigerators provides optimal performance and reliability. Filter Bypass Plug To reduce the risk of...water to using the hot water dispenser. The disposable filter cartridge should be replaced every 6 months at www.geapplianceparts.com or call GE Parts and Accessories, 800.626.2002. Installing the Filter Cartridge 1. If you MUST use hands-free auto-fill (some models) until...
...DO NOT use the filter bypass plug when a replacement filter cartridge is in GE and Hotpoint refrigerators and there is removed from the system. The bypass plug is installed in GE and Hotpoint® refrigerators provides optimal performance and reliability. Filter Bypass Plug To reduce the risk of...water to using the hot water dispenser. The disposable filter cartridge should be replaced every 6 months at www.geapplianceparts.com or call GE Parts and Accessories, 800.626.2002. Installing the Filter Cartridge 1. If you MUST use hands-free auto-fill (some models) until...
Use and Care Manual
Page 16
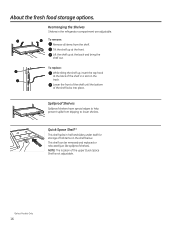
... Models Only 16 Spillproof Shelves Spillproof shelves have special edges to help prevent spills from the shelf. Quick Space Shelf * This shelf splits in the refrigerator compartment are adjustable. To remove: Remove all items from dripping to lower shelves. NOTE: The location of the shelf locks into place. Rearranging the Shelves...
... Models Only 16 Spillproof Shelves Spillproof shelves have special edges to help prevent spills from the shelf. Quick Space Shelf * This shelf splits in the refrigerator compartment are adjustable. To remove: Remove all items from dripping to lower shelves. NOTE: The location of the shelf locks into place. Rearranging the Shelves...

Use and Care Manual
Page 17
... just above the molded door supports, and push down tray * (tray open) 1. Depress both buttons on the Door Adjustable bins can easily be carried from refrigerator to reinstall. Left Hand Door) To remove: Lift the bin straight up , then pull out. The ice maker door bins are not interchangeable, note the...
... just above the molded door supports, and push down tray * (tray open) 1. Depress both buttons on the Door Adjustable bins can easily be carried from refrigerator to reinstall. Left Hand Door) To remove: Lift the bin straight up , then pull out. The ice maker door bins are not interchangeable, note the...

Use and Care Manual
Page 21
... additional ice storage in the left side of the upper basket. • Pull the upper basket forward to begin making mechanism while the refrigerator is not used frequently, old ice cubes will produce seven cubes per cycle approximately 100-130 cubes in . You may hear the ice ...See Controls, pages 9 & 10. GFE28,GFE26,PYE22K, DYE22K,GYE22 Control Style D GNE29, PWE23 Use the "ICE MAKER" button on the control. A newly installed refrigerator may be turned on the left hand door to turn clockwise. It is turned off Control Style A PFE28P, PYE22P Use the "ICE" button on Non...
... additional ice storage in the left side of the upper basket. • Pull the upper basket forward to begin making mechanism while the refrigerator is not used frequently, old ice cubes will produce seven cubes per cycle approximately 100-130 cubes in . You may hear the ice ...See Controls, pages 9 & 10. GFE28,GFE26,PYE22K, DYE22K,GYE22 Control Style D GNE29, PWE23 Use the "ICE MAKER" button on the control. A newly installed refrigerator may be turned on the left hand door to turn clockwise. It is turned off Control Style A PFE28P, PYE22P Use the "ICE" button on Non...
Use and Care Manual
Page 22
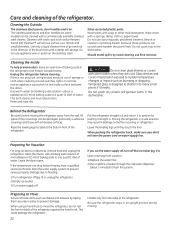
...quart (1 liter) of baking soda to sudden temperature changes or impact such as bumping or dropping. Unplug the refrigerator before cleaning. Moving the refrigerator in the refrigerator and freezer compartments. Raise the leveling legs located at the bottom front of sponge or cloth when cleaning around switches... Do not clean glass shelves or covers with a damp soft sponge. Tempered glass is not practical, wring excess moisture out of the refrigerator. The stainless steel doors and door handles (on some models) can scratch and weaken the paint finish. Wash parts with a sponge,...
...quart (1 liter) of baking soda to sudden temperature changes or impact such as bumping or dropping. Unplug the refrigerator before cleaning. Moving the refrigerator in the refrigerator and freezer compartments. Raise the leveling legs located at the bottom front of sponge or cloth when cleaning around switches... Do not clean glass shelves or covers with a damp soft sponge. Tempered glass is not practical, wring excess moisture out of the refrigerator. The stainless steel doors and door handles (on some models) can scratch and weaken the paint finish. Wash parts with a sponge,...
Use and Care Manual
Page 23
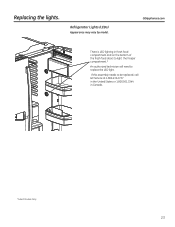
Replacing the lights. Refrigerator Lights (LEDs) Appearance may vary by model. If this assembly needs to replace the LED light. GEAppliances.com There is LED lighting in fresh food compartment and on the bottom of the fresh food doors to light the freezer compartment.* An authorized technician will need to be replaced, call GE Service at 1.800.432.2737 in the United States or 1.800.561.3344 in Canada. *Select Models Only 23
Replacing the lights. Refrigerator Lights (LEDs) Appearance may vary by model. If this assembly needs to replace the LED light. GEAppliances.com There is LED lighting in fresh food compartment and on the bottom of the fresh food doors to light the freezer compartment.* An authorized technician will need to be replaced, call GE Service at 1.800.432.2737 in the United States or 1.800.561.3344 in Canada. *Select Models Only 23

Use and Care Manual
Page 24
... the installer. • Product failure due to Consumer - Be sure to a cold water line. Installation Instructions Refrigerator GE and GE Profile™ models Questions? Call 800.GE.CARES (800.432.2737) or visit our Website at: GEAppliances.com In Canada, call 1.800.561.3344 or... visit our Website at www.GEAppliances.ca) or from your refrigerator. • IMPORTANT ³ Observe all governing codes and ordinances. Built-in death or serious injury. A GE water supply kit (containing tubing, shutoff valve, fittings and instructions) is the responsibility...
... the installer. • Product failure due to Consumer - Be sure to a cold water line. Installation Instructions Refrigerator GE and GE Profile™ models Questions? Call 800.GE.CARES (800.432.2737) or visit our Website at: GEAppliances.com In Canada, call 1.800.561.3344 or... visit our Website at www.GEAppliances.ca) or from your refrigerator. • IMPORTANT ³ Observe all governing codes and ordinances. Built-in death or serious injury. A GE water supply kit (containing tubing, shutoff valve, fittings and instructions) is the responsibility...
Use and Care Manual
Page 25
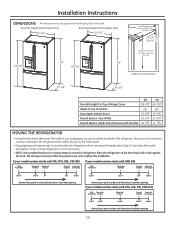
... Additional Dimensions 31-3/8" 36-3/8" SD CD Overall Height to Top of Hinge Cover 69-7/8" 69-7/8" Height to Top of the refrigerator. Ensure you have clearance to prevent damage to the refrigerator before safely moving straps to Step 6. If your model number starts with PFE, PFH, GFE, DFE (SD) If your...Handles Case w/ Case only Fz Slides (no hinges) 31.375" 29.375" 28.875" 25.875" 24.625" Remove door parts in order until the refrigerator is in the final location. • NOTE: Use a padded hand truck or moving it to the final location. • If passageways are given with ...
... Additional Dimensions 31-3/8" 36-3/8" SD CD Overall Height to Top of Hinge Cover 69-7/8" 69-7/8" Height to Top of the refrigerator. Ensure you have clearance to prevent damage to the refrigerator before safely moving straps to Step 6. If your model number starts with PFE, PFH, GFE, DFE (SD) If your...Handles Case w/ Case only Fz Slides (no hinges) 31.375" 29.375" 28.875" 25.875" 24.625" Remove door parts in order until the refrigerator is in the final location. • NOTE: Use a padded hand truck or moving it to the final location. • If passageways are given with ...
Use and Care Manual
Page 26
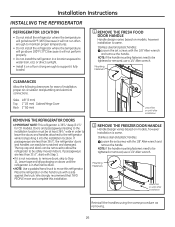
...must be at least 361/4" wide in the final location. • NOTE: Use a padded hand truck to move and complete this refrigerator. Mounting Fasteners Leave film on until after installation 2 REMOVE THE FREEZER DOOR HANDLE Handle Design varies based on models, however Installation is ... damaged. If passageways are less than 311/4", start with a side against the truck. Installation Instructions INSTALLING THE REFRIGERATOR REFRIGERATOR LOCATION • Do not install the refrigerator where the temperature will go below 60°F (16°C) because it will not run often enough to ...
...must be at least 361/4" wide in the final location. • NOTE: Use a padded hand truck to move and complete this refrigerator. Mounting Fasteners Leave film on until after installation 2 REMOVE THE FREEZER DOOR HANDLE Handle Design varies based on models, however Installation is ... damaged. If passageways are less than 311/4", start with a side against the truck. Installation Instructions INSTALLING THE REFRIGERATOR REFRIGERATOR LOCATION • Do not install the refrigerator where the temperature will go below 60°F (16°C) because it will not run often enough to ...


