
Owners Manual
Page 1
...;ol empieza en la página 93 200D9366P002 49-60530-2 01-08 JR Customers 41, 42 State of the refrigerator compartment. ge.com Bottom Refr igeratoFreezerrs Safety Instructions 2, 3 Operating Instructions Additional Features 8 Automatic Icemaker 11 Care and Cleaning 12-13...Installing the Refrigerator . . . .20-24 Installing the Water Line . . . . .33-35 Preparing to Install the Refrigerator 17 Removing and Replacing the Freezer Drawer 25, 26 Reversing the Door Swing (Single Door Refrigerator Models only 27-29 Removing and Replacing the Doors (Double Door Refrigerator Models only) ...
...;ol empieza en la página 93 200D9366P002 49-60530-2 01-08 JR Customers 41, 42 State of the refrigerator compartment. ge.com Bottom Refr igeratoFreezerrs Safety Instructions 2, 3 Operating Instructions Additional Features 8 Automatic Icemaker 11 Care and Cleaning 12-13...Installing the Refrigerator . . . .20-24 Installing the Water Line . . . . .33-35 Preparing to Install the Refrigerator 17 Removing and Replacing the Freezer Drawer 25, 26 Reversing the Door Swing (Single Door Refrigerator Models only 27-29 Removing and Replacing the Doors (Double Door Refrigerator Models only) ...

Owners Manual
Page 4
... Support Troubleshooting Tips Installation Instructions Operating Instructions Safety Instructions About the controls with temperature settings. (on some models) (on some models) NOTE: The refrigerator is displayed. The ACTUAL TEMP light will come on usage and operating environment. Several adjustments may vary ... power to reach the temperature you adjust controls, allow 24 hours for the refrigerator. Setting either the refrigerator or freezer. To turn the unit back on -the-Door Models: To change the temperature, press either the WARMER or COLDER pad until the...
... Support Troubleshooting Tips Installation Instructions Operating Instructions Safety Instructions About the controls with temperature settings. (on some models) (on some models) NOTE: The refrigerator is displayed. The ACTUAL TEMP light will come on usage and operating environment. Several adjustments may vary ... power to reach the temperature you adjust controls, allow 24 hours for the refrigerator. Setting either the refrigerator or freezer. To turn the unit back on -the-Door Models: To change the temperature, press either the WARMER or COLDER pad until the...

Owners Manual
Page 5
... Operating Instructions Installation Instructions Troubleshooting Tips Consumer Support About TurboCool.™ (on some models) ge.com (on some models) (on some models) How it will cycle on and off to maintain this setting. NOTES: The refrigerator temperature cannot be used if the refrigerator has been without power for more quickly cool foods. It can form on...
... Operating Instructions Installation Instructions Troubleshooting Tips Consumer Support About TurboCool.™ (on some models) ge.com (on some models) (on some models) How it will cycle on and off to maintain this setting. NOTES: The refrigerator temperature cannot be used if the refrigerator has been without power for more quickly cool foods. It can form on...
Owners Manual
Page 6
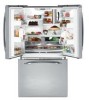
... models) (on some models) Water Filter Cartridge Filter Bypass Plug The water filter cartridge is located in on the tab at the front and pulling down . If you need to the dispenser or icemaker decreases. Remove the cartridge by pressing in the back upper right corner of the refrigerator compartment...available. A small amount of the cartridge. Run water from the end of water may drip down . Filter Model GSWF Customers in the United States, visit our Website, ge.com, or call GE Parts and Accessories, 800.626.2002. CAUTION: If air has been trapped in the system, the filter cartridge...
... models) (on some models) Water Filter Cartridge Filter Bypass Plug The water filter cartridge is located in on the tab at the front and pulling down . If you need to the dispenser or icemaker decreases. Remove the cartridge by pressing in the back upper right corner of the refrigerator compartment...available. A small amount of the cartridge. Run water from the end of water may drip down . Filter Model GSWF Customers in the United States, visit our Website, ge.com, or call GE Parts and Accessories, 800.626.2002. CAUTION: If air has been trapped in the system, the filter cartridge...

Owners Manual
Page 7
...: Remove all items from shelf. To replace: Place the rear shelf tabs just in the same manner. Refrigerator Compartment To remove: Remove all items from the shelf. To replace: While tilting the shelf up, insert ...the top hook at the back and bring the shelf out. ge.com Spillproof Shelves (on all the way in until it can be removed. Slide the shelf out until...in a slot on the track. Lower the shelf into place. Make sure you push the shelves all models. Make sure that can be adjusted in front of the shelf in . Tilt the shelf up at...
...: Remove all items from shelf. To replace: Place the rear shelf tabs just in the same manner. Refrigerator Compartment To remove: Remove all items from the shelf. To replace: While tilting the shelf up, insert ...the top hook at the back and bring the shelf out. ge.com Spillproof Shelves (on all the way in until it can be removed. Slide the shelf out until...in a slot on the track. Lower the shelf into place. Make sure you push the shelves all models. Make sure that can be adjusted in front of the shelf in . Tilt the shelf up at...
Owners Manual
Page 8
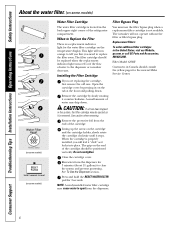
Consumer Support Troubleshooting Tips Installation Instructions Operating Instructions Safety Instructions About the shelves and bins. Not all models. Non-Adjustable Beverage Rack To remove: Lift the rack straight up , then pull out. To replace or relocate: Slide in the molded supports on the... on the door shelf. Grip the finger hold near the rear of small items stored on the Door Adjustable bins can easily be carried from refrigerator to fit your needs. About the additional features. The bin will lock in place. It will lock in the molded supports on all features ...
Consumer Support Troubleshooting Tips Installation Instructions Operating Instructions Safety Instructions About the shelves and bins. Not all models. Non-Adjustable Beverage Rack To remove: Lift the rack straight up , then pull out. To replace or relocate: Slide in the molded supports on the... on the door shelf. Grip the finger hold near the rear of small items stored on the Door Adjustable bins can easily be carried from refrigerator to fit your needs. About the additional features. The bin will lock in place. It will lock in the molded supports on all features ...

Owners Manual
Page 9
ge.com Adjustable Humidity Crisper (on all the way to the LOW setting to provide high humidity recommended for most fruits. Pull the drawer out to access the 4 swing locks. Make sure all four swing locks are on some models) Slide the control all four swing locks by rotating them to Remove ... Pan To remove: To replace: Remove the fruit and vegetable drawers. Place the sides of the drawer up and out. Slide the control all models. Lock all the way to the unlock position. Swing Locks Lift the lid to the stop position. Fruit and Vegetable Crisper Excess water that may...
ge.com Adjustable Humidity Crisper (on all the way to the LOW setting to provide high humidity recommended for most fruits. Pull the drawer out to access the 4 swing locks. Make sure all four swing locks are on some models) Slide the control all four swing locks by rotating them to Remove ... Pan To remove: To replace: Remove the fruit and vegetable drawers. Place the sides of the drawer up and out. Slide the control all models. Lock all the way to the unlock position. Swing Locks Lift the lid to the stop position. Fruit and Vegetable Crisper Excess water that may...
Owners Manual
Page 10
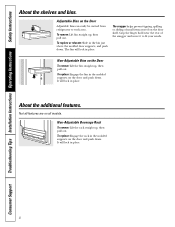
... basket: Tilt the basket back and lower it stops. NOTE: Always be sure to the stop location. When replacing the basket, make sure that all models. Appearance may vary Appearance may vary Tab Basket Removal To remove the deep full-width basket on all 4 basket tabs are engaged in the top... of the basket go into the drawer. Not all 4 tabs are on freezer drawer models: Open the freezer drawer until it down into the freezer. Lift the basket so that all features are out of the slide bracket. Lift the...
... basket: Tilt the basket back and lower it stops. NOTE: Always be sure to the stop location. When replacing the basket, make sure that all models. Appearance may vary Appearance may vary Tab Basket Removal To remove the deep full-width basket on all 4 basket tabs are engaged in the top... of the basket go into the drawer. Not all 4 tabs are on freezer drawer models: Open the freezer drawer until it down into the freezer. Lift the basket so that all features are out of the slide bracket. Lift the...

Owners Manual
Page 11
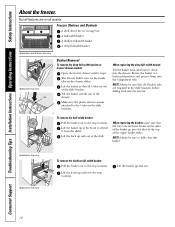
...beeping stops when you may be cleaned periodically by wiping with lower-than 2 minutes. If no water is dispensed when the refrigerator is located on some models) The water dispenser is first installed, there may take 12 to 24 hours to lock the dispenser and control panel. Press ... air from the water line and to 15°F (-10°C). ge.com Power Switch Green Power Light Icemaker Feeler Arm Automatic Icemaker (on freezer compartment temperature, room temperature, number of ice. When the refrigerator has been connected to fill the water system. Throw away the first ...
...beeping stops when you may be cleaned periodically by wiping with lower-than 2 minutes. If no water is dispensed when the refrigerator is located on some models) The water dispenser is first installed, there may take 12 to 24 hours to lock the dispenser and control panel. Press ... air from the water line and to 15°F (-10°C). ge.com Power Switch Green Power Light Icemaker Feeler Arm Automatic Icemaker (on freezer compartment temperature, room temperature, number of ice. When the refrigerator has been connected to fill the water system. Throw away the first ...

Owners Manual
Page 12
... in the refrigerator and freezer compartments. Wipe clean with hot water because the extreme temperature difference may leave a residue that can be cleaned with a commercially available stainless steel cleaner. Do not use wax on some models) can erode the paint. If this is not practical, ... bleach or cleaners containing bleach because these products can cause it to shatter. After cleaning the door gaskets, apply a thin layer of the refrigerator. Avoid cleaning cold glass shelves with a sponge, damp cloth or paper towel. A spray-on stainless steel cleaner works best. Dry and...
... in the refrigerator and freezer compartments. Wipe clean with hot water because the extreme temperature difference may leave a residue that can be cleaned with a commercially available stainless steel cleaner. Do not use wax on some models) can erode the paint. If this is not practical, ... bleach or cleaners containing bleach because these products can cause it to shatter. After cleaning the door gaskets, apply a thin layer of the refrigerator. Avoid cleaning cold glass shelves with a sponge, damp cloth or paper towel. A spray-on stainless steel cleaner works best. Dry and...

Owners Manual
Page 13
...an upright position during moving the refrigerator away from the sides of the refrigerator against the hand truck. When pushing the refrigerator back, make sure you don't roll over the power cord or icemaker supply line (on some models) and ensure the anti-tip ...Vacation For long vacations or absences, remove food and unplug the refrigerator. When using a hand truck to the refrigerator. Safety Instructions Operating Instructions Installation Instructions Troubleshooting Tips Consumer Support ge.com Behind the Refrigerator Be careful when moving . 13 Raise the leveling legs located...
...an upright position during moving the refrigerator away from the sides of the refrigerator against the hand truck. When pushing the refrigerator back, make sure you don't roll over the power cord or icemaker supply line (on some models) and ensure the anti-tip ...Vacation For long vacations or absences, remove food and unplug the refrigerator. When using a hand truck to the refrigerator. Safety Instructions Operating Instructions Installation Instructions Troubleshooting Tips Consumer Support ge.com Behind the Refrigerator Be careful when moving . 13 Raise the leveling legs located...

Owners Manual
Page 14
Refrigerator Lights (on some models) CAUTION: Light bulbs may be hot. Appearance may vary Freezer Light CAUTION: Light bulbs may be hot. The bulb is located at the back. Rotate ... and pull out to release the tabs at the front of the shield. NOTE: Appliance bulbs may be ordered from GE Parts and Accessories, 800.626.2002. LED Refrigerator Lights (on some models) An authorized technician will need to release the tabs at the back and pull out to replace the LED light...
Refrigerator Lights (on some models) CAUTION: Light bulbs may be hot. Appearance may vary Freezer Light CAUTION: Light bulbs may be hot. The bulb is located at the back. Rotate ... and pull out to release the tabs at the front of the shield. NOTE: Appliance bulbs may be ordered from GE Parts and Accessories, 800.626.2002. LED Refrigerator Lights (on some models) An authorized technician will need to release the tabs at the back and pull out to replace the LED light...

Owners Manual
Page 15
...included in the kit. Use the guidelines below and tape the filler onto the back of the door and the wood panel. For panel required models Read these instructions completely and carefully. You can add wood panels to install door panels. Left Fresh Food Door Right Fresh Food Door Filler 3/4&#... panel itself being no larger than the panel. If you are installing the pre-cut decorator panels, pre-cut black or white decorator panels from GE Parts and Accessories, 800.626.2002, or you need to create a filler panel, such as 1/8″ cardboard, that the filler be 11/32″ (8.7...
...included in the kit. Use the guidelines below and tape the filler onto the back of the door and the wood panel. For panel required models Read these instructions completely and carefully. You can add wood panels to install door panels. Left Fresh Food Door Right Fresh Food Door Filler 3/4&#... panel itself being no larger than the panel. If you are installing the pre-cut decorator panels, pre-cut black or white decorator panels from GE Parts and Accessories, 800.626.2002, or you need to create a filler panel, such as 1/8″ cardboard, that the filler be 11/32″ (8.7...
Owners Manual
Page 17
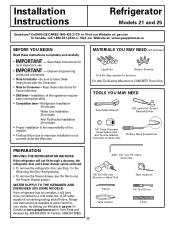
...BEFORE YOU BEGIN Read these instructions with the Consumer. • Note to Installer - Refrigerator Installation 20 minutes Water Line Installation 30 minutes Anti-Tip Bracket Installation 20 minutes • Proper installation is available at extra cost from Parts and Accessories, 800... and Electric or Hand Drill Pencil Wire Cutters Tape measure 1/4″ Nut Driver Level 17 Installation Instructions Refrigerator Models 21 and 25 Questions? A GE water supply kit (containing tubing, shutoff valve, fittings and instructions) is the responsibility of this appliance requires...
...BEFORE YOU BEGIN Read these instructions with the Consumer. • Note to Installer - Refrigerator Installation 20 minutes Water Line Installation 30 minutes Anti-Tip Bracket Installation 20 minutes • Proper installation is available at extra cost from Parts and Accessories, 800... and Electric or Hand Drill Pencil Wire Cutters Tape measure 1/4″ Nut Driver Level 17 Installation Instructions Refrigerator Models 21 and 25 Questions? A GE water supply kit (containing tubing, shutoff valve, fittings and instructions) is the responsibility of this appliance requires...

Owners Manual
Page 18
... NOTE: • It is REQUIRED to use the anti-tip floor bracket as shown in Step 3. models) WARNING Under certain circumstances, this refrigerator. 1 MEASURE CABINET OPENING AVAILABLE VS. REFRIGERATOR WIDTH Measure width of construction as a template for your configuration and type of cabinet opening . Rear Wall...screws to persons can tip forward. Both must be less than 36 inches. Injury to mount the floor bracket (one on 21 ft. Installation Instructions INSTALLING THE ANTI-TIP FLOOR BRACKET (on each side of Cabinet Wall Locator Template Sheet B Place the anti-tip ...
... NOTE: • It is REQUIRED to use the anti-tip floor bracket as shown in Step 3. models) WARNING Under certain circumstances, this refrigerator. 1 MEASURE CABINET OPENING AVAILABLE VS. REFRIGERATOR WIDTH Measure width of construction as a template for your configuration and type of cabinet opening . Rear Wall...screws to persons can tip forward. Both must be less than 36 inches. Injury to mount the floor bracket (one on 21 ft. Installation Instructions INSTALLING THE ANTI-TIP FLOOR BRACKET (on each side of Cabinet Wall Locator Template Sheet B Place the anti-tip ...

Owners Manual
Page 20
...a side against the truck. Leave tape and all packaging on some models) •IMPORTANT NOTE: This refrigerator is 34-1/2″ deep. We strongly recommend that could clog the screen of the refrigerator. Lift off and remove top cap. Refer to "Replacing the Freezer...reinstallation. If using GE SmartConnect™ Refrigerator Tubing Kit, you will need an additional tube (WX08X10002) to connect the filter. D Move refrigerator to the installation location. 20 Top Hinge B 1 CONNECTING THE REFRIGERATOR TO THE HOUSE WATER LINE (icemaker and dispenser models) A cold water...
...a side against the truck. Leave tape and all packaging on some models) •IMPORTANT NOTE: This refrigerator is 34-1/2″ deep. We strongly recommend that could clog the screen of the refrigerator. Lift off and remove top cap. Refer to "Replacing the Freezer...reinstallation. If using GE SmartConnect™ Refrigerator Tubing Kit, you will need an additional tube (WX08X10002) to connect the filter. D Move refrigerator to the installation location. 20 Top Hinge B 1 CONNECTING THE REFRIGERATOR TO THE HOUSE WATER LINE (icemaker and dispenser models) A cold water...

Owners Manual
Page 21
... water on at the shutoff valve (house water supply) and check for any leaks. 3 PLUG IN THE REFRIGERATOR On models with the cutout in position. Use a 3/8″ hex wrench with a wrench. If you are using the GE SmartConnect™ tubing, the nuts are already assembled to hold it . C Fasten the tubing into the...
... water on at the shutoff valve (house water supply) and check for any leaks. 3 PLUG IN THE REFRIGERATOR On models with the cutout in position. Use a 3/8″ hex wrench with a wrench. If you are using the GE SmartConnect™ tubing, the nuts are already assembled to hold it . C Fasten the tubing into the...
Owners Manual
Page 22
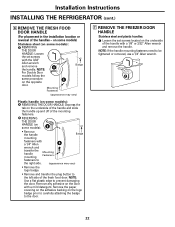
...door. NOTE: Use a flat plastic edge to be tightened or removed, use a 1/4″ Allen wrench. NOTE: A For Double Door models follow the same procedure B on the underside of the handle with a 1/4″ Allen A wrench and transfer the handle mounting Mounting Fasteners ... of the handles - NOTE: If the handle mounting fasteners need to prevent damaging the door. A 22 Installation Instructions INSTALLING THE REFRIGERATOR (cont.) 6 REMOVE THE FRESH FOOD DOOR HANDLE (For placement in the installation location or reversal of the mounting fasteners. Mounting Fasteners...
...door. NOTE: Use a flat plastic edge to be tightened or removed, use a 1/4″ Allen wrench. NOTE: A For Double Door models follow the same procedure B on the underside of the handle with a 1/4″ Allen A wrench and transfer the handle mounting Mounting Fasteners ... of the handles - NOTE: If the handle mounting fasteners need to prevent damaging the door. A 22 Installation Instructions INSTALLING THE REFRIGERATOR (cont.) 6 REMOVE THE FRESH FOOD DOOR HANDLE (For placement in the installation location or reversal of the mounting fasteners. Mounting Fasteners...

Owners Manual
Page 23
... vary) Plastic handle: A Attach the handle to the handle mounting fasteners and tighten the set screws with a 3/32″ Allen wrench. NOTE: For Double Door models follow the same procedure on back of the handle with a 1/8″ or 3/32″ Allen wrench. Installation Instructions 8 ATTACH THE FRESH FOOD DOOR HANDLE Stainless...
... vary) Plastic handle: A Attach the handle to the handle mounting fasteners and tighten the set screws with a 3/32″ Allen wrench. NOTE: For Double Door models follow the same procedure on back of the handle with a 1/8″ or 3/32″ Allen wrench. Installation Instructions 8 ATTACH THE FRESH FOOD DOOR HANDLE Stainless...
Owners Manual
Page 24
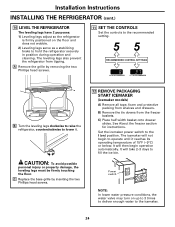
... It will not begin operation automatically. B Turn the leveling legs clockwise to raise the refrigerator, counterclockwise to the I (on) position. C Replace the base grille by removing the... the refrigerator securely in position during operation and cleaning. Installation Instructions INSTALLING THE REFRIGERATOR (cont.) 10 LEVEL THE REFRIGERATOR The leveling legs have 2 purposes: 1) Leveling legs adjust so the refrigerator is ... and drawers. The leveling legs also prevent the refrigerator from tipping. A Remove the grille by inserting the two Phillips head screws. 12 REMOVE...
... It will not begin operation automatically. B Turn the leveling legs clockwise to raise the refrigerator, counterclockwise to the I (on) position. C Replace the base grille by removing the... the refrigerator securely in position during operation and cleaning. Installation Instructions INSTALLING THE REFRIGERATOR (cont.) 10 LEVEL THE REFRIGERATOR The leveling legs have 2 purposes: 1) Leveling legs adjust so the refrigerator is ... and drawers. The leveling legs also prevent the refrigerator from tipping. A Remove the grille by inserting the two Phillips head screws. 12 REMOVE...

