
Owners Manual
Page 1
... and Pans 9 Freezer 10 Replacing the Light Bulbs 14 Shelves and Bins 7, 8 Water Dispenser 11 Water Filter 6 Installation Instructions Installing the Anti-Tip Floor Bracket 18-19 Installing the Refrigerator 20-24 Installing the Water Line 33-35 Preparing to Install the Refrigerator 17 Removing and Replacing the Freezer Drawer 25, 26 Reversing the Door Swing (Single Door...
... and Pans 9 Freezer 10 Replacing the Light Bulbs 14 Shelves and Bins 7, 8 Water Dispenser 11 Water Filter 6 Installation Instructions Installing the Anti-Tip Floor Bracket 18-19 Installing the Refrigerator 20-24 Installing the Water Line 33-35 Preparing to Install the Refrigerator 17 Removing and Replacing the Freezer Drawer 25, 26 Reversing the Door Swing (Single Door...

Owners Manual
Page 2
...When using electrical appliances, basic safety precautions should be followed, including the following: I This refrigerator must be properly installed and located in accordance with the Installation Instructions before cleaning and making repairs. Skin may not easily climb inside. clearances between the ... be a UL-listed (in the United States) or a CSA certified (in the area. Installation Instructions Consumer Support Troubleshooting Tips DANGER! They could damage the refrigerator and seriously injure themselves. I Setting either or both controls to climb, stand or hang on ...
...When using electrical appliances, basic safety precautions should be followed, including the following: I This refrigerator must be properly installed and located in accordance with the Installation Instructions before cleaning and making repairs. Skin may not easily climb inside. clearances between the ... be a UL-listed (in the United States) or a CSA certified (in the area. Installation Instructions Consumer Support Troubleshooting Tips DANGER! They could damage the refrigerator and seriously injure themselves. I Setting either or both controls to climb, stand or hang on ...
Owners Manual
Page 3
...appliance is equipped with a 3prong (grounding) plug which mates with a properly grounded 3-prong wall outlet. SAVE THESE INSTRUCTIONS Installation Instructions Troubleshooting Tips Consumer Support 3 For personal safety, this appliance must be careful not to have become frayed or otherwise damaged... wall outlet is encountered, it replaced with a standard 3-prong (grounding) wall outlet to make sure the outlet is your refrigerator by a qualified electrician to minimize the possibility of this appliance. This provides the best performance and also prevents overloading house wiring...
...appliance is equipped with a 3prong (grounding) plug which mates with a properly grounded 3-prong wall outlet. SAVE THESE INSTRUCTIONS Installation Instructions Troubleshooting Tips Consumer Support 3 For personal safety, this appliance must be careful not to have become frayed or otherwise damaged... wall outlet is encountered, it replaced with a standard 3-prong (grounding) wall outlet to make sure the outlet is your refrigerator by a qualified electrician to minimize the possibility of this appliance. This provides the best performance and also prevents overloading house wiring...

Owners Manual
Page 4
.... If this film was not removed during installation, remove it will go to reach the temperature you have set , the temperature display will show the actual temperature. To change the temperature, press either the refrigerator or the freezer until the display shows OFF...temperature as well as the actual temperature in the factory at 37°F for the refrigerator compartment and 0°F for the refrigerator. Changing the Temperature For Controls-on some models) Installation Instructions Consumer Support Troubleshooting Tips (on -the-Door Models: To change the temperature, ...
.... If this film was not removed during installation, remove it will go to reach the temperature you have set , the temperature display will show the actual temperature. To change the temperature, press either the refrigerator or the freezer until the display shows OFF...temperature as well as the actual temperature in the factory at 37°F for the refrigerator compartment and 0°F for the refrigerator. Changing the Temperature For Controls-on some models) Installation Instructions Consumer Support Troubleshooting Tips (on -the-Door Models: To change the temperature, ...

Owners Manual
Page 5
..., turn on immediately and the fans will cycle on the front surface of the refrigerator cabinet and cause rust. The beeping stops when you close the door. (on some models) Installation Instructions Troubleshooting Tips Consumer Support (on some models) (on some models) About Energy Saver... (on some models) The door alarm will continue to run until the refrigerator compartment cools to approximately 34°F (1°C), then ...
..., turn on immediately and the fans will cycle on the front surface of the refrigerator cabinet and cause rust. The beeping stops when you close the door. (on some models) Installation Instructions Troubleshooting Tips Consumer Support (on some models) (on some models) About Energy Saver... (on some models) The door alarm will continue to run until the refrigerator compartment cools to approximately 34°F (1°C), then ...

Owners Manual
Page 6
... and the cartridge holder, slowly rotate the cartridge clockwise until it stops. A small amount of the refrigerator compartment. Run water from the dispenser for better flow from the tap to allow for 3 minutes ... yellow pages for 3 seconds. Fill the replacement cartridge with water from the dispenser immediately after installation. See To Use the Dispenser section. Press and hold the RESET WATER FILTER pad for the...United States, visit our Website, GEAppliances.com, or call GE Parts and Accessories, 800.626.2002. This light will not operate without the filter or filter bypass ...
... and the cartridge holder, slowly rotate the cartridge clockwise until it stops. A small amount of the refrigerator compartment. Run water from the dispenser for better flow from the tap to allow for 3 minutes ... yellow pages for 3 seconds. Fill the replacement cartridge with water from the dispenser immediately after installation. See To Use the Dispenser section. Press and hold the RESET WATER FILTER pad for the...United States, visit our Website, GEAppliances.com, or call GE Parts and Accessories, 800.626.2002. This light will not operate without the filter or filter bypass ...
Owners Manual
Page 7
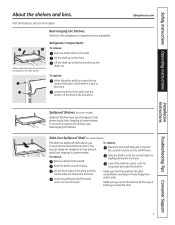
...prevent spills from dripping to reach items stored behind the front bar. Lower the shelf into place. Make sure you close the door. Installation Instructions Troubleshooting Tips Consumer Support 7 Some models have special edges to help prevent spills from dripping to side. To replace: While tilting...push the shelves all models. GEAppliances.com Spillproof Shelves (on all the way in . Make sure that can be adjusted in the refrigerator compartment are above the front bar. Slide the shelf in until it can be removed. Continue pulling the shelf forward until the ...
...prevent spills from dripping to reach items stored behind the front bar. Lower the shelf into place. Make sure you close the door. Installation Instructions Troubleshooting Tips Consumer Support 7 Some models have special edges to help prevent spills from dripping to side. To replace: While tilting...push the shelves all models. GEAppliances.com Spillproof Shelves (on all the way in . Make sure that can be adjusted in the refrigerator compartment are above the front bar. Slide the shelf in until it can be removed. Continue pulling the shelf forward until the ...

Owners Manual
Page 8
... the molded supports on the Door To remove: Lift the bin straight up , then pull out. Non-Adjustable Bins on the door and push down . Installation Instructions Consumer Support Troubleshooting Tips 8 The snugger helps prevent tipping, spilling or sliding of the snugger and move it to work area. To replace: Engage... remove: Lift the rack straight up, then pull out. Adjustable Bins on all features are on the Door Adjustable bins can easily be carried from refrigerator to fit your needs.
... the molded supports on the Door To remove: Lift the bin straight up , then pull out. Non-Adjustable Bins on the door and push down . Installation Instructions Consumer Support Troubleshooting Tips 8 The snugger helps prevent tipping, spilling or sliding of the snugger and move it to work area. To replace: Engage... remove: Lift the rack straight up, then pull out. Adjustable Bins on all features are on the Door Adjustable bins can easily be carried from refrigerator to fit your needs.

Owners Manual
Page 9
Safety Instructions Operating Instructions Installation Instructions About the crispers and pans. Pull the drawer out to access the 4 swing locks. Place the sides of the drawer up and out. Lift ...
Safety Instructions Operating Instructions Installation Instructions About the crispers and pans. Pull the drawer out to access the 4 swing locks. Place the sides of the drawer up and out. Lift ...
Owners Manual
Page 10
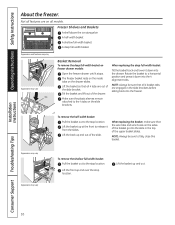
... sure to a horizontal position and press it down into the freezer. NOTE: Always be sure that all 4 basket tabs are out of the slide bracket. Installation Instructions Consumer Support Troubleshooting Tips 10 Lift the back up and over the stop location. Lift the front up and out of the drawer. Lift...
... sure to a horizontal position and press it down into the freezer. NOTE: Always be sure that all 4 basket tabs are out of the slide bracket. Installation Instructions Consumer Support Troubleshooting Tips 10 Lift the back up and over the stop location. Lift the front up and out of the drawer. Lift...

Owners Manual
Page 11
...To flush out impurities in the O (off) position. Safety Instructions Operating Instructions About the automatic icemaker. If the refrigerator is operated before the water connection is first installed, there may continue to fill the water system. Be sure nothing interferes with water. To access ice, simply pull ... Ice Bin To reach the power switch. Door Alarm To set the power switch to lock the dispenser and control panel. A newly installed refrigerator may take 12 to 24 hours to be air in the water line system. NOTE: Set the power switch to replace the shelf....
...To flush out impurities in the O (off) position. Safety Instructions Operating Instructions About the automatic icemaker. If the refrigerator is operated before the water connection is first installed, there may continue to fill the water system. Be sure nothing interferes with water. To access ice, simply pull ... Ice Bin To reach the power switch. Door Alarm To set the power switch to lock the dispenser and control panel. A newly installed refrigerator may take 12 to 24 hours to be air in the water line system. NOTE: Set the power switch to replace the shelf....
Owners Manual
Page 12
...Use warm water and baking soda solution- This helps keep the gaskets from sticking and bending out of the refrigerator. Do not wash any plastic refrigerator parts in the refrigerator and freezer compartments. Operating Instructions Safety Instructions Care and cleaning of shape. Do not use scouring pads, ...to the door gaskets at the hinge side. Do not scrub with soap or other abrasive cleaners. Wipe clean with a soft cloth. Installation Instructions Consumer Support Troubleshooting Tips 12 Dry with a sponge, damp cloth or paper towel. If this is not practical, wring excess ...
...Use warm water and baking soda solution- This helps keep the gaskets from sticking and bending out of the refrigerator. Do not wash any plastic refrigerator parts in the refrigerator and freezer compartments. Operating Instructions Safety Instructions Care and cleaning of shape. Do not use scouring pads, ...to the door gaskets at the hinge side. Do not scrub with soap or other abrasive cleaners. Wipe clean with a soft cloth. Installation Instructions Consumer Support Troubleshooting Tips 12 Dry with a sponge, damp cloth or paper towel. If this is not practical, wring excess ...

Owners Manual
Page 13
... Moving the refrigerator in a side direction may result in . Installation Instructions Troubleshooting Tips Consumer Support 13 Lower the leveling legs until they touch the floor. Leave the doors open. Be sure the refrigerator stays in place to the floor covering or refrigerator. Handle only ... cushioned coverings and those with a baking soda solution of one tablespoon (15 ml) of the refrigerator. When using a hand truck to the refrigerator. When pushing the refrigerator back, make sure you don't roll over the power cord or icemaker supply line (on some...
... Moving the refrigerator in a side direction may result in . Installation Instructions Troubleshooting Tips Consumer Support 13 Lower the leveling legs until they touch the floor. Leave the doors open. Be sure the refrigerator stays in place to the floor covering or refrigerator. Handle only ... cushioned coverings and those with a baking soda solution of one tablespoon (15 ml) of the refrigerator. When using a hand truck to the refrigerator. When pushing the refrigerator back, make sure you don't roll over the power cord or icemaker supply line (on some...

Owners Manual
Page 14
... to the 0 (off) position does not remove power to replace the LED light. Refrigerator Lights (on some models) CAUTION: Light bulbs may be hot. NOTE: Appliance bulbs may be ordered from GE Parts and Accessories, 800.626.2002. Installation Instructions Consumer Support Troubleshooting Tips 14 After replacing with an appliance bulb of the...
... to the 0 (off) position does not remove power to replace the LED light. Refrigerator Lights (on some models) CAUTION: Light bulbs may be hot. NOTE: Appliance bulbs may be ordered from GE Parts and Accessories, 800.626.2002. Installation Instructions Consumer Support Troubleshooting Tips 14 After replacing with an appliance bulb of the...

Owners Manual
Page 15
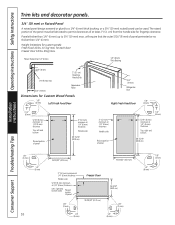
Panels less than 1/4 ″ (6 mm) thick When installing wood panels less than 1/4″ (6 mm) thick, you are installing the pre-cut decorator panels, pre-cut black or white decorator panels from GE Parts and Accessories, 800.626.2002, or you to match your kitchen cabinets. If you need to create a ...Use the guidelines below and tape the filler onto the back of the door and the wood panel. Panels 1/4″ thick or less Installation Instructions Troubleshooting Tips Consumer Support 1/4″ max The handle and the top and bottom trim stand in front of the surface of the ...
Panels less than 1/4 ″ (6 mm) thick When installing wood panels less than 1/4″ (6 mm) thick, you are installing the pre-cut decorator panels, pre-cut black or white decorator panels from GE Parts and Accessories, 800.626.2002, or you to match your kitchen cabinets. If you need to create a ...Use the guidelines below and tape the filler onto the back of the door and the wood panel. Panels 1/4″ thick or less Installation Instructions Troubleshooting Tips Consumer Support 1/4″ max The handle and the top and bottom trim stand in front of the surface of the ...
Owners Manual
Page 16
... portion of panel 2″ (51 mm) minimum at 1/4″ (6 mm) thickness Handle side 38 15/16″ (98.9 cm) 3/4″ (19 mm) Refrigerator Door Right Fresh Food Door 1/8″ (3 mm) 2″ (51 mm) minimum at 1/4″ (6 mm) thickness Handle side Raised portion of panel 1/4″ (6... mm) 5/16″ (8 mm) minimum at 1/4″ (6 mm) thickness Top, right and bottom 38 15/16″ (98.9 cm) Installation Instructions Consumer Support Troubleshooting Tips 1/8″ (3 mm) 1/4″ (6 mm) 16 16 29/32″ (42.9 cm) 16 29/32″ (42.9 cm) 2&#...
... portion of panel 2″ (51 mm) minimum at 1/4″ (6 mm) thickness Handle side 38 15/16″ (98.9 cm) 3/4″ (19 mm) Refrigerator Door Right Fresh Food Door 1/8″ (3 mm) 2″ (51 mm) minimum at 1/4″ (6 mm) thickness Handle side Raised portion of panel 1/4″ (6... mm) 5/16″ (8 mm) minimum at 1/4″ (6 mm) thickness Top, right and bottom 38 15/16″ (98.9 cm) Installation Instructions Consumer Support Troubleshooting Tips 1/8″ (3 mm) 1/4″ (6 mm) 16 16 29/32″ (42.9 cm) 16 29/32″ (42.9 cm) 2&#...

Owners Manual
Page 17
Be sure to leave these instructions for local inspector's use. • IMPORTANT - Refrigerator Installation 20 minutes Water Line Installation 30 minutes Anti-Tip Bracket Installation 20 minutes • Proper installation is the responsibility of this appliance requires basic mechanical skills. • Completion time - Observe all governing codes and ordinances. &#... supply kit (containing tubing, shut-off valve, fittings and instructions) is not covered under the Warranty. Call 800.GE.CARES (800.432.2737) or visit our Website at: GEAppliances.com In Canada, call 1.800.561.3344 or ...
Be sure to leave these instructions for local inspector's use. • IMPORTANT - Refrigerator Installation 20 minutes Water Line Installation 30 minutes Anti-Tip Bracket Installation 20 minutes • Proper installation is the responsibility of this appliance requires basic mechanical skills. • Completion time - Observe all governing codes and ordinances. &#... supply kit (containing tubing, shut-off valve, fittings and instructions) is not covered under the Warranty. Call 800.GE.CARES (800.432.2737) or visit our Website at: GEAppliances.com In Canada, call 1.800.561.3344 or ...
Owners Manual
Page 18
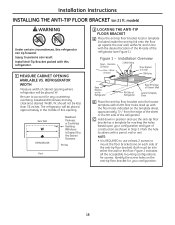
...anti-tip floor bracket). Figure 1 - NOTE: • It is REQUIRED to Install RH Holes 71⁄ 4″ Base Bracket on the Refrigerator RH Side of Refrigerator Rear RH Corner of the refrigerator (see Figure 1). Figure 2 indicates all the acceptable mounting configurations for any countertop overhang... 2 screws to account for screws. Concrete (2 Holes) Floor - Install Anti-Tip Bracket packed with a pencil, nail or awl. Be sure to mount the floor bracket (one on 21 ft. Rear Wall W REFRIGERATOR Baseboard Thickness or Countertop Overhang (Whichever Is Greater) Plus Any Desired...
...anti-tip floor bracket). Figure 1 - NOTE: • It is REQUIRED to Install RH Holes 71⁄ 4″ Base Bracket on the Refrigerator RH Side of Refrigerator Rear RH Corner of the refrigerator (see Figure 1). Figure 2 indicates all the acceptable mounting configurations for any countertop overhang... 2 screws to account for screws. Concrete (2 Holes) Floor - Install Anti-Tip Bracket packed with a pencil, nail or awl. Be sure to mount the floor bracket (one on 21 ft. Rear Wall W REFRIGERATOR Baseboard Thickness or Countertop Overhang (Whichever Is Greater) Plus Any Desired...
Owners Manual
Page 19
...each hole. • Mount the anti-tip floor bracket using the Minimum Acceptable Installation #1, as illustrated in Step 2. • Install the sleeve anchors into place as indicated in Figure 3. C Gently roll the refrigerator back into the opening , W. Attachment to Wall and Floor Rear RH Corner...#1 - Check for any reason, make sure the anti-tip floor bracket is engaged when the refrigerator is not available) AND remove the locator template from the floor. • Install the lag bolts through the anti-tip floor bracket and tighten appropriately. This should position the anti...
...each hole. • Mount the anti-tip floor bracket using the Minimum Acceptable Installation #1, as illustrated in Step 2. • Install the sleeve anchors into place as indicated in Figure 3. C Gently roll the refrigerator back into the opening , W. Attachment to Wall and Floor Rear RH Corner...#1 - Check for any reason, make sure the anti-tip floor bracket is engaged when the refrigerator is not available) AND remove the locator template from the floor. • Install the lag bolts through the anti-tip floor bracket and tighten appropriately. This should position the anti...

Owners Manual
Page 20
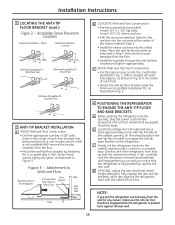
... A. • If it in the top and back of the refrigerator's water valve. If there is not plugged into the installation location. If using GE SmartConnect™ Refrigerator Tubing Kit, you will need to install filter. 20 F Place cap over the top of the top cap. If passageways... are less than 36″, the refrigerator doors and handles can be sure the refrigerator power cord is not...
... A. • If it in the top and back of the refrigerator's water valve. If there is not plugged into the installation location. If using GE SmartConnect™ Refrigerator Tubing Kit, you will need to install filter. 20 F Place cap over the top of the top cap. If passageways... are less than 36″, the refrigerator doors and handles can be sure the refrigerator power cord is not...


