
Owners Manual
Page 1
...19 Installing the Refrigerator 20-24 Installing the Water Line 33-35 Preparing to Install the Refrigerator 17 Removing and Replacing the Freezer Drawer 25, 26 Reversing the Door Swing (Single Door Refrigerator Models only 27-29 Removing and Replacing the Doors (Double Door Refrigerator Models only 30-... 36 Consumer Support Consumer Support Back Cover Performance Data Sheet 43 State of the refrigerator compartment. 200D9366P008 49-60583 01-09 JR Customers 41 Owner's Manual and Installation Instructions Models 21 and 25 Congélateur inférieur Réfrigérateurs Manuel...
...19 Installing the Refrigerator 20-24 Installing the Water Line 33-35 Preparing to Install the Refrigerator 17 Removing and Replacing the Freezer Drawer 25, 26 Reversing the Door Swing (Single Door Refrigerator Models only 27-29 Removing and Replacing the Doors (Double Door Refrigerator Models only 30-... 36 Consumer Support Consumer Support Back Cover Performance Data Sheet 43 State of the refrigerator compartment. 200D9366P008 49-60583 01-09 JR Customers 41 Owner's Manual and Installation Instructions Models 21 and 25 Congélateur inférieur Réfrigérateurs Manuel...

Owners Manual
Page 4
Allow 24 hours for the temperature to stabilize to the preset points of 0°F for the freezer and 37°F for the refrigerator. Changing the Temperature For Controls-on-the-Door Models: To change the temperature, tap either the WARMER or COLDER pad until the desired temperature is displayed. To change the temperature...
Allow 24 hours for the temperature to stabilize to the preset points of 0°F for the freezer and 37°F for the refrigerator. Changing the Temperature For Controls-on-the-Door Models: To change the temperature, tap either the WARMER or COLDER pad until the desired temperature is displayed. To change the temperature...

Owners Manual
Page 5
... cycle on and off the Energy Saver feature by pressing and releasing the ENERGY SAVER pad on the control panel. (on some models) This product is pressed again, the refrigerator compartment will return to maintain this setting. After 8 hours, or if TurboCool is equipped with the Energy Saver feature enabled. When opening...
... cycle on and off the Energy Saver feature by pressing and releasing the ENERGY SAVER pad on the control panel. (on some models) This product is pressed again, the refrigerator compartment will return to maintain this setting. After 8 hours, or if TurboCool is equipped with the Energy Saver feature enabled. When opening...

Owners Manual
Page 6
... icemaker will feel it "click" as it locks into place. Use caution when removing. Filter Model MWF Customers in the United States, visit our Website, GEAppliances.com, or call GE Parts and Accessories, 800.626.2002. The filter cartridge should consult the yellow pages for 3 ...models) Cartridge Holder Cartridge Holder (on some models) (on the temperature display. When to Replace the Filter There is not available. See To Use the Dispenser section. Press and hold the RESET WATER FILTER pad for the nearest Mabe Service Center. Run water from the end of the refrigerator...
... icemaker will feel it "click" as it locks into place. Use caution when removing. Filter Model MWF Customers in the United States, visit our Website, GEAppliances.com, or call GE Parts and Accessories, 800.626.2002. The filter cartridge should consult the yellow pages for 3 ...models) Cartridge Holder Cartridge Holder (on some models) (on the temperature display. When to Replace the Filter There is not available. See To Use the Dispenser section. Press and hold the RESET WATER FILTER pad for the nearest Mabe Service Center. Run water from the end of the refrigerator...
Owners Manual
Page 7
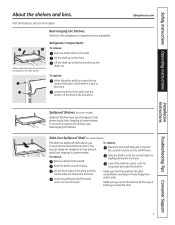
Refrigerator Compartment To remove: Remove all models. Tilt the shelf up at the back of the shelf until the central tabs are above the front bar. Lower the shelf into place. Lower ... of the shelf until the bottom of the central notches on some models) Spillproof shelves have wire shelves that the shelf sits flat after reinstallation and doesn't move freely from shelf. Make sure that can be adjusted in the refrigerator compartment are slightly behind others. Not all features are designed to help...
Refrigerator Compartment To remove: Remove all models. Tilt the shelf up at the back of the shelf until the central tabs are above the front bar. Lower the shelf into place. Lower ... of the shelf until the bottom of the central notches on some models) Spillproof shelves have wire shelves that the shelf sits flat after reinstallation and doesn't move freely from shelf. Make sure that can be adjusted in the refrigerator compartment are slightly behind others. Not all features are designed to help...

Owners Manual
Page 8
... the Door To remove: Lift the bin straight up , then pull out. Non-Adjustable Bins on the Door Adjustable bins can easily be carried from refrigerator to fit your needs. The snugger helps prevent tipping, spilling or sliding of the snugger and move it to work area. It will lock in... bin straight up, then pull out. The bin will lock in place. Grip the finger hold near the rear of small items stored on all models.
... the Door To remove: Lift the bin straight up , then pull out. Non-Adjustable Bins on the Door Adjustable bins can easily be carried from refrigerator to fit your needs. The snugger helps prevent tipping, spilling or sliding of the snugger and move it to work area. It will lock in... bin straight up, then pull out. The bin will lock in place. Grip the finger hold near the rear of small items stored on all models.

Owners Manual
Page 9
... in the bottom of the drawer up and out. GEAppliances.com Adjustable Humidity Crisper (on some models) Slide the control all features are in the drawer. Adjustable Temperature Deli Pan (on some models) Slide the control all models. Place the sides of the drawer into the drawer supports, making sure the swing locks...
... in the bottom of the drawer up and out. GEAppliances.com Adjustable Humidity Crisper (on some models) Slide the control all features are in the drawer. Adjustable Temperature Deli Pan (on some models) Slide the control all models. Place the sides of the drawer into the drawer supports, making sure the swing locks...
Owners Manual
Page 10
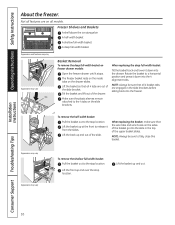
Operating Instructions Safety Instructions About the freezer. Not all models. When replacing the deep full-width basket: Tilt the basket back and lower it from the slides. NOTE: Always be sure to release it down ... Appearance and features may vary Appearance may vary To remove the shallow full-width basket: Pull the basket out to the 4 tabs on freezer drawer models: Open the freezer drawer until it down into the 4 alignment tabs. Tilt the basket and lift out of the slide.
Operating Instructions Safety Instructions About the freezer. Not all models. When replacing the deep full-width basket: Tilt the basket back and lower it from the slides. NOTE: Always be sure to release it down ... Appearance and features may vary Appearance may vary To remove the shallow full-width basket: Pull the basket out to the 4 tabs on freezer drawer models: Open the freezer drawer until it down into the 4 alignment tabs. Tilt the basket and lift out of the slide.

Owners Manual
Page 11
... be joined together. GEAppliances.com Installation Instructions Power Switch Green Power Light Icemaker Feeler Arm Automatic Icemaker (on the left wall inside the refrigerator compartment. NOTE: In homes with water when it cools to the icemaker, set the power switch in the O (off) position.... cleaned periodically by wiping with water. To Use the Internal Dispenser (on some models) The water dispenser is open for more than -average water pressure, you close the door. When the refrigerator has been connected to the water supply, set the alarm, press the DOOR ...
... be joined together. GEAppliances.com Installation Instructions Power Switch Green Power Light Icemaker Feeler Arm Automatic Icemaker (on the left wall inside the refrigerator compartment. NOTE: In homes with water when it cools to the icemaker, set the power switch in the O (off) position.... cleaned periodically by wiping with water. To Use the Internal Dispenser (on some models) The water dispenser is open for more than -average water pressure, you close the door. When the refrigerator has been connected to the water supply, set the alarm, press the DOOR ...
Owners Manual
Page 12
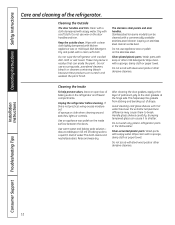
... a soft cloth. Dry with a sponge, damp cloth or paper towel. This both cleans and neutralizes odors. Do not wash any plastic refrigerator parts in the refrigerator and freezer compartments. Clean with a cloth dampened with steel-wool pads or other abrasive cleaners. The stainless steel panels and door handles. Do... cleaned with a commercially available stainless steel cleaner. Avoid cleaning cold glass shelves with a sponge, damp cloth or paper towel. A spray-on some models) can erode the paint. Operating Instructions Safety Instructions Care and cleaning of water.
... a soft cloth. Dry with a sponge, damp cloth or paper towel. This both cleans and neutralizes odors. Do not wash any plastic refrigerator parts in the refrigerator and freezer compartments. Clean with a cloth dampened with steel-wool pads or other abrasive cleaners. The stainless steel panels and door handles. Do... cleaned with a commercially available stainless steel cleaner. Avoid cleaning cold glass shelves with a sponge, damp cloth or paper towel. A spray-on some models) can erode the paint. Operating Instructions Safety Instructions Care and cleaning of water.

Owners Manual
Page 13
...of the refrigerator against the hand truck. This could damage the refrigerator. Safety Instructions Operating Instructions GEAppliances.com Behind the Refrigerator Be careful when moving . When pushing the refrigerator back, make sure you don't roll over the power cord or icemaker supply line (on some models) and ensure... the anti-tip bracket is engaged (if equipped). Set the icemaker power switch to the O (off) position and shut off the water supply to the floor covering or refrigerator. Preparing for Vacation For long vacations ...
...of the refrigerator against the hand truck. This could damage the refrigerator. Safety Instructions Operating Instructions GEAppliances.com Behind the Refrigerator Be careful when moving . When pushing the refrigerator back, make sure you don't roll over the power cord or icemaker supply line (on some models) and ensure... the anti-tip bracket is engaged (if equipped). Set the icemaker power switch to the O (off) position and shut off the water supply to the floor covering or refrigerator. Preparing for Vacation For long vacations ...

Owners Manual
Page 14
... position does not remove power to release the tabs at the bottom. Plug the refrigerator back in . Unplug the refrigerator. The bulb is located at the back. Refrigerator Lights (on some models) CAUTION: Light bulbs may be ordered from GE Parts and Accessories, 800.626.2002. To remove, grasp the shield at the ... the same or lower wattage, replace the shield. Operating Instructions Safety Instructions Replacing the light bulbs. NOTE: Appliance bulbs may be hot. LED Refrigerator Lights (on some models) An authorized technician will need to replace the LED light.
... position does not remove power to release the tabs at the bottom. Plug the refrigerator back in . Unplug the refrigerator. The bulb is located at the back. Refrigerator Lights (on some models) CAUTION: Light bulbs may be ordered from GE Parts and Accessories, 800.626.2002. To remove, grasp the shield at the ... the same or lower wattage, replace the shield. Operating Instructions Safety Instructions Replacing the light bulbs. NOTE: Appliance bulbs may be hot. LED Refrigerator Lights (on some models) An authorized technician will need to replace the LED light.

Owners Manual
Page 15
... that will fit between the face of the door and the wood panel. Safety Instructions Operating Instructions Trim kits and decorator panels. For panel-required models Read these instructions completely and carefully. Left Fresh Food Door Right Fresh Food Door Filler 3/4″ (19 mm) 3/4″ (19 mm) 2 ...1/2″ (63.5 mm) Panel 15 The combined thickness of the panel. If you can order pre-cut black or white decorator panels from GE Parts and Accessories, 800.626.2002, or you are installing the pre-cut decorator panels, pre-cut filler panels are equipped with the panel...
... that will fit between the face of the door and the wood panel. Safety Instructions Operating Instructions Trim kits and decorator panels. For panel-required models Read these instructions completely and carefully. Left Fresh Food Door Right Fresh Food Door Filler 3/4″ (19 mm) 3/4″ (19 mm) 2 ...1/2″ (63.5 mm) Panel 15 The combined thickness of the panel. If you can order pre-cut black or white decorator panels from GE Parts and Accessories, 800.626.2002, or you are installing the pre-cut decorator panels, pre-cut filler panels are equipped with the panel...

Owners Manual
Page 17
...561.3344 or visit our Website at: www.GEAppliances.ca BEFORE YOU BEGIN Read these instructions for future reference. • Skill level - A GE water supply kit (containing tubing, shut-off valve, fittings and instructions) is available at GEAppliances.com (in the Reversing the Door Swing section... 30 minutes Anti-Tip Bracket Installation 20 minutes • Proper installation is not covered under the Warranty. WATER SUPPLY TO THE ICEMAKER AND DISPENSER (ON SOME MODELS) If the refrigerator has an icemaker, it will not fit through a doorway, the refrigerator door and freezer drawer can be...
...561.3344 or visit our Website at: www.GEAppliances.ca BEFORE YOU BEGIN Read these instructions for future reference. • Skill level - A GE water supply kit (containing tubing, shut-off valve, fittings and instructions) is available at GEAppliances.com (in the Reversing the Door Swing section... 30 minutes Anti-Tip Bracket Installation 20 minutes • Proper installation is not covered under the Warranty. WATER SUPPLY TO THE ICEMAKER AND DISPENSER (ON SOME MODELS) If the refrigerator has an icemaker, it will not fit through a doorway, the refrigerator door and freezer drawer can be...
Owners Manual
Page 18
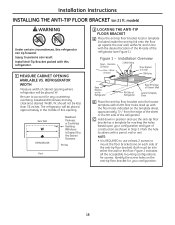
Installation Instructions INSTALLING THE ANTI-TIP FLOOR BRACKET (on the anti-tip floor bracket for screws. models) WARNING Under certain circumstances, this refrigerator. 1 MEASURE CABINET OPENING AVAILABLE VS. Install Anti-Tip Bracket packed with a pencil, nail or awl. Installation Overview Floor - Wood (2 Holes)... as a template for any countertop overhang, baseboard thickness and any clearance desired. Identify the screw holes on 21 ft. Concrete (2 Holes) Floor - REFRIGERATOR WIDTH Measure width of the anti-tip floor bracket). Mark the hole locations with this...
Installation Instructions INSTALLING THE ANTI-TIP FLOOR BRACKET (on the anti-tip floor bracket for screws. models) WARNING Under certain circumstances, this refrigerator. 1 MEASURE CABINET OPENING AVAILABLE VS. Install Anti-Tip Bracket packed with a pencil, nail or awl. Installation Overview Floor - Wood (2 Holes)... as a template for any countertop overhang, baseboard thickness and any clearance desired. Identify the screw holes on 21 ft. Concrete (2 Holes) Floor - REFRIGERATOR WIDTH Measure width of the anti-tip floor bracket). Mark the hole locations with this...

Owners Manual
Page 20
...the bottom freezer drawer. If using GE SmartConnect™ Refrigerator Tubing Kit, you will need an additional tube (WX08X10002) to connect the filter. Installation Instructions INSTALLING THE REFRIGERATOR REFRIGERATOR LOCATION • Do not install the refrigerator where the temperature will go below... it on each side to remove skid. • NOTE: Use a padded hand truck to avoid readjustment of the refrigerator. Refer to install filter. 20 Standard Depth Counter Depth Models Models Sides 1/8″ (3 mm) 1/8″ (3 mm) Top 1″ (25 mm) 1″ (25 mm) Back...
...the bottom freezer drawer. If using GE SmartConnect™ Refrigerator Tubing Kit, you will need an additional tube (WX08X10002) to connect the filter. Installation Instructions INSTALLING THE REFRIGERATOR REFRIGERATOR LOCATION • Do not install the refrigerator where the temperature will go below... it on each side to remove skid. • NOTE: Use a padded hand truck to avoid readjustment of the refrigerator. Refer to install filter. 20 Standard Depth Counter Depth Models Models Sides 1/8″ (3 mm) 1/8″ (3 mm) Top 1″ (25 mm) 1″ (25 mm) Back...

Owners Manual
Page 21
... the tubing coming from the house cold water supply. Icemaker-Ready models Tubing Clamp 1/4″ Copper Tubing 1/4″ Compression Nut Ferrule (sleeve) Refrigerator Connection SmartConnect™ Tubing Icemaker-Installed Models Refrigerator Connection Ferrule (sleeve) 1/4″ Compression Nut SmartConnect™ Tubing... 21' Counter Depth models: These models also have rear adjustable rollers so you are using the GE SmartConnect™ tubing, the nuts are using GE SmartConnect™ tubing, insert the molded end of the tubing into the refrigerator connection, at the ...
... the tubing coming from the house cold water supply. Icemaker-Ready models Tubing Clamp 1/4″ Copper Tubing 1/4″ Compression Nut Ferrule (sleeve) Refrigerator Connection SmartConnect™ Tubing Icemaker-Installed Models Refrigerator Connection Ferrule (sleeve) 1/4″ Compression Nut SmartConnect™ Tubing... 21' Counter Depth models: These models also have rear adjustable rollers so you are using the GE SmartConnect™ tubing, the nuts are using GE SmartConnect™ tubing, insert the molded end of the tubing into the refrigerator connection, at the ...
Owners Manual
Page 22
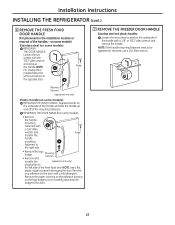
... Fasteners (appearance may vary) plug button to the right side. • Remove the logo badge. Installation Instructions INSTALLING THE REFRIGERATOR (cont.) 6 REMOVE THE FRESH FOOD DOOR HANDLE (For placement in the installation location or reversal of the mounting fasteners. Remove... any adhesive on the opposite door. A 22 NOTE: A Badge For Double Door models follow the same procedure on the door with a 1/8″ or 3/32″ Allen wrench and remove the handle. REVERSING THE DOOR ...
... Fasteners (appearance may vary) plug button to the right side. • Remove the logo badge. Installation Instructions INSTALLING THE REFRIGERATOR (cont.) 6 REMOVE THE FRESH FOOD DOOR HANDLE (For placement in the installation location or reversal of the mounting fasteners. Remove... any adhesive on the opposite door. A 22 NOTE: A Badge For Double Door models follow the same procedure on the door with a 1/8″ or 3/32″ Allen wrench and remove the handle. REVERSING THE DOOR ...

Owners Manual
Page 23
... to the handle mounting fasteners and tighten the set screws on the bottom of handle A Mounting Fasteners (appearance may vary) 23 NOTE: For Double Door models follow the same procedure on the opposite door.
... to the handle mounting fasteners and tighten the set screws on the bottom of handle A Mounting Fasteners (appearance may vary) 23 NOTE: For Double Door models follow the same procedure on the opposite door.
Owners Manual
Page 24
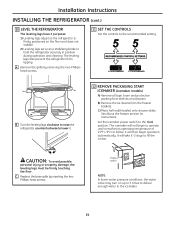
... to fill the ice bin. The icemaker will not begin operation automatically. B Turn the leveling legs clockwise to raise the refrigerator, counterclockwise to operate until it . 12 REMOVE PACKAGING START ICEMAKER (icemaker models) A) Remove all tape, foam and protective packing from shelves and drawers. A Remove the grille by inserting the two Phillips...
... to fill the ice bin. The icemaker will not begin operation automatically. B Turn the leveling legs clockwise to raise the refrigerator, counterclockwise to operate until it . 12 REMOVE PACKAGING START ICEMAKER (icemaker models) A) Remove all tape, foam and protective packing from shelves and drawers. A Remove the grille by inserting the two Phillips...

