Use and Care Manual
Page 1
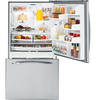
... Water Filter 6 Installation Instructions Installing the Anti-Tip Floor Bracket 18, 19 Installing the Refrigerator . . . . . .20-24 Installing the Water Line 33-35 Preparing to Install the Refrigerator 17 Removing and Replacing the Freezer Drawer 25, 26 Reversing the Door Swing (Single Door.... .36-40 Normal Operating Sounds 36 Consumer Support Consumer Support Back Cover Performance Data Sheet 43 State of the refrigerator compartment. 200D9366P019 49-60609-2 04-10 GE Customers 41 Owner's Manual and Installation Instructions Models 21 and 25 Congélateur inférieur Réfrig...
... Water Filter 6 Installation Instructions Installing the Anti-Tip Floor Bracket 18, 19 Installing the Refrigerator . . . . . .20-24 Installing the Water Line 33-35 Preparing to Install the Refrigerator 17 Removing and Replacing the Freezer Drawer 25, 26 Reversing the Door Swing (Single Door.... .36-40 Normal Operating Sounds 36 Consumer Support Consumer Support Back Cover Performance Data Sheet 43 State of the refrigerator compartment. 200D9366P019 49-60609-2 04-10 GE Customers 41 Owner's Manual and Installation Instructions Models 21 and 25 Congélateur inférieur Réfrig...
Use and Care Manual
Page 2
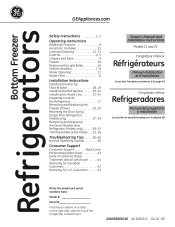
... children may stick to product disposal. clearances between the doors and between the doors and cabinet are in the refrigerator. Before You Throw Away Your Old Refrigerator or Freezer: n Take off ) does not remove power to do. Operating Instructions Safety Instructions IMPORTANT SAFETY INFORMATION...rid of the "pinch point" areas; Use this appliance only for "just a few days." n Keep fingers out of an old refrigeration product, check with the Installation Instructions before cleaning and making repairs. n Leave the shelves in accordance with the company handling the disposal ...
... children may stick to product disposal. clearances between the doors and between the doors and cabinet are in the refrigerator. Before You Throw Away Your Old Refrigerator or Freezer: n Take off ) does not remove power to do. Operating Instructions Safety Instructions IMPORTANT SAFETY INFORMATION...rid of the "pinch point" areas; Use this appliance only for "just a few days." n Keep fingers out of an old refrigeration product, check with the Installation Instructions before cleaning and making repairs. n Leave the shelves in accordance with the company handling the disposal ...
Use and Care Manual
Page 3
... appliance must be careful not to minimize the possibility of this appliance. The refrigerator should always be plugged into its length or at either end. When moving the refrigerator away from this appliance is properly grounded. The power cord of electric shock hazard... grounded. This provides the best performance and also prevents overloading house wiring circuits which has a voltage rating that have it is your refrigerator by a qualified electrician to make sure the outlet is equipped with a 3prong (grounding) plug which mates with a properly grounded 3-prong...
... appliance must be careful not to minimize the possibility of this appliance. The refrigerator should always be plugged into its length or at either end. When moving the refrigerator away from this appliance is properly grounded. The power cord of electric shock hazard... grounded. This provides the best performance and also prevents overloading house wiring circuits which has a voltage rating that have it is your refrigerator by a qualified electrician to make sure the outlet is equipped with a 3prong (grounding) plug which mates with a properly grounded 3-prong...
Use and Care Manual
Page 4
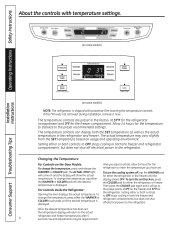
... pad until the desired temperature is shipped with protective film covering the temperature controls. Setting either or both controls to the actual 4 refrigerator and freezer temperatures after 5 seconds. Setting either or both controls to the preset points of 0°F for the freezer and 37&#...for the freezer compartment. The ACTUAL TEMP light will come on -the-Door Models: To change the temperature, tap either the refrigerator or the freezer until the desired temperature is displayed. Changing the Temperature For Controls-on and the display will return to OFF stops...
... pad until the desired temperature is shipped with protective film covering the temperature controls. Setting either or both controls to the actual 4 refrigerator and freezer temperatures after 5 seconds. Setting either or both controls to the preset points of 0°F for the freezer and 37&#...for the freezer compartment. The ACTUAL TEMP light will come on -the-Door Models: To change the temperature, tap either the refrigerator or the freezer until the desired temperature is displayed. Changing the Temperature For Controls-on and the display will return to OFF stops...
Use and Care Manual
Page 5
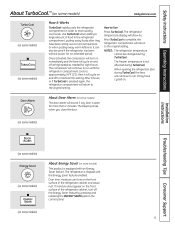
...Energy Saver feature enabled. Over time, moisture can also be changed during TurboCool. Use TurboCool when adding a large amount of the refrigerator cabinet and cause rust. It can form on some models) The door alarm will cycle on and off the Energy Saver feature by... and the fans will continue to the original setting. If moisture does appear on . After 8 hours, or if TurboCool is complete, the refrigerator compartment will show . The beeping stops when you close the door. (on some models) Installation Instructions Troubleshooting Tips Consumer Support (on some models...
...Energy Saver feature enabled. Over time, moisture can also be changed during TurboCool. Use TurboCool when adding a large amount of the refrigerator cabinet and cause rust. It can form on some models) The door alarm will cycle on and off the Energy Saver feature by... and the fans will continue to the original setting. If moisture does appear on . After 8 hours, or if TurboCool is complete, the refrigerator compartment will show . The beeping stops when you close the door. (on some models) Installation Instructions Troubleshooting Tips Consumer Support (on some models...
Use and Care Manual
Page 6
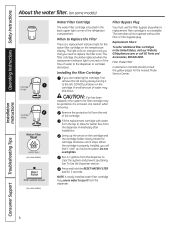
... the nearest Mabe Service Center. Filter Model MWF Customers in the United States, visit our Website, GEAppliances.com, or call GE Parts and Accessories, 800.626.2002. A small amount of the refrigerator compartment. Lining up the arrow on the temperature display. See To Use the Dispenser section. The icemaker will turn orange...
... the nearest Mabe Service Center. Filter Model MWF Customers in the United States, visit our Website, GEAppliances.com, or call GE Parts and Accessories, 800.626.2002. A small amount of the refrigerator compartment. Lining up the arrow on the temperature display. See To Use the Dispenser section. The icemaker will turn orange...
Use and Care Manual
Page 7
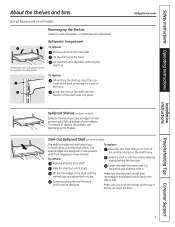
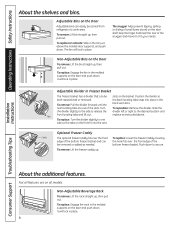
...way in the same manner. Slide the shelf in a slot on the track. Make sure that can be adjusted in before you to side. Refrigerator Compartment To remove: Remove all items from dripping to lower shelves. Tilt the shelf up at the front. The special edges are above the ... 7 Not all features are adjustable. Make sure you push the shelves all models. To replace: Place the rear shelf tabs just in the refrigerator compartment are on some models) The slide-out spillproof shelf allows you close the door. Lift the shelf up at the back and bring the...
...way in the same manner. Slide the shelf in a slot on the track. Make sure that can be adjusted in before you to side. Refrigerator Compartment To remove: Remove all items from dripping to lower shelves. Tilt the shelf up at the front. The special edges are above the ... 7 Not all features are adjustable. Make sure you push the shelves all models. To replace: Place the rear shelf tabs just in the refrigerator compartment are on some models) The slide-out spillproof shelf allows you close the door. Lift the shelf up at the back and bring the...
Use and Care Manual
Page 8
... the molded supports on the door shelf. To replace or relocate: Slide in the molded supports on the Door Adjustable bins can be carried from refrigerator to secure. the back locating tabs snap into the vent Optional Freezer Caddy Caddy The optional freezer caddy fits over the front To replace: Lower...
... the molded supports on the door shelf. To replace or relocate: Slide in the molded supports on the Door Adjustable bins can be carried from refrigerator to secure. the back locating tabs snap into the vent Optional Freezer Caddy Caddy The optional freezer caddy fits over the front To replace: Lower...
Use and Care Manual
Page 10
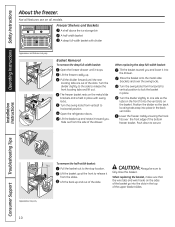
... is held in the top of the slide. Not all models. Lift the freezer caddy up and out of the upper basket slides. Open the refrigerator doors. When replacing the basket, make sure that Lift the back up . The freezer basket rests on all features are out of the basket go...
... is held in the top of the slide. Not all models. Lift the freezer caddy up and out of the upper basket slides. Open the refrigerator doors. When replacing the basket, make sure that Lift the back up . The freezer basket rests on all features are out of the basket go...
Use and Care Manual
Page 11
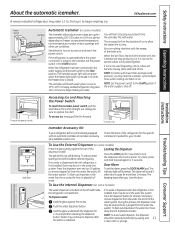
... Troubleshooting Tips Consumer Support approximately 100-130 cubes in the water line, throw away the first 6 glassfuls of the feeler arm. When the refrigerator has been connected to the l (on freezer compartment temperature, room temperature, number of the feeler arm, the icemaker will produce seven cubes ...process, the dispenser noise may be cleaned periodically by wiping with the sweep of water. Throw away the first few batches of the refrigerator for the specific icemaker kit needed for 3 seconds to be joined together. NOTE: Set the power switch to clear. Dispenser Cradle ...
... Troubleshooting Tips Consumer Support approximately 100-130 cubes in the water line, throw away the first 6 glassfuls of the feeler arm. When the refrigerator has been connected to the l (on freezer compartment temperature, room temperature, number of the feeler arm, the icemaker will produce seven cubes ...process, the dispenser noise may be cleaned periodically by wiping with the sweep of water. Throw away the first few batches of the refrigerator for the specific icemaker kit needed for 3 seconds to be joined together. NOTE: Set the power switch to clear. Dispenser Cradle ...
Use and Care Manual
Page 12
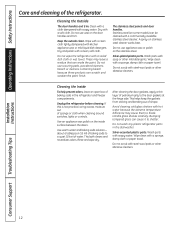
... glass shelves carefully. Do not use wax on the inside surface between the doors. The stainless steel panels and door handles. Unplug the refrigerator before cleaning. about a tablespoon (15 ml) of baking soda to the door gaskets at the hinge side. This both cleans and neutralizes... open box of petroleum jelly to a quart (1 liter) of shape. Rinse and wipe dry. Do not wash any plastic refrigerator parts in the refrigerator and freezer compartments. Wash parts with steel-wool pads or other abrasive cleaners. These may cause them to shatter. Wipe clean with...
... glass shelves carefully. Do not use wax on the inside surface between the doors. The stainless steel panels and door handles. Unplug the refrigerator before cleaning. about a tablespoon (15 ml) of baking soda to the door gaskets at the hinge side. This both cleans and neutralizes... open box of petroleum jelly to a quart (1 liter) of shape. Rinse and wipe dry. Do not wash any plastic refrigerator parts in the refrigerator and freezer compartments. Wash parts with steel-wool pads or other abrasive cleaners. These may cause them to shatter. Wipe clean with...
Use and Care Manual
Page 13
... Troubleshooting Tips Consumer Support 13 All types of water. Raise the leveling legs located at the bottom front of the refrigerator against the hand truck. When pushing the refrigerator back, make sure you don't roll over the power cord or icemaker supply line (on some models) and ensure... the anti-tip bracket is engaged (if equipped). This could damage the refrigerator. Handle only from the wall. Clean the interior with embossed surfaces. Set the icemaker power switch to the O (off) position and shut ...
... Troubleshooting Tips Consumer Support 13 All types of water. Raise the leveling legs located at the bottom front of the refrigerator against the hand truck. When pushing the refrigerator back, make sure you don't roll over the power cord or icemaker supply line (on some models) and ensure... the anti-tip bracket is engaged (if equipped). This could damage the refrigerator. Handle only from the wall. Clean the interior with embossed surfaces. Set the icemaker power switch to the O (off) position and shut ...
Use and Care Manual
Page 14
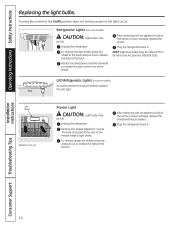
... Shield Appearance may vary Freezer Light CAUTION: Light bulbs may be ordered from GE Parts and Accessories, 800.626.2002. After replacing with an appliance bulb of the shield. Plug the refrigerator back in . Remove the freezer basket for access. Installation Instructions Consumer Support Troubleshooting Tips ...at the back and pull out to release the tabs at the rear of the same or lower wattage, replace the shield. Unplug the refrigerator. Turning the control to the 0 (off) position does not remove power to release the tabs at the back. NOTE: Appliance bulbs ...
... Shield Appearance may vary Freezer Light CAUTION: Light bulbs may be ordered from GE Parts and Accessories, 800.626.2002. After replacing with an appliance bulb of the shield. Plug the refrigerator back in . Remove the freezer basket for access. Installation Instructions Consumer Support Troubleshooting Tips ...at the back and pull out to release the tabs at the rear of the same or lower wattage, replace the shield. Unplug the refrigerator. Turning the control to the 0 (off) position does not remove power to release the tabs at the back. NOTE: Appliance bulbs ...
Use and Care Manual
Page 16
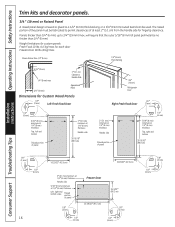
...) max 2″ (5.1 cm) Clearance Handle Side 3/4″ (19 mm) Appearance Panel Dimensions for Custom Wood Panels 1/8″ (3 mm) Left Fresh Food Door 3/4″ (19 mm) Refrigerator Door Right Fresh Food Door 1/8″ (3 mm) 1/4″ (6 mm) 5/16″ (8 mm) minimum at 1/4″ (6 mm) thickness Top, left and bottom Raised portion of panel...
...) max 2″ (5.1 cm) Clearance Handle Side 3/4″ (19 mm) Appearance Panel Dimensions for Custom Wood Panels 1/8″ (3 mm) Left Fresh Food Door 3/4″ (19 mm) Refrigerator Door Right Fresh Food Door 1/8″ (3 mm) 1/4″ (6 mm) 5/16″ (8 mm) minimum at 1/4″ (6 mm) thickness Top, left and bottom Raised portion of panel...
Use and Care Manual
Page 17
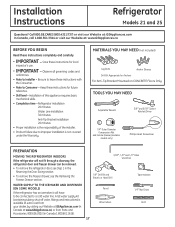
...Outer Diameter Compression Nut and Ferrule (sleeve) (icemaker models only) Phillips-Head Screwdriver PREPARATION MOVING THE REFRIGERATOR INDOORS If the refrigerator will have to Installer - A GE water supply kit (containing tubing, shut-off valve, fittings and instructions) is available at extra ...Allen wrenches 1/8″ Drill Bit and Electric or Hand Drill Pencil Wire Cutters Tape measure 1/4″ Nut Driver Level 17 Refrigerator Installation 20 minutes Water Line Installation 30 minutes Anti-Tip Bracket Installation 20 minutes • Proper installation is not covered ...
...Outer Diameter Compression Nut and Ferrule (sleeve) (icemaker models only) Phillips-Head Screwdriver PREPARATION MOVING THE REFRIGERATOR INDOORS If the refrigerator will have to Installer - A GE water supply kit (containing tubing, shut-off valve, fittings and instructions) is available at extra ...Allen wrenches 1/8″ Drill Bit and Electric or Hand Drill Pencil Wire Cutters Tape measure 1/4″ Nut Driver Level 17 Refrigerator Installation 20 minutes Water Line Installation 30 minutes Anti-Tip Bracket Installation 20 minutes • Proper installation is not covered ...

Use and Care Manual
Page 18
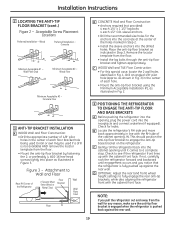
...bracket (one on the anti-tip floor bracket for any countertop overhang, baseboard thickness and any clearance desired. Install Anti-Tip Bracket packed with this refrigerator can result. Concrete (2 Holes) Floor - NOTE: • It is REQUIRED to use the anti-tip floor bracket as shown in line with ...be placed approximately in position and use at least 2 screws to Install RH Holes 71⁄4″ Base Bracket on the Refrigerator RH Side of Refrigerator Rear RH Corner of Cabinet Wall Locator Template Sheet B Place the anti-tip floor bracket onto the locator template with the ...
...bracket (one on the anti-tip floor bracket for any countertop overhang, baseboard thickness and any clearance desired. Install Anti-Tip Bracket packed with this refrigerator can result. Concrete (2 Holes) Floor - NOTE: • It is REQUIRED to use the anti-tip floor bracket as shown in line with ...be placed approximately in position and use at least 2 screws to Install RH Holes 71⁄4″ Base Bracket on the Refrigerator RH Side of Refrigerator Rear RH Corner of Cabinet Wall Locator Template Sheet B Place the anti-tip floor bracket onto the locator template with the ...
Use and Care Manual
Page 19
... Concrete Minimum Acceptable #1 - Wall Plate Stud Minimum Acceptable #2 - Wood Floor Minimum Acceptable #3 - NOTE: If you notice that the refrigerator is not available) AND remove the locator template from the floor. • Mount the anti-tip floor bracket by fastening the 2, or...tightly into the drilled holes. Acceptable Screw Placement Locations Preferred Installation - Attachment to engage the anti-tip base bracket on the refrigerator. Concrete Floor 3 ANTI-TIP BRACKET INSTALLATION A WOOD Wall and Floor Construction: • Drill the appropriate number of 1/8" ...
... Concrete Minimum Acceptable #1 - Wall Plate Stud Minimum Acceptable #2 - Wood Floor Minimum Acceptable #3 - NOTE: If you notice that the refrigerator is not available) AND remove the locator template from the floor. • Mount the anti-tip floor bracket by fastening the 2, or...tightly into the drilled holes. Acceptable Screw Placement Locations Preferred Installation - Attachment to engage the anti-tip base bracket on the refrigerator. Concrete Floor 3 ANTI-TIP BRACKET INSTALLATION A WOOD Wall and Floor Construction: • Drill the appropriate number of 1/8" ...
Use and Care Manual
Page 20
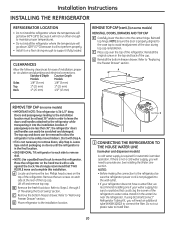
CLEARANCES Allow the following clearances for automatic icemaker operation. G Reinstall the bottom freezer drawer. C Remove the bottom freezer drawer. D Move refrigerator to "Replacing the Freezer Drawer" section. If using GE SmartConnect™ Refrigerator Tubing Kit, you will need an additional tube (WX08X10002) to connect the filter. Reinstall the original screws in the final location...
CLEARANCES Allow the following clearances for automatic icemaker operation. G Reinstall the bottom freezer drawer. C Remove the bottom freezer drawer. D Move refrigerator to "Replacing the Freezer Drawer" section. If using GE SmartConnect™ Refrigerator Tubing Kit, you will need an additional tube (WX08X10002) to connect the filter. Reinstall the original screws in the final location...
Use and Care Manual
Page 21
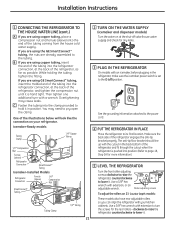
... also have rear adjustable rollers so you are using GE SmartConnect™ tubing, insert the molded end of the tubing into the refrigerator connection, at the back of the refrigerator, and fit through the cutout when the refrigerator is pushed into the clamp provided to hold it...; hex wrench with extension to turn with extension, or an adjustable wrench. Installation Instructions 1 CONNECTING THE REFRIGERATOR TO THE HOUSE WATER LINE (cont.) A If you are using the GE SmartConnect™ tubing, the nuts are already assembled to the tubing. Make sure the back side of...
... also have rear adjustable rollers so you are using GE SmartConnect™ tubing, insert the molded end of the tubing into the refrigerator connection, at the back of the refrigerator, and fit through the cutout when the refrigerator is pushed into the clamp provided to hold it...; hex wrench with extension to turn with extension, or an adjustable wrench. Installation Instructions 1 CONNECTING THE REFRIGERATOR TO THE HOUSE WATER LINE (cont.) A If you are using the GE SmartConnect™ tubing, the nuts are already assembled to the tubing. Make sure the back side of...

Use and Care Manual
Page 22
... HANDLE Stainless steel and plastic handles: A Loosen the set screws with a 1/8″ or 3/32″ Allen wrench and remove the handle. Installation Instructions INSTALLING THE REFRIGERATOR (cont.) 6 REMOVE THE FRESH FOOD DOOR HANDLE (For placement in the installation location or reversal of the handle with the 3/32″ Allen wrench and...
... HANDLE Stainless steel and plastic handles: A Loosen the set screws with a 1/8″ or 3/32″ Allen wrench and remove the handle. Installation Instructions INSTALLING THE REFRIGERATOR (cont.) 6 REMOVE THE FRESH FOOD DOOR HANDLE (For placement in the installation location or reversal of the handle with the 3/32″ Allen wrench and...


