
Installation Instructions
Page 1
...Specifications Allow 1-1⁄4" for overlap of the Microwave Oven Kit Trim over any General Electric/Hotpoint/RCA single electric wall oven. • Do not alter or modify any part of this kit. • Save these instructions, Owner's Manual and Important Safety Instructions completely and carefully. • This Kit...(2) 4. receptacle in case they lose one during installation. Bottom Trim 1 6. receptacle outside cutout 18" Min. Microwave Oven Installation instructions for your new Built-In Trim Kit JX827BN, JX827WN, JX827SS, JX827CD CAUTION: • Before you ...
...Specifications Allow 1-1⁄4" for overlap of the Microwave Oven Kit Trim over any General Electric/Hotpoint/RCA single electric wall oven. • Do not alter or modify any part of this kit. • Save these instructions, Owner's Manual and Important Safety Instructions completely and carefully. • This Kit...(2) 4. receptacle in case they lose one during installation. Bottom Trim 1 6. receptacle outside cutout 18" Min. Microwave Oven Installation instructions for your new Built-In Trim Kit JX827BN, JX827WN, JX827SS, JX827CD CAUTION: • Before you ...

Installation Instructions
Page 4
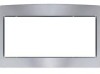
... sure the door clears the trim when open. Step 6 Assembling the Trim Kit Frame Assemble Top Trim (4), Bottom Trim (5) and Side Trims (6) shown with 8 screws (C). Screw C Part No. 245B1790P064 (2) Pub. Fasten through holes in position and secured), insert the Trim Kit Frame into Base Pan and Side Cover. Remove the Trim Kit Frame. 3. No. 31-1163 (2) SPECIFICATIONS SUBJECT TO CHANGE WITHOUT...
... sure the door clears the trim when open. Step 6 Assembling the Trim Kit Frame Assemble Top Trim (4), Bottom Trim (5) and Side Trims (6) shown with 8 screws (C). Screw C Part No. 245B1790P064 (2) Pub. Fasten through holes in position and secured), insert the Trim Kit Frame into Base Pan and Side Cover. Remove the Trim Kit Frame. 3. No. 31-1163 (2) SPECIFICATIONS SUBJECT TO CHANGE WITHOUT...