Installation Instructions
Page 1
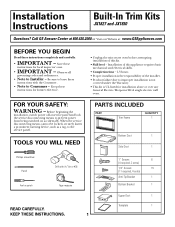
.../Hotpoint/RCA single electric wall oven. Keep these instructions with 7⁄64″ bit or #35 Tape measure READ CAREFULLY. Call GE Answer Center at 800.626.2000 or Visit our Website at service panel and lock the service disconnecting means to Consumer - When the...cannot be locked, securely fasten a prominent warning device, such as a tag, to Installer - FOR YOUR SAFETY: WARNING - TOOLS YOU WILL NEED PARTS INCLUDED PART Trim Frame QUANTITY 1 Bottom Duct 1 Side Duct 1 Phillips screwdriver Pencil Awl or punch Drill with the Consumer. • Note to prevent power from ...
.../Hotpoint/RCA single electric wall oven. Keep these instructions with 7⁄64″ bit or #35 Tape measure READ CAREFULLY. Call GE Answer Center at 800.626.2000 or Visit our Website at service panel and lock the service disconnecting means to Consumer - When the...cannot be locked, securely fasten a prominent warning device, such as a tag, to Installer - FOR YOUR SAFETY: WARNING - TOOLS YOU WILL NEED PARTS INCLUDED PART Trim Frame QUANTITY 1 Bottom Duct 1 Side Duct 1 Phillips screwdriver Pencil Awl or punch Drill with the Consumer. • Note to prevent power from ...
Installation Instructions
Page 4
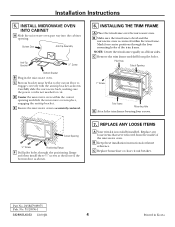
... oven in place, engaging the anti-tip bracket. NOTE: Center the trim frame equally on all four sides. REPLACE ANY LOOSE ITEMS A Your trim kit is accurately centered. 6. Part No. 245B1790P075 Pub. E Ensure the microwave oven is now fully installed. C Remove the trim frame and drill four pilot holes. Cutout Opening 1⁄2″ Screw...
... oven in place, engaging the anti-tip bracket. NOTE: Center the trim frame equally on all four sides. REPLACE ANY LOOSE ITEMS A Your trim kit is accurately centered. 6. Part No. 245B1790P075 Pub. E Ensure the microwave oven is now fully installed. C Remove the trim frame and drill four pilot holes. Cutout Opening 1⁄2″ Screw...


