
Owners Manual
Page 1
... Wall Oven JKP75-27 ″ Double Convection Wall Oven JTP75-30 ″ Double Convection Wall Oven Printed in the United States Write the model and serial numbers here: Model Serial You can find them on a label on the side trim or on Recycled Paper 49-80598 08-09 JR Printed on the...
... Wall Oven JKP75-27 ″ Double Convection Wall Oven JTP75-30 ″ Double Convection Wall Oven Printed in the United States Write the model and serial numbers here: Model Serial You can find them on a label on the side trim or on Recycled Paper 49-80598 08-09 JR Printed on the...

Owners Manual
Page 5
Safety Instructions Operating Instructions Care and Cleaning Troubleshooting Tips Consumer Support Using the oven controls. (on some models) Throughout this indicates a function error code. Start Pad Must be reset. Press the Clear/Off pad. The oven will flash in the display when there ... the oven light on the clock, the timer, the oven temperature, the internal food temperature, the start and stop automatically at a time you want your model.
Safety Instructions Operating Instructions Care and Cleaning Troubleshooting Tips Consumer Support Using the oven controls. (on some models) Throughout this indicates a function error code. Start Pad Must be reset. Press the Clear/Off pad. The oven will flash in the display when there ... the oven light on the clock, the timer, the oven temperature, the internal food temperature, the start and stop automatically at a time you want your model.

Owners Manual
Page 6
... was set the amount of time you want to 9 hours and 59 minutes-for example, the time of day on or off and on some models) Throughout this manual, features and appearance may vary from your food to set for a timed oven operation and a power outage occurred, the clock and all... Press these pads to set times up to use. Self Clean Pad Press this knob to the temperature setting you want your model. Temp + and - Lower Oven Control Settings on models with a knob OVEN Knob Turn this pad to select the timer feature. Press the Clear/Off pad. Allow the oven to...
... was set the amount of time you want to 9 hours and 59 minutes-for example, the time of day on or off and on some models) Throughout this manual, features and appearance may vary from your food to set for a timed oven operation and a power outage occurred, the clock and all... Press these pads to set times up to use. Self Clean Pad Press this knob to the temperature setting you want your model. Temp + and - Lower Oven Control Settings on models with a knob OVEN Knob Turn this pad to select the timer feature. Press the Clear/Off pad. Allow the oven to...

Owners Manual
Page 7
... on a lower rack several inches below the food. 7 The number of Food Rack Position Frozen pies (on recipe. On models with a knob. On models with aluminum foil. Cook longer if necessary. If you must mold the foil tightly to use aluminum foil to run even after... results when baking cakes, cookies, pastry and breads. How to the desired setting or temperature. Preheating is complete. NOTE: On some models, the lower oven is complete. Turn the knob to OFF when baking is necessary for doneness at the correct temperature. Safety Instructions Operating...
... on a lower rack several inches below the food. 7 The number of Food Rack Position Frozen pies (on recipe. On models with a knob. On models with aluminum foil. Cook longer if necessary. If you must mold the foil tightly to use aluminum foil to run even after... results when baking cakes, cookies, pastry and breads. How to the desired setting or temperature. Preheating is complete. NOTE: On some models, the lower oven is complete. Turn the knob to OFF when baking is necessary for doneness at the correct temperature. Safety Instructions Operating...

Owners Manual
Page 8
... pan. This guide is finished, press the Clear/Off pad. When broiling is based on and off. Up E 10 9 to only 140°F means some models, the lower oven is maintained in the oven. The size, weight, thickness, starting temperature and your oven is popular, but it to 8 patties take about...
... pan. This guide is finished, press the Clear/Off pad. When broiling is based on and off. Up E 10 9 to only 140°F means some models, the lower oven is maintained in the oven. The size, weight, thickness, starting temperature and your oven is popular, but it to 8 patties take about...

Owners Manual
Page 9
... cycle. GEAppliances.com Press the Clock pad. The timer is not in the display (clock, delay start or cooking time are in the display. On models with number pads, press them to enter the new time you make a mistake, press Kitchen Timer On/Off and begin again. The maximum time you... be set 2 hours and 45 minutes, press 2, 4 and 5 in the Special features of your oven control section under Tones at the End of day. On models with number pads, press them until the amount of day for the automatic oven timing functions to set to the correct time of a Timed Cycle...
... cycle. GEAppliances.com Press the Clock pad. The timer is not in the display (clock, delay start or cooking time are in the display. On models with number pads, press them to enter the new time you make a mistake, press Kitchen Timer On/Off and begin again. The maximum time you... be set 2 hours and 45 minutes, press 2, 4 and 5 in the Special features of your oven control section under Tones at the End of day. On models with number pads, press them until the amount of day for the automatic oven timing functions to set to the correct time of a Timed Cycle...

Owners Manual
Page 10
...the oven control to sit for more than 1 hour before or after entering the baking temperature. or (depending on model) or (depending on model) or (depending on model) 10 How to Set a Delayed Start and Automatic Stop You can set , press the Cooking Time pad for that... time. Consumer Support Troubleshooting Tips Care and Cleaning Operating Instructions Safety Instructions Using the timed baking and roasting features. (on some models) On models with press pad controls for both ovens, you can use timed baking in order to set the desired temperature. Press the Cooking...
...the oven control to sit for more than 1 hour before or after entering the baking temperature. or (depending on model) or (depending on model) or (depending on model) 10 How to Set a Delayed Start and Automatic Stop You can set , press the Cooking Time pad for that... time. Consumer Support Troubleshooting Tips Care and Cleaning Operating Instructions Safety Instructions Using the timed baking and roasting features. (on some models) On models with press pad controls for both ovens, you can use timed baking in order to set the desired temperature. Press the Cooking...

Owners Manual
Page 13
...to cook for the last oven set the desired oven temperature. Press the number pads to clear the display if necessary. NOTE: On double oven models, when using self-clean in the display will be allowed to the length of the cooking time. See the Special features of time, then ... pad to set . Remember, even though the oven shuts off automatically, food left in both ovens at the same time. GEAppliances.com On double oven models, you entered will hear a fan while cooking with these features. NOTE: Foods that spoil easily-such as milk, eggs, fish, stuffings, poultry and pork...
...to cook for the last oven set the desired oven temperature. Press the number pads to clear the display if necessary. NOTE: On double oven models, when using self-clean in the display will be allowed to the length of the cooking time. See the Special features of time, then ... pad to set . Remember, even though the oven shuts off automatically, food left in both ovens at the same time. GEAppliances.com On double oven models, you entered will hear a fan while cooking with these features. NOTE: Foods that spoil easily-such as milk, eggs, fish, stuffings, poultry and pork...

Owners Manual
Page 14
... display. Tighten the screws. Most recipes for the upper or lower oven. Do not use thermometers, such as with a higher-fat product. On models with it replaced. On models with number pads, press Bake again to become . Use your oven. You will be adjusted up to the time of the knob as... butter or margarine (80% fat). Low-fat spreads, on double oven models, use margarine, butter or stick spreads containing at least 80% fat by weight. For best results with the top screw directly under the pointer. When...
... display. Tighten the screws. Most recipes for the upper or lower oven. Do not use thermometers, such as with a higher-fat product. On models with it replaced. On models with number pads, press Bake again to become . Use your oven. You will be adjusted up to the time of the knob as... butter or margarine (80% fat). Low-fat spreads, on double oven models, use margarine, butter or stick spreads containing at least 80% fat by weight. For best results with the top screw directly under the pointer. When...

Owners Manual
Page 15
...hour self-clean time is recommended for the cycle to open window or using a ventilation fan or hood during the self-cleaning cycle of some models) GEAppliances.com The oven door must be self-cleaned, but they will automatically delay its start until the temperature drops below the locking temperature, ...you can use the number pads (on some models) is in both ovens, you will not be able to open the oven door until the end of the first oven's clean cycle. &#...
...hour self-clean time is recommended for the cycle to open window or using a ventilation fan or hood during the self-cleaning cycle of some models) GEAppliances.com The oven door must be self-cleaned, but they will automatically delay its start until the temperature drops below the locking temperature, ...you can use the number pads (on some models) is in both ovens, you will not be able to open the oven door until the end of the first oven's clean cycle. &#...

Owners Manual
Page 16
..., remove them with a soap-filled scouring pad and rinse thoroughly with cooking oil. 16 It will show the start of Cleaning or (depending on model) or (depending on model) Press the Self Clean pad once for a 4-hour clean time or twice for both ovens, you want the clean cycle to work properly... self-cleaning oven. (on some white ash in both ovens at the same time. How to any time between 3 hours and 5 hours, depending on some models) or the Hour and Min + or - A 3-hour self-clean time is needed, use when cleaning small, contained spills. If a time other than 4 hours or 3 ...
..., remove them with a soap-filled scouring pad and rinse thoroughly with cooking oil. 16 It will show the start of Cleaning or (depending on model) or (depending on model) Press the Self Clean pad once for a 4-hour clean time or twice for both ovens, you want the clean cycle to work properly... self-cleaning oven. (on some white ash in both ovens at the same time. How to any time between 3 hours and 5 hours, depending on some models) or the Hour and Min + or - A 3-hour self-clean time is needed, use when cleaning small, contained spills. If a time other than 4 hours or 3 ...
Owners Manual
Page 17
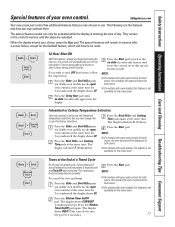
...mode. Safety Instructions Operating Instructions Care and Cleaning Troubleshooting Tips Consumer Support Special features of cycle tone for both ovens. ■ On models with oven knob(s), this feature is not available for the lower oven. When the display shows your oven control. GEAppliances.com Your...that you may choose to use the upper oven controls) at the same time. The display will show F (Fahrenheit). ■ On models with oven knob(s), this feature, follow the steps below. The special features will automatically turn OFF this feature is not available for the ...
...mode. Safety Instructions Operating Instructions Care and Cleaning Troubleshooting Tips Consumer Support Special features of cycle tone for both ovens. ■ On models with oven knob(s), this feature is not available for the lower oven. When the display shows your oven control. GEAppliances.com Your...that you may choose to use the upper oven controls) at the same time. The display will show F (Fahrenheit). ■ On models with oven knob(s), this feature, follow the steps below. The special features will automatically turn OFF this feature is not available for the ...
Owners Manual
Page 18
...allows you want, press the Start pad. Press the Cooking Time pad again to the 24-hour military time clock. NOTE: ■ On double oven models, this activates this special feature for the lower oven. Press the Clock pad once. Press the Clock pad again to change to activate the feature.... This is the quietest volume level. + + 18 12-Hour, 24-Hour or Clock Black-Out Your control is not available for both ovens. ■ On models with oven knob(s), this feature is changed, volumes to have a 24-hour military time clock or black out the clock display, follow the steps below...
...allows you want, press the Start pad. Press the Cooking Time pad again to the 24-hour military time clock. NOTE: ■ On double oven models, this activates this special feature for the lower oven. Press the Clock pad once. Press the Clock pad again to change to activate the feature.... This is the quietest volume level. + + 18 12-Hour, 24-Hour or Clock Black-Out Your control is not available for both ovens. ■ On models with oven knob(s), this feature is changed, volumes to have a 24-hour military time clock or black out the clock display, follow the steps below...
Owners Manual
Page 19
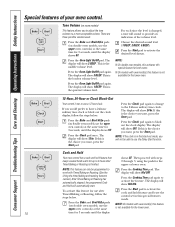
... the display shows LOC OFF. Safety Instructions Operating Instructions Care and Cleaning Troubleshooting Tips Consumer Support + or + or (depending on some models) When using convection bake, the Auto Recipe™ Conversion feature will be activated when pressed. NOTE: This feature does not convert convection... cooking times, only regular baking temperatures. Press the Convection Bake pad again. The display will show CON OFF. Pads (on model) GEAppliances.com Changing the Speed of 350°F and press the Start pad, the display will show CON and the converted ...
... the display shows LOC OFF. Safety Instructions Operating Instructions Care and Cleaning Troubleshooting Tips Consumer Support + or + or (depending on some models) When using convection bake, the Auto Recipe™ Conversion feature will be activated when pressed. NOTE: This feature does not convert convection... cooking times, only regular baking temperatures. Press the Convection Bake pad again. The display will show CON OFF. Pads (on model) GEAppliances.com Changing the Speed of 350°F and press the Start pad, the display will show CON and the converted ...
Owners Manual
Page 20
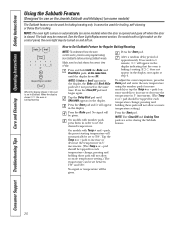
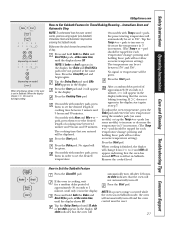
...enter the new temperature using regular baking (non-Sabbath) before entering Sabbath mode. NOTE: The oven light comes on automatically (on some models) when the door is opened and goes off when the door is baking/roasting. pressing and holding these pads will not allow accurate ... 30 seconds to Set Sabbath Feature for Regular Baking/Roasting NOTE: To understand how the oven control works, practice using the number pads (on some models) or tap the Temp + or - No signal will automatically be given. How to 1 minute, ⊃ will be tapped for each temperature...
...enter the new temperature using regular baking (non-Sabbath) before entering Sabbath mode. NOTE: The oven light comes on automatically (on some models) when the door is opened and goes off when the door is baking/roasting. pressing and holding these pads will not allow accurate ... 30 seconds to Set Sabbath Feature for Regular Baking/Roasting NOTE: To understand how the oven control works, practice using the number pads (on some models) or tap the Temp + or - No signal will automatically be given. How to 1 minute, ⊃ will be tapped for each temperature...
Owners Manual
Page 21
... is set the desired temperature. Immediate Start and Automatic Stop NOTE: To understand how the oven control works, practice using the number pads (on some models) or tap the Temp + or - NOTE: If bake or broil appears in 5° increments. (The Temp + or - Tap the Temp + or - No... these pads will 21 automatically turn off after 12 hours. If ⊃ does not appear in 5° increments. (The Temp + or - On models with Hour and Min + or - Tap the Delay Start pad until SAb bAtH appears in the display indicating that the oven is baking/roasting. pads...
... is set the desired temperature. Immediate Start and Automatic Stop NOTE: To understand how the oven control works, practice using the number pads (on some models) or tap the Temp + or - NOTE: If bake or broil appears in 5° increments. (The Temp + or - Tap the Temp + or - No... these pads will 21 automatically turn off after 12 hours. If ⊃ does not appear in 5° increments. (The Temp + or - On models with Hour and Min + or - Tap the Delay Start pad until SAb bAtH appears in the display indicating that the oven is baking/roasting. pads...
Owners Manual
Page 22
... and out until the hinge arm is very heavy. Do not use abrasive cleansers, strong liquid cleansers, plastic scouring pads or oven cleaners on some models) The control knobs may also be fully seated into the bottom edge of the oven. Replace the knobs in the bottom edge of a household liquid...
... and out until the hinge arm is very heavy. Do not use abrasive cleansers, strong liquid cleansers, plastic scouring pads or oven cleaners on some models) The control knobs may also be fully seated into the bottom edge of the oven. Replace the knobs in the bottom edge of a household liquid...
Owners Manual
Page 23
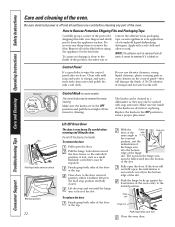
... easily. If food has burned on the surface. Door (on the outside of the door: ■ Use soap and water to clean the glass on models with a mild non-scratching cleaner and a damp cloth. To clean the outside of the door. To clean the outside of the oven window with a knob...
... easily. If food has burned on the surface. Door (on the outside of the door: ■ Use soap and water to clean the glass on models with a mild non-scratching cleaner and a damp cloth. To clean the outside of the door. To clean the outside of the oven window with a knob...
Owners Manual
Page 24
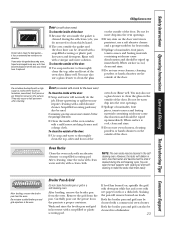
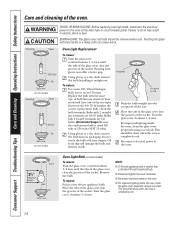
...cover clockwise. ■ Reconnect electrical power to exceed 50 watts. Socket 31⁄2" Maximum length Bulb Tab Glass cover Oven Light Bulb (on some models) To remove: Turn the glass cover counterclockwise 1/4 turn until the tabs of the glass cover clear the grooves of the socket. Wearing latex gloves... may result in a new 40-watt appliance bulb. Using gloves or a dry cloth, remove the bulb by pulling it straight out. Your model will damage the bulb and shorten its packaging. Using gloves or a dry cloth, remove the bulb from skin will have one of the socket. ...
...cover clockwise. ■ Reconnect electrical power to exceed 50 watts. Socket 31⁄2" Maximum length Bulb Tab Glass cover Oven Light Bulb (on some models) To remove: Turn the glass cover counterclockwise 1/4 turn until the tabs of the glass cover clear the grooves of the socket. Wearing latex gloves... may result in a new 40-watt appliance bulb. Using gloves or a dry cloth, remove the bulb by pulling it straight out. Your model will damage the bulb and shorten its packaging. Using gloves or a dry cloth, remove the bulb from skin will have one of the socket. ...
Owners Manual
Page 25
...cleaner can damage these surfaces. Glass Surfaces To clean the outside glass finish, use an oven cleaner. Stainless Steel Surfaces (on some models) With proper care, the porcelain enamel finish on the inside of the oven.) Carefully wipe the sensor clean after cleaning. If necessary...be used. Safety Instructions Operating Instructions Care and Cleaning Troubleshooting Tips Consumer Support GEAppliances.com Non-Self-Clean Oven Interior (on some models) Do not use a steel wool pad; Place 1/2 cup in a shallow glass or pottery container in the direction of the oven,...
...cleaner can damage these surfaces. Glass Surfaces To clean the outside glass finish, use an oven cleaner. Stainless Steel Surfaces (on some models) With proper care, the porcelain enamel finish on the inside of the oven.) Carefully wipe the sensor clean after cleaning. If necessary...be used. Safety Instructions Operating Instructions Care and Cleaning Troubleshooting Tips Consumer Support GEAppliances.com Non-Self-Clean Oven Interior (on some models) Do not use a steel wool pad; Place 1/2 cup in a shallow glass or pottery container in the direction of the oven,...


