Use and Care Manual
Page 1
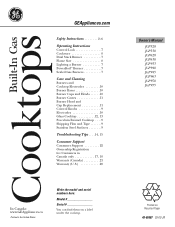
... Safety Instructions 2-6 Operating Instructions Control Lock 7 Cookware 8 Dual Stack Burner 7 Flame Size 8 Lighting a Burner 7 PowerBoil™ Burner 7 Sealed Gas Burners 7 Care and Cleaning Burners and Cooktop Electrodes 10 Burner Bases 10 Burner Caps and Heads . . . . . .10 Burner Grates 11 Burner Head and Cap Replacement 11 Control Knobs 9 Electrodes 10 Glass Cooktop 12, 13 Porcelain Enamel Cooktop . . . .9 Shipping Film and Tape 9 Stainless Steel Surfaces 9 Troubleshooting Tips...
... Safety Instructions 2-6 Operating Instructions Control Lock 7 Cookware 8 Dual Stack Burner 7 Flame Size 8 Lighting a Burner 7 PowerBoil™ Burner 7 Sealed Gas Burners 7 Care and Cleaning Burners and Cooktop Electrodes 10 Burner Bases 10 Burner Caps and Heads . . . . . .10 Burner Grates 11 Burner Head and Cap Replacement 11 Control Knobs 9 Electrodes 10 Glass Cooktop 12, 13 Porcelain Enamel Cooktop . . . .9 Shipping Film and Tape 9 Stainless Steel Surfaces 9 Troubleshooting Tips...
Quick Specs
Page 2
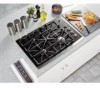
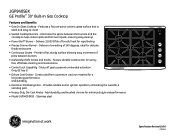
... cooktop to prevent unintended activation. Constructed from a premium cast iron material for enhanced style and performance • Model JGP940SEKSS - Eliminates the space between burners • Dishwasher-Safe Grates and Knobs - JGP940SEK GE Profile™ 30" Built-In Gas Cooktop Features and Benefits • Gas On Glass Cooktop - Features a flat one-piece ceramic glass surface that is sleek and easy-to-clean • Sealed Cooktop Burners...
... cooktop to prevent unintended activation. Constructed from a premium cast iron material for enhanced style and performance • Model JGP940SEKSS - Eliminates the space between burners • Dishwasher-Safe Grates and Knobs - JGP940SEK GE Profile™ 30" Built-In Gas Cooktop Features and Benefits • Gas On Glass Cooktop - Features a flat one-piece ceramic glass surface that is sleek and easy-to-clean • Sealed Cooktop Burners...

Installation Instructions
Page 4
...cooktop dimensions 30″ Cooktop 21″ (21-1/2″ Max. From Backwall Recommended gas supply location 13-1/4″ From Cutout Center Line 5 Make sure wall coverings, countertop and cabinets around cooktop can withstand heat (up to 200°F) generated by cooktop.... clearance from backwall 1" Min. for Glass Top models) 3″ 19-3/8″ 28-1/4″ 4 Recommended Gas Supply Location from countertop to nearest cabinet ...either side of the unit NOTE: All gas cooktop models require 7/16″ free area below cooktop height to make a template when cutting the...
...cooktop dimensions 30″ Cooktop 21″ (21-1/2″ Max. From Backwall Recommended gas supply location 13-1/4″ From Cutout Center Line 5 Make sure wall coverings, countertop and cabinets around cooktop can withstand heat (up to 200°F) generated by cooktop.... clearance from backwall 1" Min. for Glass Top models) 3″ 19-3/8″ 28-1/4″ 4 Recommended Gas Supply Location from countertop to nearest cabinet ...either side of the unit NOTE: All gas cooktop models require 7/16″ free area below cooktop height to make a template when cutting the...

Installation Instructions
Page 5
... are met. Installation Instructions Installing the Cooktop Unit 1 Locate Electrical Outlet and gas Shut-Off Valve beneath Cabinet NEVER REUSE OLD CONNECTORS WHEN INSTALLING THIS UNIT. Install the electrical outlet 12″ below the countertop. 2 Protect Surface of the glass. Bottom of cooktop Cloth under Cooktop 3 Attach Foam Tape (glass maintop models only) Apply the foam tape...
... are met. Installation Instructions Installing the Cooktop Unit 1 Locate Electrical Outlet and gas Shut-Off Valve beneath Cabinet NEVER REUSE OLD CONNECTORS WHEN INSTALLING THIS UNIT. Install the electrical outlet 12″ below the countertop. 2 Protect Surface of the glass. Bottom of cooktop Cloth under Cooktop 3 Attach Foam Tape (glass maintop models only) Apply the foam tape...

Installation Instructions
Page 13
... electrical power, at the spring retainer to use LP gas, the regulator and burner orifices must purchase a butane conversion kit. B Shut off valve. Cap Gasket NAT LP DOWN FOR OFF NAT NAT LP LP NAT NAT. Model JGP940 JGP945 JGP933 JGP330 JGP328 Butane Kit # WB28T10228 WB28T10230...Glasses No. 15 Torx-Head Driver Small Flat-Head Screwdriver (4mm or 5/32″ tip size, 60mm long) 1 Safety Information you wish to locate the NAT or LP position. To use your cooktop for use this work assumes responsibility for natural gas. If you should know The pressure regulator and burner...
... electrical power, at the spring retainer to use LP gas, the regulator and burner orifices must purchase a butane conversion kit. B Shut off valve. Cap Gasket NAT LP DOWN FOR OFF NAT NAT LP LP NAT NAT. Model JGP940 JGP945 JGP933 JGP330 JGP328 Butane Kit # WB28T10228 WB28T10230...Glasses No. 15 Torx-Head Driver Small Flat-Head Screwdriver (4mm or 5/32″ tip size, 60mm long) 1 Safety Information you wish to locate the NAT or LP position. To use your cooktop for use this work assumes responsibility for natural gas. If you should know The pressure regulator and burner...

Installation Instructions
Page 15
... of each orifice to the cooktop burner. F Return the natural gas orifices to the bracket and reattach the bracket and the instruction sheet to a maximum of appliance). I II III X I II III X 18,000 BTU/HR Burner (on some models) The 18,000 BTU/HR burner has two orifices with markings located... in .-lbs torque.) 15 NOTE: The main orifice is located low in the illustrations above. G Replace the burner bases, heads, caps and top grates. (Note: When re-attaching the burner bases to glass top ...
... of each orifice to the cooktop burner. F Return the natural gas orifices to the bracket and reattach the bracket and the instruction sheet to a maximum of appliance). I II III X I II III X 18,000 BTU/HR Burner (on some models) The 18,000 BTU/HR burner has two orifices with markings located... in .-lbs torque.) 15 NOTE: The main orifice is located low in the illustrations above. G Replace the burner bases, heads, caps and top grates. (Note: When re-attaching the burner bases to glass top ...


