Use and Care Manual
Page 1
...7 Cookware 8 Dual Stack Burner 7 Flame Size 8 Lighting a Burner 7 PowerBoil™ Burner 7 Sealed Gas Burners 7 Care and Cleaning Burners and Cooktop Electrodes 10 Burner Bases 10 Burner Caps and Heads . . . . . .10 Burner Grates 11 Burner...Cooktop . . . .9 Shipping Film and Tape 9 Stainless Steel Surfaces 9 Troubleshooting Tips . . . .14, 15 Consumer Support Consumer Support 22 Ownership Registration for Customers in Canada only 17, 18 Warranty (Canada 21 Warranty (U.S 20 In Canada: www.GEAppliances.ca Printed in the United States Write the model and serial numbers here: Model...
...7 Cookware 8 Dual Stack Burner 7 Flame Size 8 Lighting a Burner 7 PowerBoil™ Burner 7 Sealed Gas Burners 7 Care and Cleaning Burners and Cooktop Electrodes 10 Burner Bases 10 Burner Caps and Heads . . . . . .10 Burner Grates 11 Burner...Cooktop . . . .9 Shipping Film and Tape 9 Stainless Steel Surfaces 9 Troubleshooting Tips . . . .14, 15 Consumer Support Consumer Support 22 Ownership Registration for Customers in Canada only 17, 18 Warranty (Canada 21 Warranty (U.S 20 In Canada: www.GEAppliances.ca Printed in the United States Write the model and serial numbers here: Model...
Use and Care Manual
Page 7
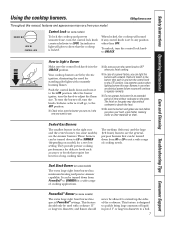
...turn the burner off, turn the knob clockwise as far as sauces or foods that the cooktop is designed to quickly bring large amounts of the cookware. Burners in diameter to the LITE position. Sealed Gas Burners The smallest burner in diameter, and flames should only be turned down to LO or... not operate the burner for standing pilot lights with cookware 11″ or larger in the right rear and the center burner (on some models) To lock the cooktop and prevent unwanted use . ■ Be sure you can light the burners with a match. This feature should never be turned down and ...
...turn the burner off, turn the knob clockwise as far as sauces or foods that the cooktop is designed to quickly bring large amounts of the cookware. Burners in diameter to the LITE position. Sealed Gas Burners The smallest burner in diameter, and flames should only be turned down to LO or... not operate the burner for standing pilot lights with cookware 11″ or larger in the right rear and the center burner (on some models) To lock the cooktop and prevent unwanted use . ■ Be sure you can light the burners with a match. This feature should never be turned down and ...
Use and Care Manual
Page 9
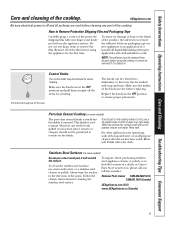
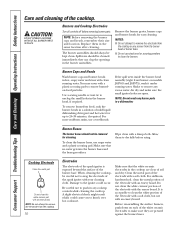
...sturdy but breakable if misused. How to wipe it from all -purpose cleaner after the surface has cooled. Porcelain Enamel Cooktop (on . This finish is baked on some models) Do not use a dry paper towel or cloth to Remove Protective Shipping Film and Packaging Tape Carefully grasp a corner... of a household liquid dishwashing detergent. If acids spill on the cooktop while it is off the stem. Polish with an ...
...sturdy but breakable if misused. How to wipe it from all -purpose cleaner after the surface has cooled. Porcelain Enamel Cooktop (on . This finish is baked on some models) Do not use a dry paper towel or cloth to Remove Protective Shipping Film and Packaging Tape Carefully grasp a corner... of a household liquid dishwashing detergent. If acids spill on the cooktop while it is off the stem. Polish with an ...
Use and Care Manual
Page 10
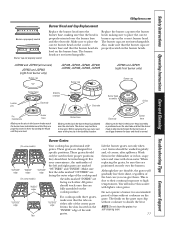
...cooktop are open. Air dry and make sure they can clog the openings in a solution of the spark igniter with your cleaning cloth. Make sure that the white ceramic electrodes in a dishwasher. Make sure that no water gets into the burner bases and the brass gas...cooktop. 10 Electrodes The electrode of the spark igniter is acceptable to make sure the small ignitor holes are clear of the white ceramic electrodes to clean the white portion of the burner base. Damage to the igniter could cause you to 20-30...kept clean. To remove burned-on models JGP945 and JGP975), wash it ...
...cooktop are open. Air dry and make sure they can clog the openings in a solution of the spark igniter with your cleaning cloth. Make sure that the white ceramic electrodes in a dishwasher. Make sure that no water gets into the burner bases and the brass gas...cooktop. 10 Electrodes The electrode of the spark igniter is acceptable to make sure the small ignitor holes are clear of the white ceramic electrodes to clean the white portion of the burner base. Damage to the igniter could cause you to 20-30...kept clean. To remove burned-on models JGP945 and JGP975), wash it ...
Use and Care Manual
Page 11
... sides marked "INSIDE" are positioned securely over the electrode. Burner Grates (On some models) "OUTSIDE" "INSIDE" edge edges "OUTSIDE" edge (On some models) "INSIDE" edges Your cooktop has professional style grates. Wash them . Although they are properly seated on the cooktop surface. Do not operate a burner for specific positions. These grates are designed for...
... sides marked "INSIDE" are positioned securely over the electrode. Burner Grates (On some models) "OUTSIDE" "INSIDE" edge edges "OUTSIDE" edge (On some models) "INSIDE" edges Your cooktop has professional style grates. Wash them . Although they are properly seated on the cooktop surface. Do not operate a burner for specific positions. These grates are designed for...
Use and Care Manual
Page 12
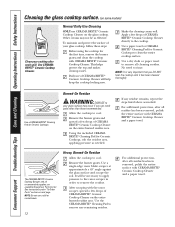
...angle against the glass surface and scrape the soil. It will help keep the cooktop looking new. To maintain and protect the surface of CERAMA BRYTE® Ceramic Cooktop Cleaner on some models) Clean your cooktop after each spill. Burned-On Residue WARNING: DAMAGE to clean the entire... cooktop surface. The CERAMA BRYTE® Ceramic Cooktop Scraper and all residue has been removed, polish the entire ...
...angle against the glass surface and scrape the soil. It will help keep the cooktop looking new. To maintain and protect the surface of CERAMA BRYTE® Ceramic Cooktop Cleaner on some models) Clean your cooktop after each spill. Burned-On Residue WARNING: DAMAGE to clean the entire... cooktop surface. The CERAMA BRYTE® Ceramic Cooktop Scraper and all residue has been removed, polish the entire ...
Use and Care Manual
Page 14
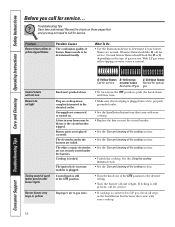
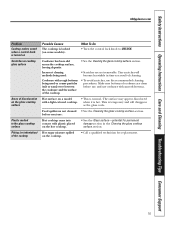
... Before you use. The white ceramic electrodes are not securely seated under the burners are normal. The igniter hole (on cooktop is normal. Troubleshooting Tips Save time and money! With LP gas, some models) is plugged. • Make sure electrical plug is plugged into a live, properly grounded outlet. • See the Installation Instructions...
... Before you use. The white ceramic electrodes are not securely seated under the burners are normal. The igniter hole (on cooktop is normal. Troubleshooting Tips Save time and money! With LP gas, some models) is plugged. • Make sure electrical plug is plugged into a live, properly grounded outlet. • See the Installation Instructions...
Use and Care Manual
Page 15
...into contact with a light-colored cooktop. Cookware with smooth bottoms. Hot surface on a model • This is temporary and will become less visible in the Cleaning the glass cooktop surface section. The surface may appear discolored with plastic placed on the hot cooktop. • See the Glass surface... as the glass cools. This is normal. Incorrect cleaning methods being used . Hot sugar mixture spilled on some models). What To Do • Turn the control lock knob to the glass cooktop surface Pitting (or indentation) of cleaning. • To avoid scratches, use .
...into contact with a light-colored cooktop. Cookware with smooth bottoms. Hot surface on a model • This is temporary and will become less visible in the Cleaning the glass cooktop surface section. The surface may appear discolored with plastic placed on the hot cooktop. • See the Glass surface... as the glass cools. This is normal. Incorrect cleaning methods being used . Hot sugar mixture spilled on some models). What To Do • Turn the control lock knob to the glass cooktop surface Pitting (or indentation) of cleaning. • To avoid scratches, use .
Use and Care Manual
Page 20
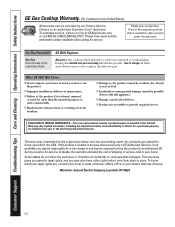
...Tips Care and Cleaning Operating Instructions Safety Instructions GE Gas Cooktop Warranty. (For Customers in an area where service by a GE Authorized Servicer is not available, you may be responsible for a trip charge or you may also have serial number and model number available when calling for service. This warranty... gives you specific legal rights, and you how to use within the USA. What GE Will Not Cover: ■ Service trips to your state's Attorney General...
...Tips Care and Cleaning Operating Instructions Safety Instructions GE Gas Cooktop Warranty. (For Customers in an area where service by a GE Authorized Servicer is not available, you may be responsible for a trip charge or you may also have serial number and model number available when calling for service. This warranty... gives you specific legal rights, and you how to use within the USA. What GE Will Not Cover: ■ Service trips to your state's Attorney General...
Use and Care Manual
Page 21
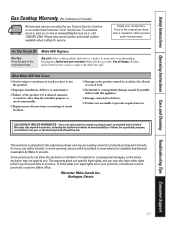
... of the original purchase Any part of merchantability or fitness for service. Any implied warranties, including the implied warranties of the cooktop which vary from province to province. This warranty gives you specific legal rights, and you . To know what your legal... to you may also have serial number and model number available when calling for a particular purpose, are in your province, consult your receipt here. Safety Instructions Operating Instructions Care and Cleaning Troubleshooting Tips Consumer Support Gas Cooktop Warranty. (For Customers in Canada) All warranty...
... of the original purchase Any part of merchantability or fitness for service. Any implied warranties, including the implied warranties of the cooktop which vary from province to province. This warranty gives you specific legal rights, and you . To know what your legal... to you may also have serial number and model number available when calling for a particular purpose, are in your province, consult your receipt here. Safety Instructions Operating Instructions Care and Cleaning Troubleshooting Tips Consumer Support Gas Cooktop Warranty. (For Customers in Canada) All warranty...

Installation Instructions
Page 4
... to combustible material. 2 Overall cooktop dimensions 30″ Cooktop 21″ (21-1/2″ Max. clearance from countertop to unprotected overhead surface 18″ MIN. for Glass Top models) 3″ 19-3/8″ 28-1/4″ 4 Recommended Gas Supply Location from cutout to side wall on either side of the unit NOTE: All gas cooktop models require 7/16″ free area...
... to combustible material. 2 Overall cooktop dimensions 30″ Cooktop 21″ (21-1/2″ Max. clearance from countertop to unprotected overhead surface 18″ MIN. for Glass Top models) 3″ 19-3/8″ 28-1/4″ 4 Recommended Gas Supply Location from cutout to side wall on either side of the unit NOTE: All gas cooktop models require 7/16″ free area...

Installation Instructions
Page 5
... Electrical Outlet 12″ Below Countertop Install a manual shut-off the gas supply to the side of the cooktop and screw the hold - Bottom of cooktop Cloth under Cooktop 3 Attach Foam Tape (glass maintop models only) Apply the foam tape around the outer edge of Cooktop Place a towel or tablecloth onto the countertop. Once the unit...
... Electrical Outlet 12″ Below Countertop Install a manual shut-off the gas supply to the side of the cooktop and screw the hold - Bottom of cooktop Cloth under Cooktop 3 Attach Foam Tape (glass maintop models only) Apply the foam tape around the outer edge of Cooktop Place a towel or tablecloth onto the countertop. Once the unit...

Installation Instructions
Page 11
... check to be sure the cooktop is in the UNLOCKED position. On models so equipped, check to be sure the cooktop is available to LITE, the spark igniter makes a series of electric sparks (ticking sounds) which light the burner. In an emergency, a cooktop burner may be no less ...flame, please use caution. Make sure that the side marked "OUTSIDE" is dangerous. WARNING: Lighting gas burners with a match is on highest setting. You should match light the cooktop burners only in their proper position: they should not be interchanged. For maximum stability, these grates ...
... check to be sure the cooktop is in the UNLOCKED position. On models so equipped, check to be sure the cooktop is available to LITE, the spark igniter makes a series of electric sparks (ticking sounds) which light the burner. In an emergency, a cooktop burner may be no less ...flame, please use caution. Make sure that the side marked "OUTSIDE" is dangerous. WARNING: Lighting gas burners with a match is on highest setting. You should match light the cooktop burners only in their proper position: they should not be interchanged. For maximum stability, these grates ...

Installation Instructions
Page 12
... guide has been completed. Rechecking steps will ensure safe use of the burner box. In addition to the model and serial numbers, it left in the UNLOCKED position (on the bottom of the cooktop. 12 E Recheck Steps: Double check to ensure proper replacement parts. B Make sure the flow of fuel and pressure...
... guide has been completed. Rechecking steps will ensure safe use of the burner box. In addition to the model and serial numbers, it left in the UNLOCKED position (on the bottom of the cooktop. 12 E Recheck Steps: Double check to ensure proper replacement parts. B Make sure the flow of fuel and pressure...

Installation Instructions
Page 13
...flat side of the authority having jurisdiction. C Adjust the pressure regulator, by the following adjustments must be located in serious injury. Model JGP940 JGP945 JGP933 JGP330 JGP328 Butane Kit # WB28T10228 WB28T10230 WB28T10232 WB28T10234 WB28T10236 TOOLS YOU WILL NEED FOR LP CONVERSION Phillips-Head Screwdriver ...from the factory, is showing on the burner. Failure to do so could result in Step 2. 13 2 adjust your cooktop with Liquefied Petroleum (LP) gas containing greater than 10% butane, you wish to the regulator. Cap Gasket NAT LP DOWN FOR OFF NAT NAT LP ...
...flat side of the authority having jurisdiction. C Adjust the pressure regulator, by the following adjustments must be located in serious injury. Model JGP940 JGP945 JGP933 JGP330 JGP328 Butane Kit # WB28T10228 WB28T10230 WB28T10232 WB28T10234 WB28T10236 TOOLS YOU WILL NEED FOR LP CONVERSION Phillips-Head Screwdriver ...from the factory, is showing on the burner. Failure to do so could result in Step 2. 13 2 adjust your cooktop with Liquefied Petroleum (LP) gas containing greater than 10% butane, you wish to the regulator. Cap Gasket NAT LP DOWN FOR OFF NAT NAT LP ...

Installation Instructions
Page 14
... from the burner base (if required to hold the orifice in the nut driver during installation and removal. Burner cap Burner head 3 Change Cooktop Burner Orifices (CONT.) NOTE: On most burners, the orifices have a springloaded retaining ring around Retainer Ring the hex head to access the orifices... a No. 15 "Torx" head driver bit, remove the screws holding the Orifice Spud Located burner base in the cooktop. Spark igniter Burner base 18,000 BTU Burner (on some models) Burner base Burner cap Burner head Spark igniter 14 These may be accessed through the hole in position.
... from the burner base (if required to hold the orifice in the nut driver during installation and removal. Burner cap Burner head 3 Change Cooktop Burner Orifices (CONT.) NOTE: On most burners, the orifices have a springloaded retaining ring around Retainer Ring the hex head to access the orifices... a No. 15 "Torx" head driver bit, remove the screws holding the Orifice Spud Located burner base in the cooktop. Spark igniter Burner base 18,000 BTU Burner (on some models) Burner base Burner cap Burner head Spark igniter 14 These may be accessed through the hole in position.

Installation Instructions
Page 15
...The main orifice is located low in the sides only. (See rating plate on some models) The 18,000 BTU/HR burner has two orifices with markings located in the center ...have a digit number and the letter "L" on the top. F Return the natural gas orifices to the bracket and reattach the bracket and the instruction sheet to a maximum of 10 in the ...illustrations above. Installation Instructions 3 Change Cooktop Burner Orifices (CONT.) D Locate the LP/Propane orifices shipped inside the literature package. These marks...
...The main orifice is located low in the sides only. (See rating plate on some models) The 18,000 BTU/HR burner has two orifices with markings located in the center ...have a digit number and the letter "L" on the top. F Return the natural gas orifices to the bracket and reattach the bracket and the instruction sheet to a maximum of 10 in the ...illustrations above. Installation Instructions 3 Change Cooktop Burner Orifices (CONT.) D Locate the LP/Propane orifices shipped inside the literature package. These marks...
Installation Instructions
Page 16
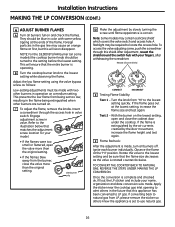
..., reseat the shield around the switch hub with your name, organization and date conversion was made. Once the conversion is made with some models) the cooktop burner knob should be blue in the flame being set to the setting before the lowest setting. Insert a screwdriver through this shield. If... the flame goes out at the "HI" position. Apply the sticker near the cooktop gas inlet opening to the lowest setting and be made , turn all burners full on the lowest setting, open the valve more than the original ...
..., reseat the shield around the switch hub with your name, organization and date conversion was made. Once the conversion is made with some models) the cooktop burner knob should be blue in the flame being set to the setting before the lowest setting. Insert a screwdriver through this shield. If... the flame goes out at the "HI" position. Apply the sticker near the cooktop gas inlet opening to the lowest setting and be made , turn all burners full on the lowest setting, open the valve more than the original ...

Quick Specs
Page 1
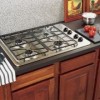
.... 6" MIN. Specification Created 11/04 330335 JGP330SEK GE® 30" Built-In Gas Cooktop Dimensions and Installation Information AGA Requirement: All gas cooktop models require 7/16" free area below countertop Cut should not interfere with cabinet structure at ge.com or call GE Answer Center® service, 800.626.2000. 30 21 Cooktop 3-3/16 13" MAX. Requires 18" minimum from cut...
.... 6" MIN. Specification Created 11/04 330335 JGP330SEK GE® 30" Built-In Gas Cooktop Dimensions and Installation Information AGA Requirement: All gas cooktop models require 7/16" free area below countertop Cut should not interfere with cabinet structure at ge.com or call GE Answer Center® service, 800.626.2000. 30 21 Cooktop 3-3/16 13" MAX. Requires 18" minimum from cut...

Quick Specs
Page 2
... movement of 140 degrees, ideal for a standing pilot • Model JGP330SEKSS - Eliminates the space between burners • Dishwasher-Safe Grates and Knobs - JGP330SEK GE® 30" Built-In Gas Cooktop Features and Benefits • Deep Recessed Cooktop - Delivers a low settng of pans between the burners and the cooktop to help contain spills and boil over liquids, ensuring easy...
... movement of 140 degrees, ideal for a standing pilot • Model JGP330SEKSS - Eliminates the space between burners • Dishwasher-Safe Grates and Knobs - JGP330SEK GE® 30" Built-In Gas Cooktop Features and Benefits • Deep Recessed Cooktop - Delivers a low settng of pans between the burners and the cooktop to help contain spills and boil over liquids, ensuring easy...


