Use and Care Manual
Page 1
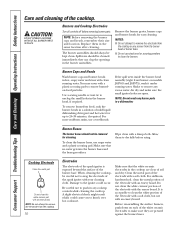
... Safety Instructions 2-6 Operating Instructions Control Lock 7 Cookware 8 Dual Stack Burner 7 Flame Size 8 Lighting a Burner 7 PowerBoil™ Burner 7 Sealed Gas Burners 7 Care and Cleaning Burners and Cooktop Electrodes 10 Burner Bases 10 Burner Caps and Heads . . . . . .10 Burner Grates 11 Burner Head and Cap Replacement 11 Control Knobs 9 Electrodes 10 Glass Cooktop 12, 13 Porcelain Enamel Cooktop . . . .9 Shipping Film and Tape 9 Stainless Steel Surfaces 9 Troubleshooting...
... Safety Instructions 2-6 Operating Instructions Control Lock 7 Cookware 8 Dual Stack Burner 7 Flame Size 8 Lighting a Burner 7 PowerBoil™ Burner 7 Sealed Gas Burners 7 Care and Cleaning Burners and Cooktop Electrodes 10 Burner Bases 10 Burner Caps and Heads . . . . . .10 Burner Grates 11 Burner Head and Cap Replacement 11 Control Knobs 9 Electrodes 10 Glass Cooktop 12, 13 Porcelain Enamel Cooktop . . . .9 Shipping Film and Tape 9 Stainless Steel Surfaces 9 Troubleshooting...
Use and Care Manual
Page 7
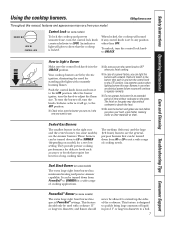
...or larger in the right rear and the center burner (on some models) are cool before you turn on some models) The extra large right front burner has maximum heating and precise simmer capability. When locked, the cooktop will go, to the OFF position. ■...Troubleshooting Tips Consumer Support Using the cooktop burners. UNLOCK LOCK CONTROL LOCK Control Lock (on some models) To lock the cooktop and prevent unwanted use . ■ Be sure you finish cooking. ■ In case of cooking applications. Sealed Gas Burners The smallest burner in diameter, and flames should...
...or larger in the right rear and the center burner (on some models) are cool before you turn on some models) The extra large right front burner has maximum heating and precise simmer capability. When locked, the cooktop will go, to the OFF position. ■...Troubleshooting Tips Consumer Support Using the cooktop burners. UNLOCK LOCK CONTROL LOCK Control Lock (on some models) To lock the cooktop and prevent unwanted use . ■ Be sure you finish cooking. ■ In case of cooking applications. Sealed Gas Burners The smallest burner in diameter, and flames should...
Use and Care Manual
Page 9
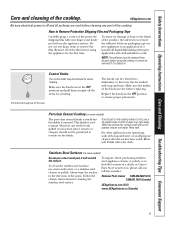
...removed if it will scratch the surface. If acids spill on the cooktop while it from the appliance surface. To inquire about purchasing stainless steel appliance cleaner or polish, or to remain on some models) Do not use warm sudsy water or a stainless steel cleaner or...Remove Protective Shipping Film and Packaging Tape Carefully grasp a corner of the cooktop. Control Knobs The control knobs may also be removed from packaging tape on new appliances is baked on some models) The porcelain enamel finish is acidresistant. Rinse well. it is an application...
...removed if it will scratch the surface. If acids spill on the cooktop while it from the appliance surface. To inquire about purchasing stainless steel appliance cleaner or polish, or to remain on some models) Do not use warm sudsy water or a stainless steel cleaner or...Remove Protective Shipping Film and Packaging Tape Carefully grasp a corner of the cooktop. Control Knobs The control knobs may also be removed from packaging tape on new appliances is baked on some models) The porcelain enamel finish is acidresistant. Rinse well. it is an application...
Use and Care Manual
Page 10
NOTE: Do not wash any cooktop controls while cleaning the cooktop. Be careful not to push in any burner parts in a dishwasher. Make sure that no water gets into the burner bases and the brass gas orifices. Do not clean the white ceramic portion of the spark igniter... clean the burner bases, use a toothbrush. For stubborn, hardened soil, clean the metal portion of the cooktop. Consumer Support Troubleshooting Tips Care and Cleaning Operating Instructions Safety Instructions Care and cleaning of the electrode with a damp cloth. To remove burned-on models JGP945 and ...
NOTE: Do not wash any cooktop controls while cleaning the cooktop. Be careful not to push in any burner parts in a dishwasher. Make sure that no water gets into the burner bases and the brass gas orifices. Do not clean the white ceramic portion of the spark igniter... clean the burner bases, use a toothbrush. For stubborn, hardened soil, clean the metal portion of the cooktop. Consumer Support Troubleshooting Tips Care and Cleaning Operating Instructions Safety Instructions Care and cleaning of the electrode with a damp cloth. To remove burned-on models JGP945 and ...
Use and Care Manual
Page 11
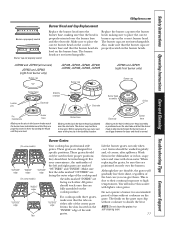
... into the slots located on the burner heads. The burner cap has three to place the correct burner cap on the cooktop surface. Electrode Burner base Make sure the hole in the burner head assembly is normal. Burner Grates (On some models) "OUTSIDE" "INSIDE" edge edges "OUTSIDE" edge (On some models) "INSIDE" edges Your cooktop has professional style grates. Make...
... into the slots located on the burner heads. The burner cap has three to place the correct burner cap on the cooktop surface. Electrode Burner base Make sure the hole in the burner head assembly is normal. Burner Grates (On some models) "OUTSIDE" "INSIDE" edge edges "OUTSIDE" edge (On some models) "INSIDE" edges Your cooktop has professional style grates. Make...
Use and Care Manual
Page 12
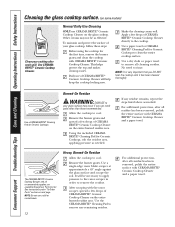
...other than those recommended. Shake the cleaning cream well. Remove the burner grates and spread a few drops of CERAMA BRYTE® Ceramic Cooktop Cleaner on the entire burned residue area. The CERAMA BRYTE® Ceramic Cooktop Scraper and all cleaning residue. If any remaining residue. Use ... and scrape the soil. Consumer Support Troubleshooting Tips Care and Cleaning Operating Instructions Safety Instructions Cleaning the glass cooktop surface. (on some models) Clean your cooktop after all residue has been removed, polish the entire surface with CERAMA BRYTE® Ceramic...
...other than those recommended. Shake the cleaning cream well. Remove the burner grates and spread a few drops of CERAMA BRYTE® Ceramic Cooktop Cleaner on the entire burned residue area. The CERAMA BRYTE® Ceramic Cooktop Scraper and all cleaning residue. If any remaining residue. Use ... and scrape the soil. Consumer Support Troubleshooting Tips Care and Cleaning Operating Instructions Safety Instructions Cleaning the glass cooktop surface. (on some models) Clean your cooktop after all residue has been removed, polish the entire surface with CERAMA BRYTE® Ceramic...
Use and Care Manual
Page 14
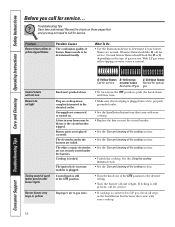
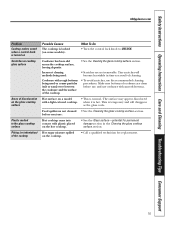
...these pages first and you may be determined visually. Troubleshooting Tips Save time and money! Control knobs will not turn Burners do not light Ticking sound of the cooktop section. Control knob is still present, call for service. What To Do • Use the illustrations below to ...isn't pushed down. • To turn from the OFF position, push the knob down and then turn. Improper air to gas ratio. • If cooktop is normal. With LP gas, some models) is plugged. • Make sure electrical plug is plugged into a live, properly grounded outlet. • See the ...
...these pages first and you may be determined visually. Troubleshooting Tips Save time and money! Control knobs will not turn Burners do not light Ticking sound of the cooktop section. Control knob is still present, call for service. What To Do • Use the illustrations below to ...isn't pushed down. • To turn from the OFF position, push the knob down and then turn. Improper air to gas ratio. • If cooktop is normal. With LP gas, some models) is plugged. • Make sure electrical plug is plugged into a live, properly grounded outlet. • See the ...
Use and Care Manual
Page 15
... into contact with smooth bottoms. Hot surface on the cooktop. • Call a qualified technician for permanent damage section in time as the glass cools. Make sure bottoms of cookware are not removable. Hot sugar mixture spilled on a model • This is normal. when it is temporary ...and will become less visible in the Cleaning the glass cooktop surface section. This is hot. before use, and use cookware with plastic placed on...
... into contact with smooth bottoms. Hot surface on the cooktop. • Call a qualified technician for permanent damage section in time as the glass cools. Make sure bottoms of cookware are not removable. Hot sugar mixture spilled on a model • This is normal. when it is temporary ...and will become less visible in the Cleaning the glass cooktop surface section. This is hot. before use, and use cookware with plastic placed on...
Use and Care Manual
Page 20
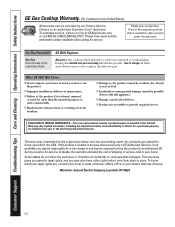
... or you how to use within the USA. This warranty gives you specific legal rights, and you may also have serial number and model number available when calling for a particular purpose, are , consult your local or state consumer affairs office or your receipt here. To ... also provide, free of merchantability or fitness for service. Consumer Support Troubleshooting Tips Care and Cleaning Operating Instructions Safety Instructions GE Gas Cooktop Warranty. (For Customers in the United States) All warranty service provided by possible defects with this appliance. ■ Damage caused ...
... or you how to use within the USA. This warranty gives you specific legal rights, and you may also have serial number and model number available when calling for a particular purpose, are , consult your local or state consumer affairs office or your receipt here. To ... also provide, free of merchantability or fitness for service. Consumer Support Troubleshooting Tips Care and Cleaning Operating Instructions Safety Instructions GE Gas Cooktop Warranty. (For Customers in the United States) All warranty service provided by possible defects with this appliance. ■ Damage caused ...
Use and Care Manual
Page 21
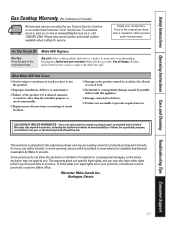
... or acts of incidental or consequential damages, so the above exclusion may not apply to you may also have serial number and model number available when calling for other rights which fails due to a defect in materials or workmanship. To know what your legal...Factory Service Centres or an authorized Customer Care® technician. Proof of the cooktop which vary from province to province. Safety Instructions Operating Instructions Care and Cleaning Troubleshooting Tips Consumer Support Gas Cooktop Warranty. (For Customers in Canada) All warranty service provided by Mabe to provide...
... or acts of incidental or consequential damages, so the above exclusion may not apply to you may also have serial number and model number available when calling for other rights which fails due to a defect in materials or workmanship. To know what your legal...Factory Service Centres or an authorized Customer Care® technician. Proof of the cooktop which vary from province to province. Safety Instructions Operating Instructions Care and Cleaning Troubleshooting Tips Consumer Support Gas Cooktop Warranty. (For Customers in Canada) All warranty service provided by Mabe to provide...

Installation Instructions
Page 4
... to unprotected overhead surface 18″ MIN. for Glass Top models) 3″ 19-3/8″ 28-1/4″ 4 Recommended Gas Supply Location from countertop to side wall on either side of countertop 4 Between cutout and the wall behind the cooktop 28-1/2" length of the unit 30″ MIN. clearance from backwall 1" Min. height from front edge...
... to unprotected overhead surface 18″ MIN. for Glass Top models) 3″ 19-3/8″ 28-1/4″ 4 Recommended Gas Supply Location from countertop to side wall on either side of countertop 4 Between cutout and the wall behind the cooktop 28-1/2" length of the unit 30″ MIN. clearance from backwall 1" Min. height from front edge...

Installation Instructions
Page 5
...cooktop Cloth under Cooktop 3 Attach Foam Tape (glass maintop models only) Apply the foam tape around the outer edge of Cooktop Place a towel or tablecloth onto the countertop. Make sure the front edge of Cooktop Pre-drilled hole Foam Tapes Cooktop Glass 6 Insert Cooktop Into Cutout Insert the cooktop... place. 5 Do not overlap the foam strips. Repeat for opposite side of the cooktop unit. Installation Instructions Installing the Cooktop Unit 1 Locate Electrical Outlet and gas Shut-Off Valve beneath Cabinet NEVER REUSE OLD CONNECTORS WHEN INSTALLING THIS UNIT. Be sure...
...cooktop Cloth under Cooktop 3 Attach Foam Tape (glass maintop models only) Apply the foam tape around the outer edge of Cooktop Place a towel or tablecloth onto the countertop. Make sure the front edge of Cooktop Pre-drilled hole Foam Tapes Cooktop Glass 6 Insert Cooktop Into Cutout Insert the cooktop... place. 5 Do not overlap the foam strips. Repeat for opposite side of the cooktop unit. Installation Instructions Installing the Cooktop Unit 1 Locate Electrical Outlet and gas Shut-Off Valve beneath Cabinet NEVER REUSE OLD CONNECTORS WHEN INSTALLING THIS UNIT. Be sure...

Installation Instructions
Page 11
..., it should be turned out of electric sparks (ticking sounds) which light the burner. On models so equipped, check to be sure the cooktop is available to LITE will not light automatically. Flames should light when gas is in the UNLOCKED position. Burns could result. 1/4″ to LITE, the spark igniter makes a series of...
..., it should be turned out of electric sparks (ticking sounds) which light the burner. On models so equipped, check to be sure the cooktop is available to LITE will not light automatically. Flames should light when gas is in the UNLOCKED position. Burns could result. 1/4″ to LITE, the spark igniter makes a series of...

Installation Instructions
Page 12
... plate for when it tells you the ratings of the burners and the type of the burner box. Check to the model and serial numbers, it left in the UNLOCKED position (on the bottom of fuel and pressure the cooktop was adjusted for your cooktop is unobstructed. Installation Instructions Operation Checklist A Make sure all controls...
... plate for when it tells you the ratings of the burners and the type of the burner box. Check to the model and serial numbers, it left in the UNLOCKED position (on the bottom of fuel and pressure the cooktop was adjusted for your cooktop is unobstructed. Installation Instructions Operation Checklist A Make sure all controls...

Installation Instructions
Page 13
...from the factory, is showing on the burner. C Adjust the pressure regulator, by closing the manual shut-off the gas supply to follow instructions could result in serious injury or property damage. Failure to the cooktop by the following adjustments must be located ...your cooktop with LP gas, you should know The pressure regulator and burner orifices are set for use this work assumes responsibility for use LP gas, the regulator and burner orifices must first replace the orifices and convert the pressure regulator. The LP orifice spuds for natural gas. Model ...
...from the factory, is showing on the burner. C Adjust the pressure regulator, by closing the manual shut-off the gas supply to follow instructions could result in serious injury or property damage. Failure to the cooktop by the following adjustments must be located ...your cooktop with LP gas, you should know The pressure regulator and burner orifices are set for use this work assumes responsibility for use LP gas, the regulator and burner orifices must first replace the orifices and convert the pressure regulator. The LP orifice spuds for natural gas. Model ...

Installation Instructions
Page 14
... a No. 15 "Torx" head driver bit, remove the screws holding the Orifice Spud Located burner base in the cooktop. A slight amount of force is required to access the orifices). Spark igniter Burner base 18,000 BTU Burner (on some models) Burner base Burner cap Burner head Spark igniter 14 Remove This Assembly B Remove the spark igniters from the...
... a No. 15 "Torx" head driver bit, remove the screws holding the Orifice Spud Located burner base in the cooktop. A slight amount of force is required to access the orifices). Spark igniter Burner base 18,000 BTU Burner (on some models) Burner base Burner cap Burner head Spark igniter 14 Remove This Assembly B Remove the spark igniters from the...

Installation Instructions
Page 15
...is located low in the illustrations above. G Replace the burner bases, heads, caps and top grates. (Note: When re-attaching the burner bases to glass top units, tighten screws to the cooktop burner. Simmer orifice Main orifice Left Rear Model Orifice JGP328 II JGP330 II JGP933 III Left Front Orifice... the LP/Propane orifices in their precise locations as noted in the center of the burner while the simmer orifice is located higher behind the center of appliance). F Return the natural gas orifices to the bracket and reattach the bracket and the instruction sheet to the pressure ...
...is located low in the illustrations above. G Replace the burner bases, heads, caps and top grates. (Note: When re-attaching the burner bases to glass top units, tighten screws to the cooktop burner. Simmer orifice Main orifice Left Rear Model Orifice JGP328 II JGP330 II JGP933 III Left Front Orifice... the LP/Propane orifices in their precise locations as noted in the center of the burner while the simmer orifice is located higher behind the center of appliance). F Return the natural gas orifices to the bracket and reattach the bracket and the instruction sheet to the pressure ...
Installation Instructions
Page 16
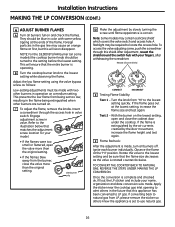
... low flame from "HI" to locate the access hole. Ignite each burner individually. Note: Some models may be turned to the illustration below that the entire burner is correct. B Turn the cooktop burner knob to natural gas from the burner, close the cabinet door under the cooktop. This will soon disappear. If converting back to the lowest setting...
... low flame from "HI" to locate the access hole. Ignite each burner individually. Note: Some models may be turned to the illustration below that the entire burner is correct. B Turn the cooktop burner knob to natural gas from the burner, close the cabinet door under the cooktop. This will soon disappear. If converting back to the lowest setting...

Quick Specs
Page 1
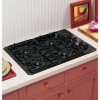
... With Single Wall Oven Information: 30" Gas Cooktops are approved for use over 30" Wall Ovens and Warming Drawers. below cooktop height to cooktop and wall oven/warming drawer installation instructions packed with product for current dimensional data. JGP328WEK/CEK/BEK GE® 30" Built-In Gas Cooktop Dimensions and Installation Information AGA Requirement: All gas cooktop models require 7/16" free area below...
... With Single Wall Oven Information: 30" Gas Cooktops are approved for use over 30" Wall Ovens and Warming Drawers. below cooktop height to cooktop and wall oven/warming drawer installation instructions packed with product for current dimensional data. JGP328WEK/CEK/BEK GE® 30" Built-In Gas Cooktop Dimensions and Installation Information AGA Requirement: All gas cooktop models require 7/16" free area below...

Quick Specs
Page 2
... construction for a standing pilot • Model JGP328WEKWW - Delivers a low settng of pans between the burners and the cooktop to help contain spills and boil over liquids, ensuring easy cleanup • High Output Burner - JGP328WEK/CEK/BEK GE® 30" Built-In Gas Cooktop Features and Benefits • Deep Recessed Cooktop - Eliminates the space between burners • Dishwasher-Safe Grates and...
... construction for a standing pilot • Model JGP328WEKWW - Delivers a low settng of pans between the burners and the cooktop to help contain spills and boil over liquids, ensuring easy cleanup • High Output Burner - JGP328WEK/CEK/BEK GE® 30" Built-In Gas Cooktop Features and Benefits • Deep Recessed Cooktop - Eliminates the space between burners • Dishwasher-Safe Grates and...


