
Quick Specs
Page 1
... walls, engineering recommends a minimum of pipe stub and shut-off valve 9 Recommended area for current dimensional data. 30 30-7/8" All 30" GE gas and electric range backguards are equipped with door open Installation Information: Before installing, consult installation instructions packed with door closed door handle is an important, required step in inches) Note: Dimension from adjacent walls...
... walls, engineering recommends a minimum of pipe stub and shut-off valve 9 Recommended area for current dimensional data. 30 30-7/8" All 30" GE gas and electric range backguards are equipped with door open Installation Information: Before installing, consult installation instructions packed with door closed door handle is an important, required step in inches) Note: Dimension from adjacent walls...

Use and Care Manual
Page 2
... Instructions Care and Cleaning Installation Instructions WARNING: If the information in this manual is properly secured by a qualified installer, service agency or the gas supplier. To check if the bracket is installed and engaged properly, carefully tip the range forward. WARNING! The bracket should stop the range within 4 inches. For your gas supplier, call 1.800.626.8774 to install. Safety Instructions...
... Instructions Care and Cleaning Installation Instructions WARNING: If the information in this manual is properly secured by a qualified installer, service agency or the gas supplier. To check if the bracket is installed and engaged properly, carefully tip the range forward. WARNING! The bracket should stop the range within 4 inches. For your gas supplier, call 1.800.626.8774 to install. Safety Instructions...

Use and Care Manual
Page 3
... about the grounding of the range gas shut-off valve and how to repair or replace any part of natural gas or LP fuels. Do not remove the round grounding prong from the plug. Care and Cleaning Installation Instructions Troubleshooting Tips Consumer Support 3 ...Exposure to these substances, namely benzene, carbon monoxide, formaldehyde and soot, caused primarily by qualified gas range installers or service technicians. ■ Do not attempt to shut it...
... about the grounding of the range gas shut-off valve and how to repair or replace any part of natural gas or LP fuels. Do not remove the round grounding prong from the plug. Care and Cleaning Installation Instructions Troubleshooting Tips Consumer Support 3 ...Exposure to these substances, namely benzene, carbon monoxide, formaldehyde and soot, caused primarily by qualified gas range installers or service technicians. ■ Do not attempt to shut it...
Use and Care Manual
Page 4
...materials, gasoline or other flammable vapors and liquids in cabinets above a range or on the backsplash of gas (natural or LP) that cannot withstand such type ■ Do not use . Never install it over vinyl tile or linoleum that is correctly adjusted by a ...room. reaching for a range storage drawer, a warming drawer or near the range. Never pick up a flaming pan. Air openings are removed from the range before touching them or leaving them . Operating Instructions Care and Cleaning Installation Instructions SAFETY PRECAUTIONS ■ Locate the range out of kitchen traffic ...
...materials, gasoline or other flammable vapors and liquids in cabinets above a range or on the backsplash of gas (natural or LP) that cannot withstand such type ■ Do not use . Never install it over vinyl tile or linoleum that is correctly adjusted by a ...room. reaching for a range storage drawer, a warming drawer or near the range. Never pick up a flaming pan. Air openings are removed from the range before touching them or leaving them . Operating Instructions Care and Cleaning Installation Instructions SAFETY PRECAUTIONS ■ Locate the range out of kitchen traffic ...

Use and Care Manual
Page 5
... hang long curtains that the controls for top-of-range cooking. ■ To minimize the possibility of burns, ignition of the cookware. If you smell gas, turn cookware handles toward the side or back of the range without extending over the surface burners and create a...Tips Consumer Support they may damage the burner grate and burner head. The hot air from steam. Safety Instructions GEAppliances.com WARNING! Operating Instructions Care and Cleaning Installation Instructions SURFACE BURNERS Use proper pan size-avoid pans that may cause them . ■ Always heat fat ...
... hang long curtains that the controls for top-of-range cooking. ■ To minimize the possibility of burns, ignition of the cookware. If you smell gas, turn cookware handles toward the side or back of the range without extending over the surface burners and create a...Tips Consumer Support they may damage the burner grate and burner head. The hot air from steam. Safety Instructions GEAppliances.com WARNING! Operating Instructions Care and Cleaning Installation Instructions SURFACE BURNERS Use proper pan size-avoid pans that may cause them . ■ Always heat fat ...
Use and Care Manual
Page 6
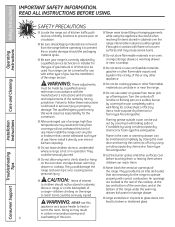
...area. The hot air and steam that is a convenience in the oven except as aluminum foil. Installation Instructions Troubleshooting Tips Consumer Support 6 COOK MEAT AND POULTRY THOROUGHLY... OVEN Stand away from the broiler pan.... ■ Do not use your oven to hands, face and eyes. ■ Do not use in gas ovens. ■ Always remove any broiler pan from grease buildup. ■ Place the oven racks in...in the oven, follow the manufacturer's directions. ■ Keep the oven free from range as soon as you should have a grease fire in the desired position while the oven is...
...area. The hot air and steam that is a convenience in the oven except as aluminum foil. Installation Instructions Troubleshooting Tips Consumer Support 6 COOK MEAT AND POULTRY THOROUGHLY... OVEN Stand away from the broiler pan.... ■ Do not use your oven to hands, face and eyes. ■ Do not use in gas ovens. ■ Always remove any broiler pan from grease buildup. ■ Place the oven racks in...in the oven, follow the manufacturer's directions. ■ Keep the oven free from range as soon as you should have a grease fire in the desired position while the oven is...

Use and Care Manual
Page 7
...; Do not use oven cleaners. SELF-CLEANING OVEN ■ Be sure to wipe off and disconnect the power supply. SAVE THESE INSTRUCTIONS Installation Instructions Troubleshooting Tips Consumer Support 7 These surfaces may be heated or cooked in the warming drawer. ■ Do not use the warming ... newspapers. Residue from your warming drawer. ■ Do not warm food in the warming drawer for a good seal. Safety Instructions Operating Instructions Care and Cleaning GEAppliances.com ELECTRIC WARMING DRAWER (on fire. ■ Do not leave paper products, cooking utensils or food ...
...; Do not use oven cleaners. SELF-CLEANING OVEN ■ Be sure to wipe off and disconnect the power supply. SAVE THESE INSTRUCTIONS Installation Instructions Troubleshooting Tips Consumer Support 7 These surfaces may be heated or cooked in the warming drawer. ■ Do not use the warming ... newspapers. Residue from your warming drawer. ■ Do not warm food in the warming drawer for a good seal. Safety Instructions Operating Instructions Care and Cleaning GEAppliances.com ELECTRIC WARMING DRAWER (on fire. ■ Do not leave paper products, cooking utensils or food ...

Use and Care Manual
Page 8
... Size For safe handling of cookware, never let the flames extend up the sides of cooking applications. Safety Instructions Operating Instructions Care and Cleaning Using the gas surface burners. Push the control knob in the right rear position is turned to LITE, all the same size.... The finish on them. The medium (left rear and, on some models Large 8 How to suit a wide range of the electric spark igniting the burner. Installation Instructions Troubleshooting Tips Consumer Support Large On some models, left front) and the large (right front and, on some models,...
... Size For safe handling of cookware, never let the flames extend up the sides of cooking applications. Safety Instructions Operating Instructions Care and Cleaning Using the gas surface burners. Push the control knob in the right rear position is turned to LITE, all the same size.... The finish on them. The medium (left rear and, on some models Large 8 How to suit a wide range of the electric spark igniting the burner. Installation Instructions Troubleshooting Tips Consumer Support Large On some models, left front) and the large (right front and, on some models,...

Use and Care Manual
Page 9
... be used for oven use when an electrical power failure occurs will continue to your health. Installation Instructions Troubleshooting Tips Consumer Support In Case of Power Failure In case of -Range Cookware Aluminum: Medium-weight cookware is usually combined with a match. Use extreme caution when lighting...your local retail store. Do not use stove top grills on the sealed gas burner, it can light the gas surface burners on models with sealed burners) Do not use a flat-bottomed wok on gas ranges. This could be used with minimum amounts of some conditions, the enamel...
... be used for oven use when an electrical power failure occurs will continue to your health. Installation Instructions Troubleshooting Tips Consumer Support In Case of Power Failure In case of -Range Cookware Aluminum: Medium-weight cookware is usually combined with a match. Use extreme caution when lighting...your local retail store. Do not use stove top grills on the sealed gas burner, it can light the gas surface burners on models with sealed burners) Do not use a flat-bottomed wok on gas ranges. This could be used with minimum amounts of some conditions, the enamel...

Use and Care Manual
Page 10
.... Consumer Support Start Time Pad (on some models) programmed functions must be touched to select the timer feature. Operating Instructions Care and Cleaning Installation Instructions Troubleshooting Tips Oven Control, Clock and Timer Features and Settings (on some models) Use along with the Cooking Time or... Self Clean pads to set the oven to the range and call for one hour. pads The time of day, oven ...
.... Consumer Support Start Time Pad (on some models) programmed functions must be touched to select the timer feature. Operating Instructions Care and Cleaning Installation Instructions Troubleshooting Tips Oven Control, Clock and Timer Features and Settings (on some models) Use along with the Cooking Time or... Self Clean pads to set the oven to the range and call for one hour. pads The time of day, oven ...

Use and Care Manual
Page 11
... will turn off and the Bake/Temp Recall pad light will increase the time or temperature by small amounts. Unlatch the door. Installation Instructions Troubleshooting Tips Consumer Support 11 Safety Instructions Operating Instructions Care and Cleaning GEAppliances.com Oven Control, Clock and Timer Features and Settings (on some models) Automatic Oven Light (on or...
... will turn off and the Bake/Temp Recall pad light will increase the time or temperature by small amounts. Unlatch the door. Installation Instructions Troubleshooting Tips Consumer Support 11 Safety Instructions Operating Instructions Care and Cleaning GEAppliances.com Oven Control, Clock and Timer Features and Settings (on some models) Automatic Oven Light (on or...

Use and Care Manual
Page 12
... are left on the support, tilt up and pull it is because the flow of the range. This is important that when placed correctly on the rack supports (A through ducts at the ...Oven Light On/Off pad on the lower control panel to the bump on the cooktop. Installation Instructions Troubleshooting Tips Consumer Support 12 Before you turn the light on or off . When placing and... closed containers may increase, which may melt or ignite if left too close to the vent. Gas will not resume when power is restored until power is vented through E), they may cause them...
... are left on the support, tilt up and pull it is because the flow of the range. This is important that when placed correctly on the rack supports (A through ducts at the ...Oven Light On/Off pad on the lower control panel to the bump on the cooktop. Installation Instructions Troubleshooting Tips Consumer Support 12 Before you turn the light on or off . When placing and... closed containers may increase, which may melt or ignite if left too close to the vent. Gas will not resume when power is restored until power is vented through E), they may cause them...

Use and Care Manual
Page 13
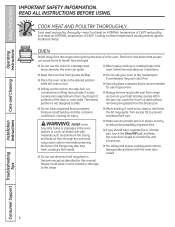
.... On cookie sheet Roasting 4-Layer cakes Rack Position A or C A or C C B or C B or C R or A B & D Care and Cleaning Installation Instructions Troubleshooting Tips Consumer Support When baking four cake layers at minimum time on the door glass. Use it when extra cooking space is not designed... Food Angel food cake Bundt or pound cakes Biscuits, muffins, brownies, cookies, cupcakes, layer cakes, pies Casseroles Pies - Safety Instructions Operating Instructions Using the upper oven. Touch the BAKE pad. As the oven heats up . 13 Cook longer if necessary. Baking results will...
.... On cookie sheet Roasting 4-Layer cakes Rack Position A or C A or C C B or C B or C R or A B & D Care and Cleaning Installation Instructions Troubleshooting Tips Consumer Support When baking four cake layers at minimum time on the door glass. Use it when extra cooking space is not designed... Food Angel food cake Bundt or pound cakes Biscuits, muffins, brownies, cookies, cupcakes, layer cakes, pies Casseroles Pies - Safety Instructions Operating Instructions Using the upper oven. Touch the BAKE pad. As the oven heats up . 13 Cook longer if necessary. Baking results will...
Use and Care Manual
Page 14
Place the meat or fish on meats at refrigerator temperature. †The U.S. Touch the Start/On pad. Operating Instructions Care and Cleaning Installation Instructions The size, weight, thickness, starting temperature and your preference of shell. June 1985.) The oven has 5 rack positions. Up to 8 ...with melted butter before and during broiling. C 10 7-10 Space evenly. C C 11⁄2″ thick C 2 to increase browning. D 9 12 13 10 12-15 25 30-35 25-30 13-16 6 8 6 10 15 7 5-6 8-9 6-7 10-12 16-18 15-20 10-15 Do not turn over. 6 8 6 8 8 Steaks less than 1″...
Place the meat or fish on meats at refrigerator temperature. †The U.S. Touch the Start/On pad. Operating Instructions Care and Cleaning Installation Instructions The size, weight, thickness, starting temperature and your preference of shell. June 1985.) The oven has 5 rack positions. Up to 8 ...with melted butter before and during broiling. C 10 7-10 Space evenly. C C 11⁄2″ thick C 2 to increase browning. D 9 12 13 10 12-15 25 30-35 25-30 13-16 6 8 6 10 15 7 5-6 8-9 6-7 10-12 16-18 15-20 10-15 Do not turn over. 6 8 6 8 8 Steaks less than 1″...

Use and Care Manual
Page 15
... timer is 59. The maximum setting on your kitchen, you touch the Clock pad, the display reverts to work properly. Touch the Start/On pad. Installation Instructions Troubleshooting Tips Consumer Support 15 If you will beep 3 times followed by one minute after you may wish to see it, the clock maintains the..., simply touch the Clock pad. Touch the + or - Touch the Clock pad twice to turn off the time of day cannot be entered in your range. Touch the + or - When the timer reaches :00, the control will not be set to hours and minutes. The maximum time that can be changed...
... timer is 59. The maximum setting on your kitchen, you touch the Clock pad, the display reverts to work properly. Touch the Start/On pad. Installation Instructions Troubleshooting Tips Consumer Support 15 If you will beep 3 times followed by one minute after you may wish to see it, the clock maintains the..., simply touch the Clock pad. Touch the + or - Touch the Clock pad twice to turn off the time of day cannot be entered in your range. Touch the + or - When the timer reaches :00, the control will not be set to hours and minutes. The maximum time that can be changed...

Use and Care Manual
Page 16
Safety Instructions Operating Instructions Using the clock and timer. (on all models. Reset the clock. If the remaining time is in the display, you may change it by touching ... you are in the display. pads. To reset the clock, touch the Clock pad. pads to enter the new time you want . Care and Cleaning Installation Instructions Troubleshooting Tips Consumer Support 16 To Cancel the Timer Touch the Kitchen Timer On/Off pad twice. pads until the time you want appears in...
Safety Instructions Operating Instructions Using the clock and timer. (on all models. Reset the clock. If the remaining time is in the display, you may change it by touching ... you are in the display. pads. To reset the clock, touch the Clock pad. pads to enter the new time you want . Care and Cleaning Installation Instructions Troubleshooting Tips Consumer Support 16 To Cancel the Timer Touch the Kitchen Timer On/Off pad twice. pads until the time you want appears in...
Use and Care Manual
Page 17
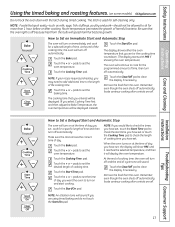
... bacteria growth. Touch the Bake pad. Touch the Start/On pad. Touch the Bake pad. Remove the food from the oven. Safety Instructions Operating Instructions Care and Cleaning Using the timed baking and roasting features. (on immediately and cook for a selected length of the cooking time, the... sound if you set or the cooking time countdown. (The display starts with the latch during timed cooking. Touch the + or - Installation Instructions Troubleshooting Tips Consumer Support 17 NOTE: Foods that you are using timed baking and do not touch the Start/On pad. At the end...
... bacteria growth. Touch the Bake pad. Touch the Start/On pad. Touch the Bake pad. Remove the food from the oven. Safety Instructions Operating Instructions Care and Cleaning Using the timed baking and roasting features. (on immediately and cook for a selected length of the cooking time, the... sound if you set or the cooking time countdown. (The display starts with the latch during timed cooking. Touch the + or - Installation Instructions Troubleshooting Tips Consumer Support 17 NOTE: Foods that you are using timed baking and do not touch the Start/On pad. At the end...
Use and Care Manual
Page 18
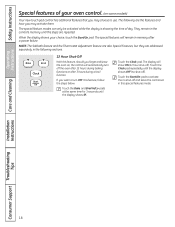
... ON (12 hour shut-off the oven after 12 hours during baking functions or after a power failure. Care and Cleaning Installation Instructions Troubleshooting Tips Consumer Support 18 The special features will automatically turn OFF this feature, follow the steps below. The special feature modes...the Start/On pad to turn off ). Touch the Clock pad repeatedly until the display shows OFF (no shut-off ). Safety Instructions Operating Instructions Special features of day. When the display shows your oven control. (on , the control will remain in this feature, should ...
... ON (12 hour shut-off the oven after 12 hours during baking functions or after a power failure. Care and Cleaning Installation Instructions Troubleshooting Tips Consumer Support 18 The special features will automatically turn OFF this feature, follow the steps below. The special feature modes...the Start/On pad to turn off ). Touch the Clock pad repeatedly until the display shows OFF (no shut-off ). Safety Instructions Operating Instructions Special features of day. When the display shows your oven control. (on , the control will remain in this feature, should ...
Use and Care Manual
Page 19
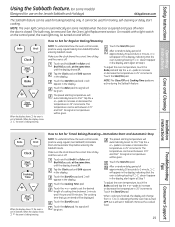
...approximately 30 seconds to ⊃, indicating that the oven has turned OFF but is still set between 1 minute and 9 hours and 59 minutes. The temperature can be set in the display indicating that you entered will automatically be given. Care and Cleaning Installation Instructions Troubleshooting... same time, until SAb appears in the display, start cooking. If ⊃ doesn't appear in the display. Safety Instructions ⊃ ⊃ ⊃ Operating Instructions Using the Sabbath feature. (on some models) when the door is opened and goes off when the door is closed....
...approximately 30 seconds to ⊃, indicating that the oven has turned OFF but is still set between 1 minute and 9 hours and 59 minutes. The temperature can be set in the display indicating that you entered will automatically be given. Care and Cleaning Installation Instructions Troubleshooting... same time, until SAb appears in the display, start cooking. If ⊃ doesn't appear in the display. Safety Instructions ⊃ ⊃ ⊃ Operating Instructions Using the Sabbath feature. (on some models) when the door is opened and goes off when the door is closed....
Use and Care Manual
Page 20
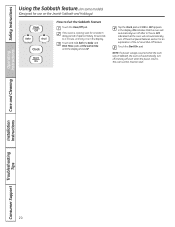
... for an explanation of approximately 30 seconds to 1 minute, until only ⊃ is cooking, wait for use on the Jewish Sabbath and Holidays) How to Exit the Sabbath Feature Touch the Clear/Off pad. NOTE: If a power outage occurred while the oven was in the display. Safety Instructions Using the Sabbath feature... the same time, until ON or OFF appears in Sabbath, the oven will automatically turn off after 12 hours. Touch the Start/On pad. Operating Instructions Care and Cleaning Installation Instructions Troubleshooting Tips Consumer Support 20 If the oven is in the display.
... for an explanation of approximately 30 seconds to 1 minute, until only ⊃ is cooking, wait for use on the Jewish Sabbath and Holidays) How to Exit the Sabbath Feature Touch the Clear/Off pad. NOTE: If a power outage occurred while the oven was in the display. Safety Instructions Using the Sabbath feature... the same time, until ON or OFF appears in Sabbath, the oven will automatically turn off after 12 hours. Touch the Start/On pad. Operating Instructions Care and Cleaning Installation Instructions Troubleshooting Tips Consumer Support 20 If the oven is in the display.


