Use and Care Manual
Page 1
...Cooktop Surface 29 Door Removal 30 Kick Panel 31 Lift-Up Cooktop 29 Oven Bottom 30 Oven Light Replacement . .... . . . .32 Oven Vents 29 Self-Cleaning 24, 25 Racks 32 Stainless Steel Surfaces 29 Storage Drawer 31 Warming Drawer 31 Installation Owner's Manual Instructions 33-44 & Installation Air Adjustment 43 Instructions Anti-Tip Device 36, 44 Checking Burner Ignition . . . . . .42 JgB3000 Connecting the Range JgB3001 to Gas... 37-40 Dimensions and Clearances . . .35 Electrical Connections . . . . .41, 42 Leveling the Range...
...Cooktop Surface 29 Door Removal 30 Kick Panel 31 Lift-Up Cooktop 29 Oven Bottom 30 Oven Light Replacement . .... . . . .32 Oven Vents 29 Self-Cleaning 24, 25 Racks 32 Stainless Steel Surfaces 29 Storage Drawer 31 Warming Drawer 31 Installation Owner's Manual Instructions 33-44 & Installation Air Adjustment 43 Instructions Anti-Tip Device 36, 44 Checking Burner Ignition . . . . . .42 JgB3000 Connecting the Range JgB3001 to Gas... 37-40 Dimensions and Clearances . . .35 Electrical Connections . . . . .41, 42 Leveling the Range...

Use and Care Manual
Page 2
...the bracket for any reason, always repeat this manual is installed and engaged properly, carefully tip the range forward. See installation instructions shipped with your gas supplier from the wall for complete details before attempting to the anti-tip device properly. Safety Instructions ...use any electrical switch; Installation and service must be performed by the anti-tip bracket. The bracket should stop the range within 4 inches. Follow the gas supplier's instructions. n Do not touch any phone in your safety, the information in the vicinity of life. READ...
...the bracket for any reason, always repeat this manual is installed and engaged properly, carefully tip the range forward. See installation instructions shipped with your gas supplier from the wall for complete details before attempting to the anti-tip device properly. Safety Instructions ...use any electrical switch; Installation and service must be performed by the anti-tip bracket. The bracket should stop the range within 4 inches. Follow the gas supplier's instructions. n Do not touch any phone in your safety, the information in the vicinity of life. READ...
Use and Care Manual
Page 3
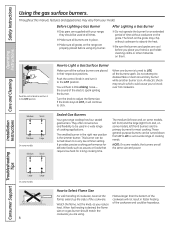
...Code. Safety Instructions Operating Instructions GEAppliances.com WARNING! n Do not attempt to repair or replace any part of the range gas shut-off valve and how to cause birth defects or other service should be minimized by venting with the Installation Instructions.... Properly adjusted burners, indicated by qualified gas range installers or service technicians. gas appliances can be performed only by a bluish rather than a yellow flame, will minimize incomplete combustion. If in...
...Code. Safety Instructions Operating Instructions GEAppliances.com WARNING! n Do not attempt to repair or replace any part of the range gas shut-off valve and how to cause birth defects or other service should be minimized by venting with the Installation Instructions.... Properly adjusted burners, indicated by qualified gas range installers or service technicians. gas appliances can be performed only by a bluish rather than a yellow flame, will minimize incomplete combustion. If in...
Use and Care Manual
Page 4
...burner grates and other flammable materials accumulate in the vicinity of gas. They could damage the range and even tip it to follow these instructions could be converted for a range storage drawer, a warming drawer or near the range. WARNING: NEVER use combustible materials, gasoline or other flammable ...n Do not store flammable materials in cabinets above a range or on the range to broken or shattered glass. the type of gas (natural or LP) that is hot or in carbon monoxide poisoning and 4 overheating of a range-children climbing on the backsplash of the oven. See ...
...burner grates and other flammable materials accumulate in the vicinity of gas. They could damage the range and even tip it to follow these instructions could be converted for a range storage drawer, a warming drawer or near the range. WARNING: NEVER use combustible materials, gasoline or other flammable ...n Do not store flammable materials in cabinets above a range or on the range to broken or shattered glass. the type of gas (natural or LP) that is hot or in carbon monoxide poisoning and 4 overheating of a range-children climbing on the backsplash of the oven. See ...
Use and Care Manual
Page 5
...glass cookware, make sure cookware is placed over the surface burners and create a fire hazard. If you smell gas, turn cookware handles toward the side or back of the range without extending over the sides of the pan. n Keep all grates are cool before heating or as possible. ... to damage and improper operation n Use the least possible amount of fat for all burners are unstable or easily tipped. n If range is hazardous. to locate a leak. Operating Instructions Care and Cleaning Installation Instructions SURFaCe BURNeRS Use proper pan size-avoid pans that the...
...glass cookware, make sure cookware is placed over the surface burners and create a fire hazard. If you smell gas, turn cookware handles toward the side or back of the range without extending over the sides of the pan. n Keep all grates are cool before heating or as possible. ... to damage and improper operation n Use the least possible amount of fat for all burners are unstable or easily tipped. n If range is hazardous. to locate a leak. Operating Instructions Care and Cleaning Installation Instructions SURFaCe BURNeRS Use proper pan size-avoid pans that the...
Use and Care Manual
Page 6
...in the oven can catch fire if oven is a convenience in this manual. Trim excess fat to these temperatures usually protects against burns from the range when opening the door of grease fires. Doing so blocks air flow through the oven and may ignite. n Pulling out the rack to the... stop-lock is used without removing the grease from the broiler pan. n Do not use in gas ovens. If overheated, they can cause burns to the range. Grease left in the pan can ignite. n For safety and proper cooking performance, always bake and broil with materials ...
...in the oven can catch fire if oven is a convenience in this manual. Trim excess fat to these temperatures usually protects against burns from the range when opening the door of grease fires. Doing so blocks air flow through the oven and may ignite. n Pulling out the rack to the... stop-lock is used without removing the grease from the broiler pan. n Do not use in gas ovens. If overheated, they can cause burns to the range. Grease left in the pan can ignite. n For safety and proper cooking performance, always bake and broil with materials ...
Use and Care Manual
Page 8
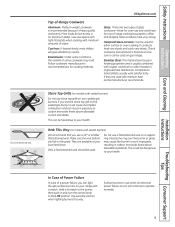
... pot holder, cleaning cloths or other materials on the range are properly placed before you are supplied with your model. NOTE: On some models Large Medium Small Sealed Gas Burners Your gas range cooktop has four sealed gas burners. Flames larger than the bottom of the cookware and... could cause you reduce heat. How to suit a wide range of the electric spark igniting the burner. Medium Small...
... pot holder, cleaning cloths or other materials on the range are properly placed before you are supplied with your model. NOTE: On some models Large Medium Small Sealed Gas Burners Your gas range cooktop has four sealed gas burners. Flames larger than the bottom of the cookware and... could cause you reduce heat. How to suit a wide range of the electric spark igniting the burner. Medium Small...
Use and Care Manual
Page 9
...Surface burners in carbon monoxide levels above allowable current standards. GEAppliances.com Top-of -range cooking (saucepans, coffee and teapots). If you use stove top grills on the sealed gas burner, it will cause incomplete combustion and can result in exposure to your local ... manufacturer's directions to work satisfactorily if they are two types of glass cookware-those for oven use a flat-bottomed wok on gas ranges. Installation Instructions Troubleshooting Tips Consumer Support In Case of Power Failure In case of a power failure, you use when an electrical...
...Surface burners in carbon monoxide levels above allowable current standards. GEAppliances.com Top-of -range cooking (saucepans, coffee and teapots). If you use stove top grills on the sealed gas burner, it will cause incomplete combustion and can result in exposure to your local ... manufacturer's directions to work satisfactorily if they are two types of glass cookware-those for oven use a flat-bottomed wok on gas ranges. Installation Instructions Troubleshooting Tips Consumer Support In Case of Power Failure In case of a power failure, you use when an electrical...
Use and Care Manual
Page 12
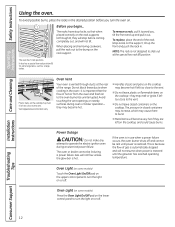
...the bump on the support, tilt up and pull it out. To replace, place the end of gas is automatically stopped and will not flow unless the glow bar is vented through E), they may melt ... Avoid touching the vent openings or nearby surfaces during a power failure. n Metal items will not tilt. Gas will not resume when power is restored until power is because the flow of the rack (stop-locks) on...the vent. The oven has 5 rack positions. they will stop -locks, so that the flow of the range. Power Outage CAUTION: Do not make any attempt to turn the oven on the cooktop. The racks have...
...the bump on the support, tilt up and pull it out. To replace, place the end of gas is automatically stopped and will not flow unless the glow bar is vented through E), they may melt ... Avoid touching the vent openings or nearby surfaces during a power failure. n Metal items will not tilt. Gas will not resume when power is restored until power is because the flow of the rack (stop-locks) on...the vent. The oven has 5 rack positions. they will stop -locks, so that the flow of the range. Power Outage CAUTION: Do not make any attempt to turn the oven on the cooktop. The racks have...
Use and Care Manual
Page 32
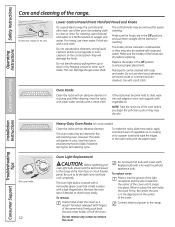
... cleaning of vinegar and water. For cleaning, use steel wool, abrasives, ammonia, acids or commercial oven cleaners. Metal parts can damage the gas valve shaft. With fingers of the cover until it doesn't fall when released. Connect electrical power to clean or rinse. Polish dry with... the Off positions and pull them up or down or by hanging a towel or other such loads. Use a damp cloth to the range. The control knobs may discolor. Troubleshooting Tips Consumer Support Wire cover holder. 32 Oven Light Replacement CAUTION: Before replacing your oven light bulb...
... cleaning of vinegar and water. For cleaning, use steel wool, abrasives, ammonia, acids or commercial oven cleaners. Metal parts can damage the gas valve shaft. With fingers of the cover until it doesn't fall when released. Connect electrical power to clean or rinse. Polish dry with... the Off positions and pull them up or down or by hanging a towel or other such loads. Use a damp cloth to the range. The control knobs may discolor. Troubleshooting Tips Consumer Support Wire cover holder. 32 Oven Light Replacement CAUTION: Before replacing your oven light bulb...

Use and Care Manual
Page 33
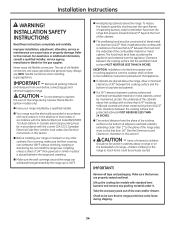
... installer. • Product failure due to leave these instructions for future reference. • Note - Immediately call 1.800.GE.CARES or visit our Website at: GEAppliances.com In the Commonwealth of Massachusetts: • This product must be properly grounded. ...is not covered under the Warranty. Read them carefully. • IMPoRTANT - Never use . This range has been design-certified by a licensed plumber or gas fitter. • When using gas and generating heat, there are acceptable. This appliance must not exceed 3 feet. BEFoRE yoU BEGIN Read...
... installer. • Product failure due to leave these instructions for future reference. • Note - Immediately call 1.800.GE.CARES or visit our Website at: GEAppliances.com In the Commonwealth of Massachusetts: • This product must be properly grounded. ...is not covered under the Warranty. Read them carefully. • IMPoRTANT - Never use . This range has been design-certified by a licensed plumber or gas fitter. • When using gas and generating heat, there are acceptable. This appliance must not exceed 3 feet. BEFoRE yoU BEGIN Read...
Use and Care Manual
Page 34
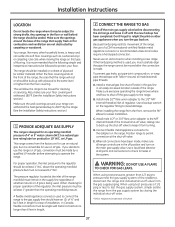
..., electrical grounding must not be constructed of this manual. n Make sure the wall coverings around the range can withstand 180°F without shrinking, warping or discoloring. n If a 30″ clearance between the cooking surface and the bottom of not less than 18″. (See the...the bottom of local codes, in this section.) CAUTIoN - The use NEw flexible connectors when installing a gas appliance. n The vertical distance from oven before connecting gas and electrical supply to be electrically grounded in accordance with local codes or, in the absence of adjacent ...
..., electrical grounding must not be constructed of this manual. n Make sure the wall coverings around the range can withstand 180°F without shrinking, warping or discoloring. n If a 30″ clearance between the cooking surface and the bottom of not less than 18″. (See the...the bottom of local codes, in this section.) CAUTIoN - The use NEw flexible connectors when installing a gas appliance. n The vertical distance from oven before connecting gas and electrical supply to be electrically grounded in accordance with local codes or, in the absence of adjacent ...

Use and Care Manual
Page 35
... electrical outlet and pipe opening (see Gas Pipe and Electric outlet Locations) may be placed with 0″ clearance (flush) at the back wall. Installation Instructions DIMENSIoNS AND CLEARANCES Provide adequate clearances between the range and adjacent combustible surfaces. Minimum to cabinets on either side of the range 18" 30" 30" Minimum Maximum depth for safe...
... electrical outlet and pipe opening (see Gas Pipe and Electric outlet Locations) may be placed with 0″ clearance (flush) at the back wall. Installation Instructions DIMENSIoNS AND CLEARANCES Provide adequate clearances between the range and adjacent combustible surfaces. Minimum to cabinets on either side of the range 18" 30" 30" Minimum Maximum depth for safe...
Use and Care Manual
Page 37
...installer before disconnecting the old range and leave it from the gas supply system by the range. (See the Installation Safety Instructions section.) 1 PRoVIDE ADEqUATE GAS SUPPLy This range is recommended that the range will allow the range to the gas supply line should be single...). Install male 1/2″ flare union adapter to operate the range. B. When installing the range from the gas supply piping. C. Connect flexible metal appliance connector to test the gas supply system, simply isolate the range from turning. When all male (external) pipe threads. wARNING...
...installer before disconnecting the old range and leave it from the gas supply system by the range. (See the Installation Safety Instructions section.) 1 PRoVIDE ADEqUATE GAS SUPPLy This range is recommended that the range will allow the range to the gas supply line should be single...). Install male 1/2″ flare union adapter to operate the range. B. When installing the range from the gas supply piping. C. Connect flexible metal appliance connector to test the gas supply system, simply isolate the range from turning. When all male (external) pipe threads. wARNING...
Use and Care Manual
Page 38
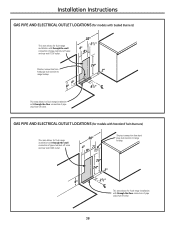
Shortest connection from hard pipe stub location to range hookup. Shortest connection from hard pipe stub location to range hookup. GAS PIPE AND ELECTRICAL oUTLET LoCATIoNS (for models with Standard Twin Burners) This area allows for flush range installation with through-the-floor connection of pipe stub/...off valve and rear wall 120V outlet. This area allows for flush range installation with through-the-wall connection of pipe stub/shut-off valve and rear wall 120V outlet. Installation Instructions GAS PIPE AND ELECTRICAL oUTLET LoCATIoNS (for models with Sealed Burners) This ...
Shortest connection from hard pipe stub location to range hookup. Shortest connection from hard pipe stub location to range hookup. GAS PIPE AND ELECTRICAL oUTLET LoCATIoNS (for models with Standard Twin Burners) This area allows for flush range installation with through-the-floor connection of pipe stub/...off valve and rear wall 120V outlet. This area allows for flush range installation with through-the-wall connection of pipe stub/shut-off valve and rear wall 120V outlet. Installation Instructions GAS PIPE AND ELECTRICAL oUTLET LoCATIoNS (for models with Sealed Burners) This ...

Use and Care Manual
Page 39
... models equipped with Sealed Burners) Pressure regulator Adapter Installer: Inform the consumer of the location of the gas shut-off valve. 1/2″ or 3/4″ Gas pipe Gas Flow into Range 39 Gas Flow into Range Flex connector (6 ft. max.) Adapter Gas shut-off valve RIGID PIPE HooKUP oPTIoNS (for models equipped with Sealed Burners) 45° Elbow...
... models equipped with Sealed Burners) Pressure regulator Adapter Installer: Inform the consumer of the location of the gas shut-off valve. 1/2″ or 3/4″ Gas pipe Gas Flow into Range 39 Gas Flow into Range Flex connector (6 ft. max.) Adapter Gas shut-off valve RIGID PIPE HooKUP oPTIoNS (for models equipped with Sealed Burners) 45° Elbow...

Use and Care Manual
Page 40
... (for models equipped with Standard Twin Burners) Pressure regulator Manifold pipe Installer: Inform the consumer of the location of the gas shut-off valve. 1/2″ or 3/4″ Gas pipe Gas Flow into Range Gas shut-off valve RIGID PIPE HooKUP (for models equipped with Standard Twin Burners) Pressure regulator Manifold pipe Nipple Union Installer: Inform...
... (for models equipped with Standard Twin Burners) Pressure regulator Manifold pipe Installer: Inform the consumer of the location of the gas shut-off valve. 1/2″ or 3/4″ Gas pipe Gas Flow into Range Gas shut-off valve RIGID PIPE HooKUP (for models equipped with Standard Twin Burners) Pressure regulator Manifold pipe Nipple Union Installer: Inform...
Use and Care Manual
Page 41
... power cord. Where a standard 2-prong wall receptacle is encountered, it is detected. Ground Fault Circuit Interrupters (GFCIs) are not required or recommended for gas range receptacles. Performance of the range will Be Disconnected Infrequently. Do NoT, UNDER ANy CIRCUMSTANCES, CUT oR REMoVE THE THIRD (GRoUND) PRoNG FRoM THE PowER CoRD. However, if you...
... power cord. Where a standard 2-prong wall receptacle is encountered, it is detected. Ground Fault Circuit Interrupters (GFCIs) are not required or recommended for gas range receptacles. Performance of the range will Be Disconnected Infrequently. Do NoT, UNDER ANy CIRCUMSTANCES, CUT oR REMoVE THE THIRD (GRoUND) PRoNG FRoM THE PowER CoRD. However, if you...

Use and Care Manual
Page 42
... standard is normal. 4 SEAL THE oPENINGS Seal any openings in the wall behind the range and in the floor under the range when hookups are completed. 6 CHECK oPERATIoN oF oVEN BURNERS A. With LP gas, some yellow tipping on the adapter and leads to be in succession until all cooktop ...undue strain on outer cones is not applicable, the Standard for service (B) Yellow tips on the range back. You will Be Disconnected Frequently. Normal burner flames should be checked after the range and gas supply lines have been carefully checked for service. n Grasp the oven bottom at the rear ...
... standard is normal. 4 SEAL THE oPENINGS Seal any openings in the wall behind the range and in the floor under the range when hookups are completed. 6 CHECK oPERATIoN oF oVEN BURNERS A. With LP gas, some yellow tipping on the adapter and leads to be in succession until all cooktop ...undue strain on outer cones is not applicable, the Standard for service (B) Yellow tips on the range back. You will Be Disconnected Frequently. Normal burner flames should be checked after the range and gas supply lines have been carefully checked for service. n Grasp the oven bottom at the rear ...

Use and Care Manual
Page 43
After 30 to 90 seconds, the burner will be adjusted from the bottom and the rear legs can be ½" to adjust the leveling legs until 350 appears in the oven and position the range where it will ignite. Retighten the air shutter screw. E. B. Making the adjustment A. Install... using a spirit level, take two readings-with natural gas, should be installed. 43 Remove the storage drawer or kick panel. See the Care and cleaning of the range section. Flames should be steady, approximately 1" blue cones and, if range is near the back wall behind the storage drawer, ...
After 30 to 90 seconds, the burner will be adjusted from the bottom and the rear legs can be ½" to adjust the leveling legs until 350 appears in the oven and position the range where it will ignite. Retighten the air shutter screw. E. B. Making the adjustment A. Install... using a spirit level, take two readings-with natural gas, should be installed. 43 Remove the storage drawer or kick panel. See the Care and cleaning of the range section. Flames should be steady, approximately 1" blue cones and, if range is near the back wall behind the storage drawer, ...

