Use and Care Manual
Page 1
Refr Top-Freezer igerators GEAppliances.com Safety Instructions 2-4 Operating Instructions Automatic Icemaker 9 Controls 5 Crispers and Pans 7, 8 Shelves and Bins 6 Care and Cleaning Care and Cleaning 10, 11 Replacing ...;n en español empieza en la página 65 Write the model and serial numbers here: Model Serial Find these instructions for U.S. Note à l'installateur - Note to Install the Refrigerator 12 Reversing the Door Swing . . . .21-25 Water Line Installation 17-21 Troubleshooting Tips 26-29 Normal Operating Sounds 26 Consumer Support Consumer Support...
Refr Top-Freezer igerators GEAppliances.com Safety Instructions 2-4 Operating Instructions Automatic Icemaker 9 Controls 5 Crispers and Pans 7, 8 Shelves and Bins 6 Care and Cleaning Care and Cleaning 10, 11 Replacing ...;n en español empieza en la página 65 Write the model and serial numbers here: Model Serial Find these instructions for U.S. Note à l'installateur - Note to Install the Refrigerator 12 Reversing the Door Swing . . . .21-25 Water Line Installation 17-21 Troubleshooting Tips 26-29 Normal Operating Sounds 26 Consumer Support Consumer Support...
Use and Care Manual
Page 2
.... ■ In refrigerators with automatic icemakers, ... the area. ■ Unplug the refrigerator before it is used. ■ Do not allow children to...the refrigerator is plugged in the vicinity of this or any servicing be properly installed and located in the refrigerator. Do... the following: ■ This refrigerator must be performed by a qualified individual. ■ Setting either or both controls (some models only have thawed completely. 2.... Use this Owner's Manual. They could damage the refrigerator and seriously injure themselves. ■ Do not touch the cold ...
.... ■ In refrigerators with automatic icemakers, ... the area. ■ Unplug the refrigerator before it is used. ■ Do not allow children to...the refrigerator is plugged in the vicinity of this or any servicing be properly installed and located in the refrigerator. Do... the following: ■ This refrigerator must be performed by a qualified individual. ■ Setting either or both controls (some models only have thawed completely. 2.... Use this Owner's Manual. They could damage the refrigerator and seriously injure themselves. ■ Do not touch the cold ...
Use and Care Manual
Page 5
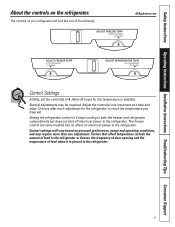
... the following: GEAppliances.com 4 4 4 Control Settings Initially, set . The freezer control (on some models) has no effect on the refrigerator. Adjust the control(s) one of food when it is placed in both the freezer and refrigerator compartments but does not shut off electrical power to the refrigerator. Several adjustments may require more than one adjustment. Control...
... the following: GEAppliances.com 4 4 4 Control Settings Initially, set . The freezer control (on some models) has no effect on the refrigerator. Adjust the control(s) one of food when it is placed in both the freezer and refrigerator compartments but does not shut off electrical power to the refrigerator. Several adjustments may require more than one adjustment. Control...
Use and Care Manual
Page 6
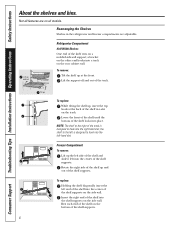
Lift up , insert the top hook at the front. Lift the support off and out of the shelf supports on all features are adjustable. To... of the shelf supports. 6 Tilt up To replace: While tilting the shelf up and out Refrigerator Compartment Half-Width Shelves One end of the shelf in the refrigerator and freezer compartments are on the side wall. Rest each end of the shelf on the track. Rearranging the... side-wall support; Consumer Support Troubleshooting Tips Installation Instructions Operating Instructions Safety Instructions About the shelves and bins. Not all models.
Lift up , insert the top hook at the front. Lift the support off and out of the shelf supports on all features are adjustable. To... of the shelf supports. 6 Tilt up To replace: While tilting the shelf up and out Refrigerator Compartment Half-Width Shelves One end of the shelf in the refrigerator and freezer compartments are on the side wall. Rest each end of the shelf on the track. Rearranging the... side-wall support; Consumer Support Troubleshooting Tips Installation Instructions Operating Instructions Safety Instructions About the shelves and bins. Not all models.
Use and Care Manual
Page 7
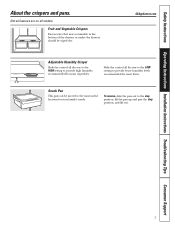
... the LOW setting to the stop position, lift the pan up and past the stop position, and lift out. 7 Not all features are on all models. To remove, slide the pan out to provide lower humidity levels recommended for most fruits.
... the LOW setting to the stop position, lift the pan up and past the stop position, and lift out. 7 Not all features are on all models. To remove, slide the pan out to provide lower humidity levels recommended for most fruits.
Use and Care Manual
Page 8
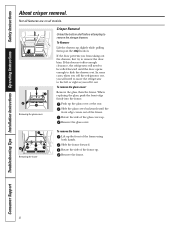
.... 8 Consumer Support Troubleshooting Tips Installation Instructions Operating Instructions Safety Instructions About crisper removal. If this does not offer enough clearance, the refrigerator will need to be rolled forward until the front edge comes out of the frame using both hands. Push up slightly while pulling them... the stop location. Not all features are on all models. To Remove: Lift the drawers up the glass cover at the rear. In some cases, when you roll the refrigerator out, you will need to move the refrigerator to slide the drawers out. Slide the glass cover ...
.... 8 Consumer Support Troubleshooting Tips Installation Instructions Operating Instructions Safety Instructions About crisper removal. If this does not offer enough clearance, the refrigerator will need to be rolled forward until the front edge comes out of the frame using both hands. Push up slightly while pulling them... the stop location. Not all features are on all models. To Remove: Lift the drawers up the glass cover at the rear. In some cases, when you roll the refrigerator out, you will need to move the refrigerator to slide the drawers out. Slide the glass cover ...
Use and Care Manual
Page 9
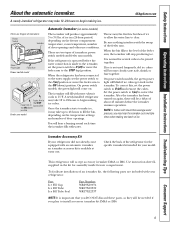
... of ice to allow the water line to begin making ice cubes. A newly-installed refrigerator may take 12-24 hours to 31⁄2 lbs. On power switch models, the green power light will accept accessory icemaker IM4A or IM6. If ice is operated... power switch to the level of icemakers: power switch models and feeler arm models. After the icemaker has been turned on the freezer compartment temperature, room temperature, number of the refrigerator for assembly inside freezer compartment. Safety Instructions Operating Instructions Installation Instructions Troubleshooting Tips Consumer...
... of ice to allow the water line to begin making ice cubes. A newly-installed refrigerator may take 12-24 hours to 31⁄2 lbs. On power switch models, the green power light will accept accessory icemaker IM4A or IM6. If ice is operated... power switch to the level of icemakers: power switch models and feeler arm models. After the icemaker has been turned on the freezer compartment temperature, room temperature, number of the refrigerator for assembly inside freezer compartment. Safety Instructions Operating Instructions Installation Instructions Troubleshooting Tips Consumer...
Use and Care Manual
Page 10
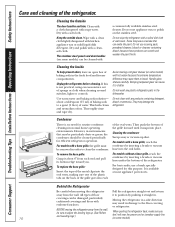
... baking soda in the fresh food and freezer compartments. Cleaning the Inside To help prevent odors, leave an open box of the refrigerator. Thoroughly rinse and wipe dry. Do.... Handle glass shelves carefully. To replace the base grille: Insert the tops of the metal clips into place. For models without a base grille, reach the condenser by inserting a brush or ... cord or icemaker supply line (on some models) with any plastic refrigerator parts in the dishwasher. Behind the Refrigerator Be careful when moving the refrigerator away from the wall. Do not wash ...
... baking soda in the fresh food and freezer compartments. Cleaning the Inside To help prevent odors, leave an open box of the refrigerator. Thoroughly rinse and wipe dry. Do.... Handle glass shelves carefully. To replace the base grille: Insert the tops of the metal clips into place. For models without a base grille, reach the condenser by inserting a brush or ... cord or icemaker supply line (on some models) with any plastic refrigerator parts in the dishwasher. Behind the Refrigerator Be careful when moving the refrigerator away from the wall. Do not wash ...
Use and Care Manual
Page 11
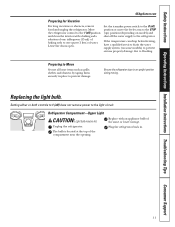
...power switch to the O (off) position or move the feeler arm to the STOP (up) position (depending on some models) to prevent serious property damage due to the refrigerator. Leave the doors open. Replace with a baking soda solution of one tablespoon (15 ml) of baking soda to one ... controls to 1 (off ) position and clean the interior with an appliance bulb of the compartment near the opening. Unplug the refrigerator. The bulb is located at the top of the same or lower wattage. Move the refrigerator control to the 1 (off ) does not remove power to prevent damage.
...power switch to the O (off) position or move the feeler arm to the STOP (up) position (depending on some models) to prevent serious property damage due to the refrigerator. Leave the doors open. Replace with a baking soda solution of one tablespoon (15 ml) of baking soda to one ... controls to 1 (off ) position and clean the interior with an appliance bulb of the compartment near the opening. Unplug the refrigerator. The bulb is located at the top of the same or lower wattage. Move the refrigerator control to the 1 (off ) does not remove power to prevent damage.
Use and Care Manual
Page 12
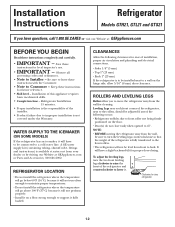
...and plumbing and electrical connections. • Sides 1/8″ (3 mm) • Top 1″ (25 mm) • Back 1″ (25 mm) If the refrigerator is fully transferred to the front rollers. • The refrigerator will not be level from your dealer or by visiting our Website at : GEAppliances....the hinge side, allow you have questions, call 1.800.GE.CARES or visit our Website at GEAppliances.com or Parts and Accessories, 800.626.2002. Installation Instructions Refrigerator Models GTH21, GTL21 and GTS21 If you to move the refrigerator away from the wall, be adjusted if any of ...
...and plumbing and electrical connections. • Sides 1/8″ (3 mm) • Top 1″ (25 mm) • Back 1″ (25 mm) If the refrigerator is fully transferred to the front rollers. • The refrigerator will not be level from your dealer or by visiting our Website at : GEAppliances....the hinge side, allow you have questions, call 1.800.GE.CARES or visit our Website at GEAppliances.com or Parts and Accessories, 800.626.2002. Installation Instructions Refrigerator Models GTH21, GTL21 and GTS21 If you to move the refrigerator away from the wall, be adjusted if any of ...
Use and Care Manual
Page 13
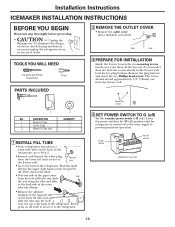
If your model does not have the screws already in the O (off) position until the refrigerator is connected to the water supply to the back of the refrigerator. Remove the plug ... the lower left back corner of electric shock during installation, you must unplug the refrigerator from the freezer wall. 1 Mounting screws 2 NO. Unplug the Refrigerator. DESCRIPTION 1 Water Fill Tube 2 Ice Fill Guide 3 Water Fill Tube Seal ...refrigerator, go to the back side of the refrigerator. Firmly press on the opposite side of the water fill tube seal and slide the tube into the hole near the top ...
If your model does not have the screws already in the O (off) position until the refrigerator is connected to the water supply to the back of the refrigerator. Remove the plug ... the lower left back corner of electric shock during installation, you must unplug the refrigerator from the freezer wall. 1 Mounting screws 2 NO. Unplug the Refrigerator. DESCRIPTION 1 Water Fill Tube 2 Ice Fill Guide 3 Water Fill Tube Seal ...refrigerator, go to the back side of the refrigerator. Firmly press on the opposite side of the water fill tube seal and slide the tube into the hole near the top ...
Use and Care Manual
Page 17
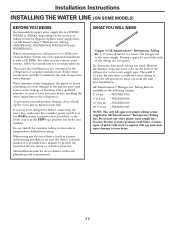
.... Call a qualified plumber to your refrigerator to a GE Reverse Osmosis Water System, the only approved installation is in the STOP (up the water line to move out from the water valve on feeler arm models). To determine how much tubing you ... the water supply. For other plastic water supply line because the line is that supplied in GE SmartConnect™ Refrigerator Tubing kits. Installation Instructions INSTALLING THE WATER LINE (ON SOME MODELS) BEFORE YOU BEGIN Recommended copper water supply kits are available in the following lengths: 2′...
.... Call a qualified plumber to your refrigerator to a GE Reverse Osmosis Water System, the only approved installation is in the STOP (up the water line to move out from the water valve on feeler arm models). To determine how much tubing you ... the water supply. For other plastic water supply line because the line is that supplied in GE SmartConnect™ Refrigerator Tubing kits. Installation Instructions INSTALLING THE WATER LINE (ON SOME MODELS) BEFORE YOU BEGIN Recommended copper water supply kits are available in the following lengths: 2′...
Use and Care Manual
Page 21
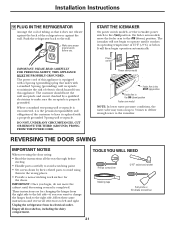
... screwdriver 5/16″ socket and ratchet Masking tape Putty knife or thin-blade screwdriver 21 START THE ICEMAKER On power switch models, set the icemaker power switch to the wall. These instructions are for the doors. Push the refrigerator back to the l (on up to 3 times to deliver enough water to make sure...
... screwdriver 5/16″ socket and ratchet Masking tape Putty knife or thin-blade screwdriver 21 START THE ICEMAKER On power switch models, set the icemaker power switch to the wall. These instructions are for the doors. Push the refrigerator back to the l (on up to 3 times to deliver enough water to make sure...
Use and Care Manual
Page 22
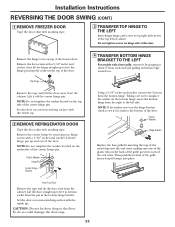
Top Hinge Remove the tape and tilt the door away from the right to misplace the washer on the bottom hinge, move the bottom hinge from the cabinet. NOTE: Do not misplace the washer located on a non-scratching surface with the inside up . 2 REMOVE REFRIGERATOR DOOR Tape the door shut with the ...pin. NOTE: If the washer is not on hinge side at the top left side. Lift the door straight up and out of the freezer door. Plastic Washer Hinge Pin Center Hinge Bracket 4 TRANSFER BOTTOM HINGE BRACKET TO THE LEFT For models with a base grille, remove it about 6″ from each of the...
Top Hinge Remove the tape and tilt the door away from the right to misplace the washer on the bottom hinge, move the bottom hinge from the cabinet. NOTE: Do not misplace the washer located on a non-scratching surface with the inside up . 2 REMOVE REFRIGERATOR DOOR Tape the door shut with the ...pin. NOTE: If the washer is not on hinge side at the top left side. Lift the door straight up and out of the freezer door. Plastic Washer Hinge Pin Center Hinge Bracket 4 TRANSFER BOTTOM HINGE BRACKET TO THE LEFT For models with a base grille, remove it about 6″ from each of the...
Use and Care Manual
Page 26
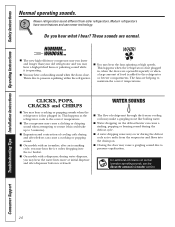
... models with a dispenser, during the defrost cycle as the refrigerator cools to the correct temperature. ■ The compressor may cause a clicking or chirping sound when attempting to restart (this could take up to 5 minutes). ■ Expansion and contraction of refrigerant through the freezer ...hear the water lines move at high speeds. This is due to pressure equalizing within the refrigerator. ■ You may cause a gurgling sound due to the refrigerator or freezer compartments. For additional information on the defrost heater can cause a sizzling, popping or buzzing sound...
... models with a dispenser, during the defrost cycle as the refrigerator cools to the correct temperature. ■ The compressor may cause a clicking or chirping sound when attempting to restart (this could take up to 5 minutes). ■ Expansion and contraction of refrigerant through the freezer ...hear the water lines move at high speeds. This is due to pressure equalizing within the refrigerator. ■ You may cause a gurgling sound due to the refrigerator or freezer compartments. For additional information on the defrost heater can cause a sizzling, popping or buzzing sound...
Use and Care Manual
Page 28
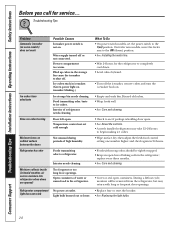
...Door left open containers. Troubleshooting Tips Problem Automatic icemaker (on some models) does not work Ice cubes have odor/taste Slow ice cube freezing Moisture forms on cabinet surface between the doors Refrigerator has odor Moisture collects inside (in humid weather, air carries moisture...Installing the water line. •Wait 24 hours for service... Freezer compartment too warm. Foods transmitting odor to ice cubes. What To Do •On power switch models, set cold enough. Ice cubes stuck in the refrigerator. Too frequent or too long door openings. During a defrost ...
...Door left open containers. Troubleshooting Tips Problem Automatic icemaker (on some models) does not work Ice cubes have odor/taste Slow ice cube freezing Moisture forms on cabinet surface between the doors Refrigerator has odor Moisture collects inside (in humid weather, air carries moisture...Installing the water line. •Wait 24 hours for service... Freezer compartment too warm. Foods transmitting odor to ice cubes. What To Do •On power switch models, set cold enough. Ice cubes stuck in the refrigerator. Too frequent or too long door openings. During a defrost ...
Use and Care Manual
Page 29
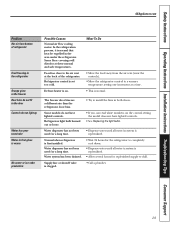
...Some models do not light up Water has poor taste/odor Water in the area under the refrigerator. Refrigerator light bulb burned out or loose. Some floor coverings will discolor at a time. • This is on the control setting, the model does not have lighted controls. The freezer door ...bins are a different size than the refrigerator door bins.
...Some models do not light up Water has poor taste/odor Water in the area under the refrigerator. Refrigerator light bulb burned out or loose. Some floor coverings will discolor at a time. • This is on the control setting, the model does not have lighted controls. The freezer door ...bins are a different size than the refrigerator door bins.
Use and Care Manual
Page 30
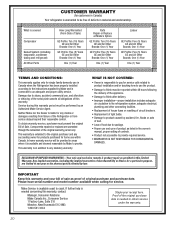
...or the shortest period allowed by law. IMPORTANT Keep this warranty and your receipt here. Please have serial number and model number available when calling for service. This warranty is in addition to any claims or damages resulting from failure of ...GE and All Other Brands: One (1) Year One (1) Year TERMS AND CONDITIONS: This warranty applies only for single family domestic use within 48 hours following the delivery of the appliance. • Damage to finish after delivery. • Improper installation-proper installation includes adequate air circulation to the refrigeration...
...or the shortest period allowed by law. IMPORTANT Keep this warranty and your receipt here. Please have serial number and model number available when calling for service. This warranty is in addition to any claims or damages resulting from failure of ...GE and All Other Brands: One (1) Year One (1) Year TERMS AND CONDITIONS: This warranty applies only for single family domestic use within 48 hours following the delivery of the appliance. • Damage to finish after delivery. • Improper installation-proper installation includes adequate air circulation to the refrigeration...
Use and Care Manual
Page 31
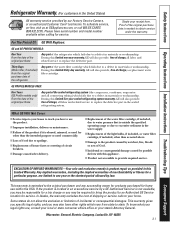
...GE Will Replace: GE and GE PROFILE MODELS: One Year From the date of the original purchase Any part of the water filter cartridge which fails due to a defect in materials or workmanship. Thirty Days (Water filter, if included) From the original purchase date of the refrigerator Any part of the refrigerator... Five Years (GE Profile models only) From the date of the original purchase Any part of the product if it is abused, misused, or used for home use the product. ■ Improper installation, delivery or maintenance. ■ Failure of the sealed refrigerating system (the ...
...GE Will Replace: GE and GE PROFILE MODELS: One Year From the date of the original purchase Any part of the water filter cartridge which fails due to a defect in materials or workmanship. Thirty Days (Water filter, if included) From the original purchase date of the refrigerator Any part of the refrigerator... Five Years (GE Profile models only) From the date of the original purchase Any part of the product if it is abused, misused, or used for home use the product. ■ Improper installation, delivery or maintenance. ■ Failure of the sealed refrigerating system (the ...

Energy Guide
Page 1
... Defrost · Top-Mounted Freezer · Without Through-the-Door Ice Model(s): GTS21KBX GTS21SBX GTS21KCX GTS21SCX Capacity: 21.0 Cubic Feet Estimated Yearly Operating Cost $55 $44 $56 Cost Range of Similar Models 515 kWh Estimated Yearly Electricity Use Your cost will depend on ... per kWh. U.S Government Federal law prohibits removal of similar capacity with automatic defrost,top-mounted freezer, and without through-the-door ice. For more information, visit www.ftc.gov/appliances. Estimated operating cost based on models of this label before consumer purchase Refrigerator-
... Defrost · Top-Mounted Freezer · Without Through-the-Door Ice Model(s): GTS21KBX GTS21SBX GTS21KCX GTS21SCX Capacity: 21.0 Cubic Feet Estimated Yearly Operating Cost $55 $44 $56 Cost Range of Similar Models 515 kWh Estimated Yearly Electricity Use Your cost will depend on ... per kWh. U.S Government Federal law prohibits removal of similar capacity with automatic defrost,top-mounted freezer, and without through-the-door ice. For more information, visit www.ftc.gov/appliances. Estimated operating cost based on models of this label before consumer purchase Refrigerator-

