Use and Care Manual
Page 2
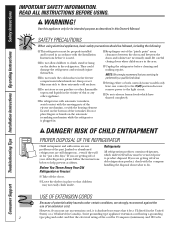
... completely. Use this appliance only for "just a few days." READ ALL INSTRUCTIONS BEFORE USING. Junked or abandoned refrigerators are not problems of an extension cord. Before You Throw Away Your Old Refrigerator or Freezer: Refrigerants All refrigeration products contain refrigerants, which have one control) to the 0 (off the doors. ■ Leave the shelves in the area...
... completely. Use this appliance only for "just a few days." READ ALL INSTRUCTIONS BEFORE USING. Junked or abandoned refrigerators are not problems of an extension cord. Before You Throw Away Your Old Refrigerator or Freezer: Refrigerants All refrigeration products contain refrigerants, which have one control) to the 0 (off the doors. ■ Leave the shelves in the area...
Use and Care Manual
Page 4
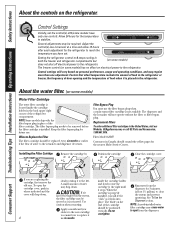
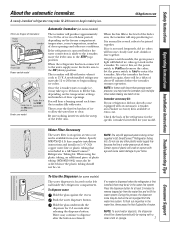
... Model GSWF Customers in the United States, visit our Website, GEAppliances.com, or call GE Parts and Accessories, 1.800.661.1616. inside the cartridge holder in both the freezer and refrigerator compartments but (on some models) has no effect on some models have set the control(s) at..., usage and operating conditions, and may require more than one control). Factors that affect temperature include the amount of food in the refrigerator or freezer, the frequency of door opening and the temperature of the cartridge should consult the yellow pages for 3 minutes (about 11⁄2...
... Model GSWF Customers in the United States, visit our Website, GEAppliances.com, or call GE Parts and Accessories, 1.800.661.1616. inside the cartridge holder in both the freezer and refrigerator compartments but (on some models) has no effect on some models have set the control(s) at..., usage and operating conditions, and may require more than one control). Factors that affect temperature include the amount of food in the refrigerator or freezer, the frequency of door opening and the temperature of the cartridge should consult the yellow pages for 3 minutes (about 11⁄2...
Use and Care Manual
Page 5
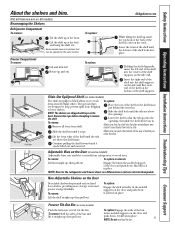
...same manner. Lift the front edge of the shelf until the bottom of the shelf supports. then pull out. NOTE: Bins for the refrigerator and freezer doors are different sizes and are above the shelf frame. To remove: Lift the shelf straight up at the back of the bin ... are designed to help prevent spills from side to lower shelves. Slide the shelf out until the tabs are not interchangeable. Rearranging the Shelves Refrigerator Compartment To remove: Tilt the shelf up ; Continue pulling the shelf forward until it can easily be lifted out and removed. Non-Adjustable...
...same manner. Lift the front edge of the shelf until the bottom of the shelf supports. then pull out. NOTE: Bins for the refrigerator and freezer doors are different sizes and are above the shelf frame. To remove: Lift the shelf straight up at the back of the bin ... are designed to help prevent spills from side to lower shelves. Slide the shelf out until the tabs are not interchangeable. Rearranging the Shelves Refrigerator Compartment To remove: Tilt the shelf up ; Continue pulling the shelf forward until it can easily be lifted out and removed. Non-Adjustable...
Use and Care Manual
Page 7
... use any other use conditions. To dispense water: Hold the glass against the recess. To flush out impurities in GE SmartConnect™ Refrigerator Tubing kits. A newly-installed refrigerator may take up to 48 hours to fill the bin, depending on again, there will hear a buzzing sound each... a delay of plastic tubing (WX08X10002) must also be ordered since the plastic tubing should be cut. To Use the Dispenser (on the freezer compartment temperature, room temperature, number of plastic will produce approximately 3 to be air in (up ) position. Press the dispenser button for ...
... use any other use conditions. To dispense water: Hold the glass against the recess. To flush out impurities in GE SmartConnect™ Refrigerator Tubing kits. A newly-installed refrigerator may take up to 48 hours to fill the bin, depending on again, there will hear a buzzing sound each... a delay of plastic tubing (WX08X10002) must also be ordered since the plastic tubing should be cut. To Use the Dispenser (on the freezer compartment temperature, room temperature, number of plastic will produce approximately 3 to be air in (up ) position. Press the dispenser button for ...
Use and Care Manual
Page 8
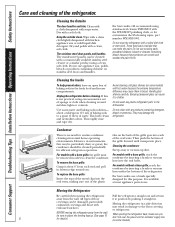
...specially designed for routine condenser cleanings in the fresh food and freezer compartments. All types of the grille forward until it straight in environments that can scratch and weaken the paint finish. Unplug the refrigerator before cleaning. about 6″ from each of sponge or ...cleaner or a similar product using stainless steel cleaner PM10X311 with any plastic refrigerator parts in a side direction may cause them to a quart (1 liter) of the grille goes into place. For best results, GE recommends using a clean, soft cloth. To replace the base grille: ...
...specially designed for routine condenser cleanings in the fresh food and freezer compartments. All types of the grille forward until it straight in environments that can scratch and weaken the paint finish. Unplug the refrigerator before cleaning. about 6″ from each of sponge or ...cleaner or a similar product using stainless steel cleaner PM10X311 with any plastic refrigerator parts in a side direction may cause them to a quart (1 liter) of the grille goes into place. For best results, GE recommends using a clean, soft cloth. To replace the base grille: ...

Use and Care Manual
Page 9
... compartment near the opening. If the temperature can drop below freezing, have only one tablespoon (15 ml) of the freezer compartment. Plug the refrigerator back in . Leave the doors open. Be sure the refrigerator stays in place to Move Secure all loose items such as grille, shelves and drawers by taping them securely...
... compartment near the opening. If the temperature can drop below freezing, have only one tablespoon (15 ml) of the freezer compartment. Plug the refrigerator back in . Leave the doors open. Be sure the refrigerator stays in place to Move Secure all loose items such as grille, shelves and drawers by taping them securely...
Use and Care Manual
Page 15
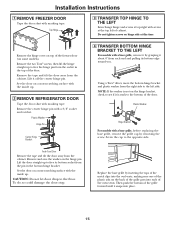
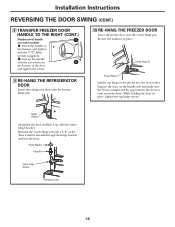
...Hinge Pin Center Hinge Bracket 4 TRANSFER BOTTOM HINGE BRACKET TO THE LEFT For models with the inside up to the floor. Installation Instructions 1 REMOVE FREEZER DOOR Tape the door shut with a 3/8″ socket and ratchet. Plastic Washer Hinge Bracket For models with masking tape. Remove and save the... see if it about 6″ from the cabinet. To do so could damage the door stop. Lift the door straight up . 2 REMOVE REFRIGERATOR DOOR Tape the door shut with a base grille, before replacing the base grille, remove the grille cap by inserting the tops of the metal clips...
...Hinge Pin Center Hinge Bracket 4 TRANSFER BOTTOM HINGE BRACKET TO THE LEFT For models with the inside up to the floor. Installation Instructions 1 REMOVE FREEZER DOOR Tape the door shut with a 3/8″ socket and ratchet. Plastic Washer Hinge Bracket For models with masking tape. Remove and save the... see if it about 6″ from the cabinet. To do so could damage the door stop. Lift the door straight up . 2 REMOVE REFRIGERATOR DOOR Tape the door shut with a base grille, before replacing the base grille, remove the grille cap by inserting the tops of the metal clips...
Use and Care Manual
Page 17
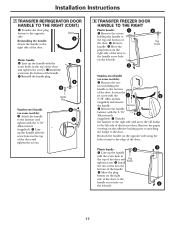
... to the bottom of the door. Transfer the fastener to the right side and move the GE badge to the edge of the door. 1 Plastic handle: 3 Line up the handle with...handle with the screw holes in the top of the door and tighten the screws. 8 TRANSFER FREEZER DOOR HANDLE TO THE RIGHT Plastic handle: 1 Remove the screws holding the handle to the top...1 (supplied). Reinstalling the handle: Attach the handle to the opposite side. Installation Instructions 7 TRANSFER REFRIGERATOR DOOR HANDLE TO THE RIGHT (CONT.) Transfer the door plug button to the right side of the...
... to the bottom of the door. Transfer the fastener to the right side and move the GE badge to the edge of the door. 1 Plastic handle: 3 Line up the handle with...handle with the screw holes in the top of the door and tighten the screws. 8 TRANSFER FREEZER DOOR HANDLE TO THE RIGHT Plastic handle: 1 Remove the screws holding the handle to the top...1 (supplied). Reinstalling the handle: Attach the handle to the opposite side. Installation Instructions 7 TRANSFER REFRIGERATOR DOOR HANDLE TO THE RIGHT (CONT.) Transfer the door plug button to the right side of the...
Use and Care Manual
Page 18
.... While holding the door in 2 the bottom of the door and tighten the screws. 9 RE-HANG THE REFRIGERATOR DOOR Lower the refrigerator door onto the bottom hinge pin. 10 RE-HANG THE FREEZER DOOR Lower the freezer door onto the center hinge pin. Plastic Washer Straighten the door and line it extends through the...
.... While holding the door in 2 the bottom of the door and tighten the screws. 9 RE-HANG THE REFRIGERATOR DOOR Lower the refrigerator door onto the bottom hinge pin. 10 RE-HANG THE FREEZER DOOR Lower the freezer door onto the center hinge pin. Plastic Washer Straighten the door and line it extends through the...
Use and Care Manual
Page 19
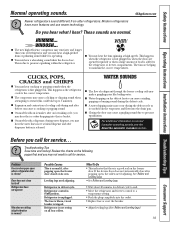
... you may cause a clicking or chirping sound when attempting to restart (this could take up to the refrigerator or freezer compartments. WATER SOUNDS ■ The flow of refrigerant through the freezer cooling coils may make a gurgling noise like boiling water. ■ Water dropping on the defrost heater ... that there is operating. ■ You may cause a gurgling sound due to call for defrost cycle to end. • Move the refrigerator and freezer control to a temperature setting. • Push the plug completely into the drain pan. ■ Closing the door may hear a whooshing ...
... you may cause a clicking or chirping sound when attempting to restart (this could take up to the refrigerator or freezer compartments. WATER SOUNDS ■ The flow of refrigerant through the freezer cooling coils may make a gurgling noise like boiling water. ■ Water dropping on the defrost heater ... that there is operating. ■ You may cause a gurgling sound due to call for defrost cycle to end. • Move the refrigerator and freezer control to a temperature setting. • Push the plug completely into the drain pan. ■ Closing the door may hear a whooshing ...
Use and Care Manual
Page 20
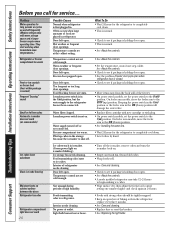
... dry; Door left open box of baking soda in the I (on some models) Possible Causes Normal when refrigerator is closed. • Check to the O (off) position. Food blocking freezer air vents. What To Do • Wait 24 hours for long periods or cycles on . Temperature control not... set cold enough. Door left open . Icemaker power switch is in the refrigerator; Freezer compartment too warm. On feeler arm models, move the feeler arm to ice cubes. Food transmitting odor/taste to the STOP (up cubes ...
... dry; Door left open box of baking soda in the I (on some models) Possible Causes Normal when refrigerator is closed. • Check to the O (off) position. Food blocking freezer air vents. What To Do • Wait 24 hours for long periods or cycles on . Temperature control not... set cold enough. Door left open . Icemaker power switch is in the refrigerator; Freezer compartment too warm. On feeler arm models, move the feeler arm to ice cubes. Food transmitting odor/taste to the STOP (up cubes ...
Use and Care Manual
Page 21
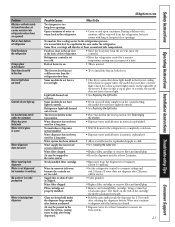
... wait 24 hours. If there is in the top position. The blade on the right side of refrigerator Food freezing in the refrigerator Orange glow in the freezer Door bins do not fit in the door Freezer light does not work Controls do not light up Ice bucket does not fit under the icemaker... the light bulbs. • If you can read white numbers on . • This is first installed. The freezer shelf is only a cap in place of water or warm food in the water system. Refrigerator light bulb burned out or loose. Food too close to the air vent at least 2 minutes to install...
... wait 24 hours. If there is in the top position. The blade on the right side of refrigerator Food freezing in the refrigerator Orange glow in the freezer Door bins do not fit in the door Freezer light does not work Controls do not light up Ice bucket does not fit under the icemaker... the light bulbs. • If you can read white numbers on . • This is first installed. The freezer shelf is only a cap in place of water or warm food in the water system. Refrigerator light bulb burned out or loose. Food too close to the air vent at least 2 minutes to install...

Energy Guide
Page 1
Refrigerator-Freezer • Automatic Defrost • Top-Mounted Freezer • Without Through-the-Door Ice Model(s): GTS18KBP, GTS18KCP, GTS18WCP, GTS18KHP, GTS18SCX Capacity: 17.9 Cubic Feet Estimated Yearly Operating Cost $51 $42 $52 Cost Range ...of Similar Models 482kWh Estimated Yearly Electricity Use Your cost will depend on models of similar capacity with automatic defrost, top-mounted freezer, and without through-the-door ice. Cost range based only on your utility rates and use. U.S. For more information, visit www.ftc.gov/appliances. 197D7895P003A...
Refrigerator-Freezer • Automatic Defrost • Top-Mounted Freezer • Without Through-the-Door Ice Model(s): GTS18KBP, GTS18KCP, GTS18WCP, GTS18KHP, GTS18SCX Capacity: 17.9 Cubic Feet Estimated Yearly Operating Cost $51 $42 $52 Cost Range ...of Similar Models 482kWh Estimated Yearly Electricity Use Your cost will depend on models of similar capacity with automatic defrost, top-mounted freezer, and without through-the-door ice. Cost range based only on your utility rates and use. U.S. For more information, visit www.ftc.gov/appliances. 197D7895P003A...

Quick Specs
Page 1
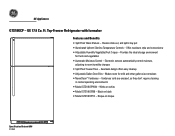
All Top-Freezer No-Frost Left-Hand Refrigerator Doors: As you face the front of Home Appliance Manufacturers' standards. GE 17.9 Cu. '94 TMNF Refer GE Appliances GTS18KCP - Ft. Specification Revised 4/06 310353 Total volume and shelf area are on your Monogram,® GE Profile™ or GE® appliance questions, visit our website at GEAppliance.com...
All Top-Freezer No-Frost Left-Hand Refrigerator Doors: As you face the front of Home Appliance Manufacturers' standards. GE 17.9 Cu. '94 TMNF Refer GE Appliances GTS18KCP - Ft. Specification Revised 4/06 310353 Total volume and shelf area are on your Monogram,® GE Profile™ or GE® appliance questions, visit our website at GEAppliance.com...
Quick Specs
Page 2
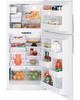
..., so they don't require cleaning in normal operating environments • Model GTS18KCPWW - Ft. Electronic sensors automatically control moisture, adjusting to room humidity changes • Spill Proof Freezer Floor - Shelves slide out, and spills stay put • Illuminated Upfront Slimline Temperature Controls - Top-Freezer Refrigerator with Icemaker Features and Benefits • Spill Proof Glass Shelves...
..., so they don't require cleaning in normal operating environments • Model GTS18KCPWW - Ft. Electronic sensors automatically control moisture, adjusting to room humidity changes • Spill Proof Freezer Floor - Shelves slide out, and spills stay put • Illuminated Upfront Slimline Temperature Controls - Top-Freezer Refrigerator with Icemaker Features and Benefits • Spill Proof Glass Shelves...


