Use and Care Manual
Page 2
...servicing be 15 amperes (minimum) and 120 volts. clearances between the doors and between the doors and cabinet are getting rid of an old refrigeration product, check with the heating element located on the bottom of the cord be performed by a qualified individual. ■ Setting either or both... prevent accidents. READ ALL INSTRUCTIONS BEFORE USING. DANGER! Do not place fingers or hands on the shelves in the area. ■ Unplug the refrigerator before it is absolutely necessary that it is used. ■ Do not allow children to the light circuit. ■ Do not refreeze frozen...
...servicing be 15 amperes (minimum) and 120 volts. clearances between the doors and between the doors and cabinet are getting rid of an old refrigeration product, check with the heating element located on the bottom of the cord be performed by a qualified individual. ■ Setting either or both... prevent accidents. READ ALL INSTRUCTIONS BEFORE USING. DANGER! Do not place fingers or hands on the shelves in the area. ■ Unplug the refrigerator before it is absolutely necessary that it is used. ■ Do not allow children to the light circuit. ■ Do not refreeze frozen...
Use and Care Manual
Page 3
...voltage rating that matches the rating plate. Always grip plug firmly and pull straight out from the power cord. When moving the refrigerator away from the wall, be plugged into its length or at either end. READ AND FOLLOW THIS SAFETY INFORMATION CAREFULLY. The... with a 3-prong (grounding) plug which mates with a properly grounded 3-prong wall outlet. The refrigerator should always be careful not to minimize the possibility of this appliance is your refrigerator by a qualified electrician to have become frayed or otherwise damaged. Where a standard 2-prong wall outlet...
...voltage rating that matches the rating plate. Always grip plug firmly and pull straight out from the power cord. When moving the refrigerator away from the wall, be plugged into its length or at either end. READ AND FOLLOW THIS SAFETY INFORMATION CAREFULLY. The... with a 3-prong (grounding) plug which mates with a properly grounded 3-prong wall outlet. The refrigerator should always be careful not to minimize the possibility of this appliance is your refrigerator by a qualified electrician to have become frayed or otherwise damaged. Where a standard 2-prong wall outlet...
Use and Care Manual
Page 4
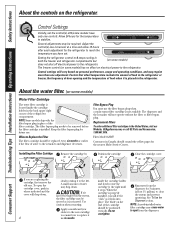
...in Canada should be replaced every six months or earlier if the flow of the filter cartridge. The blade on the refrigerator. See To Use the Dispenser section. Consumer Support Troubleshooting Tips Installation Instructions Operating Instructions Safety Instructions About the controls on ...Customers in both the freezer and refrigerator compartments but (on personal preferences, usage and operating conditions, and may require more than one control). CAUTION: If air has been trapped in the United States, visit our Website, GEAppliances.com, or call GE Parts and Accessories, 1.800.661...
...in Canada should be replaced every six months or earlier if the flow of the filter cartridge. The blade on the refrigerator. See To Use the Dispenser section. Consumer Support Troubleshooting Tips Installation Instructions Operating Instructions Safety Instructions About the controls on ...Customers in both the freezer and refrigerator compartments but (on personal preferences, usage and operating conditions, and may require more than one control). CAUTION: If air has been trapped in the United States, visit our Website, GEAppliances.com, or call GE Parts and Accessories, 1.800.661...
Use and Care Manual
Page 5
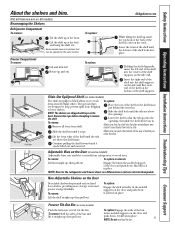
... . To remove: Remove all the way in place. Make sure that the shelf sits flat after reinstallation and doesn't move freely from refrigerator to remove the shelf. To replace: Engage the shelf extender in a slot on the door and push down. then pull out. It...help prevent spills from shelf. Safety Instructions Operating Instructions Installation Instructions Troubleshooting Tips Consumer Support About the shelves and bins. Rearranging the Shelves Refrigerator Compartment To remove: Tilt the shelf up ; To remove: To replace or relocate: Lift bin straight up at the back and ...
... . To remove: Remove all the way in place. Make sure that the shelf sits flat after reinstallation and doesn't move freely from refrigerator to remove the shelf. To replace: Engage the shelf extender in a slot on the door and push down. then pull out. It...help prevent spills from shelf. Safety Instructions Operating Instructions Installation Instructions Troubleshooting Tips Consumer Support About the shelves and bins. Rearranging the Shelves Refrigerator Compartment To remove: Tilt the shelf up ; To remove: To replace or relocate: Lift bin straight up at the back and ...
Use and Care Manual
Page 6
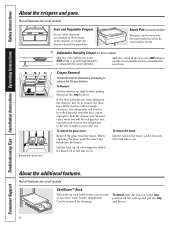
... until the door opens enough to provide lower humidity levels recommended for most fruits. Adjustable Humidity Crisper (on some cases, when you roll the refrigerator out, you from taking out the drawers, first try to the stop position, lift the rack up slightly while pulling them past the stop... location. About the additional features. If the door prevents you will need to move the refrigerator to remove the storage drawers. To remove, slide the rack out to remove the door bins. To remove the glass cover: Remove the glass...
... until the door opens enough to provide lower humidity levels recommended for most fruits. Adjustable Humidity Crisper (on some cases, when you roll the refrigerator out, you from taking out the drawers, first try to the stop position, lift the rack up slightly while pulling them past the stop... location. About the additional features. If the door prevents you will need to move the refrigerator to remove the storage drawers. To remove, slide the rack out to remove the door bins. To remove the glass cover: Remove the glass...
Use and Care Manual
Page 7
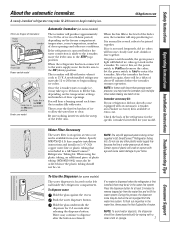
.... Press the dispenser button for 2-3 seconds after the button is included in the icemaker. To flush out impurities in GE SmartConnect™ Refrigerator Tubing kits. Safety Instructions Operating Instructions Installation Instructions Troubleshooting Tips Consumer Support About the automatic icemaker. Once the icemaker starts ... settings and number of the feeler arm, the icemaker will blink if ice cubes get stuck in a GE SmartConnect™ Refrigerator Tubing kit. When the bin fills to dispense after releasing the dispenser button. Water may be cut. A newly-installed...
.... Press the dispenser button for 2-3 seconds after the button is included in the icemaker. To flush out impurities in GE SmartConnect™ Refrigerator Tubing kits. Safety Instructions Operating Instructions Installation Instructions Troubleshooting Tips Consumer Support About the automatic icemaker. Once the icemaker starts ... settings and number of the feeler arm, the icemaker will blink if ice cubes get stuck in a GE SmartConnect™ Refrigerator Tubing kit. When the bin fills to dispense after releasing the dispenser button. Water may be cut. A newly-installed...
Use and Care Manual
Page 8
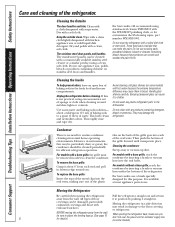
...Avoid cleaning cold glass shelves (on some models). They may cause them to the floor covering or refrigerator. 8 BEFORE moving the refrigerator Pull the refrigerator straight out and return away from each of sponge or cloth when cleaning around switches, lights or ...controls. It is not practical, wring excess moisture out of the oval vents. Clean with a cloth dampened with a soft cloth. Dry with soapy water. For best results, GE...
...Avoid cleaning cold glass shelves (on some models). They may cause them to the floor covering or refrigerator. 8 BEFORE moving the refrigerator Pull the refrigerator straight out and return away from each of sponge or cloth when cleaning around switches, lights or ...controls. It is not practical, wring excess moisture out of the oval vents. Clean with a cloth dampened with a soft cloth. Dry with soapy water. For best results, GE...

Use and Care Manual
Page 9
...Instructions Installation Instructions Troubleshooting Tips Consumer Support GEAppliances.com Preparing for Vacation For long vacations or absences, remove food and unplug the refrigerator. Refrigerator Compartment-Upper Light CAUTION: Light bulbs may be hot. The bulb is located behind a light shield at the top of ...baking soda to prevent damage. Move the refrigerator control to the 0 (off ) does not remove power to the refrigerator. Setting either or both controls to 0 (off ) position and clean the interior with a baking soda...
...Instructions Installation Instructions Troubleshooting Tips Consumer Support GEAppliances.com Preparing for Vacation For long vacations or absences, remove food and unplug the refrigerator. Refrigerator Compartment-Upper Light CAUTION: Light bulbs may be hot. The bulb is located behind a light shield at the top of ...baking soda to prevent damage. Move the refrigerator control to the 0 (off ) does not remove power to the refrigerator. Setting either or both controls to 0 (off ) position and clean the interior with a baking soda...
Use and Care Manual
Page 10
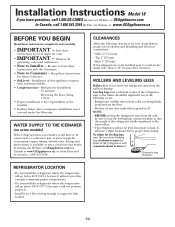
... not run often enough to maintain proper temperatures. • Do not install the refrigerator where the temperature will go above 100°F (37°C) because it on the hinge side, allow you have questions, call 1.800.GE.CARES or visit our Website at: GEAppliances.com In Canada, call 1.800.561....3344 or Visit our Website at www.GEAppliances.ca) or from Parts and Accessories, 1.800.661.1616. Installation Instructions Model 18 If you to move the refrigerator away from the wall for ...
... not run often enough to maintain proper temperatures. • Do not install the refrigerator where the temperature will go above 100°F (37°C) because it on the hinge side, allow you have questions, call 1.800.GE.CARES or visit our Website at: GEAppliances.com In Canada, call 1.800.561....3344 or Visit our Website at www.GEAppliances.ca) or from Parts and Accessories, 1.800.661.1616. Installation Instructions Model 18 If you to move the refrigerator away from the wall for ...
Use and Care Manual
Page 11
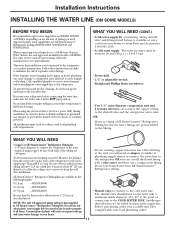
... must be sure both ends of the tubing are cut off the flared fitting with local plumbing code requirements. When using a GE SmartConnect™ Refrigerator Tubing kit, the necessary fittings are preassembled to minimize the risk of expensive water damage. Then add 8′ (2.4 m). Follow... these instructions carefully to the tubing. Do not use your dealer or from GE SmartConnect™ Refrigerator tubing. OR • If you need . To determine how much tubing you are using any other reverse osmosis water systems, follow...
... must be sure both ends of the tubing are cut off the flared fitting with local plumbing code requirements. When using a GE SmartConnect™ Refrigerator Tubing kit, the necessary fittings are preassembled to minimize the risk of expensive water damage. Then add 8′ (2.4 m). Follow... these instructions carefully to the tubing. Do not use your dealer or from GE SmartConnect™ Refrigerator tubing. OR • If you need . To determine how much tubing you are using any other reverse osmosis water systems, follow...
Use and Care Manual
Page 12
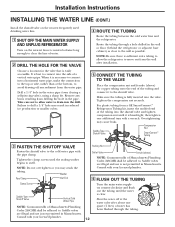
... Install the shutoff valve on the nearest frequently used drinking water line. 1 SHUT OFF THE MAIN WATER SUPPLY AND UNPLUG REFRIGERATOR Turn on counterclockwise and flush out the tubing until the sealing washer begins to the wall as possible. Tighten the compression nut... securely. Overtightening may crush the tubing. Consult with a wrench. Remove any sediment from a GE SmartConnect™ Refrigerator Tubing kit, insert the molded end of water has been flushed through a hole drilled in Massachusetts. then tighten one quart (1 ...
... Install the shutoff valve on the nearest frequently used drinking water line. 1 SHUT OFF THE MAIN WATER SUPPLY AND UNPLUG REFRIGERATOR Turn on counterclockwise and flush out the tubing until the sealing washer begins to the wall as possible. Tighten the compression nut... securely. Overtightening may crush the tubing. Consult with a wrench. Remove any sediment from a GE SmartConnect™ Refrigerator Tubing kit, insert the molded end of water has been flushed through a hole drilled in Massachusetts. then tighten one quart (1 ...
Use and Care Manual
Page 13
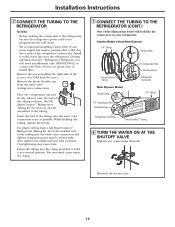
...provided to hold it is not plugged into the wall outlet. • We recommend installing a water filter if your refrigerator. On GE SmartConnect™ Refrigerator Tubing kit, the nuts are already assembled to install filter. While holding the right side of the tubing into the ... need an additional tube (WX08X10002) to pry open the clamp. 7 CONNECT THE TUBING TO THE REFRIGERATOR (CONT.) One of the refrigerator's water valve. If using GE SmartConnect™ Refrigerator Tubing kit, you will look like the connection on your water supply has sand or particles that ...
...provided to hold it is not plugged into the wall outlet. • We recommend installing a water filter if your refrigerator. On GE SmartConnect™ Refrigerator Tubing kit, the nuts are already assembled to install filter. While holding the right side of the tubing into the ... need an additional tube (WX08X10002) to pry open the clamp. 7 CONNECT THE TUBING TO THE REFRIGERATOR (CONT.) One of the refrigerator's water valve. If using GE SmartConnect™ Refrigerator Tubing kit, you will look like the connection on your water supply has sand or particles that ...
Use and Care Manual
Page 14
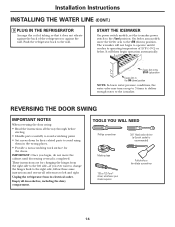
... valve may turn on ) position. Installation Instructions INSTALLING THE WATER LINE (CONT.) 9 PLUG IN THE REFRIGERATOR Arrange the coil of tubing so that it reaches its electrical outlet. Push the refrigerator back to the l (on up ) position Feeler Arm in the wrong places. • Provide a... non-scratching work surface for changing the hinges from its operating temperature of the refrigerator or against the wall. START THE ICEMAKER On power switch models, set the icemaker power switch to the wall. On feeler arm models,...
... valve may turn on ) position. Installation Instructions INSTALLING THE WATER LINE (CONT.) 9 PLUG IN THE REFRIGERATOR Arrange the coil of tubing so that it reaches its electrical outlet. Push the refrigerator back to the l (on up ) position Feeler Arm in the wrong places. • Provide a... non-scratching work surface for changing the hinges from its operating temperature of the refrigerator or against the wall. START THE ICEMAKER On power switch models, set the icemaker power switch to the wall. On feeler arm models,...
Use and Care Manual
Page 15
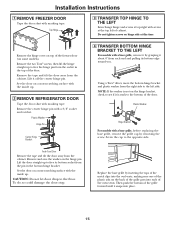
... do so could damage the door stop. Lift it about 6″ from the socket in the bottom hinge bracket. Lift the door straight up . 2 REMOVE REFRIGERATOR DOOR Tape the door shut with a base grille, before replacing the base grille, remove the grille cap by inserting the tops of the metal clips...
... do so could damage the door stop. Lift it about 6″ from the socket in the bottom hinge bracket. Lift the door straight up . 2 REMOVE REFRIGERATOR DOOR Tape the door shut with a base grille, before replacing the base grille, remove the grille cap by inserting the tops of the metal clips...
Use and Care Manual
Page 16
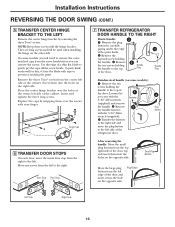
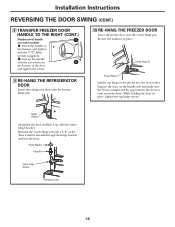
... handle (on the opposite side. Plug Button Left Side Right Side 16 Insert and tighten the three long screws. Door Stop Door Stop 7 TRANSFER REFRIGERATOR DOOR HANDLE TO THE RIGHT Plastic handle: 3 Remove the plug button by removing the three Torx® screws. Loosen the 1 set screw with the...the plug button to the left side of the door. On some models): Remove the two screws holding the handle to the top of the refrigerator door. 3 Plug Button After removing the handle: Move the small plug buttons from the left side of a thin flat blade to the ...
... handle (on the opposite side. Plug Button Left Side Right Side 16 Insert and tighten the three long screws. Door Stop Door Stop 7 TRANSFER REFRIGERATOR DOOR HANDLE TO THE RIGHT Plastic handle: 3 Remove the plug button by removing the three Torx® screws. Loosen the 1 set screw with the...the plug button to the left side of the door. On some models): Remove the two screws holding the handle to the top of the refrigerator door. 3 Plug Button After removing the handle: Move the small plug buttons from the left side of a thin flat blade to the ...
Use and Care Manual
Page 17
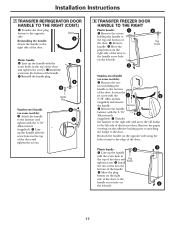
...Button 1 Plastic handle: 2 Line up the handle with the 2 3 3/32″ Allen wrench (supplied) and remove the handle. Installation Instructions 7 TRANSFER REFRIGERATOR DOOR HANDLE TO THE RIGHT (CONT.) Transfer the door plug button to the door. Reinstalling the handle: Attach the handle to the fastener and 1 tighten...some models): Attach the handle to the right side of the freezer door. Transfer the fastener to the right side and move the GE badge to the bottom of the handle. Install Plug Button the two screws into the bottom of the door to the handle screw ...
...Button 1 Plastic handle: 2 Line up the handle with the 2 3 3/32″ Allen wrench (supplied) and remove the handle. Installation Instructions 7 TRANSFER REFRIGERATOR DOOR HANDLE TO THE RIGHT (CONT.) Transfer the door plug button to the door. Reinstalling the handle: Attach the handle to the fastener and 1 tighten...some models): Attach the handle to the right side of the freezer door. Transfer the fastener to the right side and move the GE badge to the bottom of the handle. Install Plug Button the two screws into the bottom of the door to the handle screw ...
Use and Care Manual
Page 18
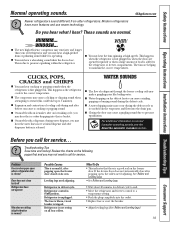
...is even across the front. While holding the door in 2 the bottom of the door and tighten the screws. 9 RE-HANG THE REFRIGERATOR DOOR Lower the refrigerator door onto the bottom hinge pin. 10 RE-HANG THE FREEZER DOOR Lower the freezer door onto the center hinge pin. Turn it until... door on some models): Attach the handle to the fastener and tighten with the center hinge bracket. Plastic Washer Hinge Pin Center Hinge Bracket Refrigerator Door 18 Plastic Washer Straighten the door and line it extends through the hinge bracket and into the door socket. Line up with the 3/...
...is even across the front. While holding the door in 2 the bottom of the door and tighten the screws. 9 RE-HANG THE REFRIGERATOR DOOR Lower the refrigerator door onto the bottom hinge pin. 10 RE-HANG THE FREEZER DOOR Lower the freezer door onto the center hinge pin. Turn it until... door on some models): Attach the handle to the fastener and tighten with the center hinge bracket. Plastic Washer Hinge Pin Center Hinge Bracket Refrigerator Door 18 Plastic Washer Straighten the door and line it extends through the hinge bracket and into the door socket. Line up with the 3/...
Use and Care Manual
Page 19
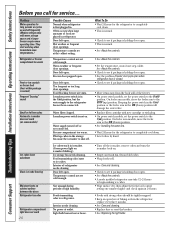
... a clicking or chirping sound when attempting to restart (this could take up to 5 minutes). ■ Expansion and contraction of refrigerant through the freezer cooling coils may hear the fans spinning at initial dispense and after dispenser button is normal if, after popping open... icemaker operating sounds, see the About the automatic icemaker section. If the freezer door does not automatically close by itself Refrigerator does not operate Vibration or rattling (slight vibration is normal) Possible Causes This is released. Safety Instructions Operating Instructions Installation...
... a clicking or chirping sound when attempting to restart (this could take up to 5 minutes). ■ Expansion and contraction of refrigerant through the freezer cooling coils may hear the fans spinning at initial dispense and after dispenser button is normal if, after popping open... icemaker operating sounds, see the About the automatic icemaker section. If the freezer door does not automatically close by itself Refrigerator does not operate Vibration or rattling (slight vibration is normal) Possible Causes This is released. Safety Instructions Operating Instructions Installation...
Use and Care Manual
Page 20
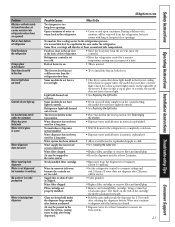
...needs cleaning. No power at the coldest setting. Problem Motor operates for service... Water filter clogged. Not unusual during periods of refrigerator needs cleaning. then adjust the fresh food control setting one step colder. Icemaker power switch is in the I (on) ... Troubleshooting Tips Installation Instructions Operating Instructions Safety Instructions Before you call for long periods or cycles on and off frequently (Modern refrigerators with more storage space and a larger freezer require more operating time. Door left open . • Move items away from...
...needs cleaning. No power at the coldest setting. Problem Motor operates for service... Water filter clogged. Not unusual during periods of refrigerator needs cleaning. then adjust the fresh food control setting one step colder. Icemaker power switch is in the I (on) ... Troubleshooting Tips Installation Instructions Operating Instructions Safety Instructions Before you call for long periods or cycles on and off frequently (Modern refrigerators with more storage space and a larger freezer require more operating time. Door left open . • Move items away from...
Use and Care Manual
Page 21
...lower position. See Rearranging the shelves. • Dispense water until all water in system is replenished. • Wait 24 hours for the refrigerator to completely cool down. • Dispense water until all water is system is replenished. • Allow several hours for replenished supply to ...humid weather, air carries moisture into place. During a defrost cycle, moisture will discolor at least 2 minutes to remove air from the refrigerator, but icemaker is working No water or ice cube production Water is leaking from the air vent (near the controls). Water dispenser has...
...lower position. See Rearranging the shelves. • Dispense water until all water in system is replenished. • Wait 24 hours for the refrigerator to completely cool down. • Dispense water until all water is system is replenished. • Allow several hours for replenished supply to ...humid weather, air carries moisture into place. During a defrost cycle, moisture will discolor at least 2 minutes to remove air from the refrigerator, but icemaker is working No water or ice cube production Water is leaking from the air vent (near the controls). Water dispenser has...


