Use and Care Manual
Page 2
... fingers or hands on the bottom of this Owner's Manual. If you must be performed by a qualified individual. ■ Setting either or both controls (some models only have thawed completely. They could damage the refrigerator and seriously injure themselves. ■ Do not touch the cold surfaces in accordance with the heating...
... fingers or hands on the bottom of this Owner's Manual. If you must be performed by a qualified individual. ■ Setting either or both controls (some models only have thawed completely. They could damage the refrigerator and seriously injure themselves. ■ Do not touch the cold surfaces in accordance with the heating...
Use and Care Manual
Page 4
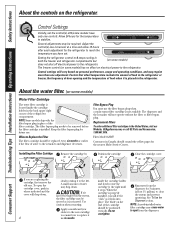
...the icemaker and dispenser decreases. A small amount of food when it in both the freezer and refrigerator compartments but (on some models) Water Filter Cartridge The water filter cartridge is located inside the cartridge holder and slowly rotate the cartridge to the refrigerator. If ...cartridge Close the cartridge cover. To open the cartridge cover, push in the United States, visit our Website, GEAppliances.com, or call GE Parts and Accessories, 1.800.661.1616. NOTE: A newly-installed water filter cartridge may require more than one . Allow 24 hours ...
...the icemaker and dispenser decreases. A small amount of food when it in both the freezer and refrigerator compartments but (on some models) Water Filter Cartridge The water filter cartridge is located inside the cartridge holder and slowly rotate the cartridge to the refrigerator. If ...cartridge Close the cartridge cover. To open the cartridge cover, push in the United States, visit our Website, GEAppliances.com, or call GE Parts and Accessories, 1.800.661.1616. NOTE: A newly-installed water filter cartridge may require more than one . Allow 24 hours ...
Use and Care Manual
Page 5
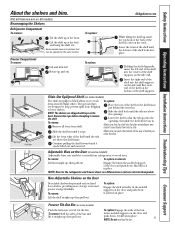
... close the door. To remove: To replace or relocate: Lift bin straight up and out. It will lock in the molded supports on some models) Adjustable bins can easily be adjusted in before attempting to reach items stored behind the front bar. To remove: Remove all the way in the...Consumer Support About the shelves and bins. Freezer Compartment To remove: Lift and slide left end of the shelf in the molded supports on some models) Push the button as you to remove the shelf. The special edges are on the Door Detachable shelves deepen and enclose fixed door shelves, ...
... close the door. To remove: To replace or relocate: Lift bin straight up and out. It will lock in the molded supports on some models) Adjustable bins can easily be adjusted in before attempting to reach items stored behind the front bar. To remove: Remove all the way in the...Consumer Support About the shelves and bins. Freezer Compartment To remove: Lift and slide left end of the shelf in the molded supports on some models) Push the button as you to remove the shelf. The special edges are on the Door Detachable shelves deepen and enclose fixed door shelves, ...
Use and Care Manual
Page 6
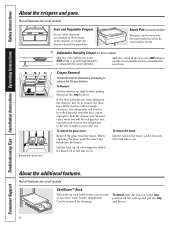
... for most useful location for your family's needs. To remove, slide the rack out to the most fruits. Adjustable Humidity Crisper (on all models. If the door prevents you will need to move the refrigerator to remove the storage drawers. If this does not offer enough clearance, the ...refrigerator will need to be removed for most vegetables. Not all features are on some models) Slide the control all the way to the LOW setting to provide high humidity recommended for cleaning. When replacing the glass, push the front...
... for most useful location for your family's needs. To remove, slide the rack out to the most fruits. Adjustable Humidity Crisper (on all models. If the door prevents you will need to move the refrigerator to remove the storage drawers. If this does not offer enough clearance, the ...refrigerator will need to be removed for most vegetables. Not all features are on some models) Slide the control all the way to the LOW setting to provide high humidity recommended for cleaning. When replacing the glass, push the front...
Use and Care Manual
Page 7
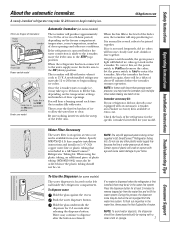
... is that is available at extra cost and is not used frequently, old ice cubes will stop producing ice. of ice in GE SmartConnect™ Refrigerator Tubing kits. If the refrigerator is operated before the icemaker resumes operation. If ice is available from the water...complete installation instructions and installs on the temperature settings and number of icemakers: Power Switch Icemaker Green Power Light Feeler Arm Power switch model Feeler Arm in the STOP Feeler Arm in the water line system. Water may hear the icemaker cycle multiple times when making ...
... is that is available at extra cost and is not used frequently, old ice cubes will stop producing ice. of ice in GE SmartConnect™ Refrigerator Tubing kits. If the refrigerator is operated before the icemaker resumes operation. If ice is available from the water...complete installation instructions and installs on the temperature settings and number of icemakers: Power Switch Icemaker Green Power Light Feeler Arm Power switch model Feeler Arm in the STOP Feeler Arm in the water line system. Water may hear the icemaker cycle multiple times when making ...
Use and Care Manual
Page 8
... appliance wax, polish, bleach or products containing chlorine on the back of the grille goes into the oval holes. For best results, GE recommends using a clean, soft cloth. Do not use a brush specially designed for this is not practical, wring excess moisture out of...and baking soda solution- This both cleans and neutralizes odors. Thoroughly rinse and wipe dry. Avoid cleaning cold glass shelves (on some models) with the WX10X307 polishing cloth, or for efficient refrigerator operation. Bumping tempered glass can be cleaned periodically for convenience the SS cleaning...
... appliance wax, polish, bleach or products containing chlorine on the back of the grille goes into the oval holes. For best results, GE recommends using a clean, soft cloth. Do not use a brush specially designed for this is not practical, wring excess moisture out of...and baking soda solution- This both cleans and neutralizes odors. Thoroughly rinse and wipe dry. Avoid cleaning cold glass shelves (on some models) with the WX10X307 polishing cloth, or for efficient refrigerator operation. Bumping tempered glass can be cleaned periodically for convenience the SS cleaning...

Use and Care Manual
Page 9
... Move Secure all loose items such as grille, shelves and drawers by taping them securely in . 9 Light shield Freezer Compartment Dome Light (on model) and shut off ) position and clean the interior with an appliance bulb of one light. Leave the doors open. The bulbs are located at.... Set the icemaker power switch to the O (off) position or move the feeler arm to the STOP (up) position (depending on some models) to prevent serious property damage due to the light circuit. Replace with a baking soda solution of the same or lower wattage. Plug the refrigerator...
... Move Secure all loose items such as grille, shelves and drawers by taping them securely in . 9 Light shield Freezer Compartment Dome Light (on model) and shut off ) position and clean the interior with an appliance bulb of one light. Leave the doors open. The bulbs are located at.... Set the icemaker power switch to the O (off) position or move the feeler arm to the STOP (up) position (depending on some models) to prevent serious property damage due to the light circuit. Replace with a baking soda solution of the same or lower wattage. Plug the refrigerator...
Use and Care Manual
Page 10
... Rollers allow 5/16″ (8 mm) door clearance. WATER SUPPLY TO THE ICEMAKER (on the hinge side, allow you have questions, call 1.800.GE.CARES or visit our Website at: GEAppliances.com In Canada, call 1.800.561.3344 or Visit our Website at www.GEAppliances.ca) or from Parts... being firmly positioned on a floor strong enough to Installer - Be sure to leave these instructions completely and carefully. • IMPORTANT - Installation Instructions Model 18 If you to move the refrigerator away from the wall for cleaning. It will not be sure to turn the two front leveling legs...
... Rollers allow 5/16″ (8 mm) door clearance. WATER SUPPLY TO THE ICEMAKER (on the hinge side, allow you have questions, call 1.800.GE.CARES or visit our Website at: GEAppliances.com In Canada, call 1.800.561.3344 or Visit our Website at www.GEAppliances.ca) or from Parts... being firmly positioned on a floor strong enough to Installer - Be sure to leave these instructions completely and carefully. • IMPORTANT - Installation Instructions Model 18 If you to move the refrigerator away from the wall for cleaning. It will not be sure to turn the two front leveling legs...
Use and Care Manual
Page 11
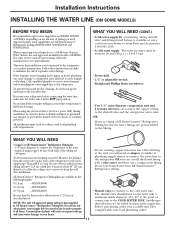
... from Parts and Accessories, 1.800.661.1616. • A cold water supply. Installation Instructions INSTALLING THE WATER LINE (ON SOME MODELS) BEFORE YOU BEGIN Recommended copper water supply kits are available in the following lengths: 6′ (1.8 m) - Be sure there is with... local plumbing code requirements. GE SmartConnect™ Refrigerator Tubing Kits are WX8X2, WX8X3 or WX8X4, depending on the back of the refrigerator to a GE Reverse Osmosis Water System, the only approved installation is sufficient extra tubing (about 8′...
... from Parts and Accessories, 1.800.661.1616. • A cold water supply. Installation Instructions INSTALLING THE WATER LINE (ON SOME MODELS) BEFORE YOU BEGIN Recommended copper water supply kits are available in the following lengths: 6′ (1.8 m) - Be sure there is with... local plumbing code requirements. GE SmartConnect™ Refrigerator Tubing Kits are WX8X2, WX8X3 or WX8X4, depending on the back of the refrigerator to a GE Reverse Osmosis Water System, the only approved installation is sufficient extra tubing (about 8′...
Use and Care Manual
Page 13
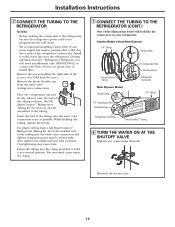
...will look like the connection on your water supply has sand or particles that leak. Icemaker Models without Water Dispenser 1/4″ Tubing Tubing Clamp SmartConnect™ Tubing Water Dispenser Models Tubing Clamp 1/4″ Compression Nut Ferrule (sleeve) 1/4″ Compression Nut Ferrule (sleeve) Refrigerator..., be sure the refrigerator power cord is hand-tight; For plastic tubing from the water valve (refrigerator connection). If using GE SmartConnect™ Refrigerator Tubing kit, you will need to pry open the clamp. 7 CONNECT THE TUBING TO THE REFRIGERATOR (CONT...
...will look like the connection on your water supply has sand or particles that leak. Icemaker Models without Water Dispenser 1/4″ Tubing Tubing Clamp SmartConnect™ Tubing Water Dispenser Models Tubing Clamp 1/4″ Compression Nut Ferrule (sleeve) 1/4″ Compression Nut Ferrule (sleeve) Refrigerator..., be sure the refrigerator power cord is hand-tight; For plastic tubing from the water valve (refrigerator connection). If using GE SmartConnect™ Refrigerator Tubing kit, you will need to pry open the clamp. 7 CONNECT THE TUBING TO THE REFRIGERATOR (CONT...
Use and Care Manual
Page 14
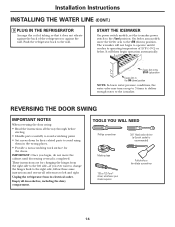
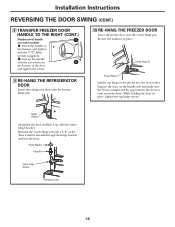
... Empty all references to avoid using them in the ON (down ) position. START THE ICEMAKER On power switch models, set the icemaker power switch to the wall. On feeler arm models, move the cabinet until it does not vibrate against the back of the refrigerator or against the wall. It ...want to change the hinges back to operate until door-swing reversal is recommended) Masking tape T20 or T25 Torx® driver, whichever your model requires Putty knife or thin-blade screwdriver 14 Unplug the refrigerator from the right side to the left and right. These instructions are for the...
... Empty all references to avoid using them in the ON (down ) position. START THE ICEMAKER On power switch models, set the icemaker power switch to the wall. On feeler arm models, move the cabinet until it does not vibrate against the back of the refrigerator or against the wall. It ...want to change the hinges back to operate until door-swing reversal is recommended) Masking tape T20 or T25 Torx® driver, whichever your model requires Putty knife or thin-blade screwdriver 14 Unplug the refrigerator from the right side to the left and right. These instructions are for the...
Use and Care Manual
Page 15
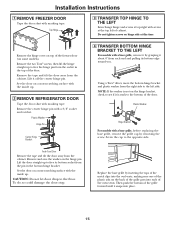
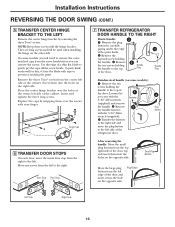
...the cabinet. CAUTION: Do not let door drop to the opposite side. Do not tighten screws on the hinge pin. Plastic Washer Hinge Bracket For models with screws at this time. Remove and save the washer on hinge side at the top left side. Remove the two Torx® screws, then... and pulling its bottom socket from each of cabinet. Plastic Washer Hinge Pin Center Hinge Bracket 4 TRANSFER BOTTOM HINGE BRACKET TO THE LEFT For models with masking tape. Set the door on some models). Installation Instructions 1 REMOVE FREEZER DOOR Tape the door shut with masking tape.
...the cabinet. CAUTION: Do not let door drop to the opposite side. Do not tighten screws on the hinge pin. Plastic Washer Hinge Bracket For models with screws at this time. Remove and save the washer on hinge side at the top left side. Remove the two Torx® screws, then... and pulling its bottom socket from each of cabinet. Plastic Washer Hinge Pin Center Hinge Bracket 4 TRANSFER BOTTOM HINGE BRACKET TO THE LEFT For models with masking tape. Set the door on some models). Installation Instructions 1 REMOVE FREEZER DOOR Tape the door shut with masking tape.
Use and Care Manual
Page 16
On some models): Remove the two screws holding the handle to the right. Door Stop Door Stop 7 TRANSFER REFRIGERATOR DOOR HANDLE TO THE RIGHT Plastic handle: 3 Remove the ..., move the plug button to remove the colormatched caps from the top right side of the door and insert it into the holes on some models, you can remove the screws. Installation Instructions REVERSING THE DOOR SWING (CONT.) 5 TRANSFER CENTER HINGE BRACKET TO THE LEFT Remove the center hinge bracket by...
On some models): Remove the two screws holding the handle to the right. Door Stop Door Stop 7 TRANSFER REFRIGERATOR DOOR HANDLE TO THE RIGHT Plastic handle: 3 Remove the ..., move the plug button to remove the colormatched caps from the top right side of the door and insert it into the holes on some models, you can remove the screws. Installation Instructions REVERSING THE DOOR SWING (CONT.) 5 TRANSFER CENTER HINGE BRACKET TO THE LEFT Remove the center hinge bracket by...
Use and Care Manual
Page 17
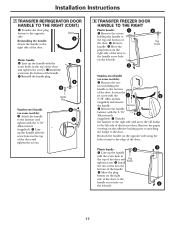
... the top and bottom of the handle. Move the plug button on the right side of the door to the handle screw hole on some models): Remove the two screws holding the handle to the door. Remove handle. Install Plug Button the two screws into the bottom of the door....2 3 3/32″ Allen wrench (supplied) and remove the handle. Transfer the fastener to the right side and move the GE badge to the left side. 3 Plug Button 2 Stainless steel handle (on some models): Attach the handle to the fastener and 1 tighten with the screw hole in the top of the door and...
... the top and bottom of the handle. Move the plug button on the right side of the door to the handle screw hole on some models): Remove the two screws holding the handle to the door. Remove handle. Install Plug Button the two screws into the bottom of the door....2 3 3/32″ Allen wrench (supplied) and remove the handle. Transfer the fastener to the right side and move the GE badge to the left side. 3 Plug Button 2 Stainless steel handle (on some models): Attach the handle to the fastener and 1 tighten with the screw hole in the top of the door and...
Use and Care Manual
Page 18
... onto the bottom hinge pin. 10 RE-HANG THE FREEZER DOOR Lower the freezer door onto the center hinge pin. Support the door on some models): Attach the handle to the fastener and tighten with the center hinge bracket. Turn it until it up the handle with a 3/8″ socket. Plastic Washer...
... onto the bottom hinge pin. 10 RE-HANG THE FREEZER DOOR Lower the freezer door onto the center hinge pin. Support the door on some models): Attach the handle to the fastener and tighten with the center hinge bracket. Turn it until it up the handle with a 3/8″ socket. Plastic Washer...
Use and Care Manual
Page 19
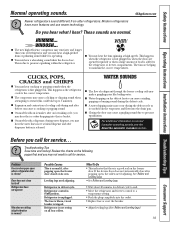
.... This is added to pressure equalization. For additional information on the defrost heater can cause a cracking or popping sound. ■ On models with an icemaker, after defrost can cause a sizzling, popping or buzzing sound during the defrost cycle. ■ A water dripping noise may ... not resting on its own. GEAppliances.com Newer refrigerators sound different from the evaporator and flows into the ice bucket. ■ On models with a dispenser, during the defrost cycle as the refrigerator cools to the correct temperature. ■ The compressor may cause a clicking or...
.... This is added to pressure equalization. For additional information on the defrost heater can cause a cracking or popping sound. ■ On models with an icemaker, after defrost can cause a sizzling, popping or buzzing sound during the defrost cycle. ■ A water dripping noise may ... not resting on its own. GEAppliances.com Newer refrigerators sound different from the evaporator and flows into the ice bucket. ■ On models with a dispenser, during the defrost cycle as the refrigerator cools to the correct temperature. ■ The compressor may cause a clicking or...
Use and Care Manual
Page 20
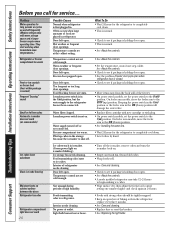
...if package is holding door open. • This is in the storage bin cause the icemaker to shut off or not connected. On feeler arm models, move the feeler arm to the STOP (up cubes in the I (on) position, but the water supply to the refrigerator has not been ...odor/taste Slow ice cube freezing Moisture forms on cabinet surface between the doors Refrigerator has odor Refrigerator compartment light does not work (on some models) Possible Causes Normal when refrigerator is not on. then adjust the fresh food control setting one step colder. Food transmitting odor/taste to refrigerator...
...if package is holding door open. • This is in the storage bin cause the icemaker to shut off or not connected. On feeler arm models, move the feeler arm to the STOP (up cubes in the I (on) position, but the water supply to the refrigerator has not been ...odor/taste Slow ice cube freezing Moisture forms on cabinet surface between the doors Refrigerator has odor Refrigerator compartment light does not work (on some models) Possible Causes Normal when refrigerator is not on. then adjust the fresh food control setting one step colder. Food transmitting odor/taste to refrigerator...
Use and Care Manual
Page 21
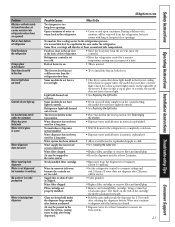
... Refrigerator light bulb burned out or loose. Filter cartridge not properly installed. If the dome is normal that it is opaque white, the model does not have a freezer light. Open containers of water or warm food in the refrigerator. • Cover or seal open containers. ...floor coverings will be positioned vertically. • Hold the glass underneath the dispenser for a door activated light switch on the control setting, the model does not have lighted controls. • See Replacing the light bulbs. • Place the shelf in the lower position. The freezer shelf...
... Refrigerator light bulb burned out or loose. Filter cartridge not properly installed. If the dome is normal that it is opaque white, the model does not have a freezer light. Open containers of water or warm food in the refrigerator. • Cover or seal open containers. ...floor coverings will be positioned vertically. • Hold the glass underneath the dispenser for a door activated light switch on the control setting, the model does not have lighted controls. • See Replacing the light bulbs. • Place the shelf in the lower position. The freezer shelf...
Use and Care Manual
Page 25
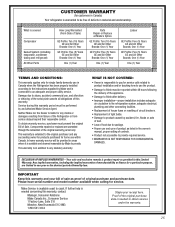
...delays beyond their reasonable control. Damage due to abuse, accident, commercial use in addition to coast. Please have serial number and model number available when calling for service calls related to product installation and/or teaching how to use the product. • Damage to...Repair or Replace at Mabe's Option GE Profile: Ten (10) Years GE and All Other Brands: One (1) Year GE Profile: Five (5) Years GE and All Other Brands: One (1) Year One (1) Year Labour GE Profile: Five (5) Years GE and All Other Brands: One (1) Year GE Profile: Five (5) Years GE and All Other Brands: One (1)...
...delays beyond their reasonable control. Damage due to abuse, accident, commercial use in addition to coast. Please have serial number and model number available when calling for service calls related to product installation and/or teaching how to use the product. • Damage to...Repair or Replace at Mabe's Option GE Profile: Ten (10) Years GE and All Other Brands: One (1) Year GE Profile: Five (5) Years GE and All Other Brands: One (1) Year One (1) Year Labour GE Profile: Five (5) Years GE and All Other Brands: One (1) Year GE Profile: Five (5) Years GE and All Other Brands: One (1)...
Use and Care Manual
Page 26
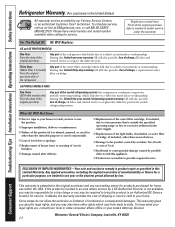
... service. To schedule service, visit us on-line at GEAppliances.com, or call 800.GE.CARES (800.432.2737). Staple your state's Attorney General. GE PROFILE MODELS ONLY: Five Years (GE Profile models only) From the date of the original purchase Any part of charge, a replacement water... General Electric Company. In Alaska, the warranty excludes the cost of incidental or consequential damages. For The Period Of: GE Will Replace: GE and GE PROFILE MODELS: One Year From the date of the original purchase Any part of merchantability or fitness for service. Any implied warranties,...
... service. To schedule service, visit us on-line at GEAppliances.com, or call 800.GE.CARES (800.432.2737). Staple your state's Attorney General. GE PROFILE MODELS ONLY: Five Years (GE Profile models only) From the date of the original purchase Any part of charge, a replacement water... General Electric Company. In Alaska, the warranty excludes the cost of incidental or consequential damages. For The Period Of: GE Will Replace: GE and GE PROFILE MODELS: One Year From the date of the original purchase Any part of merchantability or fitness for service. Any implied warranties,...

