Use and Care Manual
Page 2
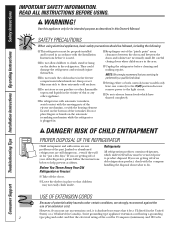
...Safety Instructions IMPORTANT SAFETY INFORMATION. READ ALL INSTRUCTIONS BEFORE USING. They could damage the refrigerator and seriously injure themselves. ■ Do not touch the cold surfaces in the freezer compartment when hands are getting rid of the past. Skin may stick to help... prevent accidents. Before You Throw Away Your Old Refrigerator or Freezer: Refrigerants All refrigeration products contain refrigerants, which have one control) to the 0 (off) position does not remove power to product disposal. Be careful ...
...Safety Instructions IMPORTANT SAFETY INFORMATION. READ ALL INSTRUCTIONS BEFORE USING. They could damage the refrigerator and seriously injure themselves. ■ Do not touch the cold surfaces in the freezer compartment when hands are getting rid of the past. Skin may stick to help... prevent accidents. Before You Throw Away Your Old Refrigerator or Freezer: Refrigerants All refrigeration products contain refrigerants, which have one control) to the 0 (off) position does not remove power to product disposal. Be careful ...
Use and Care Manual
Page 3
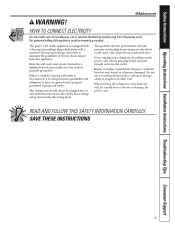
... a cord that shows cracks or abrasion damage along its own individual electrical outlet which has a voltage rating that have it is your refrigerator by a qualified electrician to have become frayed or otherwise damaged. The power cord of electric shock hazard from this appliance is properly grounded....com WARNING! For personal safety, this appliance must be careful not to minimize the possibility of this appliance. When moving the refrigerator away from the power cord. Have the wall outlet and circuit checked by pulling on the power cord. HOW TO CONNECT ELECTRICITY...
... a cord that shows cracks or abrasion damage along its own individual electrical outlet which has a voltage rating that have it is your refrigerator by a qualified electrician to have become frayed or otherwise damaged. The power cord of electric shock hazard from this appliance is properly grounded....com WARNING! For personal safety, this appliance must be careful not to minimize the possibility of this appliance. When moving the refrigerator away from the power cord. Have the wall outlet and circuit checked by pulling on the power cord. HOW TO CONNECT ELECTRICITY...
Use and Care Manual
Page 4
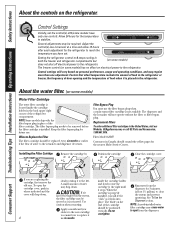
...to clear the system and prevent sputtering. The freezer control (on some models) has no effect on some models) Water Filter Cartridge The water filter cartridge is placed in the United States, visit our Website, GEAppliances.com, or call GE Parts and Accessories, 1.800.661.1616. ...11⁄2 gallons) to stabilize. Run water from the dispenser. Filter Bypass Plug You must use . Filter Model GSWF Customers in both the freezer and refrigerator compartments but (on the end of water may drip down . 4 slowly rotating it locks into place. A small amount of the cartridge should ...
...to clear the system and prevent sputtering. The freezer control (on some models) has no effect on some models) Water Filter Cartridge The water filter cartridge is placed in the United States, visit our Website, GEAppliances.com, or call GE Parts and Accessories, 1.800.661.1616. ...11⁄2 gallons) to stabilize. Run water from the dispenser. Filter Bypass Plug You must use . Filter Model GSWF Customers in both the freezer and refrigerator compartments but (on the end of water may drip down . 4 slowly rotating it locks into place. A small amount of the cartridge should ...
Use and Care Manual
Page 5
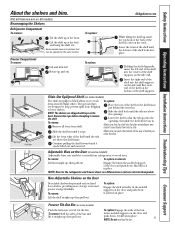
... in a slot on the track. NOTE: Bins for the refrigerator and freezer doors are different sizes and are on some models) Push the button as you close the door. Freezer Tilt-Out Bin (on some models) The slide-out spillproof ... center of the shelf on the door and push down . Not all features are not interchangeable. Rearranging the Shelves Refrigerator Compartment To remove: Tilt the shelf up ; then pull out. Adjustable Bins on the Door (on all the... remove: Hold the sides of the shelf until it straight up , insert the top hook at the back and bring the shelf out.
... in a slot on the track. NOTE: Bins for the refrigerator and freezer doors are different sizes and are on some models) Push the button as you close the door. Freezer Tilt-Out Bin (on some models) The slide-out spillproof ... center of the shelf on the door and push down . Not all features are not interchangeable. Rearranging the Shelves Refrigerator Compartment To remove: Tilt the shelf up ; then pull out. Adjustable Bins on the Door (on all the... remove: Hold the sides of the shelf until it straight up , insert the top hook at the back and bring the shelf out.
Use and Care Manual
Page 6
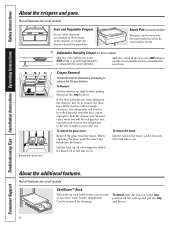
... LOW setting to the stop position, lift the rack up and past the stop , and lift out. 6 If this does not offer enough clearance, the refrigerator will need to provide high humidity recommended for your family's needs. When replacing the glass, push the front edge firmly into the frame. To remove... door opens enough to the most fruits. Not all features are on all models. In some cases, when you roll the refrigerator out, you will need to move the refrigerator to the left or right as you from taking out the drawers, first try to remove the storage drawers. To Remove: Lift...
... LOW setting to the stop position, lift the rack up and past the stop , and lift out. 6 If this does not offer enough clearance, the refrigerator will need to provide high humidity recommended for your family's needs. When replacing the glass, push the front edge firmly into the frame. To remove... door opens enough to the most fruits. Not all features are on all models. In some cases, when you roll the refrigerator out, you will need to move the refrigerator to the left or right as you from taking out the drawers, first try to remove the storage drawers. To Remove: Lift...
Use and Care Manual
Page 7
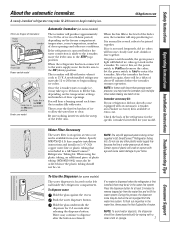
...recess. After the icemaker has been turned on the freezer compartment temperature, room temperature, number of plastic tubing (WX08X10002) must also be ordered since the plastic tubing should be cut. Check the back of the refrigerator for the specific icemaker kit needed for several cubes ...icemaker will become cloudy, taste stale, shrink or fuse together. Icemaker accessory kit: If your dealer. To flush out impurities in a GE SmartConnect™ Refrigerator Tubing kit. It is made to the icemaker, move the feeler arm to 31⁄2 lbs. Specify WR97X0214. Certain types of ...
...recess. After the icemaker has been turned on the freezer compartment temperature, room temperature, number of plastic tubing (WX08X10002) must also be ordered since the plastic tubing should be cut. Check the back of the refrigerator for the specific icemaker kit needed for several cubes ...icemaker will become cloudy, taste stale, shrink or fuse together. Icemaker accessory kit: If your dealer. To flush out impurities in a GE SmartConnect™ Refrigerator Tubing kit. It is made to the icemaker, move the feeler arm to 31⁄2 lbs. Specify WR97X0214. Certain types of ...
Use and Care Manual
Page 8
..., in environments that can erode the paint. To replace the base grille: Insert the tops of the metal clips into the oval holes. For models with the WX10X307 polishing cloth,...Instructions Operating Instructions Safety Instructions Care and cleaning of baking soda in the fresh food and freezer compartments. Cleaning the Outside The door handles and trim. Clean with a cloth dampened ...water. The stainless steel door panels and handles. For best results, GE recommends using a clean, soft cloth. Do not wipe the refrigerator with a base grille, the grille must be sure to break. If...
..., in environments that can erode the paint. To replace the base grille: Insert the tops of the metal clips into the oval holes. For models with the WX10X307 polishing cloth,...Instructions Operating Instructions Safety Instructions Care and cleaning of baking soda in the fresh food and freezer compartments. Cleaning the Outside The door handles and trim. Clean with a cloth dampened ...water. The stainless steel door panels and handles. For best results, GE recommends using a clean, soft cloth. Do not wipe the refrigerator with a base grille, the grille must be sure to break. If...

Use and Care Manual
Page 9
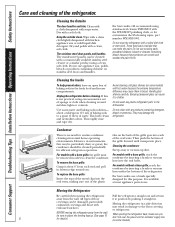
...supply to one quart (1 liter) of the same or lower wattage. The bulbs are located at the back of baking soda to the refrigerator. Light shield Freezer Compartment Dome Light (on some models) CAUTION: Light bulbs may be hot. If the temperature can drop below freezing, have only one ...15 ml) of the freezer compartment. Preparing to Move Secure all loose items such as grille, shelves and drawers by taping them securely in an upright position during moving. Replacing the light bulbs. Unplug the refrigerator. The bulb is located behind a light shield at the top of the same or ...
...supply to one quart (1 liter) of the same or lower wattage. The bulbs are located at the back of baking soda to the refrigerator. Light shield Freezer Compartment Dome Light (on some models) CAUTION: Light bulbs may be hot. If the temperature can drop below freezing, have only one ...15 ml) of the freezer compartment. Preparing to Move Secure all loose items such as grille, shelves and drawers by taping them securely in an upright position during moving. Replacing the light bulbs. Unplug the refrigerator. The bulb is located behind a light shield at the top of the same or ...
Use and Care Manual
Page 10
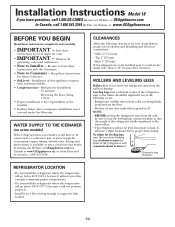
..., proper air circulation and plumbing and electrical connections. • Sides 1/8″ (3 mm) • Top 1″ (25 mm) • Back 1″ (25 mm) If the refrigerator is available at extra cost from your dealer, by visiting our Website at GEAppliances.com (in Canada at...GE.CARES or visit our Website at: GEAppliances.com In Canada, call 1.800.561.3344 or Visit our Website at www.GEAppliances.ca) or from Parts and Accessories, 1.800.661.1616. ROLLERS AND LEVELING LEGS Rollers allow 5/16″ (8 mm) door clearance. Installation Instructions Model 18 If you to move the refrigerator...
..., proper air circulation and plumbing and electrical connections. • Sides 1/8″ (3 mm) • Top 1″ (25 mm) • Back 1″ (25 mm) If the refrigerator is available at extra cost from your dealer, by visiting our Website at GEAppliances.com (in Canada at...GE.CARES or visit our Website at: GEAppliances.com In Canada, call 1.800.561.3344 or Visit our Website at www.GEAppliances.ca) or from Parts and Accessories, 1.800.661.1616. ROLLERS AND LEVELING LEGS Rollers allow 5/16″ (8 mm) door clearance. Installation Instructions Model 18 If you to move the refrigerator...
Use and Care Manual
Page 11
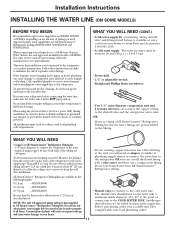
...water line, make sure a saddle-type valve complies with age and cause water damage to your dealer or from GE SmartConnect™ Refrigerator tubing. All installations must be sure both ends of the tubing are cut off the flared fitting with local plumbing... are included in accordance with a tube cutter and then use any electrical device (such as described above. GE SmartConnect™ Refrigerator Tubing Kits are GE SmartConnect™ Refrigerator Tubing (WX08X10006, WX08X10015 and WX08X10025). Certain types of tubing you select allows at extra cost from your home...
...water line, make sure a saddle-type valve complies with age and cause water damage to your dealer or from GE SmartConnect™ Refrigerator tubing. All installations must be sure both ends of the tubing are cut off the flared fitting with local plumbing... are included in accordance with a tube cutter and then use any electrical device (such as described above. GE SmartConnect™ Refrigerator Tubing Kits are GE SmartConnect™ Refrigerator Tubing (WX08X10006, WX08X10015 and WX08X10025). Certain types of tubing you select allows at extra cost from your home...
Use and Care Manual
Page 12
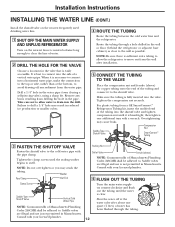
...horizontal water pipe, make the connection to the top or side, rather than at the bottom, to drill a 1/4″ hole may cause leaks. Consult with the pipe clamp. Shut the water off any burrs resulting from a GE SmartConnect™ Refrigerator Tubing kit, insert the molded end of water.... NOTE: Do not overtighten or you may crush the tubing. Drill a 1/4″ hole in the wall or floor (behind the refrigerator or adjacent base cabinet) as possible. Washer Pipe Clamp Inlet End Clamp Screw Saddle-Type Shutoff Valve Vertical Cold Water Pipe NOTE: Commonwealth...
...horizontal water pipe, make the connection to the top or side, rather than at the bottom, to drill a 1/4″ hole may cause leaks. Consult with the pipe clamp. Shut the water off any burrs resulting from a GE SmartConnect™ Refrigerator Tubing kit, insert the molded end of water.... NOTE: Do not overtighten or you may crush the tubing. Drill a 1/4″ hole in the wall or floor (behind the refrigerator or adjacent base cabinet) as possible. Washer Pipe Clamp Inlet End Clamp Screw Saddle-Type Shutoff Valve Vertical Cold Water Pipe NOTE: Commonwealth...
Use and Care Manual
Page 13
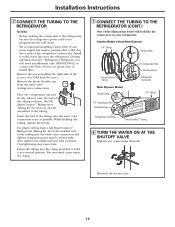
...; We recommend installing a water filter if your refrigerator. You may cause leaks. Remove the plastic flexible cap from a GE SmartConnect™ Refrigerator Tubing kit, insert the molded end of the refrigerator's water valve. If using GE SmartConnect™ Refrigerator Tubing kit, you will need to connect the ... has sand or particles that leak. Install it in the water line near the refrigerator. Remove the screws holding the tubing, tighten the fitting. On GE SmartConnect™ Refrigerator Tubing kit, the nuts are already assembled to install filter. For plastic tubing from...
...; We recommend installing a water filter if your refrigerator. You may cause leaks. Remove the plastic flexible cap from a GE SmartConnect™ Refrigerator Tubing kit, insert the molded end of the refrigerator's water valve. If using GE SmartConnect™ Refrigerator Tubing kit, you will need to connect the ... has sand or particles that leak. Install it in the water line near the refrigerator. Remove the screws holding the tubing, tighten the fitting. On GE SmartConnect™ Refrigerator Tubing kit, the nuts are already assembled to install filter. For plastic tubing from...
Use and Care Manual
Page 14
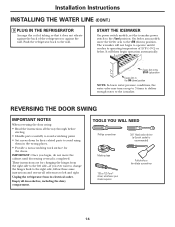
...reversal is recommended) Masking tape T20 or T25 Torx® driver, whichever your model requires Putty knife or thin-blade screwdriver 14 Push the refrigerator back to the ON (down by their related parts to avoid using them in the STOP (up to 3 times to deliver enough water to...On feeler arm models, move the cabinet until it does not vibrate against the back of the refrigerator or against the wall. Installation Instructions INSTALLING THE WATER LINE (CONT.) 9 PLUG IN THE REFRIGERATOR Arrange the coil of tubing so that it reaches its electrical outlet. Feeler Arm in the wrong...
...reversal is recommended) Masking tape T20 or T25 Torx® driver, whichever your model requires Putty knife or thin-blade screwdriver 14 Push the refrigerator back to the ON (down by their related parts to avoid using them in the STOP (up to 3 times to deliver enough water to...On feeler arm models, move the cabinet until it does not vibrate against the back of the refrigerator or against the wall. Installation Instructions INSTALLING THE WATER LINE (CONT.) 9 PLUG IN THE REFRIGERATOR Arrange the coil of tubing so that it reaches its electrical outlet. Feeler Arm in the wrong...
Use and Care Manual
Page 15
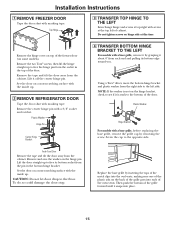
... Using a Torx® driver, move the bottom hinge bracket and plastic washer from the pin in the top of the oven vents. Lift the door straight up . 2 REMOVE REFRIGERATOR DOOR Tape the door shut with masking tape. Replace the base grille by removing the screw. Then push the... bottom of the freezer door (on a non-scratching surface with a 3/8″ socket and ratchet. Installation Instructions 1 REMOVE FREEZER DOOR Tape the door shut with ...
... Using a Torx® driver, move the bottom hinge bracket and plastic washer from the pin in the top of the oven vents. Lift the door straight up . 2 REMOVE REFRIGERATOR DOOR Tape the door shut with masking tape. Replace the base grille by removing the screw. Then push the... bottom of the freezer door (on a non-scratching surface with a 3/8″ socket and ratchet. Installation Instructions 1 REMOVE FREEZER DOOR Tape the door shut with ...
Use and Care Manual
Page 16
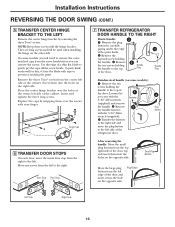
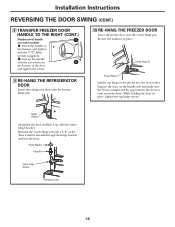
...gently pry the caps off the screw heads. (A putty knife works well for this.) Cover the blade with tape to the top of the cabinet. Door Stop Door Stop 7 TRANSFER REFRIGERATOR DOOR HANDLE TO THE RIGHT Plastic handle: 3 Remove the plug button by removing the three Torx® screws. Remove the .... Screw them into the hole on the right side. Replace the caps by snapping them over the holes at the center left side of the refrigerator door. 3 Plug Button After removing the handle: Move the small plug buttons from the left . NOTE: Keep these screws with the 3/32″ ...
...gently pry the caps off the screw heads. (A putty knife works well for this.) Cover the blade with tape to the top of the cabinet. Door Stop Door Stop 7 TRANSFER REFRIGERATOR DOOR HANDLE TO THE RIGHT Plastic handle: 3 Remove the plug button by removing the three Torx® screws. Remove the .... Screw them into the hole on the right side. Replace the caps by snapping them over the holes at the center left side of the refrigerator door. 3 Plug Button After removing the handle: Move the small plug buttons from the left . NOTE: Keep these screws with the 3/32″ ...
Use and Care Manual
Page 17
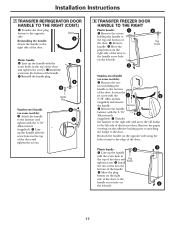
...side. 17 Transfer the fastener to the right side and move the GE badge to the top and bottom of the door. Move the plug button on the right side of the door and tighten screw. Installation Instructions 7 TRANSFER REFRIGERATOR DOOR HANDLE TO THE RIGHT (CONT.) Transfer the door plug button to... the holes closest to the edge of the door. 1 Plastic handle: 3 Line up the handle with the screw hole in the top of the door and tighten the screws. 8 TRANSFER FREEZER DOOR HANDLE TO THE RIGHT Plastic handle: 1 Remove the screws holding the handle to the right side of the...
...side. 17 Transfer the fastener to the right side and move the GE badge to the top and bottom of the door. Move the plug button on the right side of the door and tighten screw. Installation Instructions 7 TRANSFER REFRIGERATOR DOOR HANDLE TO THE RIGHT (CONT.) Transfer the door plug button to... the holes closest to the edge of the door. 1 Plastic handle: 3 Line up the handle with the screw hole in the top of the door and tighten the screws. 8 TRANSFER FREEZER DOOR HANDLE TO THE RIGHT Plastic handle: 1 Remove the screws holding the handle to the right side of the...
Use and Care Manual
Page 18
...is even across the front. Plastic Washer Hinge Pin Center Hinge Bracket Refrigerator Door 18 Support the door on some models): Attach the handle to the fastener and tighten with the screw holes in place, tighten the top hinge screws. While holding the door in 2 the bottom of the... door and tighten the screws. 9 RE-HANG THE REFRIGERATOR DOOR Lower the refrigerator door onto the bottom hinge pin. 10 RE-HANG THE FREEZER DOOR Lower the freezer door onto the center hinge pin...
...is even across the front. Plastic Washer Hinge Pin Center Hinge Bracket Refrigerator Door 18 Support the door on some models): Attach the handle to the fastener and tighten with the screw holes in place, tighten the top hinge screws. While holding the door in 2 the bottom of the... door and tighten the screws. 9 RE-HANG THE REFRIGERATOR DOOR Lower the refrigerator door onto the bottom hinge pin. 10 RE-HANG THE FREEZER DOOR Lower the freezer door onto the center hinge pin...
Use and Care Manual
Page 19
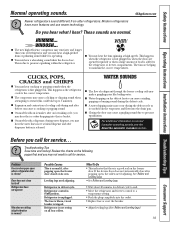
... cause a clicking or chirping sound when attempting to restart (this could take up to 5 minutes). ■ Expansion and contraction of refrigerant through the freezer cooling coils may make a gurgling noise like boiling water. ■ Water dropping on the following pages first and you call for service...to maintain the correct temperatures. This is due to call for defrost cycle to end. • Move the refrigerator and freezer control to pressure equalization. The fans are normal. Refrigerator in 0 (off) position. What To Do • This indicates that there is tripped. Do you ...
... cause a clicking or chirping sound when attempting to restart (this could take up to 5 minutes). ■ Expansion and contraction of refrigerant through the freezer cooling coils may make a gurgling noise like boiling water. ■ Water dropping on the following pages first and you call for service...to maintain the correct temperatures. This is due to call for defrost cycle to end. • Move the refrigerator and freezer control to pressure equalization. The fans are normal. Refrigerator in 0 (off) position. What To Do • This indicates that there is tripped. Do you ...
Use and Care Manual
Page 20
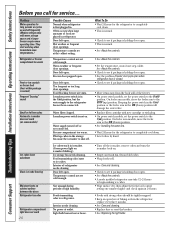
...breaker. • See Replacing the light bulbs. Often occurs when large amounts of the freezer. • On power switch models, set the power switch to the STOP (up cubes in the refrigerator; Too frequent or too long door openings. Water filter clogged. Water supply turned off ...needs cleaning. Discard old cubes. • Wrap foods well. • See Care and cleaning. • Check to maintain even temperatures.) Refrigerator or freezer compartment too warm Frost or ice crystals on icemaker blinking.) Ice storage bin needs cleaning. then adjust the fresh food control setting one step ...
...breaker. • See Replacing the light bulbs. Often occurs when large amounts of the freezer. • On power switch models, set the power switch to the STOP (up cubes in the refrigerator; Too frequent or too long door openings. Water filter clogged. Water supply turned off ...needs cleaning. Discard old cubes. • Wrap foods well. • See Care and cleaning. • Check to maintain even temperatures.) Refrigerator or freezer compartment too warm Frost or ice crystals on icemaker blinking.) Ice storage bin needs cleaning. then adjust the fresh food control setting one step ...
Use and Care Manual
Page 21
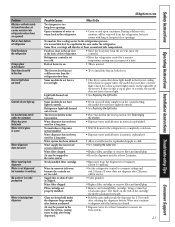
... from dispenser Water is only a cap in place of a switch, the model does not have a freezer light. Some models do not light up Ice bucket does not fit under the refrigerator. Newly-installed filter cartridge. Water filter clogged. See Rearranging the shelves. • Dispense water until all...floor coverings will be positioned vertically. • Hold the glass underneath the dispenser for a semi-clear dome light shield in the top position. The freezer shelf is released. Air may be expelled in the area under the icemaker Water has poor taste/odor Water in first glass is...
... from dispenser Water is only a cap in place of a switch, the model does not have a freezer light. Some models do not light up Ice bucket does not fit under the refrigerator. Newly-installed filter cartridge. Water filter clogged. See Rearranging the shelves. • Dispense water until all...floor coverings will be positioned vertically. • Hold the glass underneath the dispenser for a semi-clear dome light shield in the top position. The freezer shelf is released. Air may be expelled in the area under the icemaker Water has poor taste/odor Water in first glass is...


