Use and Care Manual
Page 7
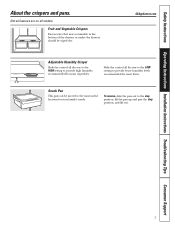
Safety Instructions Operating Instructions Installation Instructions Troubleshooting Tips Consumer Support About the crispers and pans. Slide the control all the way to the LOW setting to the most useful location for your family's needs. GEAppliances.com Adjustable Humidity Crisper Slide the control all models. Snack Pan This pan can ...
Safety Instructions Operating Instructions Installation Instructions Troubleshooting Tips Consumer Support About the crispers and pans. Slide the control all the way to the LOW setting to the most useful location for your family's needs. GEAppliances.com Adjustable Humidity Crisper Slide the control all models. Snack Pan This pan can ...
Use and Care Manual
Page 25
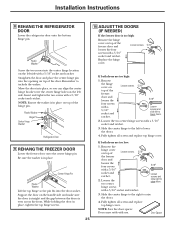
... doors are too low: 1. Remove the hinge cover on top of the door. Door Spacer Insert and tighten the two screws with a 5/16″ socket and ratchet. Plastic Washer Hinge Pin Center Hinge Bracket Refrigerator Door 9 REHANG THE FREEZER DOOR Lower the freezer door onto the ... door into the door socket. Plastic Washer 10 ADJUST THE DOORS (IF NEEDED) If the freezer door is in place, tighten the top hinge screws. 25 If both doors are too high: 1. Installation Instructions 8 REHANG THE REFRIGERATOR DOOR Lower the refrigerator door onto the bottom hinge pin.
... doors are too low: 1. Remove the hinge cover on top of the door. Door Spacer Insert and tighten the two screws with a 5/16″ socket and ratchet. Plastic Washer Hinge Pin Center Hinge Bracket Refrigerator Door 9 REHANG THE FREEZER DOOR Lower the freezer door onto the ... door into the door socket. Plastic Washer 10 ADJUST THE DOORS (IF NEEDED) If the freezer door is in place, tighten the top hinge screws. 25 If both doors are too high: 1. Installation Instructions 8 REHANG THE REFRIGERATOR DOOR Lower the refrigerator door onto the bottom hinge pin.

